Friday, January 28, 2022

In the Frame


Hello!
Hope you've had a good week.
I've been feeling a bit sorry for myself as I've got a cold, but getting through the Winter without one would be a bit of a miracle, I suppose!

This week it was Nat's turn to choose a challenge for the  Daring Cardmakers it took me most of the week to make my card as this cold has made me feel very tired and headachy.  I was late posting because I just didn't have the energy to stick the last few dots on and photograph it, so that was this morning;s job.
 

In the Frame

It's Nat here, ready to set my first dare for 2022!

I want you to feature a frame on your card.

You can use it to spotlight a sentiment or image, or you can go the whole hog with a large frame that showcases your entire card design.

It's totally up to you!

To help get your creative cogs turning, here are the lovely projects the design team has made:
 

Info
I've used a smooth white card blank, but trimmed about 1.5 cmx off the edge to make a more interesting fat rectangle shape. To add some texture to the background I part-embossed the card front with Cuttlebug's Distressed Stripes folder - an old one, but still a favourite! By placing the folder and card at an angle on the platform I was able to get a diagonal embossing on the the left of the card/
The frame is created using a couple of nested rectangles form Tonic.  The backing piece is a remnant left over from my card for January's Inspiration challenge card.
For the flowers I inked one side of a piece of thin white card in yellow shades and the other in peach tones, then die cut the  petals using a Hunkydory die set..  For the leaves I used a couple of different dies and shades of green inked card. s

The sentiment is another of my pc generated ones and the tiny dots are the 'waste' from using a border punch on gold glitter card and the scraps of that used for the flower
 Hopefully you can see the embossing better on the photo below


Thank you so much for coming by
 
 Happy Crafting, Stay Safe, 


Monday, January 24, 2022

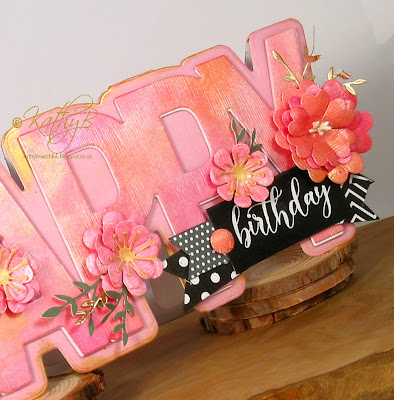
HAPPY card 2


Hello
So, last week I shared a birthday card made using a Crafters Companion HAPPY shaped die set.  Today's card is in a similar vein, but in a different colour palette and with some different flowers.   Shabneez and Sarah's birthdays were in December and the opportunity to get away from Christmas colours and shapes and "go girly" with pretty colours and lovely flowers was just too good to miss!
But one day I shall use this set to make something more masculine - I have loads of 'boy' birthdays coming up so watch this space!

Anyway, back to Sarah's card


 Info

This time I chose a yellow, orange, peach mix of colours for the background shaped card, the upper layer of the letters and also for the thinner card I needed for making the flowers.  I used inks and Nuvo Embellishment mousses for this both sides of the thin card were coloured as the flowers would be 3D
 

I've not had the chance to make a big rose since the card and box I made for my nephew and new niece in law's wedding in July. so as this card would be hand delivered I took the chance of going ultra dimensional with my flowers!  Well, it would be rude not to, wouldn't it?
There is something so relaxing and satisfying about making a paper rose, I always enjoy making them. 
I cut the petals for this one using an extra large flower punch.  I have instructions on how to make paper roses HERE
 
 
 To balance the large rose I used a little trio of small coiled paper roses on the 'H', and added some green die-cut leaves to set them all off.

 To complete the card I made e sentiment piece using black and white sentiment and patterned pieces from my bag of bits.  I can't remember what font I used on this one, but I really love it!
Obviously, with the big flowers this was never going to fit into a regular DL envelope so I custom-made one to fit it. If I'd needed to post it I'd have made a box for it instead


Thank you so much for coming by, please don't go without leaving a little message, I do love to hear from you.  
Or maybe I really am just talking to myself
 
 Happy Crafting, Stay Safe,


Friday, January 21, 2022

Think of a Number

Hello!
Hope you've had a good week - its been pretty chilly here - we've had a frosty start to every morning. but a bit of sunshine occasionally too.  Lots of very clear moon-y nights too.

This week was my turn to choose a challenge for the   Daring Cardmakers 
 
Think of a Number
I'd like you to make one or more numerals the stars of your card in some way this time. 
It could be for one of those 'special number' birthdays or anniversaries. using a background formed from numbers or perhaps you could even make a number shaped card.
 
Info
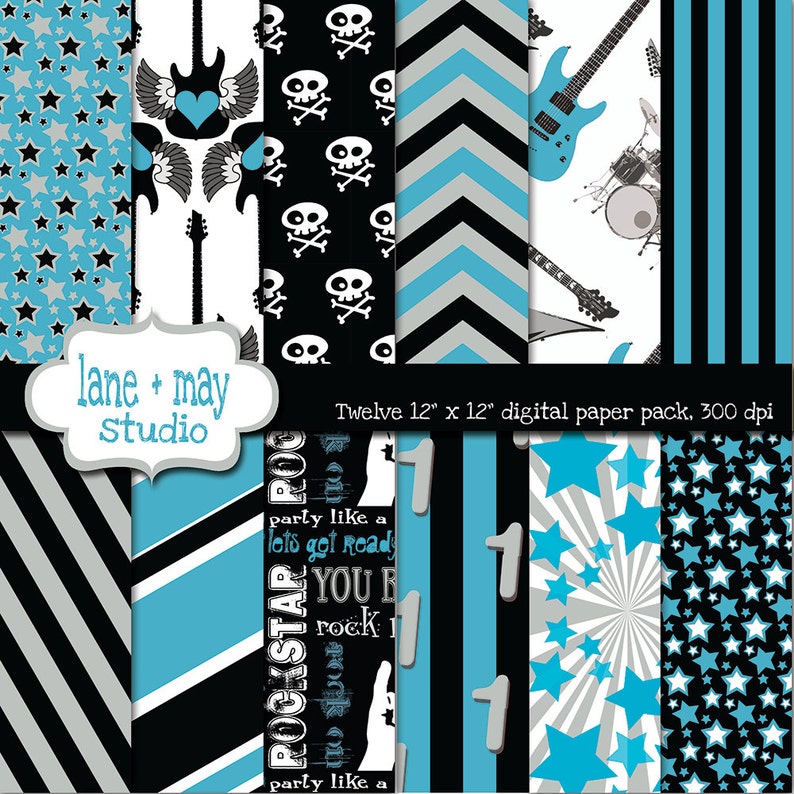
I've used digital papers from the Rockstar set by . via Etsy for this 16th birthday card, they were resized and printed onto white Bazzill card. 
I also gave my Silhouette Cameo an airing for the first time in a couple of years - with hubby working full time from home now and in the same room as me and my noisy gadgets I've avoided using the ones that take the longest time.  But this time I wanted supersized numerals so managed to be organised enough to download the papers and set up the Cameo to cut all the number layers at the weekend!
The numbers were cut three times in navy blue and once in the patterned cardstock
The base card was covered in a drums and guitars design and the numerals glued in place.
I added some silvery threads across the top and some stars punched from matching  colours, plus the happy birthday sentiment
Finally I die-cut the letters SAM from a couple of layers of white card and a top silver layer. and inked around the edge of the card with black ink for a bit of teenage grunginess

 
Thank you so much for coming by
 
 Happy Crafting, Stay Safe, 
 

Monday, January 17, 2022

HAPPY card 1


Hello
No, don't panic, you've not slept through the week and its Friday already - it is actually me posting on a Monday and trying to get back to a couple of blog posts a week, at least while I have catching up to be done.
Back in September, Shabneez sent me a lovely birthday card made using a Crafters Companion HAPPY die set.  Obviously I had to buy it myself 🙄, but then it sat in the box as I got on with other things.
Then when it came to making a card for Shabneez's own birthday I couldn't resist using it!
 

 Info
The first die in the Crafters Companion HAPPY die set cuts your shaped base card and the second die cuts is used for the word on the top.  I was pleasantly surprised at how well the first die cut through two layers of 280gsm card with only a couple of runs through my eBosser.
I used a Hunkydory pale pink card for the base layer and added a bit of Tonic Indian Gold Embellishment mousse around the edges.
Next I used pink and peach inks and Embellishment mousses over both sides of a sheet of thin smooth white card to use for the top layer of letters and for the flowers. I also cut a couple of layers of letters in my regular cardstock, gluing these on top of each other and finishing with the coloured layer of letters.
The sentiment piece was made using black and white sentiment and patterned pieces from my bag of bits - I never throw any of the bits I make away as they always come in handy eventually! 
Once this was in place I make the flowers and decide where they would look best.
For the flowers I used a couple of different Spellbinders flower die sets to make layered flowers in a few different sizes, plus a few leafy details in green and gold. Some of the flowers have pre-made stamens, some have die cut ones.
To finish I shaped a small punched circle to create a faux brad.
 
And then I realised that my love of going 'over the edge' meant the card wouldn't fit in a regular DL envelope.  Doh!! 
So I grabbed a sheet of 12x12 card and made one.  I would say that you live and learn, but I'm not sure I ever will do the 'learning' bit now!
 

I've another of these cards to share, but I'll save that for next time

Thank you so much for coming by, please don't go without leaving a little message, I do love to hear from you.  
Or maybe I really am just talking to myself
 
 Happy Crafting, Stay Safe,


Friday, January 14, 2022

Up up and Away...


 Hello!


I've finally got all my Christmas dies etc put away and my desk cleared of shiny and glittery stuff!
So this week I chose to use colours I've not played with for a while and go with pinks and peaches for my  Daring Cardmakers challenge card this week.
 
This time it's me, Enfys here, and my challenge is called:
Up up and Away...
To put it simply, I'd just love to see lots of balloons
as the focal point of your card.
They always loos so cheerful when you see them floating up there in the sky, don't they?
 They can be hot air balloons or party balloons.  
One big balloon or lots of little ones!
 

  Info

 I started by using some pale pink embellishment mousse and stencilled the diamond pattern background, Next I used more shades of embellishment mousse over scraps of white card to use for the various die0cut elements.  The three Scribbled Square frames are by Tonic and the rest of the die cuts are from an old Papercraft Society box.
The black and white elements are created on the pc and printed out in various sizes - I always keep the small pieces as they do come in useful eventually! 
Once I'd cut all the bits and pieces out it was just a case of arranging them over the Scribbled Squares and the black and white pieces until I was happy with the arrangement.  Some of the elements were adhered to chipboard scraps before attaching them to the card. 
Lengths of black and white twine were tucked under the balloons and the other ends secured with a heart die-cut


Thank you so much for coming by
 
 Happy Crafting, Stay Safe, 
 

Friday, January 07, 2022

January Elemental Inspiration Challenge


  Hello! Happy New Year!

I hope you had a beautiful Christmas.  Once I'd finally finished my last card (foe Hubby and stuck the last tags on presents I didn't so much as sit at my craft desk till this week.  It was the state of it that put me off  - I couldn't face making a start on putting all that Christmas mess away.  Of course it has to be done and I managed to put most of it back in its rightful place earlier this week - but I still have a few dies that need purring back in their 'homes' and a few new ones to find homes for.

So I ended up moving some things aside so that I could get on with the first   Daring Cardmakers challenge of 2022
  

January Elemental Inspiration Challenge
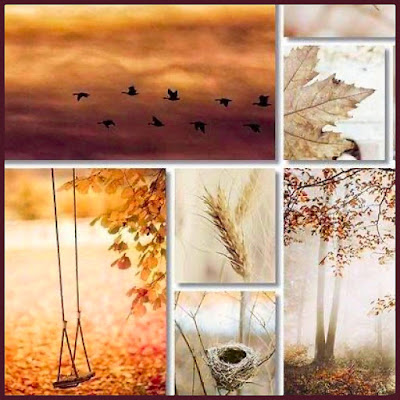
t's Shabneez here to share a chilly sort of mood-board, with a colour palette a bit different to all those Christmas colours we've been using.  Not that you have to use these colours of course!


I've chosen a cool, ethereal and textural mood-board to inspire your crafting at the start of this new year.  
Just choose at least 3 elements from the picture to use when you make
your card.  As usual if you use the colour combo it counts as 1 element 
 
 I chose the Layout, the soft muted tones of one of the square pictures and the grasses to use on my card

 Info
 
I made the background first using a piece of smooth white card then lots of inks, applied with scraps of dampened old wet-wipes - I keep any that aren't too filthy to reuse for inky, blending jobs like this - it makes me feel better about using them in the first place!
Here's how it turned out
Next I chopped it up into the squares and rectangles I needed for the layout and glued them to my base card
I found a couple of pieces of pale gold card in different finishes and die cut the grasses from a plain soft sheen card and the twiggy stems from some very fine glitter card
To finish I used a dark blue card to cut 'Thank You' using my new (Christmas present) Spellbinders sentiments die set.
 
 
Thank you so much for coming by, it would be fab to hear what you think of this one.
 
 Happy Crafting, Stay Safe,


Thursday, December 23, 2021

Baubles and Brights


    Hello!

I'm late with my DCM card this week.  For one reason and another its been a bit of a frantic week, but despite plans having to be thrown out of the window Christmas comes and sometimes we just have to roll with the the changes. 
I hope all is well with you and your Christmas is full of love, peace and joy

And now for my last Daring Cardmakers card pf the year!

We're now at the final challenge of our 
 "Have Yourself a Crafty Little Christmas"
 series for 2021
wk 7:  Baubles, Boxes and Bows
Three things beginning with B - you can choose one of them or all three to feature when you make your project this week!
Maybe make a bauble to put in a box and decorate with a bow!
Remember it doesn't have to be Christmas themed, and it can be a card or anything else you're inspired to get crafty and make.
We'll leave this challenge open until we return on 7th January 2022 after our Christmas break, but before we go we'd like to thank you for joining in with us all year, and to wish you a 
Very Happy and Peaceful Christmas
I didn't have very long to get my card done this week, but I did need to make a card to fit alongside a gift in a quite small box, so I was able to join those two tasks together and make this
 
 The background rectangles were stencilled with bright coloured inks using a stencil made by cutting the shape I needed from a piece of acetate
The gold 'joy' frame is an old Memory Box one that I haven't used yet this year so it was good to give it an airing!
 
 The baubles are the smallest ones from a couple of different sets. I cut them iun different finishes of gold card and added a punched snowflake to one and some tiny stars to the other.
Now I cut this panel down to fit my card and before gluing down I added the gold thread hangers/
To finish, I added a few tiny stars punched from different kinds of gold card


Thank you so much for coming by, please don't go without leaving a little message, I do love to hear from you.  
Or maybe I really am just talking to myself
 
 Happy Crafting, Stay Safe, 
 
Have a Wonderful Christmas


Sunday, December 12, 2021

Loopy Tree Trio


Hi there
I thought I'd share a quick post featuring more of the loopy trees I used for this week's Daring Cardmakers challenge.  
I got on a bit of a roll using some of the trees I'd cut a few days back and also some of the cards I'd already done the backgrounds on.
I hope you like them!
 
Washi tape, glitter card, silver thread, home-made decal sentiment
Washi tape, glitter card, gold thread, home-made white on black printed sentiment

Inked stripes, glitter card and soft sheen silver card, silver thread, home-made decal sentiment

Thank you so much for coming by, please don't go without leaving a little message, I do love to hear from you.  
Or maybe I really am just talking to myself
 
 Happy Crafting, Stay Safe,


Friday, December 10, 2021

Time to Trim Those Trees


   Hello!
hope all is well with you and your Christmas preparations are going well too.

 
"Have Yourself a Crafty Little Christmas"
 
Challenge this week, our theme is
Trim the Tree
We'd love to see some trees on this week's projects, please!
Christmas Trees or Wonderful Winter Landscapes. One tree
or a whole forest.  Oaks, Pines, Palms .....
Remember it doesn't have to be Christmas themed, and can be a
card or anything else you're inspired to get crafty and make 
 
I've made a bit of a forest this week but my trees aren't all on the same card. I'll share a couple of them today and save more for another day, so please pop back to see them.
 
Card 1
 
 
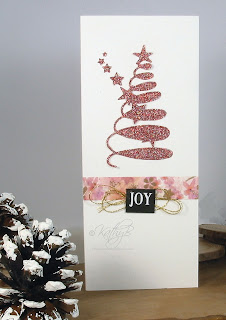
The background is stencilled with both Snow and Indian Gold embellishing mousse - I like the soft variation of colour I get using the two shades.  The stencil is home-made - just a rough squarish shape cut out from a piece of acetate.  I save the plastic packaging from die sets to make these simple hand-cut stencils - its good to get another 'life' out of this kind of stuff, isn't it?
 
The trees are die cut from black glitter card and from soft sheen gold card.
'JOY' is one of my home0made sentiments and its finished off with a multi loop gold thread bow.
To complete the card I added a few black and fold gems from a sheet I found at the back of a drawer when I was looking for something else! 😂

Card 2
I've used the same die (I cut loads of these in different colours so there are more cards to be made!)
These were cut in a variety of aqua shades and different card finishes and glued them down in a 'dancing trees' kind of arrangement. Next I used some of the cut out waste bits to fill in a few of the loops - not sure if I this this or not though.
I've been on a bit of a mission to use some of the lovely Washi tape I find it hard to resist buying, so I've used some to add the borders here - plus a few narrow strips of card if I didn't have a suitable match.
 
The sentiment is a home-made decal sticker and again I added a thread loopy bow, this time in silver.  To complete there are punched stars in various sizes
 

I hope you like them!

Thank you so much for coming by, please don't go without leaving a little message, I do love to hear from you.  
Or maybe I really am just talking to myself
 
 Happy Crafting, Stay Safe,