Friday, January 29, 2016

Up Up and Away


Another Daring Cardmakers Day today, and Leo's turn to set the theme:

Hi Leo here to bring you a new challenge for a new week, the last week in January in fact, how fast has that gone! 
This week I'd like you to create a card featuring:
Balloons
It can be a real one if you're feeling really creative or else a die cut, sticker, stamp, anything you want to use that features a balloon/s. :)

Here's the LINK to this week's design team creations - it's a post full of lovely  ideas and inspiration, so please pop over to see.

I decided to make a hot air balloon for my card, and set about making one using the DoCrafts/XCut die set and the same papers I used for the last card I shared - because a0 they were still on my desk and b) they are absolutely gorgeous!  
Step 1 completed, time to think about the card it would go on to. 
That's when it all went a bit wrong
I was given a Clarity Stamps Hills and Mountains mask as part of a forum Secret Santa gift - well, that would make a perfect background, wouldn't it?  So I set to with loads of inks and made something I really liked but took ages.
And then found that my balloon just got lost on it, so I had to make more in brighter colours. 
Here's my card

Info:
White card, black card
background created with Hills and Mountains mask (Clarity Stamps),
 and lots of different inks (and I mean LOTS!!!)
Square die set for aperture (Tonic) 
Build a Scene die set for balloons (XCut die set )
Papers are Summer Lovin' 6x6 (Carta Bella) 
Silver thread to hang the smaller balloon in the aperture
Can't say I'm really happy with the result but it took so long to get this far that I didn't have time to do any tweaking.  Which is a reminder that I should start earlier and not be such a last Minute Minnie! grrr
Anyway, that's it for this time, maybe I'll try and use the other balloons I made in a different project later!  I'd feel better if I achieved that
Thanks for visiting


Wednesday, January 27, 2016

Bubbly Funkery

Wednesday is my day to post a project on Bubbly Funk's blog, and this week
I took the self-indulgent route for my card
27th Kathy flower 3
 There's more about how I made the background, and the stencils I used (Basic Circles and Basketweave) on the Bubbly Funk Blog {{HERE}}

 I used:
Stencils; Basic Circles and  Basketweave  (both Crafters Workshop) 
Papers;  "Glistening" 6x6 paper pad (Authentique)
Mosaic Punch to make flower petals (I trimmed one end off to make it curved)
Dies; for flower centre from DieNamics Poinsettia die set 
Plain circle, Leaves (both Spellbinders), Scalloped circle (XCut)
Inks; various, inc Versamagic , Versacraft cubes and Cats Eye
Toning flat-backed pearls


27th_flower 2

Basketweave 

27th_flower 1
  
That’s it for this time, I had an absolute ball making this - there is nothing like a bit of creative self-indulgence to  fire the mojo - I heartily recommend it and I hope you like my card.
Thank you for visiting, I hope you’ll take a minute to leave a comment :)


Tuesday, January 26, 2016

Early New Sketch!


The February LO from The Sketch File has been released a week early so is available from today.  I've used it to make this card
I kept fairly close to the sketch for this one, though I did replace the smaller circle with a couple of hearts.  I wanted to keep it simple and see if I could use the papers from this rather old (and for some reason, hardly-used) paper pad for most of the elements.
Info
The Sketch File
14xm square card blank
All papers from an old Bo Bunny 6x6 pad; the little love-birds on the focal piece and the hearts are cut from a couple of the papers and matted onto card for some dimension
Silver cord, silver heart brads, tiny silver gems. red heart-shaped pearl
Plain circle cut with Nested Circles die set (Spellbinders)
Black matting circle cut with Pinking Circles die set (Spellbinders)


Hope you'll give the sketch a try, it would be lovely to see what you can do with it.
Thanks for looking :)

Friday, January 22, 2016

Gold

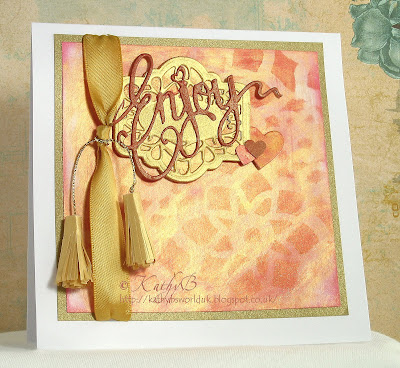
This week, the Daring Cardmakers blog is looking very shiny with lots of Golden Greetings on show.  It was Sharon who set the challenge:
Fool's Gold
I'd like to see gold featured heavily in your design - either gold embossing powder, gold cardstock, glitter, gold foil, gold paint - anything you can think of as long as it's gold!    Rose gold is my favourite thing ever, so you can have bonus points if you manage to feature rose gold.


I wanted to try and take up that second part of the challenge to use Rose Gold but that was easier said than done!  I used some Distress Inks, some Gold Stencil Pain and a stencil to create the background and I'm not sure I got the colours correct really, but I quite like them anyway

Info
Distress Inks Tattered Rose and Festive Berries swooshed onto plain white
 card with a piece of old baby wipe, then some 
Gold Stencil paint added in the same way
Stencil taped in place then a stronger layer of the Festive Berries
 added over the top
Background piece trimmed down and matted onto gold card and a piece 
of gold satin ribbon knotted around
Tassels made from gold vellum  strips, rolled around gold cord are threaded through holes in the card behind the ribbon and knotted in front
"Enjoy" (Sue Wilson Dies) cut from gold card, then inked over with the red Festive Berries Ink
This was adhered onto a piece created with "Provence " die set 
(Sue Wilson Dies, French Collection; Provence)
The baseplate is cut from the spare stencilled card, the filigree layer from
 gold card.  I rubbed it over with "Inca Gold" Alchemy Wax 
before gluing to the base plate
A few small hearts were added to complete

My second card was supposed to be simpler and more CAS, (Clean and Simple) but as often happens it's not as Simple as that!

Info
Stencil (Memory Box; Drip Rings) taped directly to the card blank
I mixed white texture paste with "Inca Gold" Alchemy Wax
and applied to the stencil with a palette knife.  
As the effect didn't seem "golden" enough, I then added a bit of Gold Sparkle Medium into the mix too, so the finished stencilled image is nice and bumpy and catches the light in different ways as you move it.
Sentiment panel is a spare strip of white card, wrapped with gold cord, 
I used a another piece of the corf to tie a knot around the three strands, then glued the white strip to a gold one so that just a tiny line of the gold shows when it is fixed to the card.  
To finish I cut some stars with dies from a Nested Stars set
 (Taylored Expressions). 
 I folded the largest to make a 3D star.
The sentiment "birthday" is from the "Handwritten Celebrate" die set (Tim Holtz)


The DCM design team have come up with some fabulous ideas for this challenge, so please hop over there for a look!

Thank you for visiting my blog, I hope you'll leave a comment 
 

Tuesday, January 19, 2016

Pretty New Die

Another card using the current LO from The Sketch File today, it's still a simple design, but I've changed a few things and added a few extras, so not quite as 'CAS' as the one I shared last week. The flowery border die was a Christmas present - I've only used a section of it on this card


Like for last week's card I started by using dies to emboss a square frame
onto the plain card blank.  
Materials and Tools
Plain white square card blank, embossed with a square from the Tonic nested squares set
Paper from  Lawn Fawn 6x6 pad "Polka. Mon Amie"
Plain Bazzill card to match 
Mall pink gems
Focus flower is created using the larger flower that features on the
 Memory Box die

Dies used: 
 Nottingham Border (Memory Box)
 "Labels and Borders" (Creative Dies CraftStash UK)
 "Handwritten Celebrate" (Tim Holtz)
That's it for this time, thank you for looking ;)

Friday, January 15, 2016

Turning Over a New Leaf.....

Jo posed an interesting challenge for The Daring Cardmakers this week, one that made me think quite hard!

  "This week I would like to see you;

Leaf It Alone!

All too often the humble leaf is upstaged by flowers on our cards so I 
would like to see you make the leaf the star!" 
I love my leafy swirly dies, and often use those, along with other leaf shapes as background details on my cards, but using the leaves as the main design element is definitely not something I do, so I wasn't sure about this one at all.
In the end though, I remembered a lovely A4 embossing folder called "Tumbling Leaves" and thought that would make a good starting point.  

Info:
15cm square smooth white card blank.
Lemon and Green Bazzill squares cut with Tonic Studios Nested Squares die set
Green square embossed with  "Tumbling Leaves" A4 folder (Crafters Companion)
Raised pattern Inked over with !Peeled Paint" Distress Ink
PVA glue applied with a brayer over the embossed area, then sprinkled with Glamour Dust (Gold colour)
Leafy swirl: Spellbinders D-Lites "Sprigs" die set in darker green shade
Sentiment; Tim Holtz "Handwritten Celebrate" 
Dewdrops, gems, pearls and enamel dots to finish 


You can see how the rest of the design team took up the challenge HERE
It would be fab if you'd join us this week and share your ideas for using Leaves in centre stage!
Thanks for visiting, I hope you'll leave a message :)

Tuesday, January 12, 2016

Simple Thanks

Today I've a simple Thank You card to share, and I've used the current LO from The Sketch File to make it.  It's a very CAS design and easy to "fancy up" a bit, but I kept to the simple route and just made a few in different colours


To add a little interest to the plain card blank I started off by embossing a square onto it using a square die- it's amazing how something as simple as this makes such a difference,  I only used one for this card, but using 2 nested dies to emboss a double frame looks even better
Materials and Tools
Plain white square card blank, embossed with a square from the Tonic nested squares set
Paper from  Lawn Fawn 6x6 pad "Polka. Mon Amie"
Banners are hand cut
Dies used: Creative Dies (CraftStash UK) "Doorplate nesting" and "Labels and Borders". 
Tim Holtz die "Handwritten Celebrate"
That's it for this time, thank you for looking ;)

Monday, January 11, 2016

The Christmas Ones that nearly got Away!

Just a bunch of cards that didn't make it on to the blog before Christmas - and a few photos of our tree etc to round it all off.
It is a curious thing that I always find its last few sets of cards I make that are the ones I'm most happy with - it happened again this time with these ones


This last one is the card I made for my Hubby.  It's quite a large card, with lots of stencilled snowflakes in red and silver, and an aperture with a silver stocking dangling in it.


I made it to match our Red, Black and Silver 2015 Christmas colour theme - because I'm sad l;ike that!

Here are a few photos of the tree etc.


And finally  the dining table with the 2 crackers I made for us - they weren't for 'pulling', but did have some little treats inside!

So that's it for another year. Thank you for visiting, I hope you will leave a comment :)


Friday, January 08, 2016

January Elemental Inspiration

Gosh, it's been a while since I blogged - probably something to do with Christmas happening....  
Anyway, I need to get back into a blogging habit - actually, this is a habit I don't think I've ever managed to grasp, but I do try, honestly!  
I'll do a "catch up" post in a couple of days, but today it's First Day Back for the Daring Cardmakers after the hols, and we have a wonderful Elemental Inspiration Picture challenge this week.  
Here's my card:


And here is Jo's choice of photo.  
It's not really surprising that most of us chose the gorgeous colour palette as one of our elements - click {HERE} to see them all! 
As well as the colours, I picked the star, the ribbon (I used die cut swirls), the bling and the cupcake cases to use on my card

 
Materials and Tools
White card, Red Bazzill 
Aqua/White dotty paper from my scrap box
Cake Case made into a coiled flower
Starry Background - Memory Box stencil with various inks and some red and Blue Diamond Sparkle Medium Glitter Paste
Large Memory Box Rosette die (cut down slightly)
Swirls cut with a Taylored Expressions die set
Red and Turquoise Dewdrop bling
3 beads wired to thread through the flower and rosette 

I really enjoyed making this one - I usually struggle to get out of the "Christmas card" mind set, but Jo's picture truly was an inspiration (Thanks Jo!)

That's it for now, thank you so much for popping by and for leaving a comment (hopefully!)