Tuesday, February 28, 2017

Paris, Again!


Hello there!
Today's weather report from Hertfordshire is that it's lovely and sunny - but there's a nip in the air - the milk bottles felt fridge=cold when I picked them off the step this morning!  Pancake day today, so need to get that batter mix ready for later, and the lemon juice, sugar and maple syrup.   
Will you be having pancakes today?  
As it's one of Hubby's "Work from home" days, we can have something a little more nutritious for lunch! 
It may be coming up to 2 years in March since we spent a fab week in Paris, but the keepsake mini album I started making just after we got home is still plodding on!  I am not a quick worker.  Actually, its quite an achievement to be still adding to it - usually I get bored after a few pages of an album and it just gathers dust on the shelf with all the others I've started and never finished.  
And Yes, I know that that is a really bad character trait. to admit to

Anyhoo.  
I have made another LO for the book, it's a double page LO based on our visit to the Musée d'Orsay, which we loved.  It used to be a railway station and I love the way the splendour of Victorian Industrial architecture makes such a fantastic backdrop for the art on display.  
I used the February Sketch File LO to create the right hand page, swapping the circle on the sketch for a rectangle, which is a flap, so room for 1 picture on either side.
I used a B + W photo from the gallery's website to show how the space used to look (well obviously we couldn't take a photo of our own showing that, could we?).


February Sketch File LO for Right hand page:
The Sketch File February 2017
 Info
Blue, Black and White card; Bazzill
All wording computer-generated
Metal cogs are from various places, inc. Craft Box

It's a pretty simple LO, but I really wanted to keep it that way and let the photo of the clock be the star.  The top floor of the gallery lets you walk right behind the clock face and the view over the Seine is fabulous - especially when the sky is as blue as it was on our visit.  Oh my, I was so pleased with this photo!
We didn't bother with the Louvre on this visit - we went there last time, but its so big and overwhelming that its a bit too much really.  The Musée d'Orsay is fantastic, and so is the Orangerie - which has the most spectacular Monet exhibit - I believe designed by Monet himself, and truly breathtaking.
Enough of the waffling! I shall shut up now

Thank you so much for visiting today, I hope you'll take a minute to leave a message, I'd love to hear what you think....about the LO....about the galleries if you've been....about pancakes.... 😁😁😁

See you again soon
 

Friday, February 24, 2017

In a Tearing Hurry

Hello there 👋

We have a beautiful sunshiney morning here - what a relief after a day spent with Storm Doris - she was quite a girl, wasn't she?  Thankfully we escaped any damage and hope you were lucky there too.

Today I've my card for the latest Daring Cardmakers challenge to share.  I was able to make a birthday card I needed with this challenge, which is always a happy '2 birds with 1 stone' sort of thing, isn't it?


"Its Dawn here with this weeks challenge and I have called it:
* * * * * Tear It Up * * * * *
I would like to see something torn on your creations.  So lets get ripping up those background papers, toppers, die cuts etc... and leave the scissors alone.   A simple challenge or so I thought.  I found it so hard to rip my precious designer papers.  I am so glad there were a few of each design to play with."

This card is for my cousin's 11 year old son so I thought bright, funky colours would make a great background, and tearing the paper to make the strips would give extra ooomph!
I worked in Paint Shop Pro to make a photo of him playing his guitar into a silhouette.  I 'drew' around the photographic image, then blanked 
out the background. 
 I saved the entire image, and also just the guitar part as gifs ready to cut with my Silhouette Cameo (too many uses of the word silhouette, eh?).
After resizing I cut the whole shape twice and the extra guitar shape once.  The image layers are all separated with pieces of thick card for dimension.
There is more dimension added with the matted black and white rectangles.
The coloured strips were made using Distress Inks on thin white card, which I then tore - I always forget which way it goes, but for this I tore the paper to show the white edges!
To finish I just added a few punched stars using scraps of the various inked papers
That's it for this time.  this post seems to have taken most of the day to write - just a lot of interruptions for one reason or another!  You get days like this, don't you?  I'd better sign off quickly before anything else happens!

Have a great weekend, don't forget to check out the Daring Blog to see all the great ideas from our fantastic, imaginative Design Team!


Tuesday, February 21, 2017

Benington Lordship

Hello

Thanks for popping by.
Here are a few photos from our visit to Benington Lordship on 20th February 2017.  The garden is well known for its beautiful snowdrops at this time of year, but its a lovely place to wander around at any time.  There are lakes, wooded areas, formal beds, a Walled Garden and wonderful views out over the Hertfordshire countryside.  It's hard to believe that the Urban Sprawl that is Stevenage is so close!


 These last 2 were taken in Benington village


I hope you've enjoyed scrolling through the photos, your messages are always appreciated
Thank you for visiting


Sketch Double

Hello!

Things are looking up!  The temperatures are into double figures and signs that Mother Nature is waking up are everywhere,  Now I'm quite well aware that February often has a sting in its tail, so I don't want to count those pesky chickens too soon, but....... 
It's been Hubby's birthday weekend, so he took yesterday of work and we went across to Benington Lordship (in Benington village) to see the snowdrops and take some photos.  The weather was fine; breezy but with some sunshine between the clouds and it was lovely to be out and about.  The pub lunch we treated ourselves to after our walk was lovely too 😜

I never did get round to blogging last week's card for the Sketch File, so today I have two to share.  First up is this week's


Info:
All patterned papers are Hip Hip Hooray 6x6  (MME )
Matted on to Peach coloured Bazzill card and a smooth White card blank
The striped papers are foiled in gold - sorry, they don't photograph well!
I glued the two designs together, then cut a circle aperture (Tonic Nested dies).
This layer was then raised on some cereal packet "chipboard" to add dimension and adhered to the peach mat. 
The flower is made using 3 layers cut with a large EK Success blossom punch. 
I inked some stamens to match and threaded them through a hole cut in the centre of the flower.
It was glued into the aperture and highlighted with swirls cut using various flourish dies (Memory Box, Die-Namics, Taylored Expressions) 
The sentiment is by Lawn Fawn, I cut it into sections this time to use on the three banners.  You can see it as a whole piece on this card
To finish the card I made 3 little faux brads from circles punched with a small circle punch and shaped with a ball tool


 Here's the February Sketch

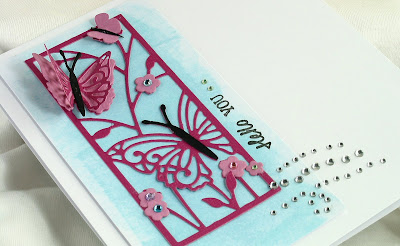
Last week I used a lovely butterfly panel die to make the panel for my card.  I didn't use the whole die cut, there's actually a third butterfly below the larger one.  I wanted to have the "lines" of the sketch a bit lower than the die cut would allow, so I trimmed and overlapped the edge of the frame to make it a better fit.


Info 
 Smooth white card blank plus extra of the same card for the raised piece, which was then inked with Distress Inks to make the background for the die cut panel
The panel was cut in deep pink. extra butterfly layers, and tiny flowers were cut in toning shades of pink.
The layered butterfly takes the place of the circle on the sketch LO
Butterfly Panel and other butterfly die set are both by 
Apple Blossom from CraftStashUK
Small flowers are from the Cherry Blossom dies set by Spellbinders
I stamped the sentiment using a couple of stamps from an Apple Blossom set and added jewel flower centres and trails of tiny silver gems to complete
 

I've put some photos from yesterday's outing on a separate post, which you can find HERE, but here's one of Hubby's macro shots to whet your appetite!


 Thank you for visiting - and hopefully leaving a comment too 😇😎


Friday, February 17, 2017

Square Dancing on a Triangle

Hello

I've been an even worse blogger than usual this week, just haven't felt up to doing much of anything at all.  I've had enough of Winter now, I'm sick of irritating coughs and colds, and now I've got a cold sore.  I think my immune system is tired of fighting!  
It was lovely to see some sunshine yesterday and the temperatures were up too so it was good to get the windows open and give the house a bit of an airing!

Not much crafting done this week.  I did quite a lot of moving pikes of stuff from one place to another, then back again - but the mojo wasn't under any of them!

Leo asked us to make our own geometric patterns on our Daring Cardmakers' projects this week, and every time I saw another of my teamies sharing a gorgeous, clever card I grew more despondent!
In the end I grabbed some Washi tape and some inks and made a bit of a chequerboard pattern.  I made it on the diagonal for another geometric element
 Decorative panel created on textured card using lengths of Washi tape applied diagonally, and lemon, yellow, peach, orange and pink inks 
Narrow dusky pink ricrac braid (The Ribbon Girl)
Sentiment and backing square are also cut from Bazzill card.  
Die by Lawn Fawn
I made the flowers from scraps of matching card.  
For the larger ones I used a die by Britannia Dies, for the smaller ones am EK Success punch.  The stamens came from Cuddly Buddly
The leaves are petals from a Punch Bunch multi sized petal punch
A few scattered pearls were added to complete
That's it for now, sorry to be a Moaning Minne at the start, I will try to be more cheerful for next time. P
Please go and check out the amazing geometric patterns the rest of the Daring Cardmakers team have made - they are so clever!

Have a great weekend
 

Friday, February 10, 2017

In a Reflective Mood?

Hello All
How are you?  Keeping warm, I hope!
After saying that there were no signs of Spring in the garden the other day, I looked again yesterday and there are irises, daffodils and tulips shooting up all over the place.  The birds definitely think Spring is on its way - well before 7am now they are making a right old racket out there! 
It's so good to see Nature waking up, by this time of year it always feels as though Winter has gone on for ever.  February is the most depressing month for me, even though my hubby thinks that can't be so as His birthday is in February!  

Which reminds me, I need to come up with an idea for his birthday card soon!

Anyway, on to this week's card for The Daring Cardmakers, and this time its Sharon setting the theme:

 Mirror, Mirror
At this time of year, with Winter dragging on we really need a bit of 

something shiny to brighten the days. 
So, I simply want to see something 
reflective on your card! 
It could be foiling, shiny stickers, mirri card, or even mirrored tiles. 
Go on, Let it Shine!!!
The first thing that jumped into my mind for this one was to try and use one of the gorgeous resin frames that have come in a couple of Craft Box kits over the last few months. I'm absolutely rubbish at planning out a card before I start, it usually all just happens "organically", which is why frame + mirri card = Mirror, rambled on in my head to "Alice Through the Looking Glass" and Alice in Wonderland generally.  So I went off to hunt on Etsy for some "Alice" themed papers to download.  
Here's what I came up with in the end
Info
Resin Frame was coated with glue then given a layer of Gilding Flakes.  The Mirror is a piece of mirri card
The background paper is from the Alice in Wonderland collection by VectoriaDesigns and are lovely!  I only bought the paper pack, but there are loads of other items on the same theme.  They have lots of gorgeous stuff perfect for Mixed Media type projects 
I made the "drink me" label and the "Enjoy the Adventure" piece in Paint Shop Pro and resized and printed directly onto part of one of the download papers
From Craft Box (various ones): Resin Frame. Tiny black bottle, 2x large flowers, Metal charm pocket watch and Metal crown charm
From other stash: Pale blue ribbon, Tiny pearls and gems, small pink flower
The Playing cards are created from an image found via a Google Image Search
All PC generated items (inc background paper) were printed onto Classic texture white Bazzill card
I really enjoyed making this, and it was good to actually USE some of the gorgeous Craft Box bits and bobs rather than just oooh and aahh, stroke them and put them away again 😉  
The bit that's not so much fun is using Gilding Flakes - they fly everywhere, which is bad enough when you don't have a cold, but when you're all bunged up and can only breathe through your mouth....... Silvery snow all over the desk!
Well that's it for this time, I hope you like it, and will feel inspired to pop over to The Daring Cardmakers blog to see what everyone else made this time.
So much for signs of Spring, as I finish writing this I see signs of snow outside the window. Not funny.  Not funny at all!

See you soon
Please leave a message xx 💙💜💛💖

Tuesday, February 07, 2017

Simple Sketch for February

Hello there
I hope you're having a good day - and that like us, you've had some sunshine wherever you are.  I've been out for a wander around the garden, hoping to see snowdrops and daffodil shoots peeping through the earth - but sadly there's no sign of any Spring activity yet.
Now that we're at the first Tuesday of a new month there is a new LO to play with over at The Sketch File blog.  It's a really simple idea this time - but I still struggled with my first attempt at using it - my card didn't really work as well as I'd hoped, but you can't win 'em all!
I wish I'd added the lines of 'text' straight rather than at jaunty angles, I think it would have looked so much better.

Info:
All papers 'Heart Day' 6x6 pad (Crate Papers)
Nested Hearts die (Die-Namics)
Sketch:
The Sketch File, February 2017
Just out of interest, are you getting used to the new Blogger Dashboard - do you like it, or do you hate it as much as I do?

Thanks for popping by today, I hope you'll join in with us and try the sketch out this month xx

All for now


Friday, February 03, 2017

The Key to my Heart

Good Morning!
It's lovely to see some sunshine today after a rather dreary, damp week around here, we've both got colds, so definitely need a bit of brightening up!  

We have a new Inspiration Picture to play with over at The Daring Cardmakers this week and if you like arty, steampunky type stuff, you'll love Svenja's picture choice! 
The DCM team is very varied in our card-making styles and favoured techniques so it's always fascinating to see how everyone responds to these inspiration pictures - sometimes its hard to believe that we all started from the same place!

"It's the first Friday of February already, so time for a brand new Elemental Inspiration challenge...
All you need to do is choose at least THREE elements from the photo and use them on your own creation (colours only count as ONE element)."
Don't quite know where to start... ? 

Just head over to the BLOG where there's some wonderful inspiration by the DT members for you."


I planned an inky, painty, narrow panel with lots of embossing (the hexagons), some extra texture and copper leafing - generally mixed media stuff, which would be tied round with wire and a key or other metal embellishment to incorporate my chosen elements from Svenja's picture:

I wasn't intending to make a heart, but that's how it evolved! 

I started with a piece of lovely pearlised "Srardream" cardstock from PDA, which was the perfect aqua-green colour and set about adding more shades using Fresco Finish acrylic paints.
The embossing folder I used is "Honeycomb" by Tereas Collins and I love that you get the two different 'looks', with either the puffy raised hexagons, or the deeply embossed lines around them as the dominant feature.  Obviously I wanted to use both  so I partially embossed the card over a diagonal area, then flipped the card and debossed a different corner. 
I also added some stencilled hexagons, but in the end the part I cut out doesn't really show them.
I used a little bit of copper and gold leafing randomly, and various other things like Alchemy Wax and Glimmer Mist (I never have much luck with these things, I should stop buying them) and anything else that I thought might be interesting
This was the point for deciding which part of the piece I'd made to use on my card and that's when the heart happened. It's die cut with one of the nested hearts from a Die-Namics set and as it was now a bit flat I had to add a bit of extra embossing.
I added more shading around the edge, and then decided to cover part of it with Diamond White Glitter Gel paste.
Then I thought it might be a good idea to give the whole thing a
 coat of Glossy Accents to embed the glitteriness and give a bit of a
 sheen to the piece!
Honestly, the problem with mixed media is that you never know when to stop.
Or is that just me!
Anyway, once dried I added some slightly smaller heart shapes cut from thick card to the back and gently bevelled the edge to get a more rounded rather than flat shape to the heart.  To fix the heart to the base card I used a scrap of extra thick card on one side, so that I could slide the metal cogs underneath at the other side
I just wanted a simple white background, but the smooth white card was "too" plain iykwim, so I used the Honeycomb embossing folder again to match the hexagons on the heart, and matted it onto some matching  sea green Bazzill


To complete the project I added small metal cogs, a length of twill ribbon and a gorgeous key on some beaded wire.  The ribbon, some of the cogs and that beautiful verdigris key came from various of the boxes I've had from Craft Box
I just love going through them all over again and rediscovering the treasures they contain - which is how I came across the little tin of micro beads - I couldn't resist adding some to this project and I love the way they've added an extra bit of texture and interest!
But just how perfect was that key for the colours of the heart!


As yet, I've not decided what to do with this card.  I'm thinking now that it would actually make a lovely canvas.  My OH gave me some small square canvases as part of a crafty goody box at Christmas so maybe it won't end up as a card after all!

That's it for today, do please take a look at our fabulous challenge blog and see if you're inspired to join in with us this week- it would be wonderful if you were!

Take care, have a good weekend and thank you fo taking the time to visit me here