Saturday, June 30, 2018

Swirl Heart - Spellblogger Post for Spellbinders


Hello
Thanks for coming by today. 
 For my Spellbloggers post this time I'm using the beautiful new
 "Swirl Heart" 
die from Joanna Fink's
On the Wings of Love Collection for Spellbinders


This is a really stunning die that just used alone would make very beautiful cards and invitations for a wedding or other romantic event.
I think this card is more of an art journal sort of thing, but that's a bit too far out of my comfort zone.  Somehow making it on a card base feels more approachable, but I think this will end up as a page in my junk journal.

Info:
First I used the die to make a stencil which was taped to a piece of white card.  I used Distress Oxide ink and a piece of old wet-wipe to swoosh the colour across the card.

Next I used more tape to mask around the heart 'stencil' and added loads of different shades of stencil paint and Sparkle Medium to the areas within the heart shape, before removing and discarding the stencil
I also used a ready made stencil to add some small subtle detailing in a couple of areas
The Swirl Heart was cut again in white card, and then coloured with Silver stencil paint.  Once dry, I wiped over it with the deep pink shade of ink and also a turquoise shade.  The colours don't really show up on the photos, but really shimmer in real life.

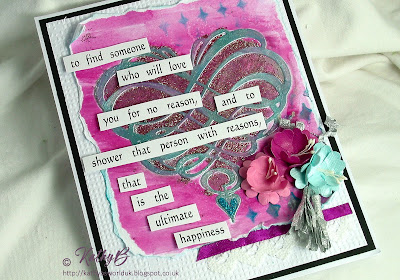
Once this die cut was dry it was adhered in place on the card.
I tore around the heart in a rough rectangle and distressed the edges and corners a bit more
The card base is about 5x7 inches, I matted the embossed white panel ('Horsehair' Embossing Folder) onto black card before adhering it to the base.
I added glue to the torn upper piece, leaving a bit of a margin all the way round so I could curl the edges and have room to slide some ribbon and lace under the lower edge;
The quotation was printed on the pc and the strips cut out fairly roughly with scissors.  Once happy with the layout I glued the pieces onto chipboard to add some dimension and then added them to the card 
Three Sweetheart flowers were made using coloured card and the smallest petal size from Cinch and Go Flowers 3
Ready made stamens were added to the flower centres and I used some scraps of silver wrapping paper to create the tassels and the paper curls.
To finish, I used the Swirl Heart die to cut just the tiny heart inset right at the bottom from deep turquoise glister card.  I cut this piece twice, glued them together fixed them into the hole then added a layer of Glossy Accents for a jewel effect. 

 Here are the details of all the Spellbinders products used this time

Swirl Heart  - from On the Wings of Love Collection by Joanne Fink 
Shapeabilities Etched Dies


Cinch and Go Flowers 3  Elegant 3D Vignettes by Becca Feeken

 Shapeabilities Etched Dies
  

 'Horsehair' Embossing Folder Tammy Tutterow Designs

  Platinum 
Die Cutting and Embossing Machine

Anyway, that's it for this time. Thank you for visiting.
Click on This Link to visit the wonderful Spellbinders store where you will find lots of lovely dies, stamps and other goodies, plus a huge amount of inspiration to get you motivated

Happy Crafting

Friday, June 29, 2018

Wedding Day

Hello
Just a quick post today because I'm 'up to my eyes' in things to do today! Still, I'm gradually managing to tick things off my list, and blogging my card for the new Daring Cardmakers challenge is next.
This is not the card I planned to make!  It's our Silver Wedding Anniversary at the end of July and I'd hoped to make my card for OH for this challenge.  But inspiration was not flowing for that so I ended up making a simple Wedding Congratulations card at the last minute instead
It's Ruth here this time and as we are well into the Wedding Season now, let's have a bit of romance this week! 
 I'd like you to make and share cards with a theme of 
Weddings and Anniversaries.
I'm really looking forward to seeing what you make!
Click HERE to see what the design team have been making this week
Info
Large rectangular white card, extra of the same card fro the embossed panel and the Sentiment panel
Silver paper and Blue card for matting
Ribbed Silver card for die-cuts
Hearts are cut from some inked scraps I already had on my desk, I'd used various Distress Inks and Oxides to colour them
To finish I added silver gems and silver twine
Folders and dies:


by Joanne Fink Shapeabilities Etched Dies  

Shapeabilities Etched Dies 

D-Lites  Etched Dies 


That's all for this time, thank you for visiting
Happy Crafting

Monday, June 25, 2018

Through the Porthole

Hello!

I'll admit that I'm guilty of hoarding my favourite crafty stash - come on, admit it, you're the same!

If you've got your hands on one of the 'Hooked!' boxes from Bubbly Funk Through the Letterbox you'll know that there are some sweet little wooden shapes on a nautical theme among the other goodies - there's no way I'd use more than one of these cuties on a project!
They are pretty small though, so I needed a design that would draw the eye in to this little yacht - something like a porthole, maybe.....


 I already had the perfect Caribbean Sea circular piece to use - its one of the cut out waste pieces from the Sea Dome card I shared  a few days ago!  I just needed to make the porthole window frame using some silver card,  a couple of Nesting circle dies and some small silver gems for the rivets (or whatever they are called!)


I covered the little wooden yacht with white gesso and left it to dry before colouring the boat section with blue ink.
The bits of card for the second yacht were just hand cut and glued in place
The 2 gorgeous ric-rac braids on the lower edge are from the BF Shop
To finish I used Paint Shop Pro to create the word 'ahoy!' and then cut it out in navy blue card using my Silhouette machine

Wooden Yacht
From the Bubbly Funk Shop
(pack contains 3x 36 inch lengths of ribbon; 1x velvet, 1x ric-rac and 1x grosgrain.)
From my stash I used, inks, Gesso, Silver card, die cuts, silver gems
You can get your "Hooked!" box for just £9.95 from HERE

Thanks for looking
Happy Crafting


Friday, June 22, 2018

What a Wonderful World


Hello
Firstly, apologies for my lack of blogging and commenting this week.  I've been really struggling with my hay-fever over the last few weeks.  It sounds really pathetic, I know, but it leaves this constant high pollen count is really making me feel exhausted and generally rotten!  Most of the time I feel as though my head is in a metal bucket!  
Anyway, hopefully it will ease up soon....been saying that for weeks, mind....!
It was my turn to set the challenge for The Daring Cardmakers this week so I had to give myself a shake and actually do something productive. 
It's Kathy here this time, and I'd love for you to use one of my all-time favourite songs to inspire your card-making, it's
by Louis  Armstrong
Sometimes we need to remind ourselves to cherish the wonderful world we live in. I inherited a love of this song from my dad and I'd love you to choose something from the lyrics to use on your card, or maybe you'll try to encapsulate the whole thing!  
Don't forget to click on the link so you can sing along with Louis!  I can't wait to see what you come up with
 You can see the whole of the lyrics and the lovely cards made by the design team HERE, but I chose the red roses from the first part of the song as the theme for my card:
'I see trees of green, red roses too
I see them bloom for me and you
And I think to myself what a wonderful world'
 Info
 Smooth white card blank plus an extra square of the same card, which was embossed with a Petite Dots embossing folder.  This was adhered to the centre of the base card.
The beautiful, intricate heart is a new Spellbinders die (details below), and was cut from a gold card that has a slight hint of glitteriness, then adhered in place with a few tiny pieces of chipboard between the layers to give a little dimension.
Next I die-cut a batch of petals to make different sized roses and made the flowers.  I actually made roses in 5 sizes though in the end I only used three of them.  My favourite die set for roses is Cinch and Go Flowers set 2
by Spellbinders, it's a six-petal shape and in the set there are 6 sizes of petals so you can make quite large and really dinky little roses from the same set 
The roses were cut from dark red Bazzill card, and the petals shaped using a bamboo skewer.
"Love" was die-cut three times and the layers adhered together before adding to the card.  The little gold heart was just lying on my desk - it was some 'waste' from another project!
To complete this card I tied a triple loop bow from organza ribbon and glued it in place

Dies used (all by Spellbinders ):


I loved making this card, I (almost) always enjoy making paper flowers and this style of rose is much easier than the finished flower implies!  
Thank you so much for popping by today, I hope you'll come again soon
Happy Crafting

Friday, June 15, 2018

Sea Dome

Hello - Happy Friday!

The good news is that its very sunny here this morning, the not-so-good-news is that the pollen count remains very high which makes things a bit uncomfortable.  Good for the sales of Kleenex Balsam tissues though, I guess....

It's Daring Cardmakers Day today and I couldn't resist making another card using the same Grand Dome dies I used for my Spellblogger project earlier in the week.  Joanne's challenge was just perfect for an under the sea sort of card!
It's Joanne here with this week's challenge and I'd like to see you using 
ABW - Anything But White! 
Using white as a card base is a really easy habit to slip into so I'd like to see what else you can come up with. It could be a chalkboard technique on black cardstock, metallic or opaque embossing powder on a coloured base, coloured pencils on kraft or something like the Joseph's Coat technique.

What will you decide on to make your base other than white? Here's what the team came up with:
   

 Info
First I used the large die as a template and scissor-cut the 6 white card pieces I needed for the dome. These were inked on both sides with various Distress and Distress Oxide Inks.  
The bits of white card left over were inked in the other colours I wanted to use
Once completely dry I die cut the pieces for the Dome, and put it together only using the tabs on one side to allow me to add all the other die cuts to the various layers - it would be very tricky to do this if the 'box' was completely formed.
 
I found that twiggy branches and other tree dies are great for making coral and seaweed - especially those in the Four Seasons Trees collection - don't you just love it when you see other ways to use your dies!
Some of the sea creatures were simply glued in place on the various layers of the dome. others were suspended on silver thread.  
When I was happy that the various layers of the dome had enough bits and bobs added to them, I slotted in the tabs on the other side and glued the tab that closes it all.
 
 I won't deny this was was fiddly, but it was fun too. The next picture shows how it just folds flat to fit in a regular sort of envelope - isn't that just soooo clever!

Here are the dies I used for this card, all from Spellbinders

Shapeabilities Etched Dies

Shapeabilities Die D-Lites Etched Dies    

That's it for this time, I hope you'll click on the link to see a wonderful array of cards from The Daring Cardmakers DT this week - and I hope you'll be inspired to join in with us.

Monday, June 11, 2018

Grand Dome 3D Vignettes - Spellblogger post for Spellbinders


Hello

I'm so happy to be able to share my first Grand Dome card for my Spellbloggers post this time! 
  I had a surprise package arrive from Spellbinders last week and among the new dies inside were a couple more of 3D Vignettes die sets, including the Grand Dome - they have been very hard to get hold of so I was thrilled to bits, I'll tell you!

 The Elegant 3D Vignettes range from Spellbinders is  Becca Feeken's beautiful new collection and I've been sharing projects made using some other dies from the range over the last few weeks, I love them to bits!  Now I've got my hands on one of the 3D card creating sets and I couldn't wait to have a go.

You wouldn't believe when you look at these cards standing up that they will fold flat and slide into an envelope, would you?I know mine has extra dimension with the flowers, but I could still mail this with a bit of bubble wrap to protect it
Here's how it looks when it's smoothed down; all the layers 'move' sideways and flatten out.


Info:
a few sheets of smooth white card 
1x inked background piece
Thinner card inked on both sides for the flowers
 Cut the main layers first, then use the leftover card for the leaves, sentiment insert etc

The larger flowers are made using a couple of the smaller petal dies from  Cinch and Go Flowers 3
For the little roses I used the smallest of the petal dies from Cinch and Go Flowers set one.
I've also used some pearl sprays, and some white and lemon flower stamens

The 3D card is easy to put together, there are instructions on  the back of the pack, but if you would like to see one being put together in real time, Becca Feeken has a video HERE 
I would advise making a practise one first so you can see how it works and also how best to add your decorative elements and layers

Here are the details of all the Spellbinders die sets used this time 
 
Grand Dome 3D Card - Elegant 3D Vignettes by Becca Feeken 
 Shapeabilities Etched Dies

 Shapeabilities Etched Dies


Shapeabilities Etched Dies

Platinum Die Cutting and Embossing Machine


This angled view shows how the layering pieces slot into the side panels.  There are 6 layers all together, the back, front and 4 inner sections


That's all for this time, but if you click on This Link you'll find yourself browsing the aisles of the wonderful Spellbinders store where you will find lots of lovely dies, stamps and other goodies, plus a huge amount of inspiration
to get you motivated

Happy Crafting