Saturday, August 29, 2020

In the Garden


Hello
I do hope you are keeping safe and well. 
 As those 'in power' are as much in the dark as the rest of us and we can't be sure who is pulling their strings (is it really safe, or is it the various sponsors and the loud business leaders who are the ones pushing the government's buttons?) I'm a cynic when it comes to politicians - I don't think there is a single one of them who isn't more concerned about themselves than you or me, whatever they say.
Yes we want to help businesses survive the crisis, but not by putting ourselves at risk. It's so hard to know what to do for the best these days.  
I'm a bit late again with my Daring Cardmakers project - Hubby and I share the room which is both study and craft room.  Most of the time its fine and its nice spending time there together, even if we're not chatting all the time!  But when he's on conference calls and I want to play with my 'noisy toys' it can be tricky 😕, and this week, there were a lot of calls and crafting had to fit between.
Anyway,  it’s Shabneez who set the challenge and its a lovely one!


In the Garden
"I’ve been spending a lot of time in the garden
lately and so I’d like to see creations with
something from your garden, window box,
windowsill or maybe the garden of your
dreams on it!"
Click here to see this week's design team inspiration
 I decided to look back to Spring time, when my fabulous, flamboyant peonies are in bloom so, once I'd managed to fit in some paper punch noises, some die-cutting noises and some digi printing noises here's what I came up with.

Info
Fat rectangle white card blank, with fold on the side 
Digital papers in are from a set called Pink Peonies from the Alphabet Store, via Etsy 
I inked paper on both sides using various shades of pink ink and used a couple of sizes of petals from a paper punch to create the flower 
More inked paper was used to die-cut the lovely twining leaves, 
die set by Spellbinders  
To finish I added a pc generated sentiment.  As you can see, I'm still loving adding a touch of black and white to everything!


Thank you so much for visiting today, I hope you'll leave a comment, I really appreciate it when people take the time to leave a message!

Happy Crafting, and please Stay Safe

Friday, August 21, 2020

Picture-Perfect Baby


Hello
The weather here continues to be weird.  We;ve had the baking hot, the ferocious thunder and lightning and even a couple of chilly days.  Today there seems to be a gale blowing out there.  OH has been out to check the tomato plants are safely tied in. just in case.....
Mind you, I think its worse in other parts of the country, so if you're in one of those areas - batten down the hatches and stay safe.

I'm still struggling with a lack of crafty mojo and every thing I make seems to be hard work. I do have cards I need to make though, and I'm hoping that a nudge from the Daring Cardmakers might get me inspired again. 

This week it’s Miri’s turn to set the challenge:


Picture-Perfect
I want to see picture-perfect cards 😊!
Use a photo camera, a picture frame, a Polaroid layout,
 an actual photograph or anything picture/photo related on your card.

Click here to see this week's design team inspiration

 When some kind of photo challenge comes up on The
Daring Cardmakers I usually go straight to the holiday photos we have stored on the pc for suspiration, but I thought I should try to do something different for a change. I couldn't find what I was looking for in my various 'useful stuff' boxes, but I did find a sheet of photo images I bought years ago, and decided to make use of one of them to make a new baby card.
 

Info
Fat rectangle white card blank
Grey and White paper from an old Fancy Pants 12x12 set
It's an 'Eclipse' card so the paper was cut to size, then the BABY letters (Lawn Fawn alphabet set), cut out and all the bits saved for later
I inked the card in the area where the letters would be in yellow before adhering the paper in place.
I cut each letter 4 more times in white card, glued them together in stacks and inked the edges in yellow. Next the cut out striped letters were glued to the top of the stacks and the tiny cut out pieces added to the reverse of the letters where applicable - I just use a tiny piece of sticky tape for this, The chunky letters were then glued in their positions on the card.
The photo card was matted onto yellow and grey card before adhering to the card. 
Finally. different sizes of stars were cut from yellow and turquoise card and folded to make them 3D


Thank you so much for visiting today, I hope you'll leave a comment, I really appreciate it when people take the time to leave a message!

Happy Crafting, and please Stay Safe

Sunday, August 16, 2020

Peek-a-Boo Secret Message

Hello
What's the weather like where you are?  As I write this, there's a ferocious thunderstorm going on here - over the last few days we've had several of them, but before that  it was days and days of seriously hot and very, very muggy. We never seem to get days that are hot, but dry - just those hot and humid kind, the ones that leave you needing to wring your whole self out!
I've had several crafting disasters and false starts this week, so I'm very late with my card for the Daring Cardmakers
Consequently, he bin has seen a lot of action, as has my bad  temper.  So I'll keep this short.
It's Nat here bringing you the details of this week's Daring Cardmakers challenge.

I want to see you make a card with some sort of opening element!
It could be: A lift-up flap. a surprise element (e.g., a tear-away section to reveal a sentiment, an interactive moving wheel, a pull tab with something that pops up)
Or simply a clever use of an aperture

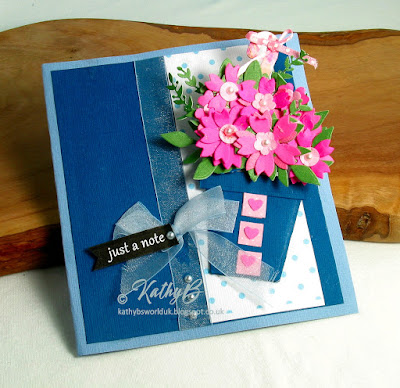
My Peek-a-boo element is a pull out secret message strip attached to the flower section of the pot and pulled out using the plant stick
 
Info
Card blank made from 2 shades of blue cardstock
Blue dotty pattern panel is a scrap leftover from another poject
Blue organza ribbon tied around and a bow added
Plant pot is from a Papercraft Society die set as are the leaves, Flowers are an old Die'Namics set
Punched squares and hearts to decorate the plant pot
Small white pearls for flower centres and to highlight the ribbon and add a little bling to the sentiment tag
Plant Stick cut using a candy cane die and finished with dotty pink ribbon

Thank you so much for visiting today, I hope you'll leave a comment, I really appreciate it when people take the time to leave a message!

Happy Crafting, and please Stay Safe

Thursday, August 13, 2020

Thinking of You Both

 
 hello there
 
What a week!  Its been so hot here that at times when we've both been in the study/craft room we've had two fans working to keep us from melting.  For the last few nights our wonderful Dyson fan has worked all night long so we can get some sleep
This morning we had a huge thunderstorm and its cleared the air a bit, but its still a little more humid than I'd like!
 
Today should have been a wonderful, happy family day, watching our lovely nephew Charlie marry his sweetheart, Annabelle. 
 Sadly thanks to the pandemic they had to take the decision to postpone their special day so that everyone they wanted to share such a special occasion could be with them.  I can't begin to imagine how they must feel today, but hopefully when the new date comes around next year it will be even more joyous and celebratory
 
I couldn't let the day go by without sending a little message to let them know we've not forgotten how special this day should have been for them
Info
A 'fat' rectangle card, this time I went with a side fold and I really like the difference it makes.
Striped section is created with a Funky Fossil stencil and aqua Altenew ink
After stencilling I added a swirl of silver stars using another Funky Fossil stencil and Silver Glitter paste
The three intertwined Scribbled Circles (Tonic Studios) were cut from textured  Silver card 
The two hearts were cut using a die from a Bright Rosa set
The sentiment pieces were created on the pc 
 
 
 That's all for today, thank you so much for visiting, I hope you'll leave a comment, I'm so grateful and happy when someone leaves a message!

Happy Crafting, and please Stay Safe
 

Saturday, August 08, 2020

How to make a Nescafé Frappé

How to make a Nescafé Frappé 
(Greek Style Iced Coffee)


You'll need:
instant coffee (traditionally Nescafé)
Ice cubes
Milk
cold water from the fridge

Also
Bamix or other stick "whizzer" 
Container suitable for whizzing in
Drinking glass
Long spoon if you have one
Drinking Straws 
(You don't need the toaster in the photo😁)


Place 3 tsp Nescafé in the mixing container, add a little chilled water
Whizz till really frothy to mix the water and coffee really well - the photo shows how mine looks after frothing about 3cms water and the coffee granules, so you can tell how increased the volume is

Put a few ice cubes in your glass and add some milk - how much milk depends on your own preference, I use about the same amount I'd use in my regular 'hot' coffee 

Pour the frothy coffee mixture into the glass and stir to mix, add more chilled water as required and mix again.  You can add more water as the froth subsides.

Add your straws, and dream of Greek Island harbourside tavernas as you enjoy your coffee.
There'll be no chance of drinking one in a harbourside taverna somewhere in Greece this year, so this is the best I can do for now - that and have a browse through my computer photo albums.
 Samos
Santorini
Skopelos

Skiathos
Rhodes

Skopelos
Samos
have a go. and let me know how you get on
Yammas!


Friday, August 07, 2020

August Elemental Inspiration Challenge

Hello
It's a hot one today, so instead of having a big mug of coffee beside my keyboard, I've made myself a Nescafé Frappé.  There'll be no chance of drinking one in a harbourside taverna somewhere in Greece this year, so this is the best I can do for now - at least I've cracked how to make them now!

 There's a bit of a drinks thing going on with Joanne's August moodboard for the Daring Cardmakers this week

 August Elemental Inspiration Picture
It's Joanne here and as it's the first Friday of a new month that means an "elemental" challenge here at DCM. Choose at least three elements from the picture to include in your project (colour scheme counts as one element).
Click HERE to take a look at the inspiration from the Design Team - more information on individual blogs if you want to find out more about how the picture inspired them!
I thought I'd interpret the elements a little loosely this time, so went with 'drink' (the coffee from the photo), 'fruit' and leaves - I used wine instead of coffee, grapes instead of strawberries and my leaves are the cine leaves.  I really wanted to find a wine-themed background similar to the coffee one on the saucer, but failed to find a ready-made one and didn't have time to make my own, So instead I used the black and white striped paper and a white on black sentiment to echo the idea.  I love how the wine element works on the wide stripes!
Info
White card blank with square of wide striped paper by DCWV
Gold and Green scribble circles die by Tonic Studios
Wine die set and Celebrate word, both Spellbinders
I inked scrap card for the wine and leaves using several shades of inks. The glass was cut out in white, coloured with ink and then I added an acetate layer over the top - I ran the acetate die cut through my little Xyron 'X' sticker maker and it worked a treat for adhering to the card die cut invisibly. 
The grapes die comes with 2 sizes of circles that you can cut out to build up a nice 3D bunch, as well as using them on the large bunch, I made another smaller one to add an extra embellishment by the sentiment.
This die set is fab, I've used it more than I ever thought I would - it includes the wine glass, grapes and vine, a wine barrel and some cheese!
Sometimes thing go wrong and I cut the black part of the sentiment panel a little wonky, so rather than start over (I'd already had to make another little bunch of grapes as the first has gone missing!) I hid the error using those small pieces of black and white patterned card. I did mean to add some Glossy Accents to some of the grapes but I ran out of time to let it dry.

That's all for today, thank you so much for visiting, I hope you'll leave a comment, I'm so grateful and happy when someone leaves a message!

Happy Crafting, and please Stay Safe
 

Sunday, August 02, 2020

Shaking It Up

Hello
I'm a bit late with this week's Daring Cardmakers card because I didn't get round to making a scheduled post to load while I was otherwise engaged.  Not that that is anything new, oh to be organised enough for that kind of thing!
We celebrated our Wedding Anniversary this week and booked ourselves an entry slot to go and have a picnic in the grounds of Anglesey Abbey, not far from Cambridge.  Our first proper outing since OH's birthday back in February!  
 The house sits in large grounds, so we knew we'd be able to find somewhere sufficiently distanced from others for our picnic, and as it happened we even managed to bag a shady place with a lovely view of the house. 
I have to say it felt a little strange to be out and about among other people and after just a few hours I felt weary and ready to be back in our own home.  I guess its more to do with being on edge, and more aware when walking around the site of the people nearby and whether they are taking care to keep away from you as much as anything.  
I wouldn't feel comfortable going to a pub or restaurant yet but taking a picnic to eat in the grounds of a stately home is a step forward, especially when everything there seems well organised and mindful of visitor safety the staff are.  However, you have no idea how the General Public will behave, have you? Let's face it, we've all seen the photos and videos over the last few months.....

So anyway,
on to this week's Daring Cardmakers challenge.  Rizwana says:

 Shake It 
"Create any type of project using
a shaker element.It can be card,
gift box, tag or even a book"

I've made a few of this type of card over the years, but I don't get on well with them! But a challenge is a challenge, and you can't just opt out because you find them difficult, can you/  Well, you can, but you shouldn't hahaha
I decided that the easiest way to go would be to bravely make a Christmas Card - in July.  Those of you who know me will know that's a challenge in itself!
Infp
Shaker element;
constructed from a square of card, inked with a few shades of blue. Little house and church also die cut then tiny pieces of, black, gold and yellow paper added to the reverse to create a lit window effect. These were glued to the bottom of the blue square and a die cut white tree and curved ground piece added. I then used a little glitter glue to add stars and a twinkle of snow to the picture.
For the box I glued several die cut square frames together then adhered them to the picture section. When the glitter glue was dry I put loose tiny stars and snowflake die cuts in silver and white, plus a few silver and white beads into the box.
For the top window section of the shaker box I cut another square frame, this time with a slightly larger border area and used DS tape to fix a square of acetate to it.  More DS tape was added all around the edge of the acetate layer, then I adhered it to the box, sealing in all the little bits so that they would now be able to move around inside.
I glued the shaker box onto the card, added a die cut tree and landscape piece and more snowflakes, glitter glue, a die cut sentiment from silver and some red gems to decorate the trees

That's all for today, I don't think making shakers will ever be my favourite thing, but its good to have a go every now and then - maybe one day I'll actually feel happy with the results!
Thank you so much for visiting, I hope you'll leave a comment, I'm so grateful and happy when someone leaves a message!

Happy Crafting, and please Stay Safe