Friday, March 30, 2018

Do Something Digi

Hello
I hope you've started the Easter Weekend off well - maybe with breakfast in bed?  Ah! we can but dream!

It's my turn to set the challenge for the Daring Cardmakers this time.  A couple of weeks ago I used some digital papers for the first time in a while, and it reminded me how much I love the scope and versatility of using my pc and printer as crafting tools.  Even if its just to print out the perfect sentiment in the perfect colour and size for a project!  It's also a great solution when you don't have exactly the right paper or image in your stash.  Google Image is a great friend when it comes to images and clip-art, and there are loads of people creating beautiful paper designs we can download for little cost.  My favourite source of lovely papers is Etsy!
The thing about digital is that you get to 'manipulate' on screen before printing on whatever material you like. If you want the flower shape on a digital design to fill your card front, then you can crop down to the bit you want and resize what's left to the actual size you want!
Anyway, I'm getting carried away....
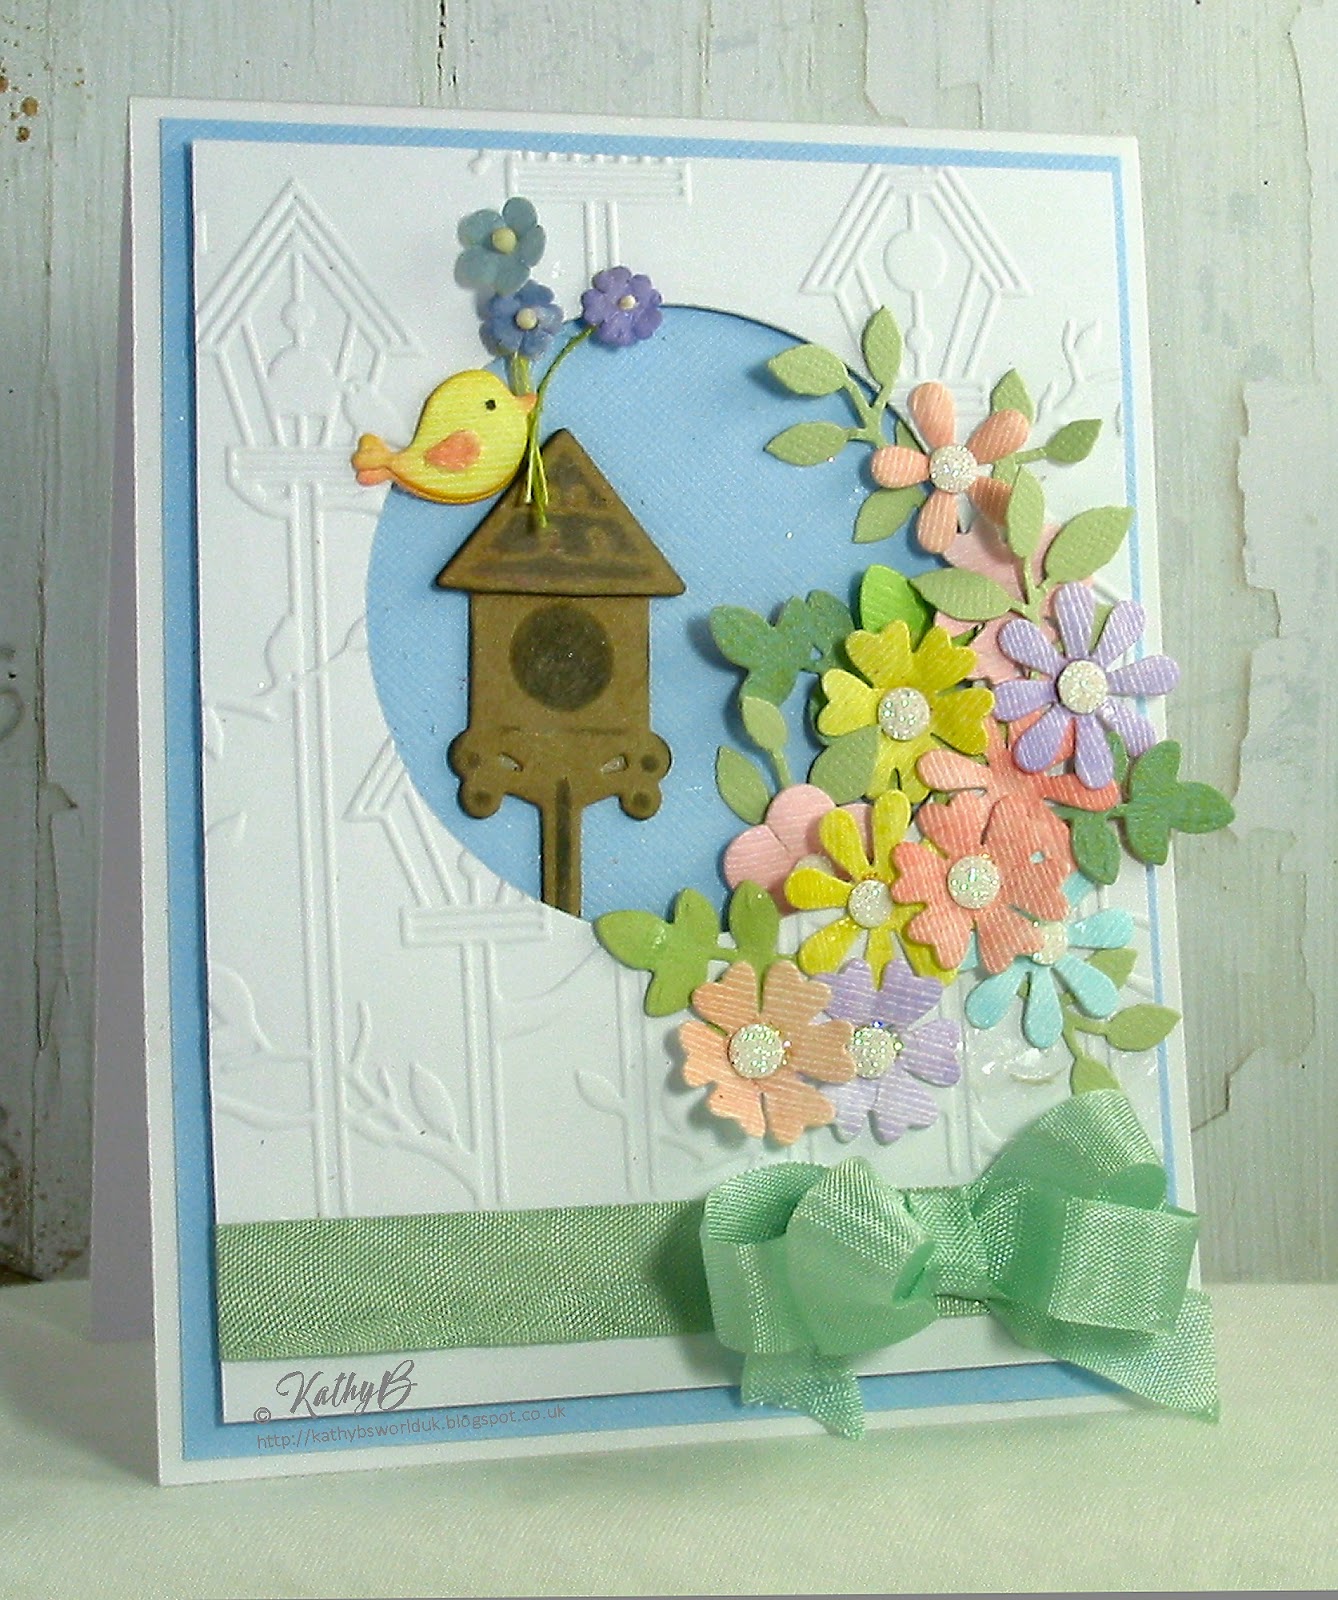
I chose and bought a digital paper collection from PaperMoonDesigns, via Etsy, and within a couple of minutes I was able to download and start using it to make the background and the flowers for my card
Info
Paper Download from PaperMoonDesigns
I used 4 or 5 of the patterns, printed onto white textured Bazzill card.  The designs I was going to use for the flowers were printed on both sides of the card 
2x shades of green card for the swirls and black for the sentiment, which was created digitally using Paint Shop Pro and cut out using my Silhouette machine
All the flowers (except those cut out from the flower paper design) are made with this die set from Spellbinders

Shapeabilities Etched Dies 

I made a triple bow from yellow ribbon to pop under the flowers and cut some swirly leaf flourishes from green card for extra contrast

That's all for this time, I really hope you'll join in this time - I would really love to see how you use digital tools in your crafting!

Wednesday, March 28, 2018

Happy Easter - Spellblogger post for Spellbinders


Hello, Happy Easter! 

For my Spellbloggers post this time I thought I'd share a couple of Spring themed cards.  I added Easter greetings to mine and I hope they will make people smile when they arrive at their destinations
The first card uses just one of the elements from a brand new set in the Die D-Lites range from Spellbinders, its called Lady Bug Garden and I have a feeling this will become a real favourite!


There are several cute shapes in this set, but I used only the little tulip shaped one to make this card - I love tulips, so I sneaked some into the second of my cards too 
I'm saving the other dies in this set for later projects - they are so darned sweet - check them out on the die set pictures and links below.
Info:
I inked up small pieces of white card in good 'tulip' shades to start with, then cut the die first in green for the stems, then in the colours.  Once cut out I added extra ink and layered the heads onto the stems with a tiny piece of chipboard between.
I matted a strip of white card onto a strip of deep pinky-peach card, adhered this across my card blank and arranged my flowers along the strip
For the lettering out came my new favourite alphabet die set (again). The letters of HAPPY were just cut once in the same green card as the flower stems.  
For EASTER I cut three layers in white card and glued them together, then used scraps of the inked card left over from the petals for the upper layer.  The tiny heart was punched from a scrap of inked card too


For my second card i used a die set that I just couldn't resist!  I knew this Some Bunny  set from the My Little Red Wagoncollection by Debi Adams  would come in handy one daywouldn't it make the sweetest  new baby card or a birthday card for a Small Fry! 
 But it's also perfect for this fun little Easter Bunny

Info:
To begin with I taped off the white edge of my card blank and filled in the remaining square with a few shades of blue ink
I coloured some white card scraps with pinks and turquoise to use for tulips, rabbit ears and the bow tie
The tulips are cut using the same die used for card 1.  The tufts of crass were cut using  Flower Field 
For the rabbit I used kraft card, and inked through the holes in the die to add the nose and eyes.  I used a baby-bud to add some pink to his cheeks
The sentiment was pc generated , then printed and matted on green card to fit between his paws 


Here are the details of all the Spellbinders die sets used this time 
Die D-Lites Etched Dies
 Small Die of the Month Club April 2017
card 2
Some Bunny (My Little Red Wagon by Debi Adams) 
Shapeabilities Etched Dies


Flower Field 

Die D-LitesEtched Dies

Platinum Die Cutting and Embossing Machine


I hope you have a lovely, peaceful Easter weekend, wherever you are and whatever you're up to.
That's it for this time. Thank you for visiting, if you click on This Link  you'll find yourself at the Spellbinders store where you will be tempted by lots of lovely dies, stamps and much much more!

Happy Crafting


Monday, March 26, 2018

Hello Spring Gift Bag

Hello!
A lovely new craft box called "Hello Spring" has just gone on sale at Bubbly Funk Through the Letterbox
As well as all the gorgeous, interesting bits and pieces you'd expect now from one of our Craft Boxes, you also get the choice of which stencil will be in your box.  Mine is the lovely flowery one I’ve used on this little gift bag. 
 
  Once I'd cut to size and made the creases that would allow my bag to fold up, I taped my stencil in place and used various yellow, pink and peachy-orange inks in a fairly random way to stencil the lovely flower.
While it was still in its flat, unfolded state I added the inked and glittered chipboard flower and used some of the green spotty ribbon for the stalk and leaves. 
 Then the bag was folded and glued into its finished shape, and holes added for the ribbon closure.
  
from  the "Hello Spring" Through the Letterbox craft box I used:
Green Ribbon
Yellow Ribbon
Flower Stencil
Flower Chipboard shape
From my stash I added; Faux brads, green dewdrops and alphabet die cuts
Bubbly Funk Through the Letterbox  craft boxes cost just £12.50 each and are stuffed with all sorts of different stash to keep you inspired and keep you crafting


That's all for this time. Thanks for popping by


Friday, March 23, 2018

Back to Basics

Hi there!
It's a bright and sunny day here today and I'm sure the weather forecaster on the radio said the words "warm and sunny" - bit of a change from last weekend, then!
I'm still putting up with having limited crafting time, which doesn't go down well, I can assure you.  Hoping things will get properly back to normal soon!
Joanne posted an interesting Back to Basics challenge for the Daring Cardmakers this week.  I thought it might prove really tricky, but in the end it went together fairly easily.

 Joanne here this week and I’d like to take us 
Back to Basics
 Choose one basic geometric shape (square, circle, triangle etc) and one primary colour (red, blue, yellow) and make them the focus of your design. You can add other shapes and colours as accents, just keep the focus on those basics.


Circles are great for making various kinds of flowers. For this flower I inked up some white card with a few shades of lemon and warmer yellow ink, punched 5 quite large circles then used a ball tool to get some shape into them.  Was it cheating to do that bit?
A smaller punched circle was used as a base to overlap the large ones on, then  the flower centres were cut from black card using a couple of different dies
I made the leaves using the same large circle punch.
Keeping to the circles theme I embossed the grey backing panel using a folder called Décor Circles
 At this point I got a bit stuck so left it overnight to have a bit of a think about how to finish it (do you do that?)
Because the flower is large and quite graphic, it needed something along the same simple lines to complete it.  So out came this fabulous alphabet die set from Spellbinders
I cut the letters three times in black card and once in the left over piece of the inked yellow card and glued them all together.
The final thing was to make three faux brads using more of the yellow card, a tiny circle punch and a ball tool for shaping

Materials and Tools
White card blank
Grey Bazzill card embossed with Décor Circles A4 folder (Teresa Collins)
White card inked both sides with various Versamagic inks
Circle Punches (EK Success and Xcut)


That's all for this time - please pop over to The Daring Cardmakers Blog to see all the wonderful Geometric and Primary cards everyone has made - I wonder if you'll take up the challenge this week?

Tuesday, March 20, 2018

The BBQ King - Spellblogger post for Spellbinders


Hello! 
I've a new Spellbloggers project to share this time
It seems to me that there is something in the Die D-Lites range from Spellbinders to suit every need and occasion!  
This time I've used "Weekend Grill" - one of the newer sets to make a card for my cousin, who loves his food!
 
It's such a cute set, especially those little BBQ tools! Perfect for the Man who loves his BBQ, Summer scrapbook pages or Barbecue party invitations!


Info:
White card Blank
Chef's check digital downloadable paper, resized on the pc to make the checks small.
Small pennants cut from the spare checked paper
Black card
Dull Silver and Red card for the die cuts, plus a scrap of yellow for the "Hot Sauce" label

"Happy Birthday" sentiment from another Spellbinders die set (see below)

Here are the details of the Spellbinders die sets used this time  

Weekend Grill 
Die D-Lites Etched Dies 

 Happy Birthday  
Die D-Lites Etched Dies


Platinum Die Cutting and Embossing Machine


Hopefully the weather will soon stop with all this ice and snow and Spring will finally arrive.  Then thoughts will turn to dragging the barbecue out of the shed and dusting it off!  You never know, perhaps Easter will be warm enough for a BBQ.  
Anyway, you really need this die set in your collection so you're all ready!  

That's it for this time. Thank you for visiting, if you click on This Link  you'll find yourself at the Spellbinders store where you will be tempted by lots of lovely dies, stamps and much much more!

Happy Crafting


Sunday, March 18, 2018

Watch the Birdie

Hello
Just a quick catch-up post this time - I wasn't able to post my card for Shabneez's "Watch the Birdie" challenge to The Daring Cardmakers on Friday so here it is now
Happy Friday! 
 It's Shabneez here today
Watch the Birdie!  
 It's my turn to set the Challenge this week and as the title suggests, it's all about birds!  So, I'd love to see you use a bird on your creation.  It can be as a focal point or embellishment, die cut or stamp, so plenty of choices!
I bought this cute little birdhouse die set ages ago, and haven't used it as much as it deserves, so I thought it would be perfect for this challenge

Info
White card blank
Pale blue card for background
White card panel with circle aperture cut with Spellbinders Nesties plain circle die set, then embossed with the Crafters Companion birdhouse embossing folder
I inked small pieces of white Bazzill card with pastel shades for the flowers and bird, and used a scrap of Kraft card to cut the birdhouse
I wrapped some pale green seam binding around the lower edge and tied a double bow
The three tiny flowers are from my stash, the centres for the other flowers are cut from white glitter card using the berries from a Holly die set
Birdhouse, Bird and one of the flowers are from Springtime Die D-Lites  
Other flowers and leaves are from  various
Spellbinders dies including Wreath Elements

There's such a wide range of ideas on the Bird theme this week over on our blog, so please don't forget to head over to see them HERE- and of course it would be even better if you'd join in and share your own Birdie creations!
Happy Crafting

Wednesday, March 14, 2018

Just a Little Treat - Spellblogger post for Spellbinders


Hello! 

I've had this sweet little treat box die from Spellbinders sitting on my desk, waiting to be made use of for a few weeks now.  Finally it's turn is here!

I just love it, so couldn't resist making two versions for my latest
 Spellbloggers project
This adorable little box is abut 13cm long, 4cm wide and just less than 2cm deep - so it's quite dinky and just right for filling with a few chocolate treats!  I put some Mint Crisps in mine
The die set comes from Marisa Job's lovely Thoughtful Expressions
range from Spellbinders

Info:
I used some digital downloadable paper collections to print on both sides of plain white card. For the 'masculine' version I found a wood-grain effect design, and for the girly one some pretty pastels.
The box is cut all in one piece, just fold along the crease lines, add tape of glue to the tabs and it's done!  You get two sentiment 'toppers' in the die set
 "JUST FOR YOU" and "I YOU" 
There are also a cute little flower and a heart shaped die


I used the flower and heart dies to make a pretty decoration for the pastel box.
In both cases I wrapped the ribbon/string around the box before adhering the topper section ion place.  That way the ribbon doesn't obscure the words, and it stays in place when the box is opened.


I think the message toppers would make great sentiments for a card or a tag too - it's always good to get more mileage from your dies, isn't it 😉


I just used one the Spellbinders die set this time 

Just For You Box Thoughtful Expressions by Marisa Job 
Shapeabilities Etched Dies


Platinum Die Cutting and Embossing Machine


That's it for this time,
Thank you for visiting, if you click on This Link  you'll find yourself at the Spellbinders store where you will be tempted by lots of lovely dies, stamps and much much more!

Happy Crafting