This is our 101st post!
Da, da, da, Daaaaaaaaaa!!!!!!
Most people would have made a big thing of the 100th but we like to think that we are a little bit different. (It is not that we failed to notice it, oh dear me no!) So this is a great opportunity to once more thank you for making this such fun! You are all so talented and stretch our dare challenges in all sorts of inspirational ways.
As a reward for all the brain power that went into the Little Extra this week, this is a simple one. From simple Lythan
With a cryptic clue.
Which, as I discovered to my embarrassment, when I laid it on the team, is only really possible to understand if you live in the UK. And even better, are Welsh.
So... a trio of Welsh Barbers means that on your card you need to have 3 die cuts!
( Dai is a common Welsh nickname for David and as there are a lot of Dai's around they are known by their jobs so a Welsh barber would be known as Dai Cuts. I'll get my coat.)
The team roused themselves from their bafflement and came up with these brilliant cards - can't wait to see yours!
Here are Lythan's "simple" rules:
If you don't have access to die cuts in any shape or from, you can still play along. You can then use punches. And if you don't have punches then you can do hand cutting. See how nice I am?
BUT no cheating now! No reaching for the scissors if you have a machine to hand - or even some old die cuts you bought ages ago (that would be me then!) You CAN use punches and scissors etc as well as die cuts though. See, very nice!!Yesterday morning I had no cards ready to show. I had a reject pile instead.
So, I went back to what's been my comfort zone of late and got the flowers out. I've been meaning to open (yes, I know....!) the packet with this cuttlebug set of a simple flower shape in graduating sizes for, oooh about a month now I think.Papers are another comfort zone element - the gorgeous Vintage Brass ones came out yet again.
I built my flowers up using Primas some are the new ones I got yesterday from Artcards (thanks Karen for all the trouble you took sorting out my order) and some from my old favourite Essentials Lucid box, I also covered some of the DCWV Posies flower shapes with some of the VB paper, I've found they are fab for making nice curled petal shapes. I used 3 of the c-bug flower shapes for the centres of my flowers - I stuck the paper on some cereal-packet "chipboard" let it dry then cut through the lot - wow, it's so easy! And, I discovered that the waste also left me with a neat little template so I used those to draw some little flower shapes on the backing paper too.
The tag was cut with the Robo and the flowers in the corner were just handcut from some of the VB paper - so lathough it looks like there are loads of die cuts, there really are only 3
Now that the"Oh no, I've got NO cards for the blog" panic had subsided, I picked up the first effort - my plan had been to use this dare to make a card for Nephew Charlie's birthday but it had very nearly gone in the bin!
But now that the heat was off, suddenly I figured out that adding a bit of green chalk ink to that background paper would help, and how I could make the name tag work (that stripey border made all the difference) - and where to put those 3 QK footballs - and that if I just added a bit more B&W stripey paper at the top and bottom - and then I remembered the footballs ribbon and the gorgeous B&W striped ribbon and well, don't you just love it when out of what seems a disaster comes good?
You can see what the Design Team made of Lythan's cryptic challenge over on the DCM blog, and hopefully there'll soon be lots of 3 Die Cuts cards in our Links List to click on and view. We do love seeing all your cards, and we try to get to visit the blogs of everyone who leaves a message so please join in - it's fun - honestly!

Here's where I share the things I've been making. If you like anything you see, or would like me to make something special for someone special, just ask - use the 'contact me' button in the side bar.
Friday, August 31, 2007
A Trio of Welsh Barbers.....(3 Dai Cuts, geddit?)
It's Friday, it's 10am (in the UK anyway!) and it's time for the Daring Cardmakers latest challenge....


Thursday, August 30, 2007
Just a Quickie
I've been out blackberry picking this afternoon....in my back garden!
Last year we had huge amounts, I put bagfuls in the freezer and gave loads away too. Not so many this year, but they are starting to ripen up nicely and I've already put one pie sized bagful in the freezer. Mind you the weather was a darn sight better last year so I'm not really expecting as big a crop. I might make some muffins tomorrow with the latest bowlful.....
Today I've finally managed to make my card for tomorrow's new DCM dare - it was touch and go for a while as the card I eventually finished was my THIRD effort! Then, all the bits for the first of the rejected ones just fell into place, so now I have two and I'm no longer feeling the panic that was beginning to set in back there.
Anyway, one card to show today, it's another teddy card, this time to say "well done" to Niece Aimee for doing so well in her GCSEs


Tuesday, August 28, 2007
"Take a Letter, Ms Jones...."
Ooooh have we got a Super-sneaky Daring Cardmakers Little Extra for you this week
"Take a Letter, Ms Jones...."
OK, it's not about monograms, we've already done that.
I've done these:
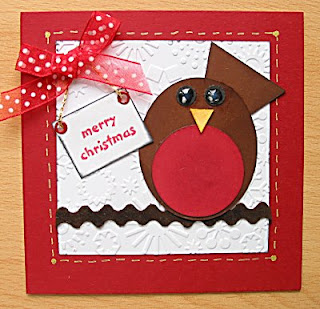 In case it isn't obvious (haha) I chose letter "R" for this one.
So my list is:
Red card, Robin, Ricrac and ribbon, oh and the font is called Ryan BT if I can squeeze that one in under the wire....
EDIT - Thanks to the wonderful Debbie for reminding me that I can add ROBO to my list....
I know it's only a short list, but it's all I could manage!
I used the snowflakes Cuttlebug embossing folder for the background and I made the robin using my Robo.
I am sorry to admit that I have now made TWO Christmas cards, thus going totally against my own rule of not mking the little beggars till after my birthday. I blame all these way-too-organised crafty bloggers for making me do it!
 Another teddy card (thanks again to Jo for coming up with this fabby little fella).
My chosen letter this time is "T"
Teddy, tag, tie, textures flowers and paper tearing
Papers are all sei Hippy Chick
Texture is fmade by the "Spots & Dots" C-bug embossing folder
Now it's over to you - we'd love to see what you can come up with for this challenge, it's a tough one so - Do You Dare?
OK, it's not about monograms, we've already done that
This time the challenge is to pick one letter and see how many things you can use on your card that begin with that letter.
Now then, you can't choose "P" and just have pink paper, pink brads, pink ink, pink ribbon - oh no no no, that's not the way it works!
You could however, use
A pink card blank, paper, petals, plasma, a monogram P, something Purple, a Flower Pot...
Or how about B?
brads, buttons, birthday, banana (well, you never know.. ) blue, black, brown, blooms, buckles, bows
Or S
spots, stripes, string, sandals, Stickles, sunshine, stars, snowI've done these:
 In case it isn't obvious (haha) I chose letter "R" for this one.
So my list is:
Red card, Robin, Ricrac and ribbon, oh and the font is called Ryan BT if I can squeeze that one in under the wire....
EDIT - Thanks to the wonderful Debbie for reminding me that I can add ROBO to my list....
I know it's only a short list, but it's all I could manage!
I used the snowflakes Cuttlebug embossing folder for the background and I made the robin using my Robo.
I am sorry to admit that I have now made TWO Christmas cards, thus going totally against my own rule of not mking the little beggars till after my birthday. I blame all these way-too-organised crafty bloggers for making me do it!
 Another teddy card (thanks again to Jo for coming up with this fabby little fella).
My chosen letter this time is "T"
Teddy, tag, tie, textures flowers and paper tearing
Papers are all sei Hippy Chick
Texture is fmade by the "Spots & Dots" C-bug embossing folder
Now it's over to you - we'd love to see what you can come up with for this challenge, it's a tough one so - Do You Dare?
Sunday, August 26, 2007
More Sneaky Stuff
Shockingly, we've had TWO sunny days in a row!
I should probably be out gardening, but instead I've been crafting. Hubby is ensconced in the Guestroom with lots of paint pots for company. Yesterday he gloss-painted the picture rail and the windowsills. This morning he went to examine his handiwork only to be heard yelling "Right.........now I'm REALLY angry....." he'd discovered the tiny tracks of a spider, then the now dead spider stuck on the windowsill, minus a couple of legs - which had been left further behind in the still damp paint.... not a happy hubby oooops!
And that's why I've been stying right out of the way and only going as far as the door to deliver cups of tea and bottles of water!
I can't share most of the stuff I've been busy with on here, so thought a few more sneak peeks might be in order - just to prove I have been working (a bit, anyway)


Saturday, August 25, 2007
Bank Holiday Inspiration
Well, here in the UK it's Bank Holiday weekend, and hopefully we'll all have some sunshine - and maybe the chance to do some crafting too.
The new "Main" dare for The Daring Cardmakers was announced yesterday - it's nice and easy, all you need to do is add a button or two to your card - any sort of button you like, there's lots of inspiration from the Design Team on the DCM blog, and already loads and loads of Fabulous Darers' cards to see via the Links List.
Remember too that the Little Extra midweek challenge runs right through till Tuesday, so you've still got time to join in with the "dots and dashes" theme there too.
If you're still looking for more then maybe the carrot of a lovely prize will get you crafting?
Well there's a competition running on the Crafty Templates blog!
So what can you win?
How does a pizza box FULL of the new Basic Grey Periphery with buttons and ribbons sound?
PLUS a guest spot for one month on the Crafty Templates DT where you'll receive templates and more goodies to play with? And here's how you enter; Basically all you have to do is make a birthday themed shaped card. You can pick any shape (except a square or rectangle, come on that would be toooo easy!) and it can be as complex or simple as you like.
Check out all the competition information here
Friday, August 24, 2007
On the Button (updated!)
Keryn is our Daring Cardmakers Darer of the week and she said:
There are some gorgeous cards from our fab design team to see on the blog, and we're very happy to have not only the usual NZ, Aussie and UK contingent, but also cards from Germany - from our latest, very talented Guest Designer , Rein, and from Sylvie who's kindly stayed on for another week and adds a French flavour to the blog. Please pop along and see the cards, and visit our personal blogs for more info.
I use buttons quite a lot in my cardmaking so I like to make things a bit harder for myself and think beyond the obvious when this sort of dare comes in.
I had a couple of ideas but somehow managed to leave it till the last minute so idea 2 didn't quite happen as I'd have hoped.
Here's the first card I made
 For my extra complication I decided that my buttons should actually work to open the card. So first I made a card with folds on both sides, the left side is narrowerer than the other and the right side overlaps it a little.
I added the buttons on a seperate narrow piece of card, tied on with various fibres.
Another seperate strip of card hides the tatty ends of the button-loops on the left hand side.
Papers are Chloe's Closet
Ribbon, fibres and buttons from my stash
Lettering is made on the Robo
I think I've managed to get a better pic of how the card works now:

Card 2 - got there eventually!
 My second plan to make life more difficult was to make some buttons from shrink plastic. Not only that, but I decided to see if I could cut them out with the Robo! Well, I was already planning to buy a new blade so thought it was worth a go. It works, you do need to cut through twice, and use the red nobbly thing, and I think that really only simple shapes would cut properly, but how fab to be able to cut flowers, squares and circles without my usual wobbly-scissor technique! I made these buttons from one sheet of plastic, they are all quite big as you can see. I wasn't happy with the colours though and didn't really have time to muck about making more. So I had to go BRIGHT yet again. As usual I cooked my SP in the oven then as I'd been using up some of the frosted SP - I don't like this stuff and won't buy it again, the finish is really quite dull-looking so I added some glittery embossing powder and UTEE and took the heat gun to it - the big round button and the square one next to it on the photo were treated this way, the other square one is the one on the card.
 These papers are from one of the Prima paper packs that I've really struggled with - I think this may be the first card I've managed to make with any of the Prima papers. All the ribbon from Ribbon Oasis, the flowers are from Dunelm Mills and the chipboard one is from Caroline the Chipboard Queen at Bubbly Funk.......
I won't be able to use this card as I was in such a hurry and a tizz trying to get it done that I managed to fold the blank inside out - so my printed details are on the inside.....not only that but I stuck it all on the wrong way round too!
oooops, where's the roll-eyes, I'm a noggin emoticon when you need it?
I know you've all got buttons stashed away somewhere, whether they've been purchased at a cardmaking store or you thriftily snipped them off DH's old shirt. I'd like you to find those buttons and use them somewhere on a card. They can be real buttons, craft shop buttons, die cut buttons, faux buttons or another type of button, surprise us all.
Don’t forget to come back when you've made your card to leave us a comment and your Blog link and we’ll come over to check out your creations. You can still join in the fun if you don’t have a Blog. Just send a pic/scan of your creation to the team at daringcardmakers@hotmail.co.uk and we’ll add it to our gallery for all to see.
Don’t forget to come back when you've made your card to leave us a comment and your Blog link and we’ll come over to check out your creations. You can still join in the fun if you don’t have a Blog. Just send a pic/scan of your creation to the team at daringcardmakers@hotmail.co.uk and we’ll add it to our gallery for all to see.
There are some gorgeous cards from our fab design team to see on the blog, and we're very happy to have not only the usual NZ, Aussie and UK contingent, but also cards from Germany - from our latest, very talented Guest Designer , Rein, and from Sylvie who's kindly stayed on for another week and adds a French flavour to the blog. Please pop along and see the cards, and visit our personal blogs for more info.
I use buttons quite a lot in my cardmaking so I like to make things a bit harder for myself and think beyond the obvious when this sort of dare comes in.
I had a couple of ideas but somehow managed to leave it till the last minute so idea 2 didn't quite happen as I'd have hoped.
Here's the first card I made
 For my extra complication I decided that my buttons should actually work to open the card. So first I made a card with folds on both sides, the left side is narrowerer than the other and the right side overlaps it a little.
I added the buttons on a seperate narrow piece of card, tied on with various fibres.
Another seperate strip of card hides the tatty ends of the button-loops on the left hand side.
Papers are Chloe's Closet
Ribbon, fibres and buttons from my stash
Lettering is made on the Robo
I think I've managed to get a better pic of how the card works now:

Card 2 - got there eventually!
 My second plan to make life more difficult was to make some buttons from shrink plastic. Not only that, but I decided to see if I could cut them out with the Robo! Well, I was already planning to buy a new blade so thought it was worth a go. It works, you do need to cut through twice, and use the red nobbly thing, and I think that really only simple shapes would cut properly, but how fab to be able to cut flowers, squares and circles without my usual wobbly-scissor technique! I made these buttons from one sheet of plastic, they are all quite big as you can see. I wasn't happy with the colours though and didn't really have time to muck about making more. So I had to go BRIGHT yet again. As usual I cooked my SP in the oven then as I'd been using up some of the frosted SP - I don't like this stuff and won't buy it again, the finish is really quite dull-looking so I added some glittery embossing powder and UTEE and took the heat gun to it - the big round button and the square one next to it on the photo were treated this way, the other square one is the one on the card.
 These papers are from one of the Prima paper packs that I've really struggled with - I think this may be the first card I've managed to make with any of the Prima papers. All the ribbon from Ribbon Oasis, the flowers are from Dunelm Mills and the chipboard one is from Caroline the Chipboard Queen at Bubbly Funk.......
I won't be able to use this card as I was in such a hurry and a tizz trying to get it done that I managed to fold the blank inside out - so my printed details are on the inside.....not only that but I stuck it all on the wrong way round too!
oooops, where's the roll-eyes, I'm a noggin emoticon when you need it?
Thursday, August 23, 2007
Look what I've got!

How exciting is this then?
I've been asked by the amazingly talented Leo to join her design team on Crafty Templates and I'm pretty excited too! I've been looking at the work these girls have been doing though, and I'm just a tad scared - they are FAB! Check out the link and you'll see what I mean.
These shaped cards are so different and such fun and guess what? I've never made anything "shaped" before - so really it's a wonder Leo asked me! Ah well, nothing ventured, nothing gained and she can always kick me off again if I'm rubbish!
What it will be is a new challenge, which is always good - and it's big-time exciting too, I'm excited and apprehensive at the same time. keep your fingers crossed for me please!
I can't believe just how much has happened in the months since Jane came up with The Daring Cardmakers idea, it's been an amazing journey. It's not just me, it's all the girls, we are all having such a blast with our cardmaking and papercrafts in all sorts of ways - long may it continue, I reckom!
Thanks Jane (yet again) for starting this ball a-rolling
Right, now I've got to get back to cooking some stuff for tomorrow's dare...............
Wednesday, August 22, 2007
I'm Blue, but I knew I would be
I knew I'd turn out to be a "blue" person even before I took the test!
Have a go and let me know what your colour is
Have a go and let me know what your colour is
| What color is your soul painted? Blue Your soul is painted the color blue, which embodies the characteristics of peace, patience, understanding, health, tranquility, protection, spiritual awareness, unity, harmony, calmness, coolness, confidence, dependability, loyalty, idealism, tackiness, and wisdom. Blue is the color of the element Water, and is symbolic of the ocean, sleep, twilight, and the sky. |
 Quizzes and Personality Tests |

Dotty and dashed DCM Little Extra, and an SA Kit record
First up is a card made for the young son of a friend, I managed to make it fit the DCM Little Extra announced yesterday:
 The papers are perfect "boy" ones, I think - they're from Junkitz and came from one of the lovely Bubbly Funk Kits - ok so I know Di spends hours designing the most wonderful projects to make with the kits, but I'm just SUCH a rebel, and if the paper fits, well.....
Letters, number and little dots were cut with the Robo - I cut the letters in a few layers of plain card, plus a top one of patterned paper and stuck them all together - a bit of a faff tbh - there must be an easier way. The letters and tiny dots were all given the Glossy Accent treatment. The ricrac I bought as my donation to a forum swap - I bought way too much and whilst it looked funky in the shop by the time I got it home I thought it looked revolting but you see, even this came in useful eventually - give it time and all your stash will come into it's own. Well maybe not those peeloffs..... This card is for niece - Emily, would you believe?
Now here's the really really amazing thing - I made this using the August SA Kit which arrived YESTERDAY - I don't think I've ever managed to make anything using bits from a kit so promptly - proud of myself? You betcha!
paper is KI Memories
Flower is made up of two felt ones and a paper one - added a bit of silver glitter glue to the back felt one - well a 9 year old girl can't have enough glittery stuff, can she?
Letters QK Olivia alpha in different coloured glitter card
big buton and tiny buttons from the stash, along with the various ribbons and brads
Had to wait till the glitter glue and Perfect Pearls dried so I could wrap this up in her parcel to take ot the post. By which time the heavens had opened and I got absolutely drenched.
Did wonders for my cold, I'm sure! Went to the chemist and bought more lemsips to nurse it with, then when I got home I made a coffee and a lemsip - only I put the milk in the lemsip instead of the coffee, yeeeeuuuuuuuucccchhhhh I told you I wasn't well, didn't I?
Dot Dot Dot Dash Dash Dash
We'd like you to make a card featuring dots and dashes, spots and stripes - that's it, a nice easy and fun little theme for you to play with - just make sure you get both spots AND stripes on your card.
 The papers are perfect "boy" ones, I think - they're from Junkitz and came from one of the lovely Bubbly Funk Kits - ok so I know Di spends hours designing the most wonderful projects to make with the kits, but I'm just SUCH a rebel, and if the paper fits, well.....
Letters, number and little dots were cut with the Robo - I cut the letters in a few layers of plain card, plus a top one of patterned paper and stuck them all together - a bit of a faff tbh - there must be an easier way. The letters and tiny dots were all given the Glossy Accent treatment. The ricrac I bought as my donation to a forum swap - I bought way too much and whilst it looked funky in the shop by the time I got it home I thought it looked revolting but you see, even this came in useful eventually - give it time and all your stash will come into it's own. Well maybe not those peeloffs.....
 This card is for niece - Emily, would you believe?
Now here's the really really amazing thing - I made this using the August SA Kit which arrived YESTERDAY - I don't think I've ever managed to make anything using bits from a kit so promptly - proud of myself? You betcha!
paper is KI Memories
Flower is made up of two felt ones and a paper one - added a bit of silver glitter glue to the back felt one - well a 9 year old girl can't have enough glittery stuff, can she?
Letters QK Olivia alpha in different coloured glitter card
big buton and tiny buttons from the stash, along with the various ribbons and brads
Had to wait till the glitter glue and Perfect Pearls dried so I could wrap this up in her parcel to take ot the post. By which time the heavens had opened and I got absolutely drenched.
Did wonders for my cold, I'm sure! Went to the chemist and bought more lemsips to nurse it with, then when I got home I made a coffee and a lemsip - only I put the milk in the lemsip instead of the coffee, yeeeeuuuuuuuucccchhhhh I told you I wasn't well, didn't I?
Tuesday, August 21, 2007
All Floral
Remember the sneak peeks from last week? Well, a few weeks ago, Caroline of Bubbly Funk fame asked me if I'd be interested in doing a Guest Designer spot for the shop, specifically on the flowers I've been making recently for my cards. I was so thrilled - and even more excited when the "few bits to play with" she promised to send turned out to be a pizza box full of deliciousness! There was paper, card, ribbon, little embellishments and of course some flowers - chipboard in every size, felt, cork, card,....all sorts of lovely stuff. And not only that, but Caroline gave me free rein to use my own stash too. I've had a whale of a time playing with it all and I've done three projects for the shop - I would have done more but time beat me - and I felt dismally to come up with any bright ideas for the cork flowers - but I can't give in so I'm still working on it..... Anyway, the flower projects are now up in the BF shop so I can post some proper photos of the cards I made with them.  The one above is made with those fab "Silver Lining" papers from We Are Memory Keepers, a chipboard flower and one form the DCWV Paper Posies bubble pack. The second one is sei paper, a chipboard flower covered with UTEE, paper flowe and felt flower
  The third flower I made is this one:
  I've not actually used this one on a card yet - in fact I can't even find it, must be buried somewhere - probably under a pile of stuff (Kathy blushes)
I've made a couple of cards using the same method - one even made it to the Basic Grey Gallery which was very exciting! The other was this tiny version made for a certain Wedding card...


Thanks Caroline for giving me such a great topic to work on and for letting me play with flowers to my heart's content - I had such a great time!
I know there are a few of the sneakies still unaccounted for but I can't show those ones yet.
 The one above is made with those fab "Silver Lining" papers from We Are Memory Keepers, a chipboard flower and one form the DCWV Paper Posies bubble pack. The second one is sei paper, a chipboard flower covered with UTEE, paper flowe and felt flower
  The third flower I made is this one:
  I've not actually used this one on a card yet - in fact I can't even find it, must be buried somewhere - probably under a pile of stuff (Kathy blushes)
I've made a couple of cards using the same method - one even made it to the Basic Grey Gallery which was very exciting! The other was this tiny version made for a certain Wedding card...


Thanks Caroline for giving me such a great topic to work on and for letting me play with flowers to my heart's content - I had such a great time!
I know there are a few of the sneakies still unaccounted for but I can't show those ones yet.
Friday, August 17, 2007
Cheap Frills
Tomorrow is a very special day for Daring Cardmaker Rhi, it's the day when she and Matt will be getting married. For weeks now the Team have followed their wedding plans, looked at photos of the Church, discussed the colour scheme and oohed and aaahed over Rhi's beautiful Wedding Dress, now the big day is almost here and I'd like to send my very best wishes to Rhi and Matt - may the sun shine brightly for you tomorrow, and may your life together be filled with joy and happiness xxxx
It's Friday and you know what that means..... It's Daring Cardmakers day again, and this week it's the wonderful, fabulously talented Jo's turn to set the dare and she wants us to show our frillies!
Here's my frilly number:
 The papers are all from the lovely, bright and fun "Silver Lining" set from We Are Memory Keepers.
 I cut the scallops with the Robo using a little template Hubby helped me make last weekend.
The frilly panel was made by overlapping them and only sticking down the straight edges, then curling up the scallops to give a frilled look.
The flowers and leaves were cut from the same set of papers and mounted on the plain yellow panel with £D foam, I cut a few extra flowers with the cuttlebug.
Letters are also cut with the Robo.
Other bits used: Stickles Glitter Glue, Glitter dots, tiny paper flowers (from the SA Kit scraps and bits shop)
And wow I've just realised - NO brads OR ribbon on this one - now that's a rarity!!!
And another:
 The frilly bit is just some lace gathered into a rosette and used as the cetnre for a chipboard flower. The paper is from a recent SA Kit, all the other card,flowers, brads etc are from my stash/
I cut the little plaque with the Robo. For all it's much simpler than the first card it took a lot longer to make as I just couldn't figure out what to do with the flower onces I'd made it! Strange how that happens isn't it?
It's Friday and you know what that means..... It's Daring Cardmakers day again, and this week it's the wonderful, fabulously talented Jo's turn to set the dare and she wants us to show our frillies!
"Hi all *waves* It's my turn (Jo) to dare this week.
You must make a card with a frill - it could be some lace, frilly ribbon, a hand cut or decorative scissor edge or a folded paper frill - or what ever you choose to make.... you decide!"
Anyone and everyone is welcome to join in with our dares, just leave a comment and your link on the DCM blog and we’ll come over to check out your creations. You can still join in the fun if you don’t have a Blog. Just send a pic/scan of your creation to the team at daringcardmakers@hotmail.co.uk and we’ll add it to our gallery for all to see.You must make a card with a frill - it could be some lace, frilly ribbon, a hand cut or decorative scissor edge or a folded paper frill - or what ever you choose to make.... you decide!"
Here's my frilly number:
 The papers are all from the lovely, bright and fun "Silver Lining" set from We Are Memory Keepers.
 I cut the scallops with the Robo using a little template Hubby helped me make last weekend.
The frilly panel was made by overlapping them and only sticking down the straight edges, then curling up the scallops to give a frilled look.
The flowers and leaves were cut from the same set of papers and mounted on the plain yellow panel with £D foam, I cut a few extra flowers with the cuttlebug.
Letters are also cut with the Robo.
Other bits used: Stickles Glitter Glue, Glitter dots, tiny paper flowers (from the SA Kit scraps and bits shop)
And wow I've just realised - NO brads OR ribbon on this one - now that's a rarity!!!
And another:
 The frilly bit is just some lace gathered into a rosette and used as the cetnre for a chipboard flower. The paper is from a recent SA Kit, all the other card,flowers, brads etc are from my stash/
I cut the little plaque with the Robo. For all it's much simpler than the first card it took a lot longer to make as I just couldn't figure out what to do with the flower onces I'd made it! Strange how that happens isn't it?
Thursday, August 16, 2007
Some Sneak Peeks
Well, I've had a busy couple of weeks, but not had much to show on my poor old blog for all my efforts - so I thought I'd take up Lynne's suggestion and put some sneak peeks on here.
So here you go.
Hopefully I can share the whole pictures soon too


So here you go.
Hopefully I can share the whole pictures soon too


Tuesday, August 14, 2007
Wibbly Wobbly
Ooooh Two posts in one day, usually I'm doing well if I make two posts in one week!
I've actually managed the Little Extra for the Daring Cardmakers this week. In fact I've done TWO cards.
The challenge this week is to use this wibbly wobbly wavy sketch
 Here are my cards.

card 1: papers from a little B&W pad from pda, flowers, brads and ribbon from stash

card 2: paper sei "doodley doo", felt flower, felt scraps, braid, brads and buttons from stash
I wanted to make the lettering fit the waves but should have planned ahead and done that first rather than left it till the end. Never was any good at forward planning.....
More cards to see on the blog, and we'd love to see what you can do with this sketch
I've actually managed the Little Extra for the Daring Cardmakers this week. In fact I've done TWO cards.
The challenge this week is to use this wibbly wobbly wavy sketch
 Here are my cards.
card 1: papers from a little B&W pad from pda, flowers, brads and ribbon from stash

card 2: paper sei "doodley doo", felt flower, felt scraps, braid, brads and buttons from stash
I wanted to make the lettering fit the waves but should have planned ahead and done that first rather than left it till the end. Never was any good at forward planning.....
More cards to see on the blog, and we'd love to see what you can do with this sketch
Breaking news
We got our planning permission!
wwowoohooyeah!
We had to change the plans and do without the extra small rooflight we wanted because the heritage people were being really ultra tedious but they are graciously allowing us to move the existing ones to more suitable places....
It's maddening really because you can hardly wee these windows at all, yet take a walk around the neighbourhood and there are many many greater and much more obvious floutings of the rules about what's allowed in the conservation area - honestly, I feel like going out, taking photos and sending a dossier!
We rang the local council and they said "go ahead you don't need to apply for extra planning permission from us for what you want to do" But because we wanted to do it "right" we contacted the heritage people to check, of course they needed detailed plans etc.
Crazy thing is, we could actully have just gone and done the work, apart from the windows all the work is internal so there's have been nothing "new" showing up as being done without permission even when we sold the house.
Sometimes trying to do things right isn't such a good idea. We should have just kept our mouths shut and got on with it. grrrr
Anyway, at least we can get on now and I'm even looking forward to the chaos, because after that there'll be 2 lovely new bathrooms.
Bye bye manky, green, chipped and broken tiles, bye bye stained carpets, split bath panel, nasty fake "old" taps that only provide a dribble of water, bye bye grotty shower with door that doesn't fit properly, bye bye loo that wobbles (yes really), and bye bye widescreen mirror to look at yourself in when you're sat on the loo - such a nice finishing touch, maybe we'll keep it.....NOT!
Monday, August 13, 2007
Paisley and Planting
A nice quiet weekend for us, good weather too, that must be two weekends running.....
Hubby is still sorting out his new pc getting all his stuff installed on it. These things seem to take a long time.
I dsicovered that not only can you pay for and print postage labels off for UK mail via the Royal Mail website, but you can also do the same for overseas mail too - and do the customs decalration stuff aswell. So yesterday morning I packed up and weighed Gillian's copy of Papercraft Inspirations magazine (the one with the Daring Cardmakers in) and took it up to the postbox in time for the Sunday lunchime collection so, Gill, it's on it's way and should be in Australia in a few days time :-)
In the afternoon I went out into the garden to do a bit of digging/weeding - it's incredible how hard and dry the ground is - you'd think after all the rain we've had it would still be easy to dig - well it's not! On the spur of the moment we jumped into the car and popped over to one of the garden centres in the next town from us. On the way there it started to rain. In fact it threw down on us - the sort of rain that requires full-speed windsreen-wiper action. Looking for shrubby plants in the pouring rain isn't much fun! Still, we managed to spend the vouchers we got for Christmas and kept forgetting we had, so that was a result.
Strangely though, driving back to our own town we realised the ground was completely dry - not a sign of rain at all, so I was good for a change and went straight out to plant the new plants. It's part of my campaign to plant so much "proper" stuff that there's no room left for the weeds and ivy that threaten to take over the whole garden. I wonder if it'll work?
I've done quite a bit of crafting over the last few days. I'll try to do some sneak peeks of some of it to put on here (good idea Lynne!), but here are a couple of cards I made with my newly acquired Cuttlebug Paisley die.
 I've used the July SA Kit, for both cards (it was nearest....).
Card 1:
I added a bit of lilac and stayed away from the yellow in the kit
Also used Stickles glitter glue and Perfect Pearls
matching gems and brads
 Card 2:
I used some bits of the yellow from the kit this time and cut the frill and greeting on my Robo, otherwise pretty similar ingredients.
This one started out quite differently - but it was such a disaster that drastic measures had to be taken. Some of it I quite like, but some I'm not happy with.
Nice die though - it's a bit fiddly but worth having in the box!
Hubby is still sorting out his new pc getting all his stuff installed on it. These things seem to take a long time.
I dsicovered that not only can you pay for and print postage labels off for UK mail via the Royal Mail website, but you can also do the same for overseas mail too - and do the customs decalration stuff aswell. So yesterday morning I packed up and weighed Gillian's copy of Papercraft Inspirations magazine (the one with the Daring Cardmakers in) and took it up to the postbox in time for the Sunday lunchime collection so, Gill, it's on it's way and should be in Australia in a few days time :-)
In the afternoon I went out into the garden to do a bit of digging/weeding - it's incredible how hard and dry the ground is - you'd think after all the rain we've had it would still be easy to dig - well it's not! On the spur of the moment we jumped into the car and popped over to one of the garden centres in the next town from us. On the way there it started to rain. In fact it threw down on us - the sort of rain that requires full-speed windsreen-wiper action. Looking for shrubby plants in the pouring rain isn't much fun! Still, we managed to spend the vouchers we got for Christmas and kept forgetting we had, so that was a result.
Strangely though, driving back to our own town we realised the ground was completely dry - not a sign of rain at all, so I was good for a change and went straight out to plant the new plants. It's part of my campaign to plant so much "proper" stuff that there's no room left for the weeds and ivy that threaten to take over the whole garden. I wonder if it'll work?
I've done quite a bit of crafting over the last few days. I'll try to do some sneak peeks of some of it to put on here (good idea Lynne!), but here are a couple of cards I made with my newly acquired Cuttlebug Paisley die.
 I've used the July SA Kit, for both cards (it was nearest....).
 Card 1:
I added a bit of lilac and stayed away from the yellow in the kit
Also used Stickles glitter glue and Perfect Pearls
matching gems and brads
 Card 2:
I used some bits of the yellow from the kit this time and cut the frill and greeting on my Robo, otherwise pretty similar ingredients.
This one started out quite differently - but it was such a disaster that drastic measures had to be taken. Some of it I quite like, but some I'm not happy with.
Nice die though - it's a bit fiddly but worth having in the box!
Friday, August 10, 2007
Photo Finish
Sometimes things don't go according to plan, and this week's Daring Cardmakers Dare from Tracie caused me a few headaches - not because of the dare itself, which I loved the look of when it was announced - but because I needed to have the printer working properly to do it., didn't I? And it was playing Silly Beggars, wasn't it? Tracie set us this fab dare:  Black and silver card both from pda White card embossed with the Cuttlebug embossing folder Silver brads from stash Photo sticker by Pebbles Inc. from Crafts U Love Spotty ribbon from Ribbon Oasis Yesterday, with printer working properly and the relief of having a card ready to show today I decided to have another go and this time I've raided my treasured box of old family photos to make this wedding card.
  Brown card blank from pda
Gorgeous paper is one of the Carrinna Rose set from Dream Street Papers
I used one of the papers from the BG Pheobe pad to make the flower
Naked Chipboard corner from an old SA Kit, covered with more paper & inked up
Lace, ribbon and brads are from stash
The DCM blog has all the DT's wonderful Photo Finish cards, and you can also meet our fabulous new Guest Designer, the French papercrafts whizz; Sylvie (aka crazystamps). From there you can also find links to all the team's personal blogs.
I spent a lovely couple of hours with Bex yesterday - it was really good to catch up and have the chance to indulge in a bit of stash-chat with someone who understands these things! What with meeting Lyth, Sue and Anita last week too, I could start to get used to these crafty get-togethers!
Photo Finish
This week I want you to make a card for any occasion but it must include a photograph somewhere! The photo subject can be people, items, locations, flowers, absolutely anything so get snapping. Dont forget to check copyright if you are using someone else's photographs in your art work
As usual you can share your work with us by leaving a comment on the DCM blog with a link to your own, or by emailing your photo to us at daringcardmakers@hotmail.co.uk
Have Fun!!!
I've waffled on before about some changes Hubby's made to our computer set up so I suppose I shouldn't have been surprised when I went to print off the photo I wanted to use only to find the printer wouldn't work - not a good start! This was sosrted out and next day the printer worked fine - to start with. But my first attempt at a card didn;t work at all fine and when I went to print off another photo to try again, well, the printer wouldn't work, again! Apparently it's been set to go into snooze mode when it's not being used, but it must have fallen into deep sleep because it wouldn't wake up however much I dug my elbows into it! Plan B I remembered some photo stickers I bought from Crafts U Love, conveniently using the same sort of B&W images on a baby theme that I wanted to do with one of our own photos. I couldn't find them - I knew where they'd been up till last week when I TIDIED up a box with baby themed stuff in it, but now..... I did find them at last, and got this card made:  Black and silver card both from pda White card embossed with the Cuttlebug embossing folder Silver brads from stash Photo sticker by Pebbles Inc. from Crafts U Love Spotty ribbon from Ribbon Oasis Yesterday, with printer working properly and the relief of having a card ready to show today I decided to have another go and this time I've raided my treasured box of old family photos to make this wedding card.
  Brown card blank from pda
 Gorgeous paper is one of the Carrinna Rose set from Dream Street Papers
I used one of the papers from the BG Pheobe pad to make the flower
Naked Chipboard corner from an old SA Kit, covered with more paper & inked up
Lace, ribbon and brads are from stash
The DCM blog has all the DT's wonderful Photo Finish cards, and you can also meet our fabulous new Guest Designer, the French papercrafts whizz; Sylvie (aka crazystamps). From there you can also find links to all the team's personal blogs.
I spent a lovely couple of hours with Bex yesterday - it was really good to catch up and have the chance to indulge in a bit of stash-chat with someone who understands these things! What with meeting Lyth, Sue and Anita last week too, I could start to get used to these crafty get-togethers!
Wednesday, August 08, 2007
Not much to show for it
Here's a card I made last week and saved as it didn't "fit" with the teddy cards or the Cuttlebug ones. It may look simple but remind me not to try and cut that particular font in such a small size on the Robo again, will you? It took AGES to stick all those teeny bits down!
 It's not that I haven't been busy making stuff, and preparing crafty bits and bobs - it's just that I can't show any of it yet! Doesn't seem fair really - I look around all the blogs and everyone has loads of gorgeous things to show and here I am working really hard (honest!) but I've nothing to share yet....ah well, I guess that's just the way it goes sometimes!
So I thought I'd tell you that the postie came yesterday with a nice big stack of new cuttlebug embossing folders, and the paisley cutting die all the way from the US of A. Not that I've had a chance to actually open any of them yet....
Which reminds me, I've not been and done my ebay feedback wotsit yet.
Friday, August 03, 2007
It that TIME again.....
Last month the DCM had their very first mention in a UK magazine when Papercrafts Inspirations put a little piece about the blog in their "What's New" pages. We thought that was exciting enough, but then we were contacted by Helen to say they wanted to do a bigger article about the blog in the following issue. Well, that issue is out today, so as soon as I'm done here I'll be off to WH Smiths to buy my copy! We've already seen it because subscribers already have their copies and Ellen, a forum friend who subs to it kindly sent a scan.
Excited? Us?
Well if you see someone ripping open one of those irritating plastic bags they insist on putting magazines in over here and madly thumbing through the pages, till they find the one that makes them grin like the Cheshire Cat - then it's probably a Daring Cardmaker, or maybe even someone who knows one! Copies of the magazine will soon be winging their way over to NZ and Australia for Jane, Keryn and Gillian too
But, getting back to what it's all about, and it was my turn to come up with the Dare this week.
It's a funny thing but we all agree - the dares we set ourselves are the hardest to actually come up with an idea for! Now that sounds mad, surely we've all got something in mind when we announce our dare? Seems not. It looks as though we all come up with a Dare Idea first and then struggle to think of something we can do for it - so if you ever think that the person setting the dare each week has an aadvantage - well think again!
Here's mine
 I don'toften do kids cards - I'm useless at them, they tend to look as though a 4 year old made them. But although I played with loads of time themed quoates trying to work one into an idea for a card nothing really worked so I went with the nursery rhyme;
Excited? Us?
Well if you see someone ripping open one of those irritating plastic bags they insist on putting magazines in over here and madly thumbing through the pages, till they find the one that makes them grin like the Cheshire Cat - then it's probably a Daring Cardmaker, or maybe even someone who knows one! Copies of the magazine will soon be winging their way over to NZ and Australia for Jane, Keryn and Gillian too
But, getting back to what it's all about, and it was my turn to come up with the Dare this week.
It's a funny thing but we all agree - the dares we set ourselves are the hardest to actually come up with an idea for! Now that sounds mad, surely we've all got something in mind when we announce our dare? Seems not. It looks as though we all come up with a Dare Idea first and then struggle to think of something we can do for it - so if you ever think that the person setting the dare each week has an aadvantage - well think again!
Here's mine
OK, Absolutely anything goes this week as long as it's on the theme of TIME. "It's About Time" So you can use clocks, calendars, quotes, sayings, pictures, nursery rhymes, or altered art-type stuff, whatever takes your fancy - just take some time out to play and have some fun; remember, time flies when you're having fun!
 I don'toften do kids cards - I'm useless at them, they tend to look as though a 4 year old made them. But although I played with loads of time themed quoates trying to work one into an idea for a card nothing really worked so I went with the nursery rhyme;
Hickory Dickory Dock
The mouse ran up the clock
The clock struck 1
The mouse ran down
Hickory Dickory Dock
Tick Tock Tick Tock
The mouse ran up the clock
The clock struck 1
The mouse ran down
Hickory Dickory Dock
Tick Tock Tick Tock
I actually (TaDahhhh) made the template for the clock myself - I used some basic shapes in Paint Shop Pro, then loaded it into the Robo, took a deep breath, crossed my fingers and pressed "cut"...and it actually worked! I used plenty of different shades of brown chalk inks to colour it in.
I knew I was going to struggle to make a decent clock face, but then thought of doing a google image search which came up with the perfect thing - I printed it off and did a bit of doodling in gold ink to make it look a bit more ornate on the white bits.
*Papers are from the scrummy Cosmo Cricket Storybook pack
*The mouse is a tiny, slightly altered version of the Circles Bear in my last message, with bits of string for his whiskers and tail
*For the pointers and the pendulum; scraps of gold card, gold brads and a flat backed gem coloured with gold Krylon pen
*The wording was done in the "Greeting Card Factory" software so that I could get a good jumble of letters, sizes and colours, and be able to jiggle them around a bit. I thought about Glossy Accent-ing them a bit, but was too scared I'd muck it all up so didn't!
For once I'm fairly happy with a kids card - an acheivement, I can tell you!
Please check the DCM blog to see all the other cards we've made this week, and then you can find more info about them all over on our personal blogs.
Now it's over to you - we'd love to see your take on the theme, so please leave a link when you're ready to share so we can come and look. What with the wonderful and ever-growing response to the dares it's not so easy for us all to leave a comment on every single blog any more, but we do all pop along to see all of your cards and we'll make sure some of us leave a message on each one.
What with Brides to Be, Expectant Mums, Families being nurtured, Summer Holidays, other crafting commitments and just Life in general all getting in the way it's all gone crazy-mad-hectic so we just hope you'll understand!
Anyway, all our Darers are members of Team DCM and everyone who joins in will find themselves part of such a supportive group, that you'll always get loads of visitors and messages whenever you play along with the DCM.
Right, TIME to GO......
Thursday, August 02, 2007
Sorry, Bears and Cuttlebug....
 An elderly relative of mine died recently, she was such a fighter and the words "We don't think she'll get through this" had been said on more than one occasion - she grew more frail each time, but did prove them wrong, until this last time - you've got to admire someone who fights as hard as she did.
Anyway this is the card I made to send to her daughters, it fit's the "I'm sorry" theme for this weeks midweek challenge, so I decided to share it. Sympathy cards are never easy are they?
On to happier things.
I saw the first cards featuring cute bears made from circles of paper absolutely ages ago - it was the very talented Jo who introduced them (to me anyway,) and obviously they went down very well because there are versions of the idea all over the place now.
Until I got my Robo I'd never had a try - I just never seemed to have the right sized punches for the job - but Robo can cut circles any size I tell it woohoo!
So here' are my first cards made with the circles-teddies, I'm really chuffed with them and I hope other people think they're cute too.

 I'm busy trying to replenish and update the box of cards that Hubby keeps at work, so have made a few cards with Cuttlebug embossing folders. Not the best cards I've ever made, but hopefully a bit of practise will bring some better ideas for using these folders.


Subscribe to:
Posts (Atom)