Monday, March 28, 2011

The Story so Far...

No, not another card for the current Daring Cardmakers challenge, this is an update on how our study renovations are going.
We're nearly there now - well, we're nearer to the time when we can start moving our stuff back in, anyway! Click HERE and HERE for other chapters in the saga!
Last Monday the guy came to alter and re-fit the carpet, then on Saturday morning a big yellow van arrived at the house!  Thank goodness we went for the delivery option is all I can say as it meant the delivery people carried all this lot upstairs and into the study, not me!
8.30 Saturday morning
Lunchtime, Saturday (the desk and shelves are in the wrong corner though)
Saturday evening - wow, didn't we do well?
Sunday lunchtime
Sunday evening

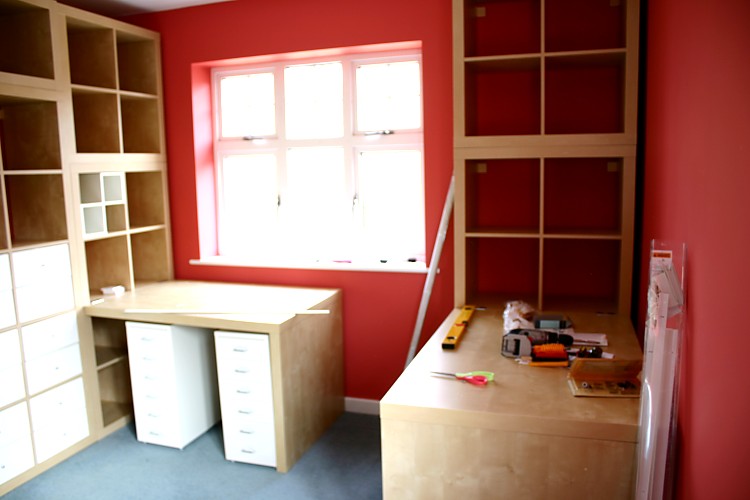
There's still a bit left to do.  The unit on the last photo needs attaching to the wall, the blinds need to be fitted and we need to move hubby's next back into the room.  We're not actually fixing the cupboard/shelf/drawer inserts into the units until I've had time to "live" with them and see where I really want them put, but as you can see it's all coming together at last.  I need to buy some nice baskets etc to put in the cubes too and decide which crafty things will be going where.
Hope you had fun sneaking a peek around the new-look room ;-)
Thanks for visiting

Friday, March 25, 2011

The Book Club

Gosh what a bad blogger I've been this week.  It's hard getting back into the routine after having time away, isn't it?  Well, that'll have to do as my excuse, anyway! The only thing I've managed to make all week is my card for today's Daring Cardmakers - and as it's my turn to set the dare it would be a pretty bad show if I hadn't, really.
The Book Club
I'd like you to take your inspiration from Books. You can do this any way you wish. You could make a card in the form of a book, make a background using a page (or scanned page) from a book, use an excerpt from a book on your card as a background or focal piece, or use an actual story/title/book to inspire your card. Don't forget to let us know which book you have taken your inspiration from if you choose to use a specific one.

I have a really bad habit of thinking up what sounds like a good title or subject for a dare without actually giving the tiniest consideration to how I can actually make the card to go with it.  We have a calendar for adding our ideas to - (because if we didn't put them down we'd all have forgotten them by the time our turn came round!) and this one has been written down for a while, and lurking there in the back of my mind without any real plan coming together.  Various favourite books popped up in my head; I really quite liked the idea of doing something romantic and vintage for Pride and Prejudice, but in the end it was good old Winnie-the-Pooh who won the day - the proper AA Milne version with the wonderful EH Shepard drawings which I adore.  I really can't be doing with the Disney travesty!
I just love all the Pooh stories, but chose one of my favourite EH Shepard illustrations as the starting point for this card
 Pooh is trying to steal honey from a bee's nest up in the tree.  He decides to use a balloon to float up into the branches - a blue one to match the sky.  Realising that they would notice a little brown bear on the end of the string he first rolls around in the mud in an attempt to disguise himself as a little black cloud.  Up he goes, calling down to Christopher Robin who's watching from the ground.  I don't think either CR or the bees were very impressed, but I still think it was a pretty good plan, really hehehe

I used:
Broken China Distress Ink for the background and the Balloon,
Balloon and Winnie-the-Pooh are cut with my Craft Robo 
Bazzill card, Ink pads (charcoal, dark blue), Bees cut from some Nikki Sivils paper (left over from a sponsored dare we did for them last year),  White gel pen, Glossy Accents, Bakers Twine (Creative Treasures, Black Enamel Accents, lots of chipboard scraps for adding dimension

It's a pretty simple card, but I was trying to keep faith with the lovely simplicity of EH Shepard's drawings.  I'll save this one to send to my cousin's wife on her birthday as she's a fellow Winnie-the-Pooh fan.

I hope you'll pop over to the DCM BLOG and see what my talented Teamies have come up with this week - and I hope you'll join in with us too.
Right, now I have to go and get my washing hung out to dry, and then, with a bit of luck I might actually get crafty!
Thanks for looking

Saturday, March 19, 2011

It Don't mean a Thing ....

If It Ain't Got That Zing!
The new Get Funky! Funky 15th challenge started on March 15th and this time it's Lou setting the challenge for the Funky Hand Gang, and hopefully for lots of Get Funky "Challengees" too!  It's all about cards and other projects with Spring Zing this month and you can see a new project on the Get Funky! blog every couple of days.  To join in you just need to follow Lou's instructions and make sure you use at least one Funky Hand product on your project - each month there's a prize on offer, and there's also a freebie download available to go with whatever the month's challenge is.
Today it's my turn to share what I've been making
I used this month's Funky Freebie, printed in three sizes for the flower, and the papers and dotty card template are from the Craft the Year Away CD
You can read how I made this card HERE
I'm very chuffed that Fabrizio has featured this card on his Papermood site today
We're now home after a few days in Derbyshire.  We were staying at another of the fab English Heritage holiday lets, this time it was East Lodge at Hardwick Old Hall.  A wonderful place to stay and a great area for touring with lovely scenery and fantastic places to visit (well, those that were open this early in the season)  One fly in the ointment was that one of the places high on my wish-to-see list, Chatsworth House was absolutely covered in scaffolding, so we didn't bother to go any nearer than the road through the park.  No doubt I'll bore you with some photos in due course....you have been warned!
Another fly in the ointment is that I managed to catch a horrible cold - I've been sneezing so hard for the last couple of days that I've hurt my ribs.  Now it's not funny, so you can stop your sniggering right now.....;-)
Catch up with all my Blogging Buds asap!
Enjoy the sunshine

Friday, March 18, 2011

No Play Today

It's Daring Cardmakers Day today, but unfortunately I wasn't able to join in with Jo's dare. It's a real shame too, because she's asked everyone to use postage stamps on our cards and I always save interesting ones on a "just in case" basis! Typical that I'm unable to play along atm...maybe I can do something over the weekend and add my card a bit late....
Anyway, don't forget to check out the BLOG to see what the team have made, and it would be fab if you'd join in - I bet you have a little bag of interesting stamps somewhere too!

I've been sharing stuff I've made over the last couple of weeks the last few days and today I have another "Our Betty" card.  This one uses the pretty Gift stamp from the "Your Special Day" clear stamps set from Funky Hand, along with more lovely Craft the Year Away papers
I stamped the sentiment (from the same set) in Brown ink randomly along the strip of card, The gift was stamped on the different papers and paper pieced onto a card background piece before cutting out.
Aperture and border cut with Nesties Large Scalloped Circles
Frilly double border strip made with MS border punch
Stickles for some bling on the bow
It was my niece Izzy's 17th birthday at the beginning of this week.  I gave her the cupcake card I showed here a couple of weeks back
She's saving up for a new saddle for her horse, so we've given her money for her Saddle Fund.  I made this little pouch to present it in - I think it's nicer than just having the cheque tumble out of the card, makes it more like a gift, doesn't it?
Green Bazzill to make the pouch
Yellow Rainbow Polka Dots papers from Funky Hand for the fluffy flower and the decorative panel.
Green Bakers Twine, Yellow brad, Lemon Ice Stickles for a bit of bling.

Hopefully this coming week things will be back to normal - at least blo-wise!  There's still a long way to go until everything else is anywhere near what you might call normal.
Catch you all soon

Wednesday, March 16, 2011

More Dots....

Anice ill be on Create and Craft TV again later in the week, this time she'll be showing her sets of "Our Betty" clear stamps, along with the wonderful Craft the Year Away CD.  Check the website for the most up-to-date info on when to get a coffee and settle down to watch, or when you need to set your recorder!

There was something about seeing all those wonderful Rainbow Polka Dot colours in the brand new Download Collection that meant I just had to make an "Elmer" card!
 The elephant is a giant version of one of the digi images from the last CD "Colour Me Happy - he's so adorable!  
I couldn't resist giving him a pun-ful notice to carry!
Next is one of my cards for the Create and Craft show.  As you all know stamping and colouring are not my forte so please don't judge too harshly! 
I've printed the white on lilac and lilac on white papers from the Rainbow Polka Dots download on either side of my card, then cut out using the Wobble Card template from Craft the Year Away CD
The bouquet of flowers and the sentiment stamp are both from the "Your Special Day" stamp set.

I've also used coiled paper roses, pearl brads, tiny gems, Seam Binding, Nesties Scalloped Ovals dies.
Thank you for looking in today - I'll catch up with all the blogs as soon as I can

Monday, March 14, 2011

Seeing Spots

A couple of weeks back the Funky Hand Gang were given a new download to play with and it's now available to buy from the Funky Hand shop site
It's called Rainbow Polka Dots and that pretty much sums it up - but not quite!  For just £3.49 you get all of this lot of dots - how fab is that?
Over on the website you'll also find a gallery of cards and other projects made by the team using these wonderful new papers.  Here are a couple of the cards I've made
The first one is Karen's birthday card - hopefully it arrived safely last week!
I made the flowers with 6 layers of paper petals (Nesties large scalloped circles) using 3 from each colourway for each flower  ie 3 from white dots on yellow background, 3 from yellow dots on white background, crmpled  up then fixed together with a brad.
The brads are topped with Stickles
mosaic border made from small (1cm) punched squares
Stems and "leaves" are made with Seam Binding (Creative Treasures)

For the second card I've made the flower in roughly the same way, but using the Nesties Dahlia dies.  The paper frill was made using my scoring board and a lot of cursing....

I've got more spotty dotty cards to share next time, so please visit again soon, I'm a bit tide up with non-crafty stuff atm so I'll have to catch up with blog-hopping once it's all settled down again
Thanks for popping by

Friday, March 11, 2011

Make it Yourself

It's Vanessa's turn to set the Daring Cardmakers challenge and it's all about
Homebaked or Homemade
The manufacturers all make it very easy to add lovely embellishments to our work with ready made, or ready to "build" embellishments, but this week Vanessa doesn't want to see any short-cuts, no! this week she wants to see us all creating at least one of the embellishments we use on our cards by ourselves - it could be something made from clay, shrink plastic, fabric - anything at all as long as we do the making/
My first thought was to dig out the shrink plastic and make my embellishment with that - but I really haven't a clue where it is atm. So on to Plan B - some sort of flower (no surprise there!).
I often make flower embellishments for my projects and it would have felt a bit like cheating if I did the same sort of thing I usually do.  So I thought I'd see what I could come up with using felt - something I have lots of, but rarely use for cards etc.  I also thought I'd add an extra dimension to the task by making something which could be detached from the card and worn as a brooch.
The problem with making the brooch is that all my jewellery stuff, including brooch backs etc is currently in the loft, so I've temporarily used an old hairclip to attach it to the card.  I'll add the brooch back once I've got my stuff back.
Actually I'm still not convinced whether to use the one shown on the card, or the first version I made just using felt.
Anyway, both of these were made in the same way, using needle and thread and lots of running stitches, then gathering up and sewing the ruffles nice and tightly to make the shapes I wanted.
Materials
version 1 (on card); 2 sizes of Nesties Dahlia dies (cut about a 1.5cm hole from the centre then make the gathering stitches around the hole and pull tight), Ice Stickles, Lace and seam binding (both from Creative Treasures), Pearlised button, lilac pearl brad - I used wire cutters to cut the prongs off then glued it to the button. Brooch back to be added later  :)
Rest of card:
Deep lilac paper, MS border punch, Pale lilac pearlised card, Seam binding this is cheat's gathering  (hehe) as I just drew a line of glue across the card and worked the binding into gathers with my fingers!, I-rock Pearls, Sentiment is cut using my Craft Robo

Flower version 2; 3 layers of felt cut with Nesties Dahlia dies  I used the 2 of the third largest size and 1 of the next size down (make holes and gather each as above), Ice Stickles, Large clear faceted brad

We hope to see lots of creative ideas for making your own embellishments this week - it will be fun to see what everyone makes and we should all learn some new ideas as we wander around the blogs of those who join in - one of the things I love and the world of Crafty Blogging is the was people share their ideas and show us how they put things together.  Actually, I'd like to say a big Thank You to all who take the time and trouble to share their ideas and skills via their blogs - I'm sure I'm not the only one who appreciates such generosity.

I hope you'll be Making It with Vanessa and the DCM, click HERE to see what the team have created to put on their cards for this challenge. 
Thanks for visiting


Thursday, March 10, 2011

Getting There...and a Sneakie Peek!

It's been a a while since I did an update on show the study renovations are coming along.
When we moved here, the room we decided to use as a study was the one that we knew would need a good sorting out.  So we just shoved the desks and bookcases from the old house in here and "made do" while we paid attention to other things "higher up the list".  With hubby working from home a couple of days a week it became more apparent that the room was a mess, there was a badly filled in chimney breast with crumbling plaster and more holes than a Swiss cheese, plus it's really cold having two outside walls, no insulation, two windows and a rather old radiator.  We finally bit the bullet and got the builders in - which meant us moving everything out of there aaaagggghhh

We have no cavity walls in the older part of the house, so we're experimenting with adding internal insulation - we'll think about doing other rooms (eventually) if this is a success - it does mean you lose an inch or so from the floorplan, but you can't have it all!
Anyway, we're nearly there now!
The internal insulation is done, the ceiling and walls have all been plastered, power sockets have been moved and added to, the new windowsills, skirting boards have been fitted, as has a new smaller, better radiator.  For the last few days Bryan the decorator has been hard at work.
We've gone from this at the end of day 1 of the work


via this (which made Hubby panic a bit!)

to the most recent photo, which I took a day or two ago, still not finished but not far off


The carpet fitter is booked to trim and re-fit the carpet and our IKEA order is all done and ready to send just as soon as we know there'll be somewhere to put all the new stuff when it's delivered - and then it'll be time for hubby and I to start building.  Now doesn't that sound like fun? hehehe

At first I got a bit stressed about everywhere being full of "bits of the study" - books, stash, files, boxes, furniture etc - but you get used to it and it's not for long really (just wait till we do the kitchen/utility/downstairs cloakroom.....). 
I've still  been crafting while all this has been going on as we set up a temporary study in the spare room - but I've been making do with what's at hand and not bothering about anything that I can't reach easily.  However most of what I've been doing is stuff I can't share atm - but keep your eyes peeled as there's a fabulous new Funky Hand download coming soon ;-).

here's a bit of a sneak peek.
Right, that's me done for today
Thank you for visiting

Friday, March 04, 2011

Is it Spring Yet?

Well, who knows!  A week or so ago it certainly seemed so - the temperature was in double figures and the sun popped out for a while - but these last few days it's been really chilly with max temperatures making it to about 4 degrees.
Never mind, today on the Daring Cardmakers we're forcing Nature's hand a bit and celebrating the first Friday of the new month with our regular Flowers of the Month challenge.  The traditional flowers for the month of March are the Jonquil and the Daffodil


In our garden the daffodils aren't out yet, but they are in bud and I love seeing them grow, the buds forming, then gradually opening.  Even when it's still too soon to put the scarves and gloves away seeing the daffodils in the garden warms my spirits!
I really wanted to keep my card simple  (plus it's a bit of a hassle hunting out stuff atm),  and in my mind's eye I saw a single flower in a tall deep-blue bottle and thought I'd have a go at doing something like that.
You're probably getting sick of seeing "I cut these with my Craft Robo", hehe but I'm sorry, this is another one!
My excuse is that the Robo is sitting on my desk alongside my pc and the box of Bazzil sheets and the scrap box are all close to hand whilst my papers and a lot of my other stash is all over the place!
So I found a clip-art of a bottle shape I liked, then hunted out a daffodil clip-art to "put" in it.
It's just a case of making the templates separately then on the Craft Robo desktop getting them to look roughly "right" together  then I resize the whole thing to fit the card I want to use.  One day I'll remember to do a screenshot of how it works!
Anyway, once it was all cut out I added lots of inking and put the bits together.
For the base card I used a white card blank inked with Spiced Marmalade DI
I added a couple of different blue inks to the blue Bazzill for the bottle then coated it with Glossy Accents.  I then made the fundamental error of picking the card up to "put it in a safe place" and stuck my thump right in the still damp GA!
To cover up my blooper I added a bit more GA and put three "dew drops" in it.  Although I was a tad cross at the time I now think that the "bubbles" in the glass finish is quite effective.
Materials:
14cm sq white card blank, Spiced Marmalade Distress Ink, Bazzill scraps in blue, green and a couple of yellow shades, Cats Eye ink-pads (lime, blues, tangerine, yellow), Dewdrops (Water mix), rubo-on sentiment, Glossy Accents
Please pop over to the Daring Cardmakers BLOG and see what the team have been making this week - we'd love it if you joined in and turned the world of crafty bloggers into a Host of Golden Daffodils!  hehe We're also introducing our fabulous March Guest Designer - we absolutely love her cards and it's such a treat to be able to showcase her work on our blog.
The plasterer is here again - he was busy doing the ceiling when I took him a cup of tea earlier.  Next week the new radiator will be fitted and the skirting boards and painting will be done, we need to get someone to re-fit the carpet as it'll need a bit of a trim now that the insulation has been added and made the room a little bit smaller!  Then it'll be a trip to IKEA to get the new furniture - we've already done a plan and made a list of everything we want to get.  That lot will take quite a while to build and fit  (and fill) so we're going to be in our makeshift study for a while yet!
Well, as I didn't do any of the March Birthday cards I need yesterday I suppose I should stop waffling and get on with some of those!
Thanks for popping by

Thursday, March 03, 2011

Gardener's Gift

With all the upheaval and what-have-you, I just didn't have the time to search out a birthday present for my SiL, so I've gone down the vouchers route.  They may seem the lazy option, but at least people can get what they actually want, can't they?  It'll be cash for my niece later this month too as she is saving up for a new saddle for her horse.  Anyway, we got some Garden centre vouchers - I know I'm always happy to get those so I hope she will be too.
I made a presentation wallet for them and continued the gardening theme:
You might recognise some of the components hehe, I've used the flower pots and seed tray, and the little seed packet I used on hubby's birthday card a couple of weeks back but gave them a more girly look with some pink, yellow and blue colours.  I did make a new template for some gardening gloves though.
Papers are Springtime from Echo Park,
Pink, yellow, Blue, Brown Bazzill
Prima flowers, Spellbinders Large Scalloped Circles die, pink Bakers Twine
Pots and seed tray, seed packet and gloves all cut with Craft Robo. 
Graphtec, the makers of the Craft Robo have recently taken over the Silhouette machines too.  I'm not sure if the software is the same, but if you have a Silhouette maybe these templates will be of use to you too.
I'm happy to share these templates with Craft Robo or Silhouette owners, just email me if you're interested.
Gosh, it's chilly today - I've got Cold Mouse Hand for the first time in ages hehehe.  The plasterer is in situ for the next couple of days so I'm trying to stay out of the way as the plaster dust seems to find its way through the smallest gaps and my eyes really don't like it :(
I'm struggling with the old crafting mojo this week - I've lots to do but it's all a bit of a trial this week.
I shouldn't moan, I know I'm lucky and at the end of all the work it'll be like a new room - what with being much warmer and looking all smart with fresh plaster, paint and lovely new furniture.  We spend such a lot of time in the study it makes sense to make it a nice place to be.
It'll all be worth it in the end, It'll all be worth it in the end, It'll all be worth it in the end....
off now to warm my hands around a mug of coffee - and then maybe get some things ticked of the to-do list :-O
Thank you for visiting, please leave a comment if you've a minute!

Tuesday, March 01, 2011

Cricketers

Don't you just love it when a plan comes together? hehe
Thinking of an idea for a birthday card for one of my cousins I came up with using some good old silhouettes.  I realised that if I got all the figures to roughly the same size, and made them fit roughly into a square pattern I could resize the whole configuration to cut the top layer of a card.  Using this for the upper layer of a card meant that I was left with lots of little cut-out cricketers to use on another card.
Actually it didn't work out quite so neatly as I made a small error in version 1 and had to cut them again - I now have lots more little cricketers than planned, but never mind!
I cut the cricketers from plain white cardstock to leave the little apertures, added scraps of chipboard to the reverse and glued to dark green Bazzill. The light green Bazzill layer is about 0.5cms bigger all round.
For the "cricket balls" on both cards I glued Red Bazzill onto scrap chipboard then cut using a suitable size circle from a Cuttlebug (you can usually find the right thing if you check your die collection!). Once I'd added them to the cards I added a layer of Glossy Accents.
I've used a few of the cut out cricketers for the second card and just matted onto the same shades of card. Cricket balls as above, and both have home made rub-on decal sentiments.
Builders are here finishing the insulation and boarding ready for the plasterer to come and do his stuff. Hubby's home-working today so sharing in the tea-making duties!

Right, I'm off to make a presentation wallet of some kind for gift tokens for my SiL's birthday.Have a great day, thanks for popping by