Tuesday, June 30, 2015

Keepsake Box

Hi,  I've a Keepsake Box project to show today.  I made this for my latest post on the Get Funky and Craft blog and it's made using the "Sunrise" designs from this month's showcase CD "Now That's Funky"  

The inner box part of this measures 10cm square by 3cm deep, so it's a good size for storing all manner of jewellery, knick-knacks, or maybe those pads of paper to keep by the phone
  

Materials and Tools
"Sunrise"   from the Funky Hand CD "Now That's Funky" 
the designs were all printed on textured white Bazzill card 
Bazzill card in the deeper colour to make the wrap-around section of the box 
Empty cereal packet for the structural pieces 
 Ribbon
Dies: Square doily (Spellbinders) 
Shapeabilities Sprigs (Spellbinders Die D'Lites) 
"Build a Flower #2" (Cheery Lynn)


The thing about this box is that it's much easier to make than it looks, which is always good in my book!  You just need to make the inner box from card - or cover one you already have with pretty Funky Hand paper, then make the wrap-around cover to stick it in to! 


This cover is made in the same way used for the memo blocks I've shoared in the past, but with an extra flap at the front.  You can find instructions for the memo block on THIS page of my blog
The layout for the pieces of chipboard (grey) on the coloured card is like in the picture below.
Remember to use a bone folder in the gaps so that the cover will fold nicely.  Turn in the margin all the way around and then add the inner cover to conceal all the workings, use the bone folder again in the hinge sections, then adhere the lower piece of ribbon in place before adding the box section.
The upper ribbon is adhered to the centre of the top section of the wrap, and then the box is ready to decorate
When I get round to it (hmmm)  I'll do a proper tutorial for this as I'm sure I'll be making another - it will make a lovely little gift box, and will be easy to make in a different size

Thanks for visiting today, please let me know what you think of this project


Friday, June 26, 2015

Ruby Rock-It, Baby!

It's a long long journey from Australia to the UK, but a big box of goodies has travelled all that way, and then was divided up and travelled on to various places in the UK, France and Germany - all so that members of the Daring Cardmakers DT could have some fun with the lovely things produced by Aussie company Ruby Rock-it.  And give away some prizes too

So today we've the first of two challenges sponsored by Ruby Rock-it, and it's a bit of a play on words:
*****
Baby Rock-It!!

The dare is to make a Baby themed card which has a 'rocking' or 'moving' element to it!

*****
The products the DT have used for their cards are from the Fundamental range from Ruby Rock-it and you can see how we've all used them over on the BLOG

Here's my rocker card

 Materials and Tools
White card for base
Bazzill card; Pink, White, Yellow
From Ruby Rock-it: 
Mulberry paper flowers (one inked to match colour scheme. one left white).  Die cut flowers and butterfly, Clear stamp for twirling piece, "Its a Girl" sentiment sticker, Die cut banner and scalloped edge strips
Other:
Baby Buggy charm.  lilac ribbon, White lace. Pink and Black gems
XCut large circle set to cut card base
Cheery Lynn die to make pink and yellow roses.
 Cameo to cut the large scalloped circle background piece


We have a wonderful little prize back from RRBF for one lucky person who completes the dare this week and as always the winner will be drawn randomly so everyone has the same chance to win.


There are just oodles of wonderful products for all types of crafters so why not take a peek at their {website} or follow them on their {facebook page}

I had such fun making my card this week!  It was quite hard deciding what to leave off because there were so many lovely things I wanted to use - but I just couldn't manage to get everything on.  The upside is that I still have loads of gorgeous goodies to use on other projects.
Look out for another DCM Ruby Rock-It challenge coming up soon.....and later, a special event when we'll be getting together with  Ruby Rock-it's amazing design team for a huge,  fabulous blog hop!

Anyway, that's me for this time, thanks for visiting, hope you'll feel inspired to join in and get your opportunity to win some Lovely Aussie Stash!

Wednesday, June 24, 2015

Sketch File Trio

Well, I've been really, really bad at posting my makes using the current LO from The Sketch File, so today I'm having a catch up and posting three!
Materials and Tools:
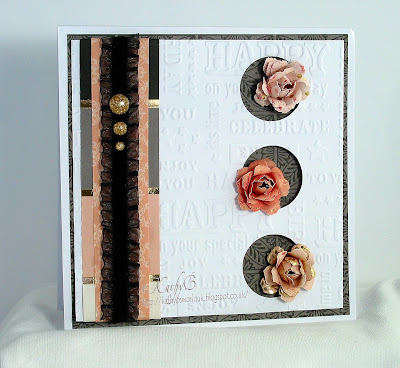
White card blank, plus extra for embossing
Papers: all from "Fancy That" 6x6 (My Mind's Eye)
Stretchy Black Lace trim
Gold Glitter Enamel Dots
Happy Birthday embossing folder (Crafters Companion)
"Tea Rose medium" (Cheery Lynn)
Silhouette Cameo to cut the circles

 This next one is a "scrapling"


Materials and Tools:
White card scrapling
Various papers and card from my scrap pile
Green narrow ribbon
Kaleidoscope Butterfly border die  (Memory Box)

I never know what to do with those sticker and die cut sheets you get in a lot of the 12x12 paper packs, so thought I'd see if I could actually make use of some for this week's card over on The Sketch File


 Materials and Tools:
White card blank
Papers and sticker die cuts all from "Summer Bliss" 12x12 pack (Echo park)
Ice Stickles Glitter Glue for a bit of "bling"

Here's the sketch.  I hope I've managed to make it look a bit different in each of these cards.  
Thank you for visiting today, I hope you'll pop over and see what Brenda has made using it too - and do give the sketch a try, we'd love to see how you use it

That's all for this time

Saturday, June 20, 2015

Lollipop Flowers


It's my turn to post on Get Funky today, and  I've made a couple of cards this time.  I've used the pretty "Lollipop" colour-way from this month's showcase CD

Both cards use the same basic background style - mainly because I used the "waste" from one to make the other, cunning, eh?

card 1 

Materials and Tools
"Lollipop"  from the Funky Hand CD "Now That's Funky" 
the designs were printed onto Diamond White Bazzill card 
which has a lovely, subtle sheen 
hand cut banner, decal sentiment
Dies:
"Tea Rose medium" (Cheery Lynn)
Tiny circle punch
Notes:
I used my craft knife to cut an aperture in the card blank, then adhered the patterned paper behind it.
I cut a rectangle from the block design paper, then cut another rectangle from it to leave the narrow border piece


card 2


Materials and Tools
"Lollipop"  from the Funky Hand CD "Now That's Funky" 
the designs were printed onto Diamond White Bazzill card 
which has a lovely, subtle sheen 
 decal sentiment
Dies:
"Hybrid Rose" (DieNamics)
Leaves cut with "Build a Flower no2" die set (Cheery Lynn)


Notes:
This time I didn't cut an aperture in the card itself.
I cut another border piece from the leftover block-design rectangle from card 1, then just cut a smaller rectangle from the leafy, flowery design to fit inside.

Don't forget, this CD is on offer in the Funky Hand SHOP for just £1 at the moment so don't miss out!

Thanks for visiting today


Friday, June 19, 2015

Bokeh

It's Friday again, so time to share my card for the latest challenge from the Daring Cardmakers.  This time it's Miri in charge and she's chosen BOKEH as our theme

It's really a photographic technique, butyou know how crafters are, they see something interesting and immediately want to reproduce it with paint, ink, paper and whatever else they have to hand.

I had a few tries with the method where you make a water-coloured background and then add the white circles through a stencil, but I wasn't particularly happy with how they turned out, so I tried a different approach. 
This time I didn't bother with making a background first, instead I just used a whole load of mini ink pads and my (homemade) stencil - just a piece of acetate with different sized circles cut from it with dies, punches and even my cropodile
Once pretty much all the paper was covered with coloured spots I added some over the top using a white ink pad and some white acrylic paint


Materials and Tools
Watercolour card, white card blank, Dark Blue Bazzill card
Various cat's Eye, Versamagic and Memento mini ink pads
White pigment ink, White acrylic paint (Fresco Finish)
Card scraps, Glitter paper for butterflies
Satin ribbon, Dewdrops, Glitter, Enamel dots
PC generated quotation panel
Dies: Large Butterfly (Spellbinders). 
Small butterfly; Butterfly Trio (Memory Box)


Miri's done a great job rounding up a host of helpful links with different techniques for mimicking the Bokeh photographic effect so please check out The Daring Cardmakers Blog [Bokeh] to find out more and see the wonderful cards made by our talented team.

Thanks for looking 

Wednesday, June 17, 2015

Pocket Page Mini

My most recent post on the Get Funky Blog was this little pocket page book - I'm a bit late posting on here, its been one of "those" weeks, but here I am finally trying to get up to date!

As I've not decided what to use this book for, so it's  pages and tags are empty and it's  lacking a title.
It's made using the "Cold Walk" designs from June's featured Funky Hand CD "Now That's Funky"  

This mini album uses the Hinge Binding method for adding the pocket pages.  There are loads of variations on this, and masses of tutorials on the web, but this is the video I used to learn how to make one [ Hinge Binding video tutorial ]

There's lots of room for photos or other "stuff" -  each "page" is a pocket, so as well as decorating the pages,  you can add a photo or journalling etc to each side of the tags that go into them too. Or take the tags out and use the pocket to store memorabilia


Materials and Tools
"Cold Walk"  from the Funky Hand CD "Now That's Funky" 
the designs were all printed on textured white Bazzill card 
Matching Bazzill card in blue to make the hinge section and the ends of the tags
EK Success border punch to decorate edges of pockets
On the Cover 
Ribbon, hand-cut banners, hand made Rolled roses,
Tiny blue gems, Stickles Glitter Glue, Die cut roses, leaves and swirls

Dies: Nesties Labels 18 (Spellbinders) 
Shapeabilities Sprigs (Spellbinders Die D'Lites) 
"Tea Rose medium" (Cheery Lynn)

Here's a quick picture tutorial on how to make the pocket pages, I hope it makes sense - you should be able to click for a larger view

For the tags, I printed on both sides of my card.  I resized to 1/4 size versions of the designs so that when cut out the tags, both sides are pretty!
I didn't have a tag die the right size to make the end bits for my tags, so I found an image on the web, "cut" it down in my graphics program so that only the fancy end remained, then put it into my Silhouette Cameo to resize and cut to fit.  There is one of these end pieces on each side of the tag so that it's nicely reinforced and won't break despite going out and in their pocket

That's it, I hope you like this book- it was fun and fairly simple to make, and I thinkin its quite adaptable too as you could make it in various shapes and sizes.
I'd love it if you left a message telling me what you think of this one
 

Friday, June 12, 2015

Neon Bright

I thought I was well ahead and super-efficient with my Daring Cardmakers card all done by Wednesday afternoon, save for the last minute blobs of glitter and extra paint I decided to add yesterday morning.  
And then I checked the dates, did one of those "double-take, must-have-read- that-wrong" things and realised that the card I'd made was for next week's challenge, not for today's....ooops! 
Kathy jumps back across to the craft desk in a panic. 

Neon stuff, I need neon stuff....I'm sure I have a few small bits I could use....where on earth did I put them? 

Of course there was no actual neon bits to be found - noooo way Josè - I will find those bits I know I have, sometime next week I reckon....when this challenge is all done and dusted.
So, what to do?  Thank goodness for Mr Bazzill and Mr Coredinations, I say! Had a bit of a hunt through the card stash and scraps box to find the brightest, neon-ish and then, with some help from the Cameo came up with this.  It's quite bright, I think I got away with it
Materials and Tools:

White card blank
Black Bazzill
Bazzill and Coredinations card for all the coloured pieces
Lime green button, bright pink ribbon
Butterfly Trio die (Memory Box)
Tiny (and I mean tiny!) dots are the waste from using one of my border punches
Petals for the flower are the waste from cutting the "O" of HELLO!
Cameo to cut the letters.

Notes:
Banners are hand cut
Multicoloured border for the black section made by glueing strips of the same card in assorted widths to the reverse of the black section then trimming with guillotine
The letters were cut several times in black then glued together (about 5 layers, I think)
I cut them in colour a couple of times in each colour as I wasn't sure whether to use the word more than once (none of that "plan first" stuff here)
BUT, the lack of planning meant I had enough "O" middles to make a big retro flower haha


The team have made some fantastic cards this week and have come up with some great ways to get the neon look even when faced with lack of the "right" stash - it's amazing how inventive you can be when you really rise to the challenge!
Anyway, that's it for this time....and of course, there is a silver-lining to my calendar error - next week's card is already done and ready to go!

Thanks for looking, please leave a message....if only to let me know I'm not the only one who crafts in a panic sometimes!

Monday, June 08, 2015

Happy New Stash!

The card I'm sharing here today is one I posted over on the Get Funky blog the other day - and then promptly forgot to pop on here too
For this one I've used this month's showcase CD "Now That's Funky" and a set of really pretty papers called "Fresh Morning"

I had a little spending spree  last week so I needed a good excuse to try out one of the new dies I bought, plus one of the new stencils and one of the Cosmic Shimmer Mists that"fell" into my basket....as they do


Materials and Tools
"Fresh Morning"  from the Funky Hand CD "Now That's Funky" 
the designs were all printed on textured white Bazzill card 
Stencil: Texture Drip Rings (Memory Box)
Cosmic Shimmer Mist; Sunrise
Lemon Ice Stickles
Dies: "Build a Flower #2" (Cheery Lynn)
"Fancy Flourish" (Die-Namics)
 Flower Centre is from a Poinsettia die set (Die-Namics)
Punch; Tiny circle (Xcut)


That's it, no waffle today :)
Thanks for visiting

Friday, June 05, 2015

June Elemental Inspiration


This is my card for June's Elemental Inspiration challenge over at The Daring Cardmakers.  The idea is that you choose at least 3 "elements" from the given picture and then use them in your own way to make a card. 
This month, it's Leo's turn to select the picture to inspire us, and she found this stunning image, with so many elements to choose from, it was actually hard to decide which to take away

There's the colour combo, the layout, the main image, the background, and then all the little details; drawing, lanterns, fish, paint spatters, numbers etc


I loved the bright "pops" of pink, turquoise and yellow with the cream and striking black, so decided that would be one of my elements.
Then there are flowers - so that goes without saying (haha), I love the "shape" of the hair and thought I could incorporate that into my card.  I also used the basic layout, some ink spatters, and one of the circles - couldn't quite work out how to use three, but figured some of the jewels or enamel dots might do.


Materials and Tools
Smooth Cream card blank plus extra for embossed panel
Bazzill card: Black, Pink, Yellow, Turquoise
2x star flowers, Wired crystal flowers, a few extra wired "bits"
Pearls, Dewdrops, Gems, Enamel dots
Cosmic Shimmer ink sprays used to create spatters
Ribbon, RicRac, Washi Tape
Distressed Stripes embossing folder (Cuttlebug)
Dies: 
Circle Doily (Crafters Companion)
Curly Swirlies (Taylored Expression)
Tea Rose - medium (Cheery Lynn)
Nesties Circles (Spellbinders)

I really wanted to give my new  Cheery Lynn Tea Rose die a trial run, so that's why I chose to make roses for the three main flowers. The joy of this die is that on the single plate you get a leaf part (not used here) and the flower 5 times - so you only need to run it through your cutting machine once to get all the petals you need to make a rose.
I used Bazzill card, and worked the shapes with my ball tools, a bamboo skewer, and a foam mat.
Two of the flower shapes were used to create the bud then another two for the lower, open petals, then  I made the remaining shape into a "transitional" shape to use between them.  I  was really pleased with how they turned out and I love the size, which makes a finished rose of around 2.5 -3cms depending how "open" you make it.

Sorry this turned out a bit of an epic - well done on making it to the end ;)
Thank you for visiting, I hope you'll leave a comment