Friday, October 29, 2010

The Witching Hour

This week it's Nat's turn to set the challenge for the Daring Cardmakers and she asked us to use Hallowe'en themes - not necessarily using spooky images though, we could also choose to make cards simply using the colours associated with the occasion. What a good chance to use that in-you-face orange and purple combo!
It's been a struggle even to sit at my craft desk this week so it was just as well this one went together pretty easily. 
 For the pumpkins I used a kid's free colouring page to make a Craft Robo template, there are several layers to this one and some of the layers are raised on bits of chipboard to get more definition. I still had a few leaves lying on my desk from making last week's card so I've added them too.  The spiders web corners are also Robo cut.  If you would like the templates email me and I'll send them to you - but please be patient as it takes a while to make the instruction sheet!  If you just want the web template that's no problem though.
Craft Robo Template: Pumpkins and Spider Web

I've used the fab, and beautifully bright papers from the Funky Hand  Spooky Dookie download (just checked the link and I see that there's a big SALE on ;-))
I cut about 6cms off the front of my 14cm square black card blank.  Adhered a stripy panel of paper to the inside edge and the spotty piece to the front before sticking the pumpkin in place. The broomstick is just a few strands of raffia tide and trimmed, then glued to narrow strip of card.  There's a hand-cut witch's hat trimmed with purple ribbon in there too
Thought I'd add a photo of the card on a white background too as I can't decide which it shows up best on!
I've already mentioned there's a  Downloads sale on over at Funky Hand this weekend and on Create and Craft TV tomorrow (11am, repeated at 10pm) you can see Anice strutting her stuff and offering a very special TV exclusive price when you buy both the Papercraft Factory CDs together.  If you are in any doubt as to the quality of the sort of thing you can achieve printing your own papers with downloads and CDs just click on the images above - believe me, I was the same before I started using Funky Hand stuff.
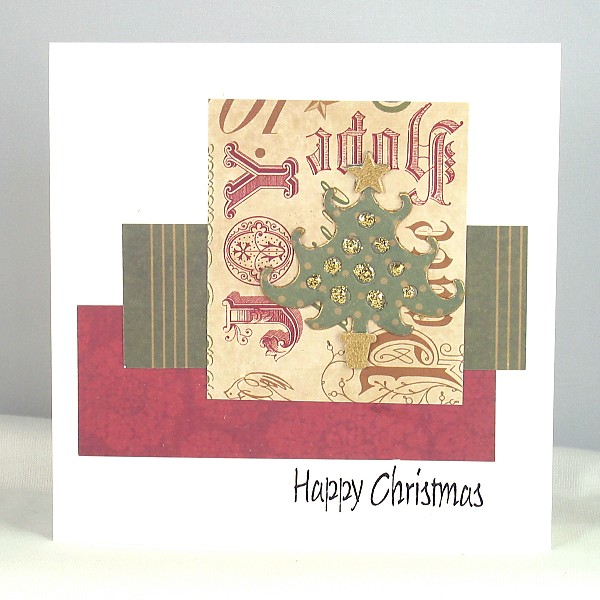
Here's another of the Christmas cards I made for tomorrow's show:
The papers are from the Merry Berry set on the Colour Me Happy CD - none of the paper collections on the CD are aimed at Christmas but you'll definitely find lots you can use for festive projects (that's what the show tomorrow will be highlighting).  I think these colours work beautifully, greens, golds and gorgeous berry red.  I resized a couple of the designs to print 4 on a sheet of A4 - that's how I could get the tiny dots and the narrower stripes for the baubles.  
 Also used:
Spellbinders Nestabilities die, Gold card scraps, gold crochet thread, Home-made decal "rub-on", Krylon gold pen for a bit of a distressed edging on the red panel
That's me for now.  I have a new baby card to make, I'm feeling a bit better today and I've been putting it off till I felt I might be able to do it without making a hash of the job. I'm still not up to H.wk (obviously!)  but I'm getting a bit worried about the Everest proportions of the ironing pile.  I must be getting better just to actually be concious of its growing dimensions.
Don't forget to visit the DCM blog where I'm sure you'll be inspired by the spooky stuff and the wonderful vibrant Hallowe'en colours you'll find there - isn't it lovely to have a good excuse to use really bright, vibrant colours all on one card!
Thanks for looking, I hope you'll leave a message before you leave

Thursday, October 28, 2010

Still coughing...

I'm still feeling rough and spending a lot of time under the duvet and not a lot either on the pc or at my craft desk.  H.work is pretty much limited to throwing something simple together for dinner as I'm too tired and wobbly to do much else.  When I was little I had a teddy bear who's seams grew a bit threadbare and his stuffing started to come out.  I feel as though my stuffing is escaping - especially from my knees! hehe
Having got the plea for sympathy out of the way (and this rotten cold, plus a trip to the Outlaws on the IOM last w/e are my excuses, nay, reasons! for not doing much blog visiting lately) I do have stuff made before our trip  that I can share on here.  Just as well as the only crafting I've managed this week is my DCM card for tomorrow - and thank goodness that went together without a hitch as I don't have any patience when I'm feeling ill.
The Crafty Templates  cards on my last post were made a week or two ago and this wedding anniversary card is part of an order I spoke of a while back and haven't got round to blogging yet
 I made this type of pocket card for hubby on our own anniversary and when I bought the GCD (Paris Nights" papers I knew they'd be fab to use for this commissioned card.  The swirly design I've used on the lower section of the pocket is flocked and very lush!  Perfect for something romantic like an anniversary. I made the pocket section so that it can stand on it's own rather than needing propping up against something.
I love the idea of a pull out section - lovely for a secret, romantic message, eh?
I used:
All papers from the GCD Paris Nights 8x8 pad
Dusty Pink ribbon, pale pink heart gems.  Coiled roses made with scraps of the same papers
Sentiment is cut with Craft Robo

Now for a Funky Hand  Update!
Anice issued the Funky Hand team with a bit of a challenge a few weeks back - she asked us to make Christmas cards using papers from the two Papercraft factory CDs "Dreams Come True" and "Colour Me Happy".  This was all to do with the up and coming TV show on Create and Craft.
Anice will be on your screen this Saturday morning  (30th October) at 11am with lots of ideas for the two CDs - and there will be a very special deal, available only from Create and Craft if you buy the two CDs together - we're not allowed to tell you what the special price is - you have to watch the show for that!
Anyway, here are a couple of the Christmas cards I made using some of the CMH and DCT papers, (hopefully they'll make an appearance on the show).  I've a couple more which I'll add next time
 Papers above are "Jovial Man" from the Colour Me Happy CD
I printed the background design direct onto the card then glued scraps of other designs onto thin card and hand cut tall triangles for the trees
Also used:
silver mirror card, plain white card, white and silver ribbon, 
punched or die-cut glitter card stars and snowflakes

The card below uses "Blue Magic" papers from Dreams Come True, plus the stocking shape from the 2009 Funky Hand digi image download "Festive Mix", which I resized and then converted to cut with the Craft Robo.  All the designs I've used here are from the same collection and I love the way these colours and patterns looks so Christmassy
Also used:
Silver crochet thread, sentiment Robo-cut from brown Bazzill card

I think we were all amazed at how many of the designs on the CD worked really well for Christmas projects even though that's not what they were intended for - and of course it's always good to add another great use for Funky Hand Stuff to the ever-growing list.  
If you tune in to the programme either on your TV or via your pc on Saturday you'll see just how much use you can get from the CDs for Christmas and you could bag a great deal too!
Right, time for the next lemsip and a gulp of the disgusting cough medicine....

Tuesday, October 26, 2010

Cough cough, Sniff sniff

We've been over to the IOM for a couple of days visiting hubby's family. I've brought a horrible cold back with me so I'm feeling sorry for myself. Oh joy.
Anyway, at least I can't spread my germs via my blog so you're safe to read on.....


The new Crafty Templates set went "live" last week and are a fun mix of Christmas and Birthday shapes.  Each month Leo also puts together a fab Crafty Goodies Kit to go with the templates and this month it's full of cards, paper and other lovely things - so if there are any left, it's definitely worth getting your hands on one.
Here are my cards for this month
I really love this layered tree template.   To make it I've used a ready printed Kraft card blank from the Goodies kit along with the bunting paper and  green dotty paper also in the kit.  The black and white spotty paper, sequins and the ribbon are all from my stash.  The pieces of the tree are layered onto thin white card and I've outlined the white edges with Polar White Flowersoft.
The second caard is another tree, this time Leo's designed the template so that just half of the tree appears on the card - I'm just looking at it now and thinking that this would work well as a bi-fold - but as I didn't have the idea till now that's not what I made!  Another Kraft card blank,  paper and one of the little Kraft tags from the Goody Kit. The tree is matted onto white card, and I've added stars, glittery ric-rac and some scraps of gingham ribbon as I thought the design had a bit of a "homespun" feel
For my third card I've used Kaiser "Dear Santa" papers from my stash and Leo's gorgeous birdhouse Hanging Greeting Card template.  I decided to reduce the size of the template so that I could fit it onto a regular sized card. In the Goody Kit are a few plain, large luggage-type labels so I covered one of them to mat the birdhouse on.
I think this template is so cute and I know it will come in very handy - especially as I can use all three parts, or just the label, house or bird - or whatever works best at the time!  Crafty Templates aren't just for Christmas...hehehe.  Sorry, blame it on the drugs..........
That's all for this time.  Thanks for visiting


Friday, October 22, 2010

Autumn Leaves

This week it's Lynda's turn to set the dare for the Daring Cardmakers and although on the other side of the world Spring is just getting going, over here it's just the perfect dare for this time of year.

AUTUMN LEAVES
I absolutely adore Autumn and the colours that come with it so this week I'd like you to get creative with leaves. Create backgrounds or even flowers with them or just simply use them to embellish your cards. Don't forget the autumnal colours though! 
 
I decided to use a photograph of one of the acers in our garden, taken a couple of weeks ago as the background for my card. I cropped it down, resized and printed it a couple of times so that I could layer it up on pieces of dull gold card onto my white card blank

The quotation is one I've used a few times now - in fact I almost used it for the "dance" card for last week's dare!  I'm glad I changed my mind as it's perfect for an Autumn Leaves theme.
Most of the leaves are cut with my Craft Robo - I particularly love the fern template - it's one I made a couple of years ago  when I was asked to make something for a family who were emigrating to New Zealand  - it's always good to get another use from a template!
The spiky leaf shape is punched with a Nellies punch.
The two wired flowers are from Creative Treasures, the flat petals and the wide, floral ribbon are from my stash


 If you head over to the Daring Cardmakers blog, you'll see a beautiful array of Autumnal shades and some wonderful way to use leaves - we're really hoping you'll feel inspired to join in so we'll have lots of gorgeous creations to visit this week!
That's all for today as I don't have much time to waffle on or show anything else - but I'll be back with more stuff to share soon.
Thank you for visiting, I hope you like what you see and will come back for more soon!

Wednesday, October 20, 2010

Bits and Pieces

Here's another card using some of the lovely flowers you can find  in the Creative Treasures shop - there are lots of other crafty treasures to find in there,  but by now you'll know that the flowers usually grab my attention first!

I wanted to try using the flowers in a different way, so I cut a couple in half, backed then with punched circles and used the, to make a border design.  I quite like the idea and I'm planning something else along the same lines.  I also used more blossoms from the same pack to make the focus flower.  I vaguely followed the same method as for making the gorgeous paper roses (the ones that start off as 3 six-petal flowers).  Using 3 of the paper e.line blossoms and some glue to hold everything in place I made the centre part of the flower just like for the grungpaper roses.  To finish it I just glued it to the centre of another paper flower.
I used:
Prima e.line blooms from Creative Treasures
Prima 6x6 pad "Fairy Flora"
Ribbon, Lace, Brads, MS PATP punches
sentiment is from the sheet of transfers I made with decal paper
This is the 70th birthday party invitation I've been making.  And if my SiL adds any more to the guest list I may well lose my cool ("lose my cool" is not exactly the phrase I'm actually thinking of, but it's more polite....)

As SiL Dearest wanted them sent out by last weekend I kept it very simple and straightforward. The papers I've used are all from the sei Juliette collection.  For the focus piece I used a shimmery, glossy design, adhered first to card before cutting with a Cuttlebug die.  I thought the Celtic look worked well as the family are Manx.  As I said, SiL wanted them all sent out by last weekend.  So why, as I write this are we still waiting for the list of guests' addresses to arrive? hmmmm
And finally...
A couple of Cword cards, just to prove I'm making them (and there are more too, I'll have you know hehehe)
Two "same but different" cards - made with scraps that were on my desk when I'd finished the ones I'll share here another day!


Papers GCD "Joyful Peace"
Tree die Spellbinders "Fanciful Holiday"
Stickles Glitter Glue
sentiment from my Christmas transfers sheet

Well done, you made it to the end, phew!
I'jj be back again soon with more - I did say I'd been busy, didn't I?
Thank you for visiting

Monday, October 18, 2010

A Birthday and a Wedding

Did you have a good weekend?  We didn't get up to anything exciting/interesting here, but did manage to do a few odd jobs such as bringing in the indoor plants that go our onto the patio for a Summer Holiday.  I really need to go out and fleece up the cordylines and palms that have just recovered from the battering last Winter gave them (we forgot to give them a fleecy blanket till it was a bit late!
We bought another set of ladders for our increasing collection as there was a piece of the ceiling over the stairs - it was only about 12x 24" that hubby couldn't reach form the set of multi-way ladders we'd already bought.  Mind you, I did say that next time the ceiling needs painting we get someone in to do it - I was a nervous wreck as even  balancing on these "proper" ladders seemed very dicey to me.
I told you it wasn't an exciting weekend hehe!
I did get loads of crafting done though, and have almost cleared my to-do list (at least for a while!).
 
But first for today I'm catching up as I made this one last week.  Alpha, the young Senegalese boy we sponsor through World Vision (please consider doing something like this if you possibly can, it makes such a difference to the lives of everyone in that child's village) has a birthday soon and as he's completely football mad I made this card for him
It's a variation on a card I made for Crafty Templates a couple of months ago using one of Leo's bunting templates.  Here I've added stars and alphabet stickers to the bunting and changed the wording to a simple Happy Birthday.  I've added a corner flag and a QK football to fill in the empty bits.  Wording and white lines/circle are cut using my Craft Robo.

Next is one of the weekend's crafting projects, something to tick off the to-do list
 I've been working on a couple of commissioned cards an this wedding card is the first of them.
I just adore this GCD 8x8 paper pad and can't stop using it!  
The papers are so lush!  Some are flocked, some are shimmery (like the dotty paper here) and they are all slightly textured, double sided and just gorgeous!
I used:
 Paris Nights Papers (GCD), Nesties Labels 9 die
Silk and feather flower and satin ribbon (John Lewis), Cream cotton lace, plain dark red brads covered with Burgundy Stickles,
Coiled roses: cream and black ones made with same paper, red version made with 
flocked paper (from stash)
Right, now I'm going to go and get the washing out of the machine before I forget, and do a few other housewifely chores.  If I get them all out of the way, I might even be able to start my next DCM card this afternoon - which as DCM day is Friday, and today is only Monday would be a bit of a shock all round!

Thanks for visiting, please leave a comment....

Friday, October 15, 2010

What's the Pointe?

On the Daring Cardmakers this week we're still thinking about October being our anniversary month, so the title of the dare for this week is "The Anniversary Waltz".  It's not anniversary cards we're after though, we're focussing on the "Waltz" part of the phrase, or rather the whole sphere of dance and dancing.  Anything goes, be it ballet, rock n' roll, Flamenco, Polka, Foxtrot, Samba ....... the list goes on.
As so often the case with subjects I don't usually make cards for, I went looking for some interesting and inspiring quotations.  I'd already discovered that the paper with ballet shoes in the corner I was convinced I had actually had a birdcage instead, hmmm Plan A already in the bin and it wasn't even 9am.
Having saved my quote collection I went to that other Great Resource for Solving Cardmaking Problems - a Google Image search! I'd already decided that silhouettes were probably the best way to go (I wouldn't need to do any tricky colouring in stuff with those, hehe).  Here's the card I came up with
 I thought the lovely, glittery swirls on this paper from one of the Lost and Found sets (MME) would look rather like ribbons being swirled around the dancers. 
The dancers are Robo cut, spotty border is also Lost and Found, Twine from The Ribbon Girl
The bit that took the longest was getting the wording right - I think this was the 4th effort - and I've just realised that I still forgot to add the piece with the author of the quotation, so I'll put it here; William W Purkey, and add it to the card later.
I knew that lots of the DCM girls have illness, family stuff and other commitments getting in the way atm, so I made another quick card to add too.  Actually it was such a good excuse to make something using the fab pun I spotted on one of the quote sites.  No author for this one, but I just can't resist a pun so I've also used it for the title of this message
I used a free colouring page image to make a Robo template for the shoes, doing the ribbons too was just way too complicated so I decided to use narrow satin ribbon instead and in fact as it turned out, making that tiny bow with a double layer of narrow ribbon was a right pain in the btm!
If you'd like the Robo template for the basic shoes, email me, but I'm not making the ribbons and bows for you!
So, that's it for today.  My next crafty task is to finish (ok, start) an order for an anniversary card and a wedding card, and of course there's always the elephant in the room isn't there - you know what I mean....Cword cards....
Thanks for looking in today, please come back soon

Wednesday, October 13, 2010

The Return of the WOYWW

 Every few weeks Tracy of Creative Treasures (aptly named because there's a host of floral, ribbony, lacy and other bits of treasure to tempt you with) sends me a little box or bag of goodies to play with.  The most recent box contained a variety of gorgeous wired flowers, card candy, pearl sprays, shiny gems, Prima blossoms and other lovely bits and pieces.  I put some of the items together with paper from sei "Claire" collection to make this card
All the petals and wired flowers came from Creative Treasures, as does the sparkly flower centre (Prima), the pearl spray and the pretty lilac bow.  The aperture was cut with a Nesties die and there's a punched circle suspended in the centre.
 For one reason or another it's been a while since I got to play along with Julia's What's On Your Workdesk Wednesday fun and games so I thought I'd better get back into the habit - after all it's a wonderful chance to see all sorts of creative spaces, and such a good way of seeing what other crafters have got at their disposal - and what they are making, of course.  Click HERE to read more and find all the links of those playing along this week.  On my desk, which looks a bit of a mess but is actually much more organised than it looks (moreso because the other day one of those little stacking towers of brads fell off the shelf and as it wasn't properly screwed together all the brads sprayed everywhere - and into all the pots and boxes...... aggggghhhhh....... obviously it had to be the one with the very tiniest 2mm brads that came apart......took ages to clear them all up) is an almost finished football themed card for our sponsored child in Senegal which I'll show another time

There are so many workspaces to see these days, but I'm looking forward to visiting them all and leaving messages on as many as I possibly can!
Yesterday the paper I needed to finish the invitations arrived so I guess I'd better get on with those now.  It'll be good to get them done because my to-do list was big enough before that little task landed in my lap!
Thanks for visiting, I hope you'll have time to leave a message to say you popped in!

Tuesday, October 12, 2010

Spooky Stuff

I've been crafting like a demon lately.  Loads of birthdays, anniversaries, invitations,  Cword cards and a couple of orders on my to-do list, plus a lovely slice of DT stuff too.
I'll get round to posting photos of it all eventually, but today it's Funky Hand DT stuff and a brand new download which has just gone on sale.


It's called Spooky Dookie and Anice has designed these papers in response to requests from customers for some Halloween themed goodies. It's not all specifically Halloween - the ghosties and bat designs would be great for those kiddies who love spooky things, plus there are some fab spotty and stripy designs in shades of purple, orange and lime.
I used one of the bats on the papers to develop a Robo template, then used a couple of the orange papers to make this card
 I covered the front of the card with the orange "bats" paper on the inside then Robo cut bats of various sizes from black card.  Some of the bats I just glued in place, a couple more were suspended from the top of the arch on gold thread.
 
 For th little gift bag I just printed my chosen design directly onto a sheet of thin A4 card, folded  and glued it into shape, added string handles to the top ad the basic bag was done.
 For the embellishment:
*I cut down the arch from the card above slightly to a better shape,
*I cropped and printed the "Things that go Bump" badge from the embellishment sheet to exactly the right size to fit my 5cm circle punch, and matted it onto a circle of black card.
*Used a small piece of the words paper, matted onto black card to make the tag.

Funky Hand papers are easy to resize so if you only want a little bit, or you want the actual design to be smaller than that's what you can make.  For example I resized four designs, including the Words paper to print 4 "complete" but dinky papers on one sheet of A4.   For the square card above I cropped and resized both the papers to fit my card before printing them
 To see more of Funky Hand's CDs and downloads click HERE.  You can download these and more of Funky Hand's collectiosn immediately - instant gratification for Paperholics!
Ah well, back to work - what will it be?  Crafting?  or ironing?  such a hard decision....
Thank you for visiting, please come back soon :-)

Friday, October 08, 2010

Office Skills

Just when I thought I was getting a grip on everything it's all gone manic again.  Ah well better busy than bored.....haha
Friday lurches around again and that means a new challenge on the Daring Cardmakers' blog.  It's our lovely Rein's turn to set the dare and she's come up with the theme of "Office".  A great chance to raid the desk drawers and stationery cabinets for staples, paperclips, and all manner of office supplies.

I went to my drawer of "stuff that might be useful one day" - in there are pages from old books, playing cards, stamps and all sorts of other "stuff" that I can't bear to throw away just in case.....  I bet you've all got one!  A few years ago a forum friend had a clear out and sent bags of vintage bits and pieces out to all who wanted some - what a treat to find old book pages, buttons, lace, fabric and all sorts of other things - obviously all little treasures and far too nice to actually use on cards and projects - so into the drawer they went.!  Hunting through said drawer I found this page from an old typing manual which I thought could help with this card, I'm adding the page here too as a blog share for anyone who might want to copy it for their own projects - click on the image for the larger version.
The page gave me the idea of  trying for something evoking the old-fashioned secretarial image - the sort of office girls you see in those old 50's movies. Somehow those girls always looked so businesslike - but always feminine too - so I reckoned I could add a bit of lace into the mix (well, you have to take every opportunity, don't you?)
It looked better in my mind's eye than it turned out - but by then I didn't have time to pull it apart and re-do it - but you can't win 'em all.
I cropped and resized the lower section of the scanned page and printed it directly onto my card base, then cropped, resized and printed the photos at the top to use as embellishments. 
I used an image from google to make a Robo template for the old fashioned telephone (if you would like the template, email me at the address in the sidebar)
The vintage photo is from a sheet that came in an old Bubbly Funk kit.  The brackets on the definition are chipboard covered with black Enamel Accents (Charmed Cards and Crafts)
From the desk drawer I added staples, ring-reinforcements, parcel twine 
and one of those paper clip thing that probably have a proper name but I can't recall what it is!
I think what I don't like is the colour of the typing photos - so I might be able to get away with just tweaking the colour and printing them again - or printing them onto a creamier coloured card.
As usual the girls on the design team have made some wonderful cards using the Office as their theme, so please visit the DCM BLOG to see what they've been doing. We'd love you to join in and we always enjoy wandering around all the blog links that are left each week.
I'm off now to prepare the cards blanks and inserts,  and cut the other bits and pieces I need to make a set of invitation cards I've said I'll do.  Now, I've always shied away from such things as I'm so useless at doing two cards exactly the same - let alone a whole set!  So this should be interesting - I only need to make 15-20, so we'll see if I can cope, eh?  I'll let you know how I get on!
Thanks for popping by, I hope you'll visit again soon

Wednesday, October 06, 2010

A Better Day

Have I mentioned that we've had no heating since we got back from our holiday?  This poor old house has been getting colder and colder - I've been wearing the sort of fleecy jumpers and furry crocs that are normally only needed in the depths of Winter.  I don't like being cold.
Anyway, the required "part" to get things working again arrived and was fitted yesterday afternoon and already things are getting better.  It makes such a difference just to give the place a heat-boost first thing in the morning.  This is not to say that we're out of the woods yet, though.  Oh no! the boiler, which has given us strife since the very day we moved into the house (to find it wasn't working) is broken and we've decided that it's time is up.  That'll teach it.
Anyway, not only is the house getting warmer again, but the sun is shining, which is something we've seen very little of this last week. 
Joanne is setting the photo prompts this month on Bubbly Funk and today's prompt was EXPLORE, so I took took advantage of the sunshine to explore the garden in the company of my camera.
I thought I'd pop some of my photos on here too


Did you join in the Papercraft Inspiration Blog Party at the weekend?  Not only were there some fab projects and ideas (like the DCM's Christmas cards for example ), but there were also some tempting shopping links.  I found myself popping rolls of ribbon into my basket at a supplier I'd not come across before ohoh! The ribbons arrived yesterday......
 I needed some Thank You cards, so printed out some gorgeous designs from Funky Hand's Colour Me Happy CD - they are the same set that I used for the SUNSET Wordbook I made for one of Anice'a C and C appearances and I just adore these gorgeous sunny shades!
 I've found some great paper for printing Anice's designs on at The Paper Mill Direct online shop.  It's especially good because it's nice and thick AND you can print on both sides - fab for making 3D projects!
This time though I just needed the designs single sided.  The little houses are one of my Craft Robo templates (I think I've used this beach hut one more than any other!). I've also used a MS border punch, some Cuttlebug dies (to make the faux brads) and some home made transfers for the lettering.
They are all slightly different, but here's a closer look at one of them.

 Right, there's a baked potato in the oven crisping up and just waiting for some grated cheese to be added- and my tummy is rumbling in anticipation!
 Thank you for visiting today, please leave a message if you've time - I do love to receive your comments :-)