Friday, September 30, 2011

ooh la la and wunderbar

It's Lythan's turn to set the challenge for The Daring Cardmakers this week:
Well, this weeks dare is a little bit retro. As it is the European Day of Languages today I would like your card to feature a foreign language. 
This takes me back to one of the very first Daring Cardmaker Dares (November 10 2006 to be precise) which was a similar challenge. So why not also see if you have any cards to show from 5 years ago to see if your style has changed?
I didn't see the second bit of that till this morning, so I'll have to scroll back and see if I can find my card for that one - I do remember the challenge, but I don't remember what I made.
Here's my card for this time though
I couldn't resist another chance to get frilly and flowery. could I?

All the following from Creative Treasures:
Cream Lace, black "Mystery" ribbon, rolled piece of Pink Silky Crush ribbon across the middle
Flowers: large pink flower made from Silky Crush ribbon with a pink wired rose in the centre, Pink tulle rose cut for a length of ribbon roses, 2cm Black wired rose
 Other supplies:
All papers: GCD's fabulous Paris Nights (8x8), some flowers made with scraps
Cream Stardream card for sentiments pieces,
EK Success border punch, Spellbinders fancy tag from "Blossom Tags and Accents" set (Charmed Cards and Crafts), Spellbinders plain small oval die
selection of black and grey gems and pearls, Black hearts and swirl accents Kand Co, also Charmed Cards and Crafts
Prima Artful flowers je t'aime is cut on Craft Robo 

I hope you'll visit the Daring Cardmakers to see the other fabulous "foreign language" inspired cards the team have made this week - it's a great challenge and it would be fab if you'd join in too, I wonder how many languages we could manage to feature?
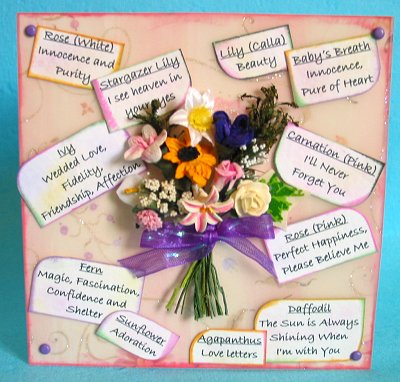
So, what did I do for my card back in Nov 2006 - well, as the challenge was just to feature "another language" I was a little bit sneaky and chose "The Language of Flowers" for my card.  Here it is:

Well, it's time I wasn't here - I think my cold is starting to improve, but it's really knocked the stuffing out of me, so my kitchen is only going to get "a lick and a promise" - I don't have the energy for much else atm.
Thanks for visiting today, I hope you'll come back soon

Thursday, September 29, 2011

Wedding

I may have thought I had a cold a few days ago, but yesterday I realised that now I really did!
In this Blame Culture we live in, I'm blaming a poor little 1 year old baby who has just started going to a day nursery for a day a week.  Such a lot of new germs for a baby to pick up and take home to his daddy who then took said germs to his office and shared them around among his colleagues - who of course then took them back with them to their own homes and so on and so forth.  And this bug is a real humdinger, I can tell you!
I suppose it's not really Baby Ps fault, but I'm blaming him anyway, because I can!


Here's a wedding card I made a few days ago to send away for a customer.  What a fab excuse to break open the MME 6x6 "Lost and Found" paper pad!  Naughty really as I do have a huge lot of these papers in the 12x12 size, but somehow the little ones are just so cute and easy to handle
Lots of gorgeousness from Creative Treasures here too: the lovely minty coloured Card Candy, the deep aqua rose, the creamy brown Apple Blossom flower, the pretty white lace, the pearl sprays and the seam binding
Shockingly (hehe) I didn't have exactly the right colour of seam binding - but I did have the right shade of ink pad so I used it to dye enough white seam binding to make the ribbon for the bottom of the card and a rosette flower.
Also used: organza circles to make backing for flowers, Prima Artful flowers, coiled rose (scrap of MME paper) Spellbinders Nesties Labels 18

I'm quite pleased with the way it turned out - it's ages since I made a paper frill like this and I always love the way they look.
That's it for today, I hope the sun is shining on you wherever you are


Challenges:
Charisma: LOVE
Stampavie and More: LOVE

Tuesday, September 27, 2011

Album Pages

Do you have those days when even something simple takes a couple of goes to get right?  I had one of those yesterday - it's probably more to do with my concentration levels being affected by this rotten cold that Hubby's so kindly shared with me than anything else, but there you go.
My trach record for completing book projects is really bad - I love making books and albums but they are soon relegated to the bottom of the pile as a new whim takes hold.
Anyway, I'm determined to see through my project to make a mini album of the various places we visited  during our year's membership of the National Trust - this was an anniversary present to ourselves which finished at the end of July this year.  So I'm really hoping that I will end up with a complete album just for once!

It was starting to slide a bit as I'd almost finished the picture page for Anglesey Abbey and then there it sat on the desk for weeks and weeks waiting to be completed. I refused to allow myself to start a new one with the September "Sketch File" sketch until I'd finished the other set. 
So I sat down and finished the picture page AND made the journalling page - and then I did another picture page. wow!
This is the picture page for Shaw's Corner in Ayot St Lawrence, using the current September Simplicity sketch
I used:
Papers: Basic Grey
The little squares were punched from a second photo of the same place, which had lots of flowers in the foreground, then matted onto pale lilac card squares
Pink Seam Binding (Creative Treasures)
Tiny yellow buttons
2 x square punches


Next is a LO using the August "Going Round in Circles" sketch - as it's only just been completed it never actually made it onto the Sketch File Blog! oops.

Anglesey Abbey, nr. Cambridge
I used:
Papers and stickers: Echo Park, most of the flowers are cut from the same papers
I used several dies )swirls, Nesties Plain circles, Lacey circles, Labels)on these pages, all from Spellbinders
Lettering and circles for matting all cut on Craft Robo
gems all Imaginisce I-rocks

Please visit The Sketch File and see what the design team have been making over the last few weeks.  You've a week left to link a project using this sketch.
Thanks for looking today -please come back soon

Friday, September 23, 2011

Green Eggs and Ham

I'm having one of those days when things won't go right - even my pc isn't playing nicely today. Or maybe its the network - I know that trying to do anything on tinterweb is either really really really slooooooooooow, or doesn't happen at all - I wonder what will happen when I try to publish this? 
Hubby says he'll reboot the network later and see if that solves it.
Today it's Jo's turn to set the challenge over on the Daring Cardmakers and she's sending us all off to look at those bright and colourful Dr Seuss books all kids (and adults) love:
"I loved reading Dr. Seuss books when I was little and my children love them now so this week, I would like to see Dr. Seuss inspired cards - whether they feature Green Eggs and Ham, The inhabitants of Whoville, The Cat in the Hat or are inspired by the colours, font or rhyming phrases, it will be brilliant to see what you make!"
As usual I didn't have a clue what to do for this one, so headed off to do a Google Image Search in the hope of finding inspiration.  Scrolling through the pictures that came up I saw a photo of a "Cat in the Hat" cake and as cakes seem to be a feature of my card-making just now I thought I'd stick with the theme and do some "baking"!
I used a simple version of the hat as a starting point and Paint Shop Pro to get the template I needed to cut this with Craft Robo. I rotated the image so that the brim would become a plate, then used the paintbrush tool to make the top stripe look more like icing on a cake.  I drew in some icing drips and some candles, and then converted my picture to a Robo template and cut the various sections
My card base is supposed to give a nod to the bright colours on the front of the books.  I used Distress Inks direct to the card blank - I actually (shock horror) did that post-it note masking technique that "real" stampers do - what do you reckon to that then? hehehe - Joanne (Angelnorth) will be sooooo surprised!
 I cut some really skinny lengths of black card to create the border and again suing the Craft Robo I cut the sentiment in black card also.  This font is one my lovely DCM teamie Sharon put us on to, a free one called,, conveniently Dr Seuss
A bit of Stickles for some glitz and that was it all done.

I hope you'll go over and visit the Daring Cardmakers today - the cards are just fantastic! 

It's taken me all day to get this far so I'm going to stop now and hopefully it will publish!
Thanks for looking, please leave a comment :-)

Thursday, September 22, 2011

Sweet Treats

Two more of my cards made with the latest set of Crafty Templates - there's a bit of a theme with these two!
The first one uses the 3 Scoops template
 I've used the template to make a shaped card, with the folds behind 
the tops of the "scoops" of ice cream
Patterned Papers  from an Echo Park 6x6 pad
Bazzill card: red, cream, yellow, brown
EJ Success border punch, Glamour Dust glitter, Glossy Accents, 
Lettering is cut with my Craft Robo

For the 2nd card I've used the Cupcake Ticket template
I've used the large size cupcake template for the main part of the card, 
4 of the ticket templates cut in a small size, and topped with 
some tiny versions of the cupcake.
Papers are all Lime Twist 6x6 (MME). Yellow Stickles
Green seam binding (Creative Treasures)

The new set of templates has the usual mix of great templates, there are foodie things like I've done here, some lovely vintage dresses, plus a couple of other quirky ideas for you to try.

All the Info about Crafty Template Sets and the Crafty Goodies Kits is HERE

I've once again got a list as long as my arm of things to do so I should rally make a start.  Daring Cardmakers tomorrow and I've been struggling to think what to do - I think I've got a bit of an idea now, but whether it'll work is something else altogether - I'm thinking that it might be wise to go with a Clean and Simple design this time.
Firt port of call must be the kitchen because that's where the kettle is and nothing is going to happen till I've had another coffee!
Thanks for visiting, see you soon

Wednesday, September 21, 2011

Sofa, So Good!

Morning!
I've a "doubling up" card to share today!  This was the first of the cards I made for Crafty Templates this month because I knew as soon as I saw it that it would work for the current sketch idea on my other blog "The Sketch File". You can see the sketch on the right, and if you pop over to The Sketch File you'll find lots of ways that my lovely teamies have found to use it.

For my Crafty Templates projects this month I optd to try and make a dent in my own stash rather than use one of Leo's fabulous Goodie Kits - this is something I do from time to time, even though I have to fight the urge to say "yes please" to the offer of more of Leo's wonderful and eclectic mixes of papers and embellishing goodies. You can find out all about the Templates Sets and the optional Goodies Kits HERE

Here's my card using the Vintage Sofa template
Sofa Template: Crafty Templates September release
Sketch; The Sketch File Blog
Papers: MME "Stella and Rose"
Small square punch, Hand cut cushions, Letters cut on Craft Robo, Ranger Enamel Accents (black)
The flowers are all cut from the same paper set

I'll come back with my other Crafty Templates projects tomorrow


I just wanted to add a quick reminder about this week's Daring Cardmakers' challenge "How Many Candles"  - It was my turn to come up with our dare for this week and as it also coincided with my own birthday and the release of Funky Hand's Happy Happy Birthday CD Rom I thought a good old birthday card challenge was perfect.  There's a fabulous prize on offer too - a chance to win that very CD Rom from Funky Hand - so please click HERE to visit the DCM and find out how easy it is to join in.
That's all for now, Thank you for visiting

Monday, September 19, 2011

Just a bit more Funky!

A couple of weeks ago I realised that I'd got totally muddled as to the date I should have added my project on the Get Funky blog - I was so embarrassed!  For some reason I was so convinced that my day was near to the end of the Seaside themed Funky Fifteenth challenge and made my little card ready for then - only to check the actual date and find that I'd already missed it - and Anice and my teamies had been too kind to point it out!
Anyway, it seems a shame not to share it as I was really pleased with what I'd made!
It's this little Beach Shack shaped card:
I used:
Papers from Craft the Year Away CD (August Holiday set) plus the matching August freebie paper for the stripes, the sun image and the little fish images
I used one of my most-used Craft Robo templates to make the shack, then made a 
new one for the surfboards. 
I used the cut out Beach Hut to create a shaped card, using the slant of the roof for the fold line

After messing up with the August challenge, I made sure I didn't do the same this month - my card was made, blog post scheduled and all ready to go ahead of Jenny even doing her own introductory post!
This month Jenny's highlighting the new "Happy Happy Birthday" CD and simply want to see any sort of project with a birthda theme - as long as you use at least one Funky Hand product on your project you'll be in with a chance of winning a free download of your choice at the end of this challenge.
As always there's a Funky Freebie to use if you want to - if you don't already own and Funky Hand products you can download that one straight away and use it for your project.  This month's freebie matches the "Sunshine Birthday" set on the new CD and if you check out the Get Funky Blog you'll find out how I made my card

Well, we got back yesterday from a few days in Bruges - a surprise trip organised by my lovely Hubby.  We travelled all the way there and back by train - a first trip on the Eurostar and actually, the first long train journey I've done in years.  I was quite relieved when I found out that we would be travelling "somewhere" by train as I've really grown to hate airports in the last few years - I used to love not just the flying part of a trip but the whole being at the airport thing too.  Now it just seems that they make it more and more unpleasant at every chance they get.  I still love flying though - how nice it would be to be so rich that you'd just be whisked through the whole process without having to deal with the queues and all the other horrible mess.
I loved Bruges - obviously the chocolate features quite heavily in that feeling of love, but it's just so pretty with all the lovely old buildings, canals, squares etc.  We had good weather and spent most of the time out wandering around, seeing the sights and soaking up the atmosphere.  It's the sort of place which is compact enough to see without having to spend valuable time travelling between the "must-sees".  There will probably be sm=ome photos to share eventually, but for now.....
Honestly - I would share if I could..............
Thanks for visiting,

Friday, September 16, 2011

How Many Candles?

On the Daring Cardmakers this week it's my turn to set the challenge, and I'm tempting you to join in with the chance of winning a fabulousoooo prize!   
 We are joining in the celebrations for the launch of Funky Hand's latest 
Papercraft Factory CD and our lucky random draw winner will receive a copy of this wonderful, brand new CD rom
"Happy Happy Birthday"
Click to visit the unky Hand Website
Funky Hand design and supply a fabulous range of digital papers, images and templates for crafting projects. Visit the Funky Hand website and you'll find the fabulous Papercraft Factory CDs and also, for more instant gratification - downloadable paper and digi image collections.
Here's my challenge:
 How Many Candles?
 I'd simply like you to make a Birthday Card with at least one candle on it this week

The DCM team have all used Funky Hand papers from the "Happy Happy Birthday" CD to make their cards this week, but as you may not have any FH stash (yet!), you can use anything you like to make your candles card..  
If you would like to try using a Funky Hand Freebie, visit Get Funky! where you'll find this months new Funky Fifteenth freebie available to download right now.

 I've only got one candle on my card!
From the "Happy Happy Birthday" CD: 
all papers,  Birthday Muffin digi image (one of loads of images, sentiments and craft templates on there) - I used it to make a Craft Robo template and cut two sets of shapes - the second one a mirror image of the first so that it looks the same whichever way it twirls.
Other materials/tools: 
Craft Robo to cut the aperture, Stickles to decorate the cake, 
Baker's Twine for the bunting

I hope you'll help me celebrate my own birthday by joining in with us this week - I'm looking forward to seeing what you make!  Don't forget to check the BLOG to see the cards the DT have made and to get all the details about how to be in with a chance of winning our prize.
Thanks for visiting


Wednesday, September 14, 2011

Create and Craft 15th September

The brand new Funky Hand CD rom "Happy Happy Birthday" will be showcased by Anice on September 15th at 9am and repeated at 4pm


The Funkettes have all been very busy for the last few weeks making lots of things for Anice to take with her - and there are some absolutely stunning things to see - and lots of ideas for using all the new goodies on the CD
Here are a some of the samples I've made for the show.  


And now you know why I've been such a bad blogger lately!  Had my nose to the crafting grindstone, you see!
Thanks for visiting today - please pop back on Friday to see another Funky project :)

Friday, September 09, 2011

Flowers and Flutterbyes

A lovely first dare from Keilly for the Daring Cardmakers this week.
 Well, its Keilly here this week with my very first dare!
I've chosen an inspiration photo and would like you to use the colours from the photo and to also include butterflies!
So, apart from the butterflies (I'm not sure why I find them such a struggle to use, just me being weird, I expect!) it's a happy "back in the comfort zone" opportunity for me this week, with a great excuse for lots of flowers and ribbon to be strewn across my desk.
The cards the team have made are stunning and look especially beautiful all grouped together on the DCM BLOG, so please take a look - we hope you'll be tempted to join in this week!

Materials and Tools:
Papers from "Happy Happy Birthday" by Funky Hand for the background, the coiled flowers, circles and tiny butterflies,
3 shades of pink Seam Binding from Creative Treasures. the green *cherry blossom" flower and it's green ruffled edge ribbon rosette also from Creative Treasures

Large green flower (top left) made from 6 circles of white crepe paper inked with versa magic chalk ink and dipped in glue and Glamour Dust.
Coiled pink flower (bottom right) is coiled crepe paper, edged with pink ink and glittery stuff as before
Pink flower (top right) is 2 soft pink gardenia flowers with a coiled paper flower in the centre
Large butterfly is made from a 6-petaled white Prima, with 2 of the petals folded in and glued at the back.  The body is made with glass beads, wire and a glittery heart bead
Tools: Craft Robo for lettering, tiny butterfly punch, small circle punch
It seems a long list of stuff to put together, but in reality it was fairly quick and easy to put together as once the background is done it's just a case of adding flowers until you think it looks right!

Our kitchen plans are plodding on, we're now on the 4th draft of the plan and the layout is looking good, so we've moved on to looking at the elevations - which of course means there are bits we're not sure about - 2 rows of wall cupboards doesn't look right, the height needs to be divided into 3, but then I kept saying that and no-one listened...... hehe  Now the builder has hit a huge problem with the job ahead of ours so it's not really looking like he's going to get here at the end of the month after all.  Unless the problem at the other place is sooooo big that he has to leave it till after Cword. oh the joys of getting work done on your house.
Well, I'm off now to make a cup of coffee, give me a shout if you want one....
Thanks for visiting

Wednesday, September 07, 2011

It's Nearly Here...

The new Funky Hand crafting CD "Happy Happy Birthday" is released soon.  20 brand new paper designs in each of 12 coordinated collections, masses of brand new digital images, and a fun new set of templates for great projects.  And of course I mustn't forget those famous wordbooks.  This CD is part of the Papercraft Factory series, which is a breeze to work with
More info HERE
I thought I'd blog a couple of sneak peeks today to give a glimpse of some of the things the new CD has to offer. 

Materials and Tools for both projects
All papers Funky Hand's Happy Happy Birthday CD
Wordbook pages, cake images also from 
Funky Hand's Happy Happy Birthday CD
Coiled roses and flat blossom layers made with scraps of same papers
Wired Roses, Seam binding from Creative Treasures
Glamour Dust, Stickles, Cats Eye ink pads
Tools: Bind-it-All, various Spellbinder shapes, motif and flower dies, EK Success border punch, Craft Robo for lettering on photo 2

Lastly, here's the card I made for my nephew's birthday last week
Materials and Tools
The referee figure and the large football are Craft Robo Templates I've made using free clipart, small footballs are made using an old Qucikutz die
Wobble card template from  
Funky Hand's Craft the Year Away CD
White lines are hand cut from card scraps
White base card coloured with Versa Magic green ink pad,
Bazzill card: yellow, red, green, white, dark grey, peach, black

That's all for today, more crafting to get on with....
Thanks for looking

Friday, September 02, 2011

September Flowers

Daring Cardmakers Day again and as it's the first challenge of the month we're looking to the flowers associated with September for our inspiration.
Sadly even though the flowers are lovely this month - Asters and Morning Glory - I didn't feel at all inspired.  I think the old mojo is off somewhere taking a break.  I hope it comes back soon because I have masses of stuff to get done in the next few weeks!
Thankfully, my Teamies didn't have the same sort of issues though, so there's lots of lovely crafting to see over on the DCM BLOG today!
I thought tasters would be perfect for one of these fun pop up cards where a (relatively) flat card that will fit in a regular envelope pops out to form a box base with "bits sticking out" - that's a technical term, don't you know? hehehe
In my head it looked ok, but I think maybe a different choice of papers would have been better.  Never mind, you can't win 'em all.
I used:
Echo Park "Springtime" papers and stickers
Craft Robo to cut all the pink flowers, Hand cut leaves, Stems are wire covered with strips of paper
Punches for white flowers and the yellow centresYellow Button, Yellow Stickles, 
Turquoise seam binding (Creative Treasures)
Spellbinders labels die

Not happy with this card, I then made another - which I like even less! but thought I might as well share anyway as I like the idea of the bowl of asters - I think I should definitely have used the KISS (keep it simple, stupid!) theory with this one - it would have worked so much better - mind you I don't like that shade of yellow either, even though it's from the same set of papers as the rest..
I used:
Fancy Pants papers,  Tobo template for flowers, punch for centres
Spellbinders dies (I used a plain circle cut down for the bowl), Tiny letter stickers
Clear and Yellow dewdrops
Flower Lace, Pale Blue and Pale Pink seam binding all from Creative Treasures

With a bit of luck I won't make as much of a pig's ear of the crafting projects I need to do today - please wish me luck!
Thanks for visiting