Friday, April 29, 2011

By Royal Appointment

Well it was only right and proper that as today is not only  Daring Cardmakers Day, but the Wedding Day of Prince William and Catherine Middleton, that we go into celebration mode for this week's challenge!
It's Nat's turn to set the dare and she's asked us to get all Royal and fly the flag a bit this week with our cards, and there are some great ideas to see over on the DCM BLOG - we're hoping you'll get into the spirit of celebration and join in with us this week.
I wanted to try and get a vintage Royal Memorabilia feel to my card, reminiscent of all those old commemorative plates and mugs, and those wonderful old postcards you see in antique shops - hence the Kraft card base and slightly distressed ivory background card
Lots of roughly ruffled (ooh cute "couplet" hehe) seam binding and loads of flowers - wired, "flat" primas, coiled roses etc ,  plenty of pearls and a few sparkly bits.  The hardest part was getting the sentiment and the fancy surround to work properly.  I could have stuck the cream circle on to the "doily" spellbinders shape, but to make life difficult I decided I wanted the doily to be a raised frame (even though it doesn't actually have a hole in the middle).  After about three goes, I finally managed to get everything the right size - I had to Robo cut the circle from blue card, then centre that and cut the doily with a Spellbinders die.  I raised the frame up with little bits of thick chipboard, and finally got to the fun bit of adding ribbons and flowers!
I used:
Kraft card blank, cream pearly background card, Distress Inks
Bazzill (Blue, Red), Spellbinders Parisian Accents die, Seam binding (red, Ivory, Royal blue), various Prima and other wired flowers, flat Prima flowers, pearl sprays, crystal sprays, loose pearls, flat backed pearls, tiny gems, feathery bits came from some Joh Lewis flowers, organza rosette, red seam binding rosette.
(seam binding, wired flowers, pearl sprays all Creative Treasures)
I think that's all - I've got to go now, I need to get to the sofa and switch the telly on!

Have a wonderful day, Enjoy the wedding if you watch.
I'll catch  you all again soon

Sunday, April 24, 2011

Easter Weekend

What fab weather we've had this Bank Holiday weekend - we don't often get to say "Bank Holiday" and Fab weather" in the same sentence, do we hehe
We went for a bit of a jaunt of Friday - and an hour or so into our journey we remembered why we tend to stay at home on Bank Holidays - the roads were jam-packed!
We were heading for Oxburgh Hall in Norfolk, a National Trust property and somewhere new to us.  Having taken out a year's membership to the NT on our anniversary jaunt last July, we're trying to make the most of it in it's last few months.  Anyhoooo, it took longer than we expected to get there, but at least we'd taken some sandwiches with us, so were able to have a quick picnic before heading into the grounds.
Oxburgh Hall is a fabulous moated medieval manor house.  Mary Queen of Scots was held here for a while, there are tapestries made by her, and also by Bess of Hardwick who seems to be "stalking" us in recent months - we stayed in the EH holiday cottage at Hardwick Hall in March and it seemed that everywhere we go, Bess, or one of her rellies has also been,
The hall is completely surrounded by the moat and there's a pretty little bridge for access to the building, through the big gatehouse and into the very sunny courtyard in the photo below.
Isn't it all gorgeous?  I quite fancy a moated house with a lovely courtyard now hehehe
I had some crafting fun at the weekend too - there have been a couple of projects I've seen recently that I wanted to have a go at.  One was this adaptation of a Splitcoaststampers idea.  The original pentagonal tube was way too complicated, especially as I didn't have the five petaled flower punch to make the top and bottom sections.  So I made my box a plain old rectangular prism, with square ends - much more suited to my limited mathematical abilities!

The project sheet had the cute bunny on the front of the box, but the instructions weren't given for that, so I had a good look at the picture and worked out what shapes I needed.  Then I created them in Craft Robo - they are mainly just circles and ovals, but I needed to "draw" the ear shapes and features "free-hand" (should that be mouse-hand?), using the paintbrush in Paint Shop Pro.  I just built up the shapes on my Craft Robo sheet, then added in the extra PSP bits and fiddled about with the sizes until I thought they all looked right.  If anyone would like my template for this Easter Bunny, just email me and I'll send you a copy.
I used:
Bazzill card for box and bunny
MS border punch for lid trim,
Cream and green seam binding, pastel buttons  all from  Creative Treasures 
(Those buttons are soooo gorgeous!)
Black pen, white pen, pink cat's eye ink pad, pink Liquid Pearls

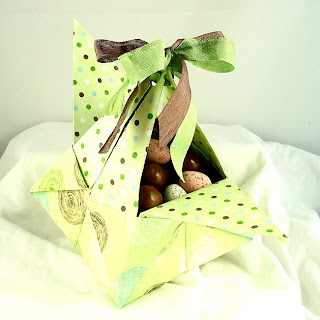
My second Easter Box is made using a video tutorial that my lovely Funky Hand Teamie Lucylou pointed me in the direction of a couple of weeks back.  Thanks Lou, what a fab idea this one is.
I made mine from a sheet of paper cut down to 10 x 10 square
Sorry, it's not a great photo so I'll try and do a better one tomorrow/
I used:
Paper: Bo Bunny Abbey Road, Mint Green and Chocolate seam binding from Creative Treasures
Chocolate mini eggs and Maltesers to fill the box with!
Hope your Easter is full of love and peace
Thanks for visiting, please leave a message before you go :)

Friday, April 22, 2011

All in a Day's Work....


Good Friday today, but still Daring Cardmakers Day, and although it's a National Holiday and most people are off work but Rein's challenge this week is use the workplace as our inspiration for making cards. 
She asked us to make a card perfect for a cook, gardener, lawyer, teacher etc for her dare:
"Professionally Speaking"
Here is my Hairdresser card:
I used a free clipart image to make my hair stylist template then cut all the bits using my Craft Robo.

I used:
Bazzill card in various colours, Bo Bunny "Crush" papers (6x6 pad), Shiny and mat silver card, Small Prima flowers, Spellbinders Large Scallop circles die, Promarkers I've just realised that I meant to add some glitzy bling around the mirror and a silver buckle for her belt, but as you can se, I forgot!

I seem to be making a habit of needing at least two attempts at getting a DCM card done - this week was no exception as a couple of days ago I started making a chef card using a fab template from an old set of Crafty Templates (March 09).  I made up the chef, but managed to get my inky fingers all over his "whites" so had to cut them all again - this time I carefully did the inking and left the bits overnight to dry. My other problem was that I hadn't a clue what to do with him once I'd made him - I couldn't think what sort of background to make.  Anyway in the meantime our lovely Zuzana shared her card with us and it is the the most cute and fab chef card AND she'd obviously planned the whole thing properly, unlike me!
So I made the hairdresser instead.
I did decide to finish the chef card though as all the bits were sitting there on my desk.  I'd found this Websters Pages sheet which was in one of the Christmas 6x6 packs while hunting for a background idea and when I found the quote "Don't mess with the Chef's buns" on a website I thought they'd all go together quite nicely.
I used:
Chef Template from Crafty Templates March 09 set, 
Cakes paper; Websters Pages, Red Paper: Basic Grey, Cakes cut with Craft Robo, 
Bazzill card, Black Enamel Accents for hair and buttons, Stickles; Fruit Punch, Sentiment; pc generated, Black Sharpies pen for doodling

There are some fab ideas for occupation themed cards on the Daring Cardmakers Blog this week, and we hope you'll feel inspired to join in with us.  It's also the last week of our DT call and all completed applications need to be with us by next Thursday (see blog for more info).
Right, it's a lovely sunny day and hubby is chuntering in my ear about how best to use it - it's hard to write while that's happening so if any bits don't make sense it's not my fault!
Hope it's just as lovely where you are.  Wishing you a wonderful, peaceful Easter-time


Other challenges:
Cupcake Layers
Charisma Make Us Laugh ( these cartoon images amuse me)
Cooking it up with Katie Pink Flowery Lady

Wednesday, April 20, 2011

Crafting on a Rocky Road

My crafting seems to have hit a rather rocky patch, so it seemed a good idea to roll with it when making my cards for Leo's Crafty Templates samples this month, and make them all Rocking cards!

This month's templates are the usual lovely mix of quirky and fun ideas that we expect from Leo -  she always manages to come up with so much inspiration for making fun cards and other projects - and her templates leave plenty of room for letting your own creativity fly.

I've used:
From Crafty Templates and Goodies Kit: "Candles" Template, 
All Papers & some buttons from Crafty Goodies Kit
From stash: buttons, flowers, Stickles (Yellow, Gold), home made rub on sentiment
Rocker card base is an oval shape folded in half

I've used: 
From Crafty Templates and Goodies Kit: "Spring Birdie" Template, 
Papers from Crafty Goodies Kit,  Basket made with scraps of yellow card from the kit
From stash: Ruffled gingham ribbon, turquoise ribbon, punched flowers, 
Liquid Pearls (white, red), ink, black brad.

I've used: 
From Crafty Templates and Goodies Kit:: "Two Little Chicks" Template, 
All Papers from Crafty Goodies Kit
Spellbinders Lacey Circle die, Inner circle cut on Craft Robo, border made with circle punch, Sentiment rub on as before.

This last one is my favourite, I love these little chicks and I love the peach and mint green colours together.  This template would be fab for so many card types - I've added hearts to make a wedding or anniversary card, but it would also work for a card with a musical theme - or just a card to say "hello"
Find out all you need to know about Crafty Templates and the Crafty Goodies Kits HERE

Well, as I've had a rather lazy morning sitting here, browsing the interweb, catching up on DCM commenting,  and a bit of "window" shopping I suppose I should try to be a bit more productive this afternoon. 

BTW watch out for the Easter Sale over on Funky Hand :
25% off everything sale on the Funky Hand website from 10am Friday 22nd April until 10pm Monday 25th

That's all for now, time to kick the Bad Fairy of Procrastination out of the house!
Thanks for visiting

Monday, April 18, 2011

Look! a Book

Ok, so it's an album really but that didn't rhyme so well :) or at all!
I decided that maybe the way to kick-start my crafting mojo was to do something other than a card, so I've made this album - or at least the cover for it.  Whether any of the pages get used remains to be seen, but I enjoyed putting this together so I hope I'll manage to do something with it.  Just don't hold your breath.
Actually the design for this is something I've been meaning to do ever since I "drew" the current Sketch File sketch.  I thought it would lend itself really well to a book with a wrap around closure.

I've another idea for using the sketch too, so with a bit of luck I might even get round to making that too before the new sketch is due up.

Incidentally, if you have time, please pop over to The Sketch File
and see what Jackie and Lynda have made with the same sketch - and we'd love it if you'd join in and make something using the LO too.  There's no "closing time" on the sketches so pick any of them that appeal and see what you can make - leave a link and we'll add it to our sidebar and come to see what you've made.

So, back to this album. I made the wrap around flap nice and wide so that if I want to make my pages bulky it should still fasten nicely.  I may have to change the Bind-it-All wires it'll do for now.
As you can see there's no title - that's because I've made loads of things like this in the past - full of grand plans for what will go inside - then two pages later (if it's lucky enough to get that far) it's gathering dust on the shelf, so I'm not committing myself to anything hehehe.
 I have, however added some card pages all ready for action.....the pages are big enough for 6"x6" layouts or photos.
I made the rosette decoration with layers of organza ribbon, lace and a couple of gorgeous flowers.  The ribbon is about 4cms wide and navy blue.  The lace started off white, but I sponged it over with ink to get a better matching colour - it's gathered already and has a bound edge, but I ran a thread through the binding to pull it into a tighter shape.  One of the two flowers was already this perfect orange colour, the other is a soft creamy-beige but I gave the petals a bit of orange  ink to pull the two together.
To make this album I used:
Cereal packet chipboard, Bo Bunny papers, MS edging punch
Lace, flowers and some ribbons from Creative Treasures
Faux brads, Chipboard photo corner, Large eyelets for ribbon closure,
Bind-it-All tool and wire, Glossy Accents, 
Bazzill card in toning colours for pages

Thanks for looking, I hope you like what you found here and will come back soon :)

Friday, April 15, 2011

Springs for Spring

We're celebrating the season over on the Daring Cardmakers this week and making cards with a Springtime or Easter theme.  For an added challenge we're suggesting you add some extra springiness or bounce to your card in some way - so a bit of a double-dare this time!
My plan was to make a wobble card which also had flowers on wire springs.  
Version 1 was a lovely yellow colour card with spring-green flower design open-weave ribbon over it - I made the whole thing then decided it was rubbish - so I pulled the flowers apart and made new ones for Version 2, which I also hated so saved the wire springs and threw the rest in the bin.
For Version 3 I ditched the wobble card idea, made flowers using my new Spellbinders die set in various spring colours plus the sentiment piece made from another of my new Spellbinders die sets.  Too many colours, it looked like a dog's breakfast.
The card I'm sharing is V4 and tbh it still looks a mess to me - but maybe that's because I'm sick to the back teeth of trying to make it work.  Also the photo is rubbish as it looks as though the pink flower doesn't match the pink on the card when in reality they were cut from the same sheet of paper - honest!

I stuck to pink and lilac in the end and ditched the Spellbinders flowers in favour of the MS Doily punch.  I think only the wire springs made it through to the finish!  
I've used:
All Papers: Funky Hand Rainbow Polka Dots download
All the following are from Creative Treasures:  
Long Pink headed pin, Tiny lilac glittery dots
Seam binding (2 shades of pink), 
White ruffled lace (its gorgeous, but doesn't show up too well in the photo, sorry).  
Tools: MS Doily punch, Spellbinders Parisian Motifs and Floral Doily Motifs Die sets

As you can probably tell from my tale of woe making this card, I'm still struggling to find my mojo and it's really disheartening  - well you all know about times like this, eh?  Anyway, today I'm going to try making something other than a card and see if that helps somehow.

Please check out the DCM blog for some stunning Spring and Easter cards - and if you visit the various personal blogs too you'll find loads more things to inspire.
Thanks for visiting

Wednesday, April 13, 2011

Get Well Soon

I'm still struggling to find any crafting mojo.  I was hoping that having a few "got to be done" projects would kick-start me into action but it's not really working.

Anyway, here's the Get Well Soon card I made for a chap at hubby's office - following a virus he caught recently, he's developed a very rare syndrome which has left him in hospital being poked and prodded by medical students, and it could be several months before he's well again. 
This is a chunky old card - a whopping 8 inches square  well, it's huge for me anyway.  Maybe I'm trying to feel less panicked by big spaces hehe
 If you think you've seen something like this before, well, you have - I used the same basic idea to make my cousin's "I' don't do birthdays" card last year. I thought having all those Med students investigating him he'd be looking just like this little guy!
For this version I've used:
All papers are from MME "True Blue" 6x6 pad (there's no real blues in it though....)
Brown grosgrain ribbon, Fibres for hair, Googly eyes, faux brads, 
Sentiment and mat are cut using my Craft Robo

Thanks for popping by today,

Friday, April 08, 2011

Draw a Bird Day!

It's Lythan's turn to set the dare for the Daring Cardmakers this week and she's found something fun to challenge us with
"Did you know that April 8th is officially draw a bird day? 
Me neither until I was stuck for a dare and looked up the significance of April 8th. 
So let's give it a go!
Draw a bird
If you really can't face drawing your own bird then I will allow stamped 
or paper pieced birds as well."

Well I can't draw for toffee - it's something I'd quite like to be able to do but am too lazy to go to classes to learn!  But I decided not to chicken out (ooooohhhhh a pun, a pun hehehe) - after all it's supposed to be a challenge, isn't it?
Here's the card I made
I took my inspiration from the MME 6x6 pad "Tickled Pink" and used papers from the pad to make the card.  There are lots of little birds on the paper and I drew my own bird on one of those. One of the papers has bunting at the top and another has little birds standing on lollipop flowers
I used:
All papers: My Minds Eye 6x6 pad "Tickled Pink",
Spellbinders Dahlia dies to make flowers, Gingham Ribbon, 
Brads, Stickles (Black, Orange), Homemade decal rub-ons for sentiment
 I drew the lines for the bunting then just hand-cut little triangles to stick along them - I left the lower points unstuck so I could curl them up for a bit of a fluttering effect
This was version 2, I didn't like version 1 and I'm not very keen on this one either but yesterday went rather to pot so I didn't get round to trying again!
Still hoping the mojo fairy will pay a visit soon!

Thanks for looking - please check out the rest of the team's cards and don't forget the DT call on the Daring Cardmakers, it's a fab team to be part of and there's still plenty of time to get your applications in.

Wednesday, April 06, 2011

First WOYWW in my New Craft Space


I thought it was about time I joined in with Julia's Wonderful What's On Your Workdesk Wednesday again - now that I'm starting to move my stash into it's new home - and as I've even started making something on my new desk!  
It's still very much a Work in Progress, so please forgive the mess - I've moved some stuff in over the last few days, but then I needed to make a Get Well card (the one half done on my craft desk) so decided I'd just bring over the stuff as I needed it and stick it in one of the holes!  I suspect there will be much "shuffling" before I'm properly settles in.
BTW I'm going to be kind and share some of these holes with hubby - maybe the ones right at the top so he has to go and get the ladders to reach them! hehehe
Our computer desks are side by side along one sidde of the room, this is mine.
 I'm busy making the words I need for my card ready to cut on my Craft Robo. In the photo I'm joining the letters together, after this I copy and paste them so that one version will stay as they are and I can select and modify the second version to make the mat.
Here is my craft desk - I had to wait until the sun had moved round to the side window before I could take a photo without loads of shadow on - it was way too bright this morning.  Eeven so, it's a rubbish photo, so I apologise for that.  On the card I'm making you can see the finished lettering that I was making earlier.
Finally, I thought I'd show you the big bank of shelving which is on the opposite wall to the pc desks.
Most of the space is still empty and I keep changing my mind about where the drawers and cupboards should go - most of them are still empty too!
Thank you for visiting today - I hope you enjoyed your visit and will come back soon to see how I'm getting on with my Stash Shifting!
Check Julia's BLOG for lots more Craft Space links! 


 ps. Don't forget the DT call over on The Daring Cardmakers 

Monday, April 04, 2011

Sketchy!

There's a new LO sketch over on The Sketch File Blog today - I'm in the naughty corner as I've not made anything with it yet - but please pop over to see what Lynda and Jackie have made as they are both gorgeous!
I'm still in the process of moving my stuff into the newly renovated study - it seems so much bigger and job than moving it all out of there was!  And that was bad enough.
You know?  It's the little things that are causing me the most bother - I just can't figure out where to put all my little bottles and stack-ups of brads, eyelets etc
As for actually making things....well there's none of that happening yet - the most creative thing I've done since last Wednesday is cover some boxes.
Oh Little Fairy of Mojo, where could you be?
Hey ho, hopefully she'll fly this way again soon, I miss her!

Just in case you've missed it - a quick reminder about THIS

Friday, April 01, 2011

Spring Fever

Gosh, I'm such a rubbish blogger atm.  I'm a rubbish crafter too - I've hardly sat at my craft desk lately - maybe it's just that being squished in a corner just doesn't fill me with creativity.  Hey ho, this weekend we'll be moving the computer stuff, our junk, craft stuff and hubby's giant desk back into the study.  No doubt I'll spend the first few weeks shuffling stuff around until I figure out where everything would be easiest to find and use.
Anyway, all I've made this week is my card for the Daring Cardmakers, which will double up as MIL's Mother's day card, and a little wallet to put her gift cheque in - she mentioned wanting to buy a couple of new plants for her garden so we jumped at the idea of giving her the wherewithal for her MD gift
There's exciting stuff happening on the  Daring Cardmakers Blog atm.  Not only do we have the fabulously talented Zuzana staying on the DT full time (we just couldn't bear to lose her!) but we also have our very first DT Call-Out - if you click HERE you'll find out more.
Gosh it's all happening! hehe

Well, as it's the first Friday of the month (as well as the first day), it's back to our year long monthly flowers theme, April's flowers are the Daisy and the Sweet Pea - two lovely flowers to play with.
I've used instructions I found on the net for making sweet peas using a Butterfly punch - I didn't have the right sort of punch so I found a clipart image and used it to make a Craft Robo template. Sneakily, I've used the same vase template as for my daffodil card last month hehe
I was quite pleased how the flowers turned out. 
For the background I used lots of Distress Inks, but looking at the photos you wouldn't know it!
You also can't really see the beautiful lace so I took another photo with some blue card underneath the lace just to show how pretty it is - there are fine silvery threads in the lace, but they don't show up even on the detail photo!
I used:
Craft Robo: Butterflies for flowers and vase, Punched leaf shapes, Distress Inks, Glossy Accents, Tiny Gems (Anita's Gem Wheels), Green Ribbon, Lace, Pearl (inked to match the ribbon), 
Bazzill card, Papers for flowers: Fancy Pants, PC generated sentiment, DL white card blank

 We'd love to see lots of lovely Daisy and Sweet Pea cards this week, so please join in with us - you can see the cards the team have made HERE - just scroll down to the post after the DT call out message.  If you'd like to join us on the team we'd love to hear from you - it's great fun being a Daring Cardmaker - I've been on the team since the start and I've loved every minute!

I'm sorry I've not done much blog visiting lately, but soon everything will settle down to "normal" again and I'll have all the fun of catching up with my favourite blogs and hopefully finding some new favourites too!
Thank you for visiting