Friday, August 30, 2019

The Resistance


Hello

I hope this Friday finds you well,It's been pretty hot and sunny here this week, which is lovely - but I've not enjoyed the horrendous hayfever symptoms that have dogged me all week!

We're looking for a bit of resistance over on  the Daring Cardmakers this time!
It sent me looking for the Muse album "The Resistance" on my phone to play while I made the card - only to find that I've not put my music onto my new phone since getting it back in May!  ooops!

Nat says:
This week I'm challenging you to embrace one of my favourite techniques of the moment: the resist technique.

You can accomplish it in a variety of ways using:
Heat embossing to resist ink, watercolour or other media,m Masking paper or  masking tape, Resist spray on its own or in combination with stencils, Masking fluid or a masking pen with watercolour, Wax crayons.....
I'm sure there are other methods you'll think of! :)
Click HERE to see what the team made this week 
 For my card I decided to use my hot foil machine and try a technique I've seen other people use but not tried myself. It involves using inks over the top of a foiled image - the foil resists the ink as you can see

Info
The first step was to do the foiling - I used silver foil and a Spellbinders Glimmer Hot Foil plate for this.
Next I chose several Versamagic ink pads in blue and aqua shades, and applied them using small scraps of old wet wipe.  I'm not confident with free-hand inking etc, so rolled up pieces of the cloth made it easier for me to get the look I wanted
While the main section was drying off, I inked up a longer length of card with stripes in the same way as before, plus inked a few scraps of card to cut the little circles from.
The main piece was matted onto silver card, then onto a dark blue card base. A narrow strip was cut from the extra striped piece and also matted onto silver.
I added a couple of strands of Baker's Twine and some faux brads
The 'to you' piece is trimmed from a longer loopy sentiment die, and the tiny circles are the berries from a Holly die set 

We'd love to have you join in with us this week, just click on the Daring Cardmakers link to find out more

Thanks for looking in today, please leave a comment to tell me what you think!

Happy Crafting!


Friday, August 23, 2019

I'd Like to be... Under the Sea


Hello

I hope this Friday finds you well, and all ready for the Bank Holiday Weekend - the last one till Christmas......🤯
Still it's warm and sunny and hopefully will stay like that for a good few weeks yet!
We're heading under the sea for the Daring Cardmakers this time, and it's had me singing that "Octopuses Garden" song all week!

It's Svenja here and I'm kind of sticking with last week's watery theme. Because...

I'd like to be... under the sea...

I would like your cards to feature any kind of underwater life. Virtual extra brownie points for octopusses (with or without gardens).

Hope this crafty weekend goes swimmingly for y'all.

Click HERE to see what the team made this week 


Info
I startred by using a few pale watery shades of ink to add some colour to my card front.
Next I used a large Studio Light stamp and a slightly darker bleuey-green ink to add the water bubblespattern
I wanted to use a piece of netting as the next layer, but having gone through my 'useful stuff' box twice, I realised I didn't have any, so instead I made a quick trellis template for cutting on the Silhouette Cameo.  After inking it to the greeny colour I was after I scrunched it up in my hands to add some shape and glued it quite 'loosely' onto the card
The seaweed, octopus, fish and crab are all die cut using die sets from
Spellbinders. The seaweed is actually branches from a Cherry Blossom set.
To finish I added tiny googly eyes to the sea creatures, some dots 
of Ice Stickles to some of the water bubbles and a
 silly sentiment, which I'd printed out on the pc

We'd love to have you join in with us this week, just click on the Daring Cardmakers link to find out more

Thanks for looking in today

Happy Crafting!


Friday, August 16, 2019

Dib, Dab, Dob, Splish, Splash, Splosh


 Hello!

I hope you're having a great Friday, its sunshine and showers all the way around here today.


As usual, on Fridays it's Daring Cardmakers day and this time it's Joanne in the Challenge Setter's Seat


Splish, Splash, Splosh
It's Joanne here this week and I'd like to see you get loose and unstructured with watercolours, inks or paints to create a focal point, background or accents for your project - sploosh, spray and splatter to your heart's content! It can be a little bit scary when you're not in total control of the results but it's fun to let go and remind yourself there's no right or wrong every once in a while!
Click HERE to see what the team made this week 
 

Info
I started by applying lots of water over a piece of watercolour card.
Next I chose four Distress Oxide colours and using bunched up scraps of old wet wipe I dabbed the colours on randomly until the card was covered, dried it off with a heat gun.


 Using one of my favourite die sets from Spellbinders (its actually part of a set for making a little book) I cut the fancy aperture into a plain white card blank. Then the inked panel was cut to size and glued inside the card.
For the butterflies I used the spare strip of inked card and a piece of textured gold card from Craft Perfect. The butterfly dies are from 2 different sets one by Hunkydory and the other by Couture Creations - both are fab because they have a plain shape and a fancy one. 
To complete I used another Spellbinders die to cut the swirly 'with love' in gold card - because the loops remind me of a butterfly's flight path! Finally I added some teeny circles cut using the berries from a holly die set - which I use more for things like this than for making holly!


We'd love to have you join in with us this week, just click on the Daring Cardmakers link to find out more

Thanks for looking in today

Happy Crafting!


Tuesday, August 13, 2019

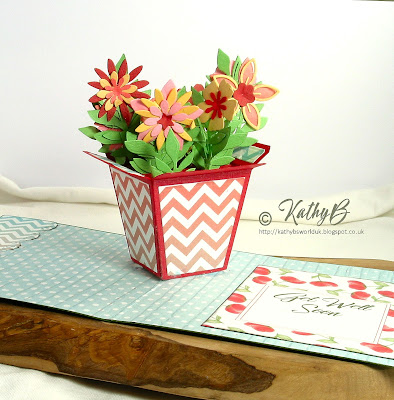
A Pot Full of Flowers


Hello!

I hope you're having a good Tuesday - it's been dry here all day so far, and yesterday we didn't even have any thunder - I was beginning to think it was now mandatory to have at least half an hour of thunder rumbling away each day!

A couple of weeks ago my lovely neighbour was rather poorly so I thought I'd make a card to send some Get Well Soon wishes through her letterbox. Today I'm finally getting round to sharing it on here.
The structural part of the card is made using one of Karen Burniston's pop up card die sets, but I used a different die set to make the flowers.


Info
The flower pot was made first; I used red Bazzill card and digital design (info below) for the pot. then lots of scraps of card for all the flowers.
The flowers were created with various flower dies, but mainly those from Hunkydory's Moonstone "Fabulous Flowers" die set.

For the card base:
I've used a few of the papers from the
Cherry and Mint In Bloom Digital paper download set printed onto white Bazzill card, plus a base card made from green Bazzill card.  
Usually I use a heavier weight for card blanks, but this was going to have more layers and needed to fold (relatively) flat so I started with something thinner.

The Sentiment panel was created by cropping one of the paper designs to the shape I needed, then using Paint Shop Pro to create the box for the text and the Get Well Soon message.  Once that was all done, I resized the whole thing to fit the space on my card and printed it out.
The pop up is really clever, you just need to be careful and make sure all the flowers tuck inside when the card is closed.
Here it is half closed
I made a slide on/off Belly Band to keep the card closed and decorated it with more flowers and leaves.
All the patterned papers i used were from the digital paper set mentioned above.
Here's the closed card
My neighbour loved the card, and I'm happy to say she's up and about and almost fully recovered now.
I love this pop up and used it again to make another card which I'll share soon!


That's my lot for today, thanks for visiting

Happy Crafting!

Friday, August 09, 2019

1,2,3,4,5 but I didn't Catch a Fish Alive!


Hello!
It's been blowing a hoolie out there all day today, and we've had a couple of squally showers.  I know the forecast for some areas is pretty awful, so I hope you all stay safe. 

This week it's my turn to set the challenge for The Daring Cardmakers and it goes like this:


1,2,3,4,5

This week I'd like you to make cards using 1 of something, 2 of something, 
3 of something, 4 of something and 5 of something. 
 It sounds tricky, but once you get your head around the idea, you'll be just fine!
 eg. 1 image, 2 colours, 3 flowers, 4 brads, 5 gems
Go on, challenge yourself, I dare you!
Click here to see what the team made and what they used.
My 1,2,3,4,5 things were 1 word, 2 butterflies, 3 pearls, 4 poppies, 5 patterned papers


Info
White card blank
Die-cut hexagons cut from 5 of the designs in the Seaside Chic and Ice Cream Social digital paper sets from Raspberry Road via Etsy.  I used 2 hexagons from each of my chosen papers to create a bit of a random background
The 4 poppies (3 fully open plus 1 just opening😉) were cut from red and green card scraps, with a bit of added inking.  The die set is by Joanna Sheen
The word is also die cut, I think its a Sue Wilson die, but not absolutely sure
the 2 butterflies were die cut using the smallest in a Memory Box butterfly Trio using scraps of the same patterned papers
To finish I added 3 turquoise pearl gems behind the pink butterfly


I would love it if you'd have a go at my challenge this week - you can join in with us by leaving a link to your creations over on the Daring Cardmakers blog, then I can come over to visit you and leave a comment. Thanks for looking in today

Happy Crafting!

Friday, August 02, 2019

August Elemental Inspiration


Hello!
Gosh I'm late today!
It's been one of those weeks - we all have them, don't we?
Anyway, I'll keep this short (for once!) and try to get it posted before something else comes up!
On the Daring Cardmakers Blog today we've our August Elemental Inspiration challenge.  It was my turn to choose the picture so I hope you like it and feel inspired to join in with us.

As usual our first challenge of the month is an
 Elemental Inspiration Challenge.  
 For August we have this beautiful Summery Mood Board
 Remember, you just need to pick a minimum 3 elements  from the picture to use when making your card.  If you choose to use the colour palette, then that would count as one of your elements
Suggested elements; 
Fairground, Sunglasses, Shells, Hearts, Beach, Parasol, Sunset.....

I liked all the squares and rectangles so decided to have a go at using them, along with the gorgeous sultry pastel shades to make a background for my card. Then I chose the hearts and the flowers to make the focus element.
Info
To begin I inked up several scraps of smooth white card, then cut them up to create the background
I used larger pieces of more inked up card to cut out the heart shapes using a fabulous dies set from Right Rosa
More inked card for the flowers, but this time I used a thinner Bazzill white card.  The dies are from the Moonstone range by Hunkydory
I layered black and white die cuts for the sentiment, Happy is by Polka Soodles and Birthday by CraftStashUK
I added some Glossy Accents to some of the heart shapes, and finished off with a few tiny black gems for the flower centres

I like the way the background worked.  Probably because it was just a case of cutting the bits to fit across the card!
I hope you'll pop over to see the fab cards the DT have made this week, and of course it would be wonderful to have you join in with the Daring Cardmakers this week

Thanks for looking in today

Happy Crafting!