Thursday, July 24, 2025

Elegant Christmas

  Hello

welcome to my little crafting place! 

It's Spellbinders Club time again, and as it's July it must be Christmas!

This time I'm sharing a stylish card using the July Wax Seal of the Month and the Glimmer of the Month

This seal is a real beauty, and I'm loving using it so much! 

I had a bit of fun turning it into a motif for a fairisle jumper and then making it the central motif for a collage,  and tnow I've a more complicated, 3 layer seal in gold, white and black, which is always a stylish colour palette!


This time I made the seal in white, then cut out the central section with scissors.  Step 2 is to use the 'pour and scrape' method, heating the stamp a little, popping the white motif back into it then stamping into gold wax and scraping away the excess with a heated spatula. The 3rd stage is to stamp the whole thing into black wax then remove the spare wax from around the square brass seal.  Sometimes just bending it brings the excess off, but I usually use a craft knife for this bit.  Alternately, I use scissors to cut around the finished item when it comes away from the seal.
 I hot foiled a piece of matte gold card with the Glimmer plate and shiny gold foil, then cut off a strip to use on the card (I can use the rest on more cards)
 

The front of my card blank was embossed with the lovely Lined Corners 3D Folder, then the gold strip adhered in place. I added the wax seal and finished off with a twine bow.

The sentiment is from a new BetterPress set, but I hot-foiled it on a strip of black card with gold foil. BetterPress plates work beautifully with hot foil machines!

I used
 
from Spellbinders;
Just a Note
~~~~~~~~~~~~~~~~~~~~~~~~~~~~~~~

  THIS is my Affiliate link to the Spellbinders store 
-  you can use it to access the store whenever you buy from Spellbinders
It doesn't cost you anything, but I may get a little reward for pointing you there.
There's a UK based shop now, so you can use the 'Visit Our UK Store' button at the top right of any page on the Spellbinders site  

~~~~~~~~~~~~~~~~~~~~~~~~~~~~~~~

Thank you so much for coming by

 Happy Crafting, Take care of yourself, and please come back soon!
 
 Kathy xx


Gingerbread Gift Bag

Hello

welcome to my little crafting place! 

It's Spellbinders Club time again, and we're still having fun with 'Christmas in July' crafting. This time I've made a gift bag, and used the Gingerbread man Deluxe Caboodle club gift to make a tag to decorate it


The actual gift bag is made from a sheet of A4 80gsm card printed with one of the designs from my ever-increasing collection of digital downloads. The bag is about 15cms high, 10cms across and about 4cms deep, so a good size for a smallgift, like a bag of nice chocolates or a set of mini toiletries etc

For the tag I cut the middlesized scalloped circle from Scallop Journal Cards and trimmed to leave 5 scallops and a bit of extra card to stick to the back of a simple rectangle. At the lower edge added a cut-down piece from one of the borders in the  Stitch & Dots Scallop Borders set. I used ribbon to conceal the joins

The gingerbread man is made the same way as on an earlier post, and I added candy canes from the July Small Die of the Monthand the little hat from last month's Walrus set (I punched a circle to use for the bobble)) and added a spring 'wobbler' between him and the tag base


 Materials
 
from Spellbinders;


Other 
80gsm white card aprinted with digital download design
Spotty ribbon
narrow satin ribbon 
 

  Just a Note
~~~~~~~~~~~~~~~~~~~~~~~~~~~~~~~

  THIS is my Affiliate link to the Spellbinders store 
-  you can use it to access the store whenever you buy from Spellbinders
It doesn't cost you anything, but I may get a little reward for pointing you there.
There's a UK based shop now, so you can use the 'Visit Our UK Store' button at the top right of any page on the Spellbinders site  

~~~~~~~~~~~~~~~~~~~~~~~~~~~~~~~

Thank you so much for coming by

 Happy Crafting, Take care of yourself, and please come back soon!
 
 Kathy xx

Wednesday, July 23, 2025

Wax Seal Centrepiece

 Hello

welcome to my little crafting place! 

It's Spellbinders Club time again, and as it's July it must be Christmas!

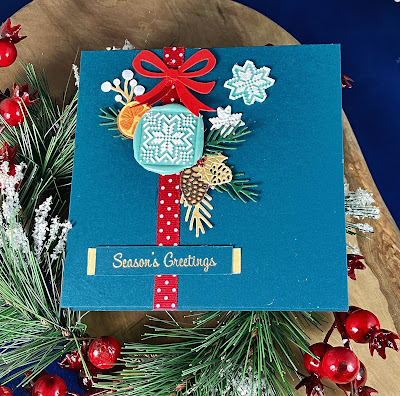
The July Wax Seal of the Monthis a real beauty, and I've enjoyed using it so much! I had a bit of fun turning it into a motif for a fairisle jumper and this time I've used it as the centrepiece of a Christmas card and combined it with elements from one of the brand new Christmas releases from Spellbinders

This seal has the same aqua and white colourway as the one I s I used on the jumper, but this time I didn't cut out the square but left it as it was - more like a traditional wax seal.. As before it's made using the 'pour and scrape' method, heating the stamp a little, pouring the white wax and scraping away the excess with a heated spatula, then pouring the aqua wax and placing the stamp (with the white pattern still in it) into it.
This time I made the white a little brighter by adding white glass pen ink to it 
I also made a couple of extras of parts of the seal's pattern, the smaller oneis all white, the other was another of the aqua and white ones, each were trimmed to leave just part of the design 
The sentiment is from a new BetterPress set, but I hot-foiled it on the same teal card with gold foil


I used
 
from Spellbinders;
Just a Note
~~~~~~~~~~~~~~~~~~~~~~~~~~~~~~~

  THIS is my Affiliate link to the Spellbinders store 
-  you can use it to access the store whenever you buy from Spellbinders
It doesn't cost you anything, but I may get a little reward for pointing you there.
There's a UK based shop now, so you can use the 'Visit Our UK Store' button at the top right of any page on the Spellbinders site  

~~~~~~~~~~~~~~~~~~~~~~~~~~~~~~~

Thank you so much for coming by

 Happy Crafting, Take care of yourself, and please come back soon!
 
 Kathy xx

Tuesday, July 22, 2025

Fairisle Knitting!


Hello

welcome to my little crafting place! 

It's Spellbinders Club time again, and as it's July it must be Christmas!

I come from a family of women who are/were accomplished knitters. My Grandma was brilliant - she could knit using four needles, circular needles, and all that clever stuff! She could knit socks, Aran patterns, Fishermens 'Ganseys' and Fairisle patterns with their intricate patterns made in lots of coloured wool all at the same time, the ends of which she would into little balls fixed with safety pins and dangling off the back of her work.  I think she was probably the one who taught me to knit - But, I never took to it and was such a disappointement! I can clearly remember her saying "I don't know who you take after" (in a Northumbrian accent, of course), as I loved sewing but loathed knitting.  I think I found out eventually as when I looked into my family history I discovered that my Great Grandmother on the other side of the family had been a seamstress. I actually made contact with a fellow researcher who as a young girl had lived next door to my Great Grandma and told me that the house was full of things she'd made and embroidered, and I also have photos of her daughter wearing dresses her mother would have made

Anyhoo, the July Wax Seal of the Month reminds me so much of those Fairisle pr Scandi knitting patterns I saw my Grandma knitting.  So I just couldn't resist using it to make a Christmas Jumper shaped card!

I started by making a bunch of seals using this stamp, but as I already had this in mind I made several with the same aqua and white colourway.#These are all made using the 'pour and scrape' method, heating the stamp a little, pouring the white wax and scraping away the excess with a heated spatula, then pouring the aqua wax and placing the stamp (with the white pattern still in it) into it.

 Next I made a jumper design on the pc using an old template I alredy had and altering it to get what I wanted. I resized the image so it would fit in an envelope and printed it out on paper.  I used this as a template for cutting the fron of the card in a pale turquoise card stock. The actual folding section of the card is a piece of plain white card glued to the back of the jumper section

I used a blending brush to add 'texture' with a couple of deeper shades of ink, then adhered my wax seals in place.
You'll see that I changed my mind about the style of jumper I was making and just added a freehand cut polo neck
 To finish I used the Let It Snow sentiment from Snowman Scene Etched Dies and holly from Sealed Holly Sprigs which are great dies for using as they are or for separtaing the individual leaves to add to projects

I used
 
from Spellbinders;
Just a Note
~~~~~~~~~~~~~~~~~~~~~~~~~~~~~~~

  THIS is my Affiliate link to the Spellbinders store 
-  you can use it to access the store whenever you buy from Spellbinders
It doesn't cost you anything, but I may get a little reward for pointing you there.
There's a UK based shop now, so you can use the 'Visit Our UK Store' button at the top right of any page on the Spellbinders site  

~~~~~~~~~~~~~~~~~~~~~~~~~~~~~~~

Thank you so much for coming by

 Happy Crafting, Take care of yourself, and please come back soon!
 
 Kathy xx

Tuesday, July 15, 2025

A Dark Snowy Night


Hello

welcome to my little crafting place! 

It's Spellbinders Club time again, and as it's July it must be Christmas!

For years and years, sometime around the end of September,  I'd start to *think* about Christmas. Then I'd have a little panic as I had no idea what to do for my festive greetings cards!  
So after harrumphing a bit about the whole Christmas in July thing, now I realise it's not such a bad idea for me to do a few seasonal things, plant the Festive Seeds and let ideas germinate in the back of my mind for a while longer!

The snowflake Glimmer of the Month plate is so beautiful - and perfect for quick, simple and stylish cards. You don't really need to add much at all to this design to have some beautiful cards made in double quick time.  And that has to be a good thing!

This one is super-simple, as I foiled the plate directly onto my black card blank!
You don't even need to add a shim as the back of the card provides that.  I Used the silver foil that comes in the club kit and it looks fabulous on black.
 
You need to be careful about getting the allignment of the plate along the fold line. I line up the plate with the fold and fix it in place with strips of washi tape that make a kind of hinge that goes to the back of the card.  This means you can now lift the plate to add the foil between plate and card.

I also foiled one of the snowy sentiments from the Glimmer set onto black card and matted onto a scrap of silver card
To finish I just added a few silver gems in different sizes 
 

I used
 
from Spellbinders;
Silver foil 
  
Other:

Black card blank
SilverGems 
 
 
Just a Note
~~~~~~~~~~~~~~~~~~~~~~~~~~~~~~~

  THIS is my Affiliate link to the Spellbinders store 
-  you can use it to access the store whenever you buy from Spellbinders
It doesn't cost you anything, but I may get a little reward for pointing you there.
There's a UK based shop now, so you can use the 'Visit Our UK Store' button at the top right of any page on the Spellbinders site  

~~~~~~~~~~~~~~~~~~~~~~~~~~~~~~~

Thank you so much for coming by

 Happy Crafting, Take care of yourself, and please come back soon!
 
 Kathy xx