
Hello!
I love making these roses, they always draw admiring comments as they look so beautiful and effective - the secret is, they are not nearly as difficult to make as people think!
I've added lots of photos to this tutorial, so hopefully you can see clearly how its done. You can click on them if you need a larger view.


I like to use Bazzill-weight card for my roses as it holds its shape really well. Once you've got the idea you can experiment with other paper, card etc
You'll need to die cut, punch, or hand-cut 4 flower pieces, all the same size.
I prefer to use a 6 petal flower for roses, but they can be made with 5 petal ones or ones with a couple more - you may have to adjust the number of shapes you start with and which of the layers you need to make
With scissors cut out the centre of three of the flowers and make other cuts as indicated in the photo below
From the first flower you get the inner "bud" (layer 1) and layer 4
From the second flower you get the outer bud (layer 2) and layer 3
The third flower is layer 5, just make one cut into the centre


Make the two bud pieces
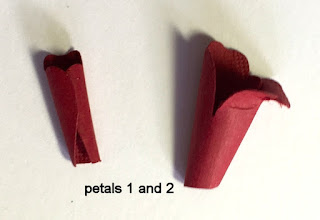
Use a bamboo skewer, Paintbrush or something similar to curl the SINGLE Petal piece. Curl it into a bit of a cone shape, and quite tightly. so it holds its shape, then set aside

Shape the 2-petal bud section by curling the two petals, again in a conical shape. Overlap the edges and add some glue to hold them together. I hold the edges together with tweezers for a minute while the glue is setting

Shape the 2-petal bud section by curling the two petals, again in a conical shape. Overlap the edges and add some glue to hold them together. I hold the edges together with tweezers for a minute while the glue is setting
When the glue is dry, gently curl the top of one of the petals over the skewer as if the bud is beginning to open


Here are both the bud sections ready to use. You can see the curl on one of the petals
of bud section 2.
You may find you need to trim a little off the lower ends of these pieces when you come to build your rose

Now you need to trim away a little from the petals which will be used as 'tabs". It's a case of trimming off the top of one petal next to where you've already removed petals from, or for flower 3, next to the cut you made into the centre.
Whatever you do, don't cut the tops off the wrong petals! This photo shows how they should look


Making the other Layers
At this point you can use the skewer, or something slightly thicker to start adding shape to the rest of the petals. If the card is a bit thick it can help manipulate the fibres a little. Nit its up to you and you may prefer to curl them later.
To make each layer, add a little glue to the trimmed down petal, then bring the one on the other side of the gap (or cut line) over to cover the 'tab' petal


and hold the layers together till stuck firmly. I use a mini bulldog clip to hold them in place while they dry, Repeat for the other 2 layers
You've now created all the layers and should now have five pieces like on the photo below, plus the extra one you put aside.


Cut a circle of the same card big enough for the largest flower (with 5 petals) to sit on and apply some glue to it. Press the largest flower into the glue.
 Now add a little more glue to the bottom (where the hole is) of the 4-petal flower and sit it inside the first one, Be sure to off-set the petals to make it look realistic

Repeat with the 3-petal flower and leave aside to dry while you make the bud.
 Apply glue to the single petal section of the bud, then place it inside the double petal section. Using wet glue means you can move it around until you like the shape of your bud. Give the petals a bit on shape by curling them over the skewer. I stood the finished bud in some blutak so that I could get a good photo - obviously, you don't need to do that!!

At this point pop the bud into the rest of the rose to check whether you need to cut a little off it. I usually find the bud stands a bit too high and need to trim off a few mms.
Once I'm happy with the height I add glue to the centre of the main rose section, and also around the lower part of the bud (about the same amount as in pic 1 above)
Then tuck the bud into the main rose, move it around until you like how it looks and leave it to dry
 When dry, add any more shaping to your petals, remember to move it around to check all angles, then glue it to that last petal die-cut you saved right at the start, it gives some extra fullness to your beautiful rose

My finished rose measures about 6-7 cms across. I made a couple of smaller ones then used them on this project, which you can see HERE, using some little extras from the Bubbly Funk "Love Is...." craft box


My finished rose measures about 6-7 cms across. I made a couple of smaller ones then used them on this project, which you can see HERE, using some little extras from the Bubbly Funk "Love Is...." craft box

Thank you so much for looking, I hope you'll give these roses a try, let me know how you get on if you do
Happy Crafting

5 comments:
Hi Kathy your roses are gorgeous. Thank you for all the hints and tips. Take care. Hugs Jackie
Extremely clear tutorial Kathy. Bet my flowers don't come out like yours though! Shabneez x
Great tutorial, thanks for sharing how you make such beautiful roses. I will be trying this but cannot guatantee what the results will be.
Sylv xx
Beautiful roses, I had totally forgotten how these were made, so thanks for the detailed walk thru!!
xx
Fab tutorial Kathy, and those flowers are stunning! x
Post a Comment