Friday, May 25, 2012

All Locked Up

It's Rein's turn to set the challenge over on the Daring Cardmakers this week:
t's Rein here this week with a very easy dare
I would love to see
Lock(s) and Key(s) 
on your card.
Any sort of card you'd like to make, just have fun and don't forget to 
come back and share your creations with us!
Now, somewhere in my stash I have some lovely metal lock and key embellishments that arrived as a freebie in a crafty parcel - they would have been perfect - if I had a clue where they were!  They are white, and I thought I might ink them, or maybe emboss them to distress them a bit - but I couldn't find them anyway so had to come up with a Plan B
Plan B was to find a suitable quotation and make a lock and key using good old Craft Robo.  The very best quote I found was way too long to use on a card, so I've just used part of it to make my card
Materials:
Cream, ribbed card blank
Brown and cream papers all Simple Stories "Documented"
 (I used a mix of 12x12 and 6x6)
Red heart is an embossed paper from Kaisercraft "These Days" 6x6
(It was a bit on the "orange side of red" for my liking so I inked it up a bit with some some Barn Door and Worn Lipstick Distress inks)
Gold card, gold ink to distress the paper edges a little,
several shades of brown ink pads,
Gold thread, red ribbon, red Card Candy
Tools:
Craft Robo, Spellbinders Moroccan Accents Dies

I cheated a bit by cutting the spellbinders shapes then using the shapes to make the templates I needed for the lock and key with the help of Paint Shop Pro.  I added the keyhole to the centre of the 2 ended shape, and drew in the leg bit of the key and a few "blobs" to attach it to the corner shaped die cut.

Now I have 2 possible anniversary cards made ahead of our anniversary in July!  If I hadn't found such a good quote I'd have made a "New Home" card as this challenge is perfect for that too.
There are some lovely cards on the Daring Cardmakers Blog, so do pay a visit!  We'd love it if you'd join in with us this week.

It's been a while since I mentioned our refurbishment project on here, but I will today because......as of yesterday we're finally finished - the new carpet in the hall, inner hall, stairs and landing were laid yesterday and what a difference it makes, pulling the whole area together.  We had a decorator in for a whole week painting the new coats cupboard, the inside of the big upstairs walk-in cupboard and then all the skirting boards and other areas of woodwork that "touch" the carpet.  It's made the rest of the wood look a bit creamy and tatty, but hubby wants to do it himself really and it was only because of time constraints that he let the decorator do as much as he did hehe
Now we need to put the shelving back on the wall in the big cupboard so we can put all the stuff back in there.  Give us a couple weeks and we might even have our guest room back!
There will be celebratory champagne here this weekend - it's already in the fridge getting itself ready!
Thanks for visiting

Tuesday, May 22, 2012

Where flowers bloom...

I've used one of my most favourite quotations to make another maze book page.  It works really well with the May sketch on The Sketch File - it's such a short quotation, but I hope that by putting the words in a column it focuses the attention on the words, with the decorative bits being secondary - if that makes any sense!
.I printed the quotation straight onto the paper then lined up a lacy edged scalloped circle to get the words in the right place.  The second circle is the ring of flowers and the rectangles on the sketch are used for the ribbons and bow and the author.
Materials and Tools:
Papers: MME Indie Chic "Ginger"
Seam Binding in 2 colours (I glued 2 lengths together for the wider piece)
Spellbinders Lacy Circles die set
Various wired flowers
Flat backed pearls in cream and pale pink

I made a flowery facing page using the same papers for some of the flowers
 Materials:
 Some flower cut with Craft Robo from the MME papers
 Small Prima flowers,
 leaf trim, green tiny ric-rac braid,
yellow gems and some Liquid Pearls
Broken China Distress Ink 

If you wander over to the Sketch File BLOG there are now a few weeks' worth of projects using this month's sketch to see - I hope you'll feel inspired to join in and make something to share with us there.

Thank you for visiting today, please come back soon

Friday, May 18, 2012

Funky and Geeky

I'm a busy blogger today as it's both Daring Cardmakers day and my turn to do the Get Funky challenge post!

It's only a couple of days since I posted my projects for the last Get Funky! challenge from Funky Hand and I'm back there today with  a couple of things I've made for the new one.  Ruth is the hostess this month and has chosen "Polka-dots and Flowers" as the theme. There are loads of both among all of the Funky Hand downloads and CDs so we're a bit spoiled for choice.  We'd love it if you'd join in - all you need to do is use those Polka-dots, Flowers AND at least one Funky Hand product on whatever you make and you'll be in with a chance of winning this month's prize
This New Home card is my "main" project for this month
I used mainly leftovers to make this second card

My papers for these cards were printed using Funky Hand's: Papercraft Factory CD "Craft the Year Away", this collection is called "September Song"
There's more info about the challenge and the cards, plus an ever-increasing number of Funky projects on the theme HERE

Now, pretty papers and flowers may be right there in the middle of my comfort zone, but Lythan's challenge for the Daring Cardmakers definitely isn't!  Still, it was a really good way to get another of my May "boys" cards done so I was reasonably happy to be challenged:
I have a son who is 18 this week and he is a real Geek - loves computers, computer games, physics, obscure comics (mostly online), Big Bang Theory and did I mention computers? So I thought I would throw out a real challenge and see what we could come up with in terms of making cards that celebrate Geek- dom. So the dare is....

Going Geek
and as an extra reward this week there is a random prize draw 

 I did say it was out of my comfort zone, didn't I!  It will be interesting to see how may people are brave enough to put their "Big Girl's Pants" on, take a deep breath and have a go at this one!
 I made this card for one of my young nephews who plays lots of computer games on his ipod-touch  - in fact all he wanted for his birthday were vouchers for downloading more of them.  So I think it counts as a bit geerky
 Materials:
Card:  Plain Black card, White card, 
Bazzill Bling Black card (gives a sheen to the screen section),
 Various scraps of coloured card, Glossy Accents
Tools:
Craft Robo, tiny square, triangle and star punches
Using a picture as a guide, I made a template for cutting with the Craft Robo.  The shapes are all really simple, mainly just rounded rectangles, regular rectangles and circles - no complicated altering of an image, you can just make this on a normal Craft Robo page by using the shape tools in the menu.  Once I'd made up the ipod I used that to hand cut the card blank from more black card.

For the icons at the bottom, I used a speech bubble and music symbol from the pre-set shapes in Paint Shop Pro so that was easy!  The browser icon is another PSP pre-set which I just "tweaked" a bit and the Mail symbol  is just drawn on a tiny rectangle of paper.  I used Robo to cut the letters, then filled in the gaps with some tiny punched shapes.  It looks more complicated that it was - which is always good, I think hehe
I'm sure everyone has a geek of some type in their life, so this is a great chance to make a special card just for them!
Head over to the Daring Blog for more inspiration and more info about our random giveaaway this week
Thank you for visiting - please leave a message to say you were here!

Sunday, May 13, 2012

It's all Sentimental, My Dear Holmes

It's my turn to show my project for hostess Debs' LET'S GET SENTIMENTAL challenge over on the FUNKY HAND challenge blog; "Get Funky!"
New challenges are issued on the Funky 15th of each month, so my project is the last one before our new theme is announced on Tuesday - this means there's just time to get your Funky Stash out and join in before this month's challenge closes! 
Just remember that you must use at least one FUNKY HAND product! and you must make the sentiment the focal point of whatever you make - there's even FUNKY FREEBIE themed especially for this current challenge to make it really easy, even if you're not yet a Funky Hand convert!
My card uses the Funky Freebie and also papers from the Funky Hand Papercraft Factory CD - Happy Happy Birthday which has the perfect paper design for something where the sentiment is the star - because the entire sheet is covered with the sentiment! Because of the way Papercraft Factory CDs work you can easily print papers at different scales - you can see I've used 2 sizes on my card.


I still had some scraps left, and a piece of gingham paper I'd printed but didn't need, so I made a "bonus" card using one of the sentiments from the Freebie - with a little freehand amendment ;)

 Head over to Get Funky for more info on how to join in and be in with a chance of winning our monthly prize
Thanks for visiting

Friday, May 11, 2012

What's all the Fuss About?

Two posts in one day - something that doesn't happen very often around here - but as I forgot to post the pics of Izzy's birthday card yesterday I decided not to leave it any longer so if you scroll down to the next post you can see how I altered one of my favourite Funky Hand cards to make it into a great big 18th birthday card for my lovely niece.

Today is Daring Cardmakers day and it's Jo's turn to set the challenge.  Jo is brilliant at putting bits and bobs together to create something fabulous and it's always a treat to see what she makes.  I think she's let us into one of her secrets with her challenge  this week!

This week it's Jo here to set the challenge and I'd like you to use 
your patterned paper in a slightly different way
"Fussy Cutting"
Instead of using your paper "straight", this week it's all about using the designs
 on the paper as your inspiration and cutting bits from them to build up a background and/or to make an embellishment 
We're looking forward to seeing how you make your papers work for
you this week, so grab your scissors and get clipping
So, at first I was going to do something flowery and layered, but as I still had a "boys" card to do so went for a wander through the boxes of paper and came across some Graphic 45 papers I'd bought with man-cards in mind.
One side of the paper features vintage postcard and poster images advertising various sporting venues.  My BiL plays golf, so I used a couple of the golfing images to make my card.
I've just had a quick "google" and the golf club is real and still exists,
I cut a full length piece of A4 to 14cm wide then folded it up to make 2 "peaks" - this way I could add extra dimension to the scene.
the extra peak      I've used two "posters" from the sheet of paper.  From one I cut the main golfer, the onlookers and the golfer in the cream outfit, all layered up on and behind the blue oval.  The second image was used pretty much as it is on the sheet of paper, but it was a bit too tall for my card, so I cut the "Cruden Bay" bit off and made that into a signpost to stick on the back section.  I made the little flag from another part of the sheet of paper, and the green Argyll design is on the reverse of the sheet.
Materials:
Papers, Graphic 45 (golfing images, both Argyll patterns and darker blue design, light blue is from Echo Park
Green card, Inks

No extra "stuff" added - that was quite a surprise when I came to make my materials list - no brads, ribbon etc - not even Glossy Accents.

I think I'd better go and have a lie down!!
Please check out the DCM Blog for lots of ideas on how to use your papers as a starting point and really make them work for you - it's often more fun than just using them the way the manufacturers intended ;)
Thanks for popping in today


Izzy's Card

 I'm later than I'd planned posting this but there's nothing new there, eh?

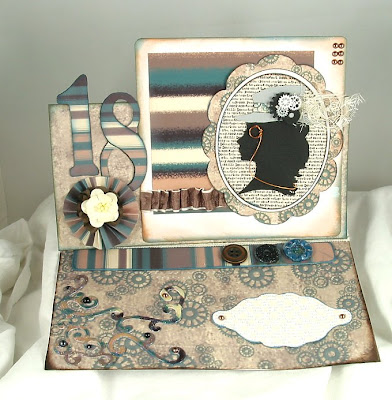
One of my favourites of the cards I've made this year was this one, using  one of Funky Hand's recent download collections "Steam Funk"

I did think of putting it on the little shelf above my desk, but in the end I took the front section of the card and used it as the basis for an 18th birthday card for my niece.
I printed off more papers (the beauty of download collections!), used my Craft Robo to create some numerals and made this 8" square easel card - I don't usually make such big cards :o
Materials:
Papers: "Steam Funk" download from Funky Hand
Bazzill card; white, grey, blacktickles, Glossy Accents
Cream mesh lace, Brown ribbon, Copper wire
Buttons, Pearls, Cream flower, Brown Seam Binding

All cogs, numerals, cameo plain and fluted oval shaped are cut with the 
Craft Robo from my own templates
Various Spellbinders dies for swirls and sentiment plate

Thanks for looking

Wednesday, May 09, 2012

This and That

My crafting has been a bit lax lately so it's a good time for a bit of a catch up on things I've missed posting, and a quick update on our house refurbishment projects too
I meant to post the third of my Crafty Templates projects last week, but for some reason (I think it may have been the Time Thief's fault, I didn't get round to it (oh, couldn't we all use a round Tuit sometimes?)
I made this using the Tall Cupcakes template from the latest set of templates and papers from the gorgeous Crafty Goodies Kit.
I cut 2 copies of each "topping" section and cut one in a spiral shape. I used glue only on a small section of the spiral so that the rest could "ping" out from the card
I used:
Tall cupcakes template from April Crafty Templates
Papers from the Crafty Goodies Kit
Glossy Accents
Border Punches from EK Success and Martha Stewart

Back in March it was Niece Izzy's 18th birthday - I'm going to blog her card tomorrow, but I thought I'd pop some photos of the ribbony decoration I made to put on top of her gift box, today

I made a length of wrapping paper into a rosette, adhering it onto a piece of card for stability, then added lots of matching seam binding and flowers to make a frothy topper!  The silver spirals are a happy accident - I'd used this floristry wire stuff to hold it all together and was about to tuck all the ends out of sight when I thought I'd see if it was strong enough to hold a spiral shape - it was, and I love the way the silver lifts the rest of the bits and bobs
 All the flowers and ribbons are from the wonderful 
 - an online shop that is "just what it says on the tin!"!

The Building Update Bit:
 Well, after all these months, I'm (very) happy to say that the kitchen is finally finished!  The glass splash-back finally arrived and even fitted ;), and last week the last few bits and pieces were done to the cupboards etc. On Friday the last sockets were fitted and it was all done!
I'm just going to put one photo on here - but if you'd like to see more, then I've put loads of hubby's Kitchen Photo Shoot pics onto a dedicated "Finished Kitchen" board on Pinterest which you can visit by clocking HERE.
There are still jobs to do in the other areas we were altering. As I write, the decorator is busy touching up those bits in the new cloakroom and hallway that needed it and prepping the new hall coats cupboard for painting,  He's also going to be doing some extra painting work we've had time to think of since he was last here - you know how it is with those ever-expanding "jobs to do" lists!  We've ordered a new bookcase for my cookery books, and chosen the new carpets and booked the fitters - all this means that the end is in sight - at least for waving "goodbye" to the various builders, tilers, painters, fitters etc.  I will still have a mountain of stuff to put away before the various rooms regain their proper use after months of being "storage" spaces though.
Actually, it might be nice to get someone in to do that job too.....I wonder if "sorter-outerers" exist?
That's it for now
I just need to find room for the stuff I've dumped on my craft desk and then I can get busy on my crafting to-do list for this week....
Thanks for visiting

Friday, May 04, 2012

Colouring May


Here in the UK it seems that Shades of Grey are the only colours we've seen for most of the last few weeks but at least over on the Daring Cardmakers we've had some pretty colours to play with for our challenge this week.
The first Friday of the month is "Colour Combo Challenge" time and this month it was Keilly who chose our theme of muted sea-green, aqua, pinks and cream via this fab inspiration photo
I loved the look of the flowers on the photo, so thought I'd start off by making a similar flower of my own.  I was very brave ;-) and instead of throwing loads of flowers into the mix I managed to stick to using just one!
It took a while to make my flower, but in the end took less time than deciding on the background - why is that so often the case?  Probably because I rarely plan what I'm going to do before getting stuck in.  I feel this is also the reason that after making something like this my desk always looks lie someone emptied the contents of every shelf and drawer on to it - which, to be fair, I did!
Materials:
Cream card blank
Mix of papers from Dream Street Papers, MME and Fancy Pants
Pink Silky Crush ribbon for bow from Creative Treasures
Hand-cut Tag
Home-made decal sentiment
Tools:
Border; Spellbinders Moroccan Accents die,
Flower; Tim Holtz Flower die, Memory Box Cherry Blossom for centre
Lots of ink!
Quilling tools for shaping flower

I was really pleased with the way this flower turned out and I hope it doesn't get too squashed when I send the card to my SiL for her birthday!
 These are such pretty colours to work with - even though it did take a bit of stash exploring to find them.  Stash exploring is good though as you find all sorts of lovely things you'd forgotten about!
The DCM Blog looks gorgeous with this colour palette so please check it out.
Thanks for visiting

Tuesday, May 01, 2012

Twice Around the Block

The first Tuesday of the month is when the new LO idea goes live for The Sketch File - it's not often that its also the first day of the month too.
The May sketch has 2 circles - that's the "Twice Around" bit,  and a square - "the Block" bit hehe
Here's the sketch
I've used it for another of my dreaded May "boys" birthday cards.  If you checked in with my last Daring Cardmakers card you'll recognise the footballer element as I've used it on here too - albeit with a bit of a tweak to give him a trophy to hold/.
 I've made the largest of the circles into a football and yes, I've sneaked in an extra circle as I realised I hadn't cut the green circle big enough - it all looked a bit out of balance.
Materials:
MME Lime Twist 6x6 papers
Bazzill card; white, black, pale peach
Striped satin ribbon, Silver star brad
home-made decal sentiment
Tools:
Craft Robo to cut circles, football, footballer and child's name
Please head over to The Sketch File to see the gorgeous card Keryn has made to start off this months DT makes.
I hope you'll give the sketch a try this month.
Thanks for looking