Thursday, February 25, 2010

Birthdays are Good for You

I'd been putting off making a Birthday card for my lovely hubby - mainly because I didn't have a clue what to put on it.
In the end I decided to make another of those pop-up cards that I've done a few times now.  There's a tutorial on Bubbly Scrumptious if you would like to have a go at making one.  I'll add the link at the end of this post.

I just had to use my wonderful sei foiled and flocked papers yet again, they really are impossible to resist, I'm already well through my second set of them.  They are the Monravia collection and I got them from the very wonderful Craftz Boutique


If you saw the Valentines card I made for him you'll already know about the "evidence" or "elephants", so I continued the theme on this card - just made the ellies a little bit bigger and gave them some copper wire springs to bounce around on - which meant it took ages to do the photos as they just wouldn't stay still hehehe
 

I've used this quotation loads of times - I saved the original version I made, with the different fonts and colours and I just change the colours and sizes to match whatever papers I'm using/

I'll tell you all about the "present" I arranged for him soon........

HERE is where you can find the tutorial for making this pop up card - while you're over there, do have a good old wander around as there are soooo many projects and ideas to get you inspired.

Thanks for looking

Wednesday, February 24, 2010

Crafty Circle Flowers

Here's another card made with the new set of Crafty Templates. I love the simplicity of this template and the way it allows you to have fun with the original design
I've used Cosmo Cricket's "Love Notes" papers again for this card.
First I cut out six ximple versions of the template and adhered them to a DL card blank.  I added a border along the bottom with one of the MS border punches..  Next I cut just the large circle part of the flowers again and gave them all a bit of "treatment".  Most were given a distressed edge, some were cut a tiny bit smaller and distressed, another was distressed and then had slits cut in towards the centre to make petals, another had an extra circle shape cut and distressed to add an extra layer of "petals".  One of the circles I cut into a spiral before gluing into place.  I cut the centres all from the same purple card and added a few fots of Stickles to finish them.

For the sentiment I used loads of odd letters that were left on various sheets of rub-ons, and added a few rub-on flowers to "dot" the i's
 I hope you like it

Monday, February 22, 2010

A Bit Late Getting Funky


I keep forgetting to give the Get Funky challenge for February a shout - but as there's still a whole week left, it's not too late to remind everyone.  If you join in you'll be in with a chance of winning £20 worth of  Fabulous Funky Hand goodies, which can't be bad, can it?

The theme this month is "I Love Crafting" which means that you can make anything you like - as long as you use some of Funky Hand's papers etc on your project.

There are some great examples from the Funky Hand Gang to help get you thinking - so do pop over and see them all, some of them are things you may have spotted on the various Ideal World and Create & Craft shows that Anice has been doing to promote the new "Dreams Come True" CD

For my team entry this month I've added my memo block made with one of the colour collections from the CD - I love the way they work so well together.


Thanks for popping by

Friday, February 19, 2010

Oh Please let the Winter stop now!

Bah humbug!
Woke up, looked out of the window and Noooooooooooo.  Another overnight snowfall, though thankfully it's already gone from the roads and paths and it's just on the grass.  Now look here, I'm really thoroughly sick of this Winter now and I want it to be over.
I'm hoping that Rein's dare this week for the Daring Cardmakers will be enough to make all the Winter Weather say "Goodbye" and let some Spring days start to happen.

So, this week we have a "celebration" - if that's the right word of all things Winter.

Winter will, hopefully, soon be gone here in Europe and for those "Down Under" It's on it's way, so for my dare I'd like to see lots of
Winter Birthday Cards
Perhaps cards with snowdrops on them, or ice skates, snowflakes, or how about using the Olympic Games currently happening in Vancouver as inspiration for your cards this week? 

As long as it's a birthday card with a Winter theme, we'd love to see it!

A few weeks ago we had a "School days" theme and I made a card for my cousin's little boy who'll be 4 next week - I did intend to use it as his birthday card, but I'm going to keep it for when he starts school. As he's a February baby I thought Rein's dare for a Winter themed birthday card would suit perfectly so I made him this penguin card

I'm quite pleased at the way this turned out and it really didn't take too long either. 
The two penguins and the cake are all Robo cut.  Making the templates probably took the longest, but once they're made you've got them always on file to use again.
I used a couple of free colouring page images to make the penguin templates. Now I've got the hang of using Paint Shop Pro to make all the layers - you need to think about which bits go on top of which then paint out the bits you don't need for each of the layers - it sounds complicated but is simple once you've done it a few times.
The birthday cake is another of Leo's Crafty Templates for this month.  I've had to resize it to use on this card, but it's such a fab design, I know I'll use it again.
A bit of inking and all matted on some ice blue card before adding to the white card blank
No ribbons, no brads and no patterned paper - what IS the world coming to?! hehehe

There ar some truly beautiful cards on the DCM BLOG this week, the delicacy of some of the designs make mine look like"a bull in a china shop" - but if there's one thing you can depend on the DCM for it's variety - anything goes for us, whatever your style!  Please join in this week and let's say "Thank you, and Goodbye" to Winter - you never know, if we all do that it might actually go and leave us in peace!

Thanks for visiting


Thursday, February 18, 2010

Late WOYWW and Sam Plank's Disco

I'm late again with my "What's on Your Workdesk Wednesday" shots,  but I'm hoping Ms Dunnit won't be too strict - I've not touched it since yesterday so I think I can get away with it....
Two photos to make up for my tardiness.
The big tatty old bookcase to the right of my desk holds all my paper boxes, various files and folders that tbh I hardly look at, the bottom shelf that you can't see has boxes of coloured A4 card,  the box of 12x12 card stands between the shredder and some horrible plastic drawers I use for the overspill ribbons, stamps and inkpads etc - the purple boxes you can just see a corner of are on top of those.  On the top shelf are a few finished circle journals and mini books, plus all my beading stuff

This is my desk this morning.  Several projects on the go and I'm starting to get a bit panicky about finishing them on time.  This set of horrible plastic drawers has a box of "stuff" including border punches on the top, then the drawers contain, from the top: more flowers, chipboard shapes, ribbon scraps, punches

This week on Bubbly Scrumptious I've made another page for my Word Book. 
This time you'll find me in San Francisco -I can never say the name without thinking about the joke that ends up with the angel singing to St Peter "I left my harp in Sam Plan's Disco", hence the post title.

You can see more photos and whatever by visiting Bubbly Scrumptious, where you'll find more crafty projects and ideas than you can shake a stick at.

Right, I MUST finish my Hubby's birthday card and I've still got my DCM card for tomorrow to move from drawing board to paper and card.
I'm really sorry that I've not been doing much blog visiting lately, I will catch up with everyone soon, I promise

Thanks for visiting

Monday, February 15, 2010

February Crafty Templates

You're probably sick of hearing me saying how long my "to-do" list has been by now.  At the end of last week I thought I'd cracked it.  I sent off the photos of my cards to Leo for the new Crafty Templates release - albeit a teeny weeny bit late (sorry Leo) and my list was all done.
"HA!"  said the voice in my head  "Think you're all done do you?  Well you can stop with the smugness.  Just you sit down and start making a to-do list for the next couple of weeks and then see how smug you feel...."

Hmmmm so that'll be another very busy week for me, then!

Anyway, back to Crafty Templates
I do like butterflies, but I struggle to use them on cards - don't ask me why, I have no idea why it should be that way.  Anyway, one of this month's templates has different sizes and shapes of butterflies and I thought I'd try and conquer the problem and make a butterfly card.

 
 I used the three different shapes, cut each twice and left the wings unstuck so that they stand away from the base card.


 While making the first card I realised that those butterflies would look lovely peeping through an aperture, so I made another card, using a Nesties die to cut the aperture


I'll show another of my Crafty Templates cards next time.  This month I've been using my own stash with the templates (well, I do need to slash the stash a bit!), but as usual Leo has put together a delicious Crafty Goodies Kit which is available as an "add-on".  To find out all about the Templates and the Goodies by clicking HERE

I mentioned on Friday's post the elephants I wanted to add to the Valentine's card I made for Hubby and why.
Here's what the inside ended up looking like - I just adore these tiny heffalumps - aren't they cute?!  I made this Robo template a while back and used it to cut 5 tiny elephants - they each measure just over 2cms wide, the hearts were cut using a  tiny punch.

 Right, I can't put it off any longer, I really do need to attack that new to-do list!
Thanks for visiting, please leave a comment - I do appreciate it, you know!

Friday, February 12, 2010

Have a Heart

Well, over on the Daring Cardmakers, the winner of the Martha Stewart punch and stamp set has just been drawn.  If you think you fulfilled the criteria given on last week's challenge (you'd be surprised at how many people didn't seem to notice that bit, but Sue kept a spreadsheet to check) then hop right over to the BLOG and see if you've our lucky winner.
This week we've all about TLC (Tender Loving Care) and we'd like you to share the love by adding a heart to your card, or making a heart shaped card, or using hearts to make an embellishment - anything really as long as you put your heart into it!
With Valentine's Day in mind I've made a card to give to my Hubby.  
 I've used 7 Gypsies paper for the background
The hearts are Robo cut - cut first in card and then various different papers for the tops.  Some were glued straight onto the base, others raised on bits of scrap chipboard.
The heart button on the lowest heart was covered with dark pink Stickles as the original was a bit too pink to get away with
Ribbons, buttons, fibres and Run-Ons are from my stash.

Now I just need to cut some little elephants out to put inside.
Why?
Because there's a song by "The Feeling" which has the line "All I wanted was some evidence that you really loved me"  Hubby always sings along substituting "elephants" for "evidence"  so I thought I'd add the elephants that I really love him to this card.  Everybody say aaaahhhhhh!
 Originally the elephants were going on the front holding heart-shaped balloons, but for some reason I forgot about that when I started making it.

He works at home on Fridays, but he's just popped out to the optician so I have to be quick and get these done while he's out.

The cards the team have made this week are sooooo lovely, loads of ideas and inspiration for adding hearts to your cards, I hope you'll check them all out.  We'd love it if you'd join in with the DARE too - let's spread some TLC all around Blog-land this week.

Back next time with the cards I've made using the newest set of Crafty Templates, finally got them finished at about 10 last night.  Good job the alarm goes off a bit later on Friday mornings!
Thanks for visiting

Thursday, February 11, 2010

More than Words....

.... by Extreme is one of my most favourite songs - so will do nicely for the title of this post.  Even though there's only one word involved actually.

OK so that's not strictly true either, because all you'll see for certain is one letter or the word.  The word I'm talking about is the one I chose for my chipboard word book, which is part of the current kit on Bubbly Funk.

If you popped in to see my work desk for "What's On Your Workdesk Wednesday" yesterday you'll have seen some of this project peeping out from under a sheet of paper!

The rest of the letters will be revealed as I get the pages made. You can try guessing what the finished word is going to be if you really want to :-)

I decided to see if it would be possible to add extra pages in between those with a letter at the end of them - does that make any sense?  Maybe the pictures will help show what I mean.

Here's the reverse of a letter page and my extra page which I cut from a piece of chipboard

And next, the other side of the extra page and the front of the next letter page. 


I used chipboard for the extra page, but adding a few more pages would be no problem if you used Bazzill pages instead.
You can see more photos and read about what I used on these by clicking HERE
I'm using my current fave sei Moravia papers throughout my book as they are just perfect for all the pages I need to do.  Is this the time to admit that I've already bought another set of them because I love them so much? hehehe
Still got loads to do so I'm not going to waffle or procrastinate today (honestly, I'm really not!)
Hoping to catch up on my blog-hopping at the weekend

Wednesday, February 10, 2010

WOYWW

This will probably be one of my shortest blog posts ever!
It's the day we share our craft spaces with each other so we can see what sort of mess we're making today.  Mine is a mess, but it's a "working mess" as I'm up to my eyes in projects and getting nowhere fast, tbh.


I've strategically dropped a sheet of paper in the middle to disguise exactly what I'm up to, but if you come back tomorrow, all will be revealed.
For those who are still wondering what AWUMP stands for, it's "Avoiding Writing Up My Project" and it's what I do most Wednesdays.  Today is a bit different because the project isn't even finished and it's nearly 3pm.  I don't think there'll be much writing done at all!

A question was asked about the shabby chic flowers I made at the w/e and showed here yesterday,  The largest is about 5.5cms diameter (that's the pale brown one) and the smallest is about 4cms - that's the red one with the glitter on, the lowest on the photo - I'm really glad you liked them, I thought they'd worked out quite well and it's always good to know others agree, so thank you for your messages.

Head over to Julia's blog - click on the WOYWW link in the sidebar to go straight there, and you'll find lots of links for dropping in on Workdesks all over the place.  Have fun!

Tuesday, February 09, 2010

A Little Bit Shabby

Although I've a list of things to do as long as my arm, whenever I sat at my craft desk at the weekend ....(which wasn't often because the study was full of bits of computer innards and a couple of pc experts ie Hubby and my cousin, trying to fix Hubby's broken pc or at least make sure settings and data was all safe and that the pc would be usable enough for logging in to the office one on work-at-home days)....I found I couldn't settle to anything on the list and all I wanted to do was play.

Sometimes it's good though, just to go where the muse leads (great band, aren't they, Lythan?).  This time the muse led me to making some flowers - what do you mean, that's a surprise?

I started off trying to  make some coffee filter roses I'd seen on a tutorial somewhere.  Now, maybe US coffee filters are stiffer than the ones we get over here, but there was no way I could curl those darned petals, the paper was way to soft for that.  So I wondered what would happen if I just crumpled the flower into a little ball and opened  the petals up again (a bit like the distressed poppies I was hooked on a few months back).  I liked the "shabby chic" effect I got so made a few more
What do you think?  You can click for a larger view.
Next is a photo of a couple of tags I made - basically using some scraps of stuff that was already out on the desk.  I rather like the way these turned out too so I think I might tweak the design a bit for using on cards.
I did manage to finish off a couple of  decorated and stuffed matchboxes for a couple of swaps.  I made a template for cutting on Mr Robo and showed the prototype HERE.  I'll show the actual swap ones soon, but I just wanted to say I'd done them in case you went away thinking I'd not done a single thing from my "to do" list ;-)
Now of course I'm running out of time to get a couple of projects finished.......okay, :-(  I mean started, so I'll shut up and move straight over to the other desk.
Thanks for visiting, hope you enjoyed it and will come back soon.
{lease leave a message and let me know what you think of the flowers...

Have a great day
I'm gone.......

Friday, February 05, 2010

A Purple Patch


Daring Cardmakers Day today and a busy old intro for the new dare on the blog!
   We say a fond farewell to January's Guest designer Caz - who's been fab, and brought  her wonderfully distinctive style to the blog - thanks Caz!
   We say Hello not to just one, but to two new Guest Designers who aren't really "new" at all as both have joined us as GDs before - but you can't have too much of a good thing, so Nat and Asia are back for a second visit and will both be staying for the next two months - it's going to be fabulous to have them sharing their wonderful  cards with us for an extended period, we're sooooo lucky
   If that wasn't enough, we have a rather tasty little Lucky Dip prize on offer this week - it's from the lovely David and Brenda of Craft Obsessions online craft shop - you'll have to pop over to the DCM BLOG to find out all about it.

  Then there's our new dare of course, which as it's the first Friday of a new month means we're continuing with this year's Monthly Birthstone sequence.  February's birthstone is the Amethyst and I thought I might do something  less obvious than just use the colour.  So I looked into the mythology and meanings surrounding the birthstone. 
"February Birthstone - Properties of the Amethyst
For those who were born in the month of February the Amethyst is the traditional birthstone. The February birthstone poem reflects some of the properties with which the Amethyst is associated - stability, peace, balance, courage, inner strength, sincerity and a calm disposition. The healing properties of the February birthstone are reputed to be effective for health problems relating to the withdrawal symptoms of any sort of addiction,  headaches, insomnia, arthritis, pain relief, circulatory system issues and general healing. The Amethyst is also referred to as the the "sobriety stone" as it was once believed to prevent drunkenness and used to treat alcoholism and other types of addictions."

hmmmm , interesting.  I then decided that it all sounded far too difficult and I reverted to the colour theme instead.  OK so I'm chicken! cluck cluck cluck.

Last month's garnet dare showed me that I actually didn't have much in the way of red coloured papers.  This month's has shown me that I don't have much in the way of purple either.  So what colours are actually in all those boxes and bags of paper then?  It's all very curious.
Purple is one of my most favourite colours, but I do find it quite tricky to use on cards without them ending up looking funereal iykwim or just a total mess.  So for this card I've gone with mainly white with just a "dusting" of the purple.
I've  used a few of my old favourites; the pleated paper strip with the pleats plumped up and the good old coiled paper flowers make a come back appearance, along with various flowers, some ribbon, buttons and brads.
The aperture is cut with a Nesties die, I backed it with a piece of acetate to which I added a couple of the new rub on stickers I made at the weekend; the sentiment and the little swirl (which was from a dingbat font)


I added the same Nesties shape cut in purple paper to the inside of the card, then used the die upside down in the aperture to draw in the purple border.  

Flowers are a mix of wired paper flowers, a paste flower cut down a bit to fit better, coiled flowers and a rosette made from organza ribbon.  A bit of inking around the edges was used to pull the various shades together.  I hope it all works okay
Please head across to the DCM BLOG  and see all the lovely cards made by the DT this week, to find the links for our lovely new GDs and of course to read about the prize we've got up for grabs this week.
 
Hope you have a great day today and a lovely weekend - oooh look!  the sun is coming out......

Thursday, February 04, 2010

Whoops!

My name is Kathy and I am a Numpty!

I thought I'd check up on blog comments on my iPod Touch while having my breakfast this morning.  Ooooh six new comments since I last looked - I went to publish them and I really, really should have zoomed in a bit more because what happened?  I managed to press the "reject" instead of the "publish" boohooboohoo, I've lost all those lovely messages and I don't think I can remember all the people who left them to go and apologise.  What a Noodle I am.

Centre stage on my desk yesterday for the WOYWW craft desk web wander was my project for today's Bubbly Scrumptious emag.  BubScrump as it's affectionately called is the BLOG for the Bubbly Funk online shop and I'm one of those lucky enough to be on the Design Team for the monthly kits.
This month's kit has just been released and there's an exciting opportunity to buy a customised word book this month - choose a word of up to 7 letters and Caroline will arrange to have a chipboard word book made especially for you and already to decorate.  

This week though I'm using papers from the "Word Book" Kit and the "Violette Wings" kit  for my project - I'll get to my word book later. Shall I tell you what word I've chosen for my book?
No....I don't think so. hahaha
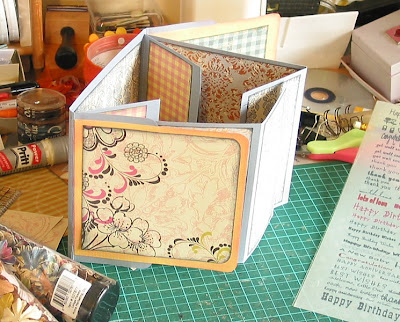
Anyway here's a closer look at the "thing" that was on my desk yesterday.

Nope, not an exploding box - or a box of any sort, though I can see why some people thought it might be.
Maybe this next picture will give more of a clue as to what it really is
Yes. you've got it, if you tuck all those bits of card in correctly it gets to look less like a box (or a jumble of different sized bits of card), and what you end up with is this rather nifty 6x6" album, there are different sized square and rectangular pages and even a couple of hidden pockets in there just waiting to be filled up.
I know it doesn't look very exciting yet, but hopefully once I've decorated the cover and filled it up with pictures and whatever else I decide to use it for it will look more inviting.
So, over on BubScrump today, you'll find the instructions on how to make the basic album, I hope you'll go and take a look and maybe even have a go - trust me, it's not nearly as complicated to make as it looks when all those pages are let loose!

Please let me know what you think - and if you leave a comment I'll try my very, very bestest not to press the wrong button this time!:-)

Wednesday, February 03, 2010

WOYWW

It's Wednesday and that means it's time to share the way our work desks are looking atm.  
For me it's also AWUMP day.   Ha! see if you can work that one out hehehe

OK so here's my desk this morning.  I keep getting those recently acquired tubes of lovely Artful flowers down from their hook to admire.  At the moment they are there to check which ones match my WiP (Work in Progress) - I think they'll be fine and plan to use several.  If I can tame the "not for using, only for stroking" feeling. 
The tall soda-stream-lppking object is actuall a daylight lamp, for those that have asked
The acetate-like page on the right is the latest page of "rub on" greetings I've made, now all ready to cut, peel and stick.  If you look closely in the top right corner of the pic you can see the remnants of other pages hanging on their hook.
Today there's also an assortment of glues visible - Power Pritt (I buy it in bulk as I use it loads), one of the pots with yellow lids contains bookbinding glue, the other is an empty BBG pot that I decant regular PVA into from a much bigger pot.  And of course there's the ever present Glossy Accents.
Susie, I don't think there's a punch to be seen today!
Centre of picture is the project I'm working on atm and maybe if I actually stop AWUMP - ing I might even be able to get on with it.

Here's another card made using the February sketch on  Sketch File BLOG
I'm not sure why but I'm not happy with this one.  I think maybe the lower piece is too wide and knocks the balance out a bit.

If you like to see what other crafters are up to, or maybe need a bit of inspiration for organising (or disorganising) your own craft space, then head over to Julia's blog to see all the links for those sharing their workdesks today.  There's a big WOYWW link in the sidebar on the right - click there to be "teleported" straight over there, but please don't leave here without leaving a message.

If I stop AWUM-ing I'll be heading over there to check out the links myself. Catch you all soon, I hope

Monday, February 01, 2010

A "Not-so-New-Year" Resolution

For the last year or so I've been posting any LO sketches I make to my other blog "The Sketch File" in a very haphazard fashion.
Now I've decided to get more organised about it and post a new sketch on the first day of each month - hopefully having a routine will help me remember to add a new card plan and also knowing when something new is due will mean more people will take the chance to use them.
It probably won't stop me posting the occasional "bonus" mid month sketch, but at least there'll be a bit more structure in place from now on.
A bit late for "New Year's" so I'll call it an "Early in the Year resolution", I think! ;-)

You'll have to pop over to The Sketch File to see the sketch, but here are a couple of peeks at cards I've made using the February sketch.  Full pics over on the other blog too ;-)


This past weekend was the RSPB's Great Garden Bird Watch, so we spent an hour at one of the upstairs windows watching for feathered visitors to our garden. We're definitely not great at recognising birds, but we get many more types in this garden that at our last house, so we're trying to encourage even more to visit by keeping the various bird feeders topped up.  Hubby had the camera, complete with giant lens primed to take photos of  yesterday's caller, here a few of them - you can click for a bigger view
We filled that feeder right to the brim on Saturday afternoon - this was taken at about 10.30 on Sunday morning - they must have been peckish.

There were loads more, but don't worry, I'm not going to bore you with any more.

It's freezing cold out there - so try and stay warm!