Tuesday, July 31, 2018

It’s Only Natural

Hello

This time I'm sharing a 'natural' sort of project, inspired by some beautiful Natural Flowers from the Bubbly Funk Shop
 I chose the hessian one from the pack for this card

I used soft blues and browns for the colour palette.
The woodgrain effect background was made with a lovely stencil from the shop and I stencilled it using soft blue and a pale brown inkpad for a weathered effect.

I tore up a piece from a cardboard box for the wrinkly strip!
From the Bubbly Funk Shop I used:
Tiny price ticket and cord are from a couple of the Through the Letterbox craft boxes
From my stash: all card and paper
 

I really love these colours and these flowers are simply beautiful!

Happy Crafting

Friday, July 27, 2018

Well Hello......

Good Morning!

Boy, has it been hot around these parts!
Now, I like it hot - take me to somewhere like Greece, sit me on a balcony or terrace with a view of the sea and I will be happy all day long.  If I get a bit hot I'll sit in the shade for a bit, take a dip in the sea or a pool, reach for a cold bottle of water - its all fine,  But here in England when the temperature heads upward, it seems that so does the humidity - and that's what I hate!
Some years ago we spent a few days in Singapore, the temperature was about 30deg but the humidity had you feeling like a soggy sock within minutes of stepping out from the air-con.  A couple of weeks later we were in the Aussie Outback, visiting Uluru and Kata Tjuta where the temperature was over 40deg - but this time it was a dry heat, and yes it was pretty sweltering, but there wasn't that horrible humid sogginess to deal with!
Anyway, enough of reminiscing!

This week Svenja's asked the Daring Cardmakers to come up with ideas for cards to say "Welcome".  It could be welcoming a new baby, a new work colleague, a new next-door neighbour.  Or maybe a Welcome to Your New Home, or even a card just to say "hello" to a friend

I made a 'hello' card, it would work just to keep in touch with someone or with the cute elephant, it could be a new baby card.  Really, I just wanted to use the hello die, its one from a new Spellbinders set that arrived earlier in the week and I love it!
Info
I inked a piece of white card with shades of grey ink, and another with shades of peachy-pinks, then used the following die sets, adding some twine for the balloon
All from
Ella-Fant from the My Little Red Wagon collection by Debi Adams  
Hello is from the May Die of the Month set 
The scalloped border is from a set of about 5 or 6 curved edge border dies. 


That's it, a sweet and east sort of card to put together and I'm quite pleased at how it turned out.

I hope you'll visit our challenge blog and see the cards the other team members have made - we'd love to Welcome You there!

Sunday, July 22, 2018

Butterfly Border

Hello

Another 'catch up' card from me today.  I wonder if I'll ever manage to get up to date?
Sadly the Spellblogger scheme has recently come to an end, but I've always been a great fan of Spellbinders dies and I'll continue enjoy using them. I think they became a bit 'overlooked' when so many other companies started making thin dies, which is a shame as they are such good quality and the designs so varied and appealing.  
I've made a simple card using one of the Hearts and Butterflies Borders set.  There are tweo dies in this set, I've already shared projects using the hearts one, so here's one using the butterflies die.  It's lovely!  You can use it to get a row of 4 butterflies, or cut them apart as I used for the flying one in the corner of my card
Info
I made a top fold card slightly wider than usual and cut the butterfly border from it to create an aperture.  I saved the die cut and the bits of waste for later
I used Gelatos in shades of blue, aqua and purple to colour enough of the same type of card for the panel to stick behind the aperture and to cut the sentiment and a couple of extra butterflies
A strip of the coloured card was fixed inside the card to show through the aperture.
The die was cut again, this time in silver card and fitted into the aperture.  I added the small pieces of 'waste' from the white cut in the spaces between the butterflies - it do9esn't look right if you don't do this
The separate butterfly was glued only behind the body part so that the wings can stand out from the card.
The 'Hello' die cut sentiment was added, then to finish I added tiny matching gems in a swirl pattern

On the Wings of Love Collection by Joanne Fink

You really can't have too many butterfly dies in a collection, can you?
Right, I think it's time I sorted out some lunch.  Have a great rest-of-weekend, stay cool if you can!
Thanks for visiting
Happy Crafting

Friday, July 20, 2018

In the Summertime....

Hello!
I am so behind with blogging!  I've sat down here most days this week with the best of intentions about getting up to date with it all.  And then I get diverted and, oh well, I fail!
So I think I need to do some nice, quick posts to get myself caught up and back into the swing,
So as it's already nearly 5pm on this Friday afternoon. I should at least try to post my card for The Daring Cardmakers quickly, so it's on the right day, if a bit late!

It's Miri's turn today:
This week after lots of sunshine and hot weather I’m in a very summery mood. So let’s enjoy all the positive aspects of summer. And one of them is definitely being outdoors (at least for me).
Go outside - it's summer !
Let's celebrate spending time outside in the sunshine! What can you do outside in the summer? Show us on your cards: Swimming, having a BBQ, walking around in flipflops or barefoot, reading a book on a deck chair, eating ice-cream, lying in the park, having a picnic etc.
I thought it was a good  opportunity to get my 4 seasons die sets out especially as I've not used the summer set yet.
 Info
I started by making a stencil for the circular 'frame' by die-cutting a large circle from card. This was taped in place and various blue and green inks applied with some scraps of old wet-wipes to create the background.
I cut the basic bare tree die in brown card, then the Summer Canopy in green card.  I glued the tree to the top of the green and adhered to the card off-centre.
A piece of white Bazzill card was coloured with several shades of green ink to create a more 'textural' piece. The Summer Canopy for the top layer was cut from this, then I stencilled through the die with various darker shades. Small pieces of chipboard were glued to the reverse and then this canopy piece was adhered over the first to give dimension.  I left a gap to slide the tree-swing into place.
The swing and chair are also part of the Summer Canopy set. The chair was cut twice, with bits of chipboard between the layers. The top ends of the 'ropes' were also glued on to small pieces of chipboard so that the swing actually hangs loose from the tree branch
To finish I hand-cut a little glass of juice with a straw and a cushion for the chair, and added a die cut .Enjoy' sentiment cut from black card 

Four Seasons die sets are by Spellbinders:

That's it - I said I'd be quick, didn't I?
Hopefully I can be just as quick next time too"
Thank you for visiting today, don't forget to check out all the other cards from the team - they are fab!


Saturday, July 14, 2018

Rose Bliss Collage Card

Hello
I've added a couple of posts to the Bubbly Funk Through the Letterbox Blog this week, one a tutorial for making roses and the other a card made using the sample rose and adding in some lovely collage3 pieces from their  "Love Is..."  craft box
I thought I'd add both projects here too, just to highlight how lovely these boxes are, you get so many different things in each box - you're sure to be inspired!
There's more info on this project over on the Bubbly Funk Blog HERE - I  then had some messy fun with Alchemy Wax and Gilding Flakes before gathering together lots of lovely things to arrange on this collage style card
Info
Gorgeous heart border die:   Hearts and Butterflies Borders die set (On the Wings of Love Collection) by Joanne Fink
The large rose is made using a flower punch

"BLISS" ticket
"Remember" word
Patterned wooden button
Gold Star Charm
Red Heart Glitter die-cut to punch tiny hearts from
I've been using this box in my crafting since January and there's still loads left in it!

Other stash: all card and paper, gilding flakes, Alchemy Wax, Ribbon

Thank you very much for visiting, I hope you'll take a minute to leave a message

Happy Crafting


Friday, July 13, 2018

Rose Tutorial

Hello!
I love making these roses, they always draw admiring comments as they look so beautiful and effective - the secret is, they are not nearly as difficult to make as people think!
I've added lots of photos to this tutorial, so hopefully you can see clearly how its done. You can click on them if you need a larger view.
I like to use Bazzill-weight card for my roses as it holds its shape really well.  Once you've got the idea you can experiment with other paper, card etc

You'll need to die cut, punch, or hand-cut 4 flower pieces, all the same size. 
 I prefer to use a 6 petal flower for roses, but they can be made with 5 petal ones or ones with a couple more - you may have to adjust the number of shapes you start with and which of the layers you need to make

With scissors cut out the centre of three of the flowers and make other cuts as indicated in the photo below
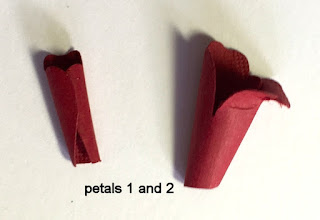
From the first flower you get the inner "bud" (layer 1) and layer 4
From the second flower you get the outer bud (layer 2) and layer 3
The third flower is layer 5, just make one cut into the centre
 
Make the two bud pieces
Use a bamboo skewer, Paintbrush or something similar to curl the SINGLE Petal piece.  Curl it into a bit of a cone shape, and quite tightly.  so it holds its shape, then set aside

  Shape the 2-petal bud section by curling the two petals, again in a conical shape. Overlap the edges and add some glue to hold them together. I hold the edges together with tweezers for a minute while the glue is setting
When the glue is dry, gently curl the top of one of the petals over the skewer as if the bud is beginning to open
 
Here are both the bud sections ready to use.  You can see the curl on one of the petals 
of bud section 2.
You may find you need to trim a little off the lower  ends of these pieces when you come to build your rose
Now you need to trim away a little from the petals which will be used as 'tabs".  It's a case of trimming off the top of one petal next to where you've already removed petals from, or for flower 3, next to the cut you made into the centre.
Whatever you do, don't cut the tops off the wrong petals!  This photo shows how they should look


 Making the other Layers
At this point you can use the skewer, or something slightly thicker to start adding shape to the rest of the petals.  If the card is a bit thick it can help manipulate the fibres a little.  Nit its up to you and you may prefer to curl them later.
To make each layer, add a little glue to the trimmed down petal, then bring the one on the other side of the gap (or cut line) over to cover the 'tab' petal

and hold the layers together till stuck firmly. I use a mini bulldog clip to hold them in place while they dry, Repeat for the other 2 layers
You've now created all the layers and should now have five pieces like on the photo below, plus the extra one you put aside. 
Cut a circle of the same card big enough for the largest flower (with 5 petals) to sit on and apply some glue to it. Press the largest flower into the glue.
 Now add a little more glue to the bottom (where the hole is) of the 4-petal flower and sit it inside the first one,  Be sure to off-set the petals to make it look realistic
Repeat with the 3-petal flower and leave aside to dry while you make the bud.
 
 Apply glue to the single petal section of the bud, then place it inside the double petal section. Using wet glue means you can move it around until you like the shape of your bud.  Give the petals a bit on shape by curling them over the skewer.   I stood the finished bud in some blutak so that I could get a good photo - obviously, you don't need to do that!!
At this point pop the bud into the rest of the rose to check whether you need to cut a little off it.  I usually find the bud stands a bit too high and need to trim off a few mms.
Once I'm happy with the height I add glue to the centre of the main rose section, and also around the lower part of the bud (about the same amount as in pic 1 above)
Then tuck the bud into the main rose, move it around until you like how it looks and leave it to dry
 When dry, add any more shaping to your petals, remember to move it around to check all angles, then glue it to that last petal die-cut you saved right at the start, it gives some extra fullness to your beautiful rose

 My finished rose measures about 6-7 cms across.  I made a couple of smaller ones then used them on this project, which you can see HERE, using some little extras from the Bubbly Funk "Love Is...." craft box

Thank you so much for looking, I hope you'll give these roses a try, let me know how you get on if you do
Happy Crafting

A Sporting Chance!

Hello!
I've rather neglected my blog this week for some reason - so now I'm going to need to do a bit of a catch up before I forget what I've been making!
I absolutely didn't intend to share a football themed card for this week's 'A Sporting Chance' challenge over at the Daring Cardmakers, but my plans went awry so even though we've probably all had enough of it (I'd be quite happy if I never heard the word ever again) football it is.  
I may still try to do something else because I bought some lovely digital papers and clipart sets on Etsy so it would be good to give them a try.
Anyway, this one is an 'impossible card' so called because the way the sections overlap even though its only one piece of card, seems impossible - it's all in the twist!

The 'impossible' section of my card is the white part - see how the stand up tabs seem to overlap the black base, how can that be when its only one piece of card?  
I decided to add the black base to add some rigidity, as having three stand up tabs instead of the more usual two, it seemed a bit floppy!
Info
Card: Black, White,  Green, Gold, Silver, Red
Dies are very old Quickutz ones!
"Happy Birthday" from Spellbinders
The banner is hand cut
The other good thing about these cards is that the pop-up sections fold flat to slide into an envelope

That's it for this time
 Thank you for popping by, I hope you'll take a look at the other cards from our designers HERE

Friday, July 06, 2018

Summer Succulents

Hello
Howe are you this hot and sunny Friday?  As I don't have much to do today other than  keeping an eye on the happenings at Wimbledon (some very unexpected results this time!) while doing a bit of crafting I plan to stay close to my lovely Dyson fan as much as possible!  And drink plenty of Greek-style Nescafe Frappe!
 This week is an Elemental Inspiration challenge over at the Daring Cardmakers and our lovely Enfys chose a wonderfully Summery mood-board to get us crafting with. You need to choose a minimum of 3 'elements' from the picture to use on your card.
Here's the mood-board we're using this time;
I couldn't resist using the colour palette as I love yellow but don't often craft with it. Then  I decided to use the succulents in the flower bouquet and the pattern of circles on the centre left of the picture.

Info

I started by using inks and pens and a Crafter's Workshop Mini Swiss Dots stencil to create the background - my interpretation of the patterned circles.  I used various grey pro-markers, plus a few different yellow inks to colour the dots.  There's a bit of oink on the mood-board in the flowers on the lower left box, so I added in some pinks to the mix
The stencilled panel was matted onto the same green Bazzill card used for the leaves and succulents
The succulents are made with die cuts (info below) and the roses are hand rolled.
The gorgeous leaves and the border design are also die cut
Once I'd decided on the arrangement I glued everything in place and added a bow to the bottom.  Originally I used a pink bow, but at the last minute (about 10 minutes before the challenge went 'live'!) I decided yellow would look better so did a quick change.
Isn't this leaf die cut beautiful?  It's quite big, so I cut off and used only parts of it to back my bouquet. 
Tools:
 Mini Swiss Dots 6x6 stencil by The Crafter's Workshop

 
Shapeabilities Etched Dies

Shapeabilities Etched Dies 

That's all for today, I loved making the little succulent plants for this card and I always enjoy making rolled roses - they are so quick and easy!  Thank you for coming by, I hope you'll join in with our challenge this week, I'd love to see what you come up with

Happy Crafting


Tuesday, July 03, 2018

'Spend Some, Save Some' Gift Wallet

Hello!
I wanted to make this money gift a bit more interesting than just giving a cheque in an envelope, so there are two parts to this gift for my nephew's 18th birthday.  It's a 'Spend Some, Save Some' wallet containing two pockets, one with a cheque for him to  use to buy Premium Bonds or put away in a savings account, the other with some cash for him to spend on something he wants now.

The wallet is made in two sections, the yellow inner is folded in such a way as to create a spine for attaching one of the pockets, then the inside front is used for the message and the second pocket is adhered to the the inside back.
The yellow section is then glued into the blue cover.
To decorate the pockets, inners and cover I used the papers and some of the card from  the Bubbly Funk Through the Letterbox 'Hooked!' craft box.   There are a couple of "You are Beautiful Inside and Out" sun shaped die cuts in the box in matching colours - but I didn't think an 18 year old male would really appreciate that sentiment, so I adapted one to use on the cover.
from the 'Hooked!' box I used
Patterned Papists
Turquoise card
'Beautiful' Sun shaped die cut
From my stash I used; Blue and Yellow card, die cuts
You can get your "Hooked!" box for just £9.95 from HERE

There's more info about this wallet on the BUBBLY BLOG HERE. and loads more ideas from the team and Guest Contributors using this and other of Bubbly Funk's fabulous craft boxes that come straight Through the Letterbox!
 
Thanks for looking
Happy Crafting