Showing posts with label Hot Foil Adventures. Show all posts

Tuesday, August 12, 2025

Down at the Bottom of the Deep Blue Sea

 Hello


welcome to my little crafting place! 

I've another card using Spellbinders Small Die of the Month  and Glimmer of the Month from their August club kits


I've used some turquoise card, foiled with the bubbly Glimmer plate and using the Speckled Prism foil that forms paty of this club kit.

I may have gone a little made with adding coral and fishes but they are just so cute!  It kind of remionds me of our trip to The Maldives, where hubby learned to dive and I snorkelled to my heart's content, engrossed and captivated by the coral and numerous fish of many sizes and colours just a few metres from our bungalow.  Heaven!
We also swam with Manta Ray and even a Whale Shark on that trip, as well as turtles and many other amazing creatures. 
The difference was - no wet suits were necessary!
 
 
Materials
 
from Spellbinders;


 Other
 
White cardstock 
Turquois card 

 
Just a Note
~~~~~~~~~~~~~~~~~~~~~~~~~~~~~~~

  THIS is my Affiliate link to the Spellbinders store 
-  you can use it to access the store whenever you buy from Spellbinders
It doesn't cost you anything, but I may get a little reward for pointing you there.
There's a UK based shop now, so you can use the 'Visit Our UK Store' button at the top right of any page on the Spellbinders site  

~~~~~~~~~~~~~~~~~~~~~~~~~~~~~~~

Thank you so much for coming by

 Happy Crafting, Take care of yourself, and please come back soon!
 
 Kathy xx

Tuesday, February 04, 2025

Glimmering Sprigs of Spring (Feb GOM, WSOM)

   Hello

and welcome  to my little crafting place! 

Having just about survived January month, I'm trying hard to look forward, beyond the cold drary days of February towards my favourite time of the year - Spring


I've been using the Spellbinders Glimmer of the Month for February and it really lifts the spirits with its beautiful leafy sprigs design

For my first project with this set I decided to go for a dark green card blank and gold foil.  I simply used the beautiful glimmer plate for this card, but in the  set you also get a cutting die to cut round the tops of the leaves and some lovely sentiments - one of which I used on this card

The February Wax seal of the Month from Spellbinderslso has a Springtime feel, and decided to make one to use on this card.  

I poured gold wax into the warmed seal and used a heated scraping tool to scrape oiff the excess. Step 2 was to stamp the motif into a mid green mix of wax and step 3 was to highlight with shiny gold leafing pen

 I used:

 leafy design plate and sentiment

February Wax seal of the Month

Dark Green card blank

Green and Gold twine and light green pearl
 

More examples of this seal

 
  Just a Note
~~~~~~~~~~~~~~~~~~~~~~~~~~~~~~~

  THIS is my Affiliate link to the Spellbinders store 
-  you can use it to access the store whenever you buy from Spellbinders
It doesn't cost you anything, but I may get a little reward for pointing you there.
There's a UK based shop now, so you can use the 'Visit Our UK Store' button at the top right of any page on the Spellbinders site  

~~~~~~~~~~~~~~~~~~~~~~~~~~~~~~~

Thank you so much for coming by

 Happy Crafting, Take care of yourself,
 
 Kathy xx

Monday, July 15, 2024

Spellbinders' July Glimmer of the Month Club


  Hello!

Welcome to my little crafting place!
 There's a Christmas in July vibe throughout this is month Spellbincers club kits and as usual I've got the Glimmer, Small Die and Wax seal sets to play with.
 
If you have a hot foiling gadget, I think you'll love this month's set -it's perfect for making simple and stylish Christmas cards as well as being fun to 'fancy up' with die cuts, ribbon and layering

card 1

I've used the Glimmer plate, gold foil and stencil from the July Glimmer of the Month Club to make this one, but this fabulous set also has the outline cutting die and a super-useful two part sentiment and matching cutting dies.

I decided on a lovely deep green base card, then backed the hot-foiled and stencilled focus piece with white and gold card.  I could have added a sentiment and left it at that, but instead I can a gold and green die cutting session with the poinsettia and foliage dies from the Small Die of the Month set   

 
Below is the Hot Foiled image filled in using the stencil and a few shades of green and red inks
 
card 2
 

This time I used the Glimmer plate, gold foil and the matching cutting die from the Glimmer of the Month Club,  and added it to a white base card with a curvy red lower panelI've used just the JOY Glimmer sentiment from the set, but you also get 'wishing you' in a lovely script font

The card didn't really need much more, but I couldn't resist anadding a red and white gingham bow


Note
~~~~~~~~~~~~~~~~~~~~~~~~~~~~~~~

  THIS is my Affiliate Link to the Spellbinders store 
-  you can use it to access the store whenever you buy from Spellbinders
It doesn't cost you anything, but I may get a little reward for pointing you there.
There's a UK based shop now, so you c use the 'Visit Our UK Store' button at the top right of any page on the Spellbinders site 

~~~~~~~~~~~~~~~~~~~~~~~~~~~~~~~

Thank you so much for coming by

 Happy Crafting, Take care of yourself,
 
 Kathy xx

Friday, May 07, 2021

May's Elemental Inspiration challenge - more hot foiling


  Hello

  Happy Friday, I hope you've had a lovely week, its been very windy here at times and not very warm. The wind plays havoc with my hay fever, so its been a very 'drippy' week for me,

This week over at The Daring Cardmakers Miri has chosen the board for our monthly Elemental Inspiration challenge

Welcome to May!

I picked this picture for our monthly inspiration:

 Choose at least three elements (colour scheme counts as one element) from the picture to kick start your project.

 Click here to see this week's design team inspiration  


Having been quite pleased with my hot-foiling exploits last week, I thought I'd use the same hot foiling plate again - after all it looked to be a perfect match for the various dotty patterned squares on Miri's mood-board.
So, my chosen elements were; Squares, Dotty pattern, Blue flower and the heart
 

Info
My base card is a smooth white square card blank
The blue paper is a gorgeous heavily textured paper from Tonic Studios.  I glued some onto scrap cardstock before hot-foiling with the Spellbinders dots Glimmer plate then cutting into squares. 
The flower is made using the same paper and one of those fab die sets from Spellbinders which have several dies of varying sizes 
The heart is also from a multi-sized pack, cut in Tonic mirror finish card, 
For the flower centre I used a blob of Glossy Accents, added some shiny gems, then filled any gaps with those teeny weeny gold micro beads that manage to go everywhere you don't want them, and just occasionally in the place you do want them.
To pull all the components together I added a tiny sentiment, and a gold thread bow, plus some of the blue and gold jewels around the flower


Thank you so much for visiting today, I hope you'll leave a comment, I really appreciate it when you do!

Happy Crafting, and please take care of yourself.


Wednesday, January 09, 2019

Happy Birthday!: Hot Foiling Adventures no 4

Hello

As this is my first post of 2019 I want to wish you a (rather belated) Happy New Year -  I hope all your crafty (and other) dreams come true, that the Bad Fairy of Procrastination stays away from your desk and that your crafty mojo is always there for you.6
I hope all that for me too, of course!
A couple of months ago we started a Handmade Card group on FB, mainly to swap birthday cards, but there will be other swaps along the way, I'm sure!   Anyway, my first card make of the year was a birthday card for Andrea, one of our group and I couldn't resist finally trying out some of the new hot foil plates I bought late last year and hadn't had time to use, plus one of those my OH gave me for Christmas
I must apologise for the photos, I've not got the hang of photographing foiled items and I was in a hurry too!

 The dotty background turned out better than I expected.  The foil is one of the 'pearl' finishes and to be honest I've found them rather disappointing when I've tried them before.  The colours look stunning on the roll but when you actually use them the colour hardly shows up at all, which is a shame.  I can't remember whether I've tried the pearl foils on coloured card so I should add that to my foiling 'to-do' list!

I'd just tried out this same pearl finish turquoise foil with another regular hot foil plate using white card and the image was really poor, so when I tried it with this lovely dotty background plate I didn't really hold out much hope - but as you can see, it worked really well and the tiny coloured dots show up very nicely.
The flower is from a foil and cut set by Spellbinders Glimmer.  It's lovely!  You get four sizes of flower along with the cutting dies for each, and also two foiling plates only for some leaves - I didn't use the leaves here as I wanted to tuck some die cut leaves behind the flower head for this card.
I foiled two of the flowers in shiny turquoise then used the cutting dies to cut the shapes out.  The cutting line wasn't as close to the foiled images as I wanted, so I just hand-cut around to make it closer
The sentiment is another Spellbinders Glimmer plate and I used lots of scrap foil, cut into strips to make a multi-coloured sentiment panel.  I'll tell you more about making these next time, and have more pictures to share too

Hot Foil Plates:
Background; Swiss Dots by Couture Creations 
Flowers; Foil Flowers by Spellbinders Glimmer
Happy Birthday Faux Script also by Spellbinders Glimmer
Hot Foil rolls all Couture Creations
Other: 
White card blank plus extra for foiling elements
Turquoise card for matting
Leaf die Spellbinders
Turquoise satin ribbon to finish
 
That's all for today.  Back soon with more Hot Foil Adventuring and other things from my crafty journey too.
Thank you for visiting, please add yourself as a 'follower' via the sidebar.  
I'd love to hear from you so please leave a comment.  
 If you're a blogger too, I'll be sure to visit you to return the favour.
Happy Crafting

Friday, December 14, 2018

Snowflakes Falling: Hot Foiling Adventures no 3

Hello!
How's it all going with you?  Everything ready for Christmas now? We'll not mention just how far behind I am.....
Straight down to the business of The Daring Cardmakers today:
This week our theme is
Snowflakes Falling
One snowflake or a whole blizzard, perhaps a snowman, or a whole snowscape if you like - just keep it snow-themed for your card this week, and remember, it doesn't have to be a Christmas card.

As far as I'm concerned the snow can just stay away all Winter.   I probably say this every year but I wouldn't mind the white stuff if it only settled on the gardens etc and never made the roads and paths so treacherous.  Being a born worrier I can never rest until I know that those I love are safe and sound and not travelling.
However, I love snowflake shapes especially when it comes to extending my die collection and I'm pretty sure it's impossible to have enough of them!
So I used quite a few to make  couple of similar cards this time, and experimented with  some hot-foil layering too.  I won't be sharing the version where my spatial awareness capabilities went to pot though!

 Info
For the  hot foil layer 1 a few of my smaller regular dies were laid onto the heating platform, then the foil (pretty side down), then the pale aqua pearl cardstock and finally a shim. It doesn't matter if some of the dies extend past the card, just be sure the shim (or you could add a piece of paper below the shim) is big enough to catch any stray foiling.
Because regular dies foil only where the cutting edges are, you get a lovely delicate background pattern
For layer 2 I used a hot-foil stamp plate ( I think this one is by CraftstashUK). You need to keep the stamp in position on the card, I use washi tape to do this and prepare the stack on my craft mat so I can get it all lined up.
  
At this point I have a tip for you:  I find it a bit fiddly cutting the slippery foil to shape, so I male a template using a scrap of card to roughly draw around the stamp on, cut the shape out leaving a small margin, write on it to label it then store stamp and template together.  It's much easier to cut the foil using the template than the actual stamp 

The foil needs to be between the card and the stamp so once I've decided where the stamp needs to be and use a small piece of tape to fix it and act as a hinge when I tuck the foil in place.
The stack (on the craft mat) will be:
Card
Foil (pretty side up),
Hot foil stamp, face down (add more washi tape to hold everything place)

Now turn the whole lot upside down and place on the heating platform
Add the shim and allow to heat through before rolling slowly through your die cutter a couple of times.
Layer 3 is the same as layer 2, but I used red shiny foil and a Spellbinders Hot Foil plate
The second card was made in pretty much the same way, just  finished off differently.  The NOEL hot foil plate is also by Spellbinders 

Info
Hot foiling as above
Gold paper added to card base
Die cut snowflakes added to the large hot foiled snowflake

Extra small die cuts and gems added to both cards

Hope you like them, and the instructions make sense, though I suspect they make more sense if you've actually got a hot foil gadget!
Have a great weekend
Happy Crafting

Tuesday, December 11, 2018

SnipArt Tree: Hot Foiling Adventures no 2

Hello
Over the last few weeks I've been continuing to experiment with my hot-foil machine and I thought it was about time I blogged another project.

I've been having a go at making my own hot foil 'plates', and will share how I got on another time - I've had to put that project aside while I concentrate on trying to get my Christmas cards done.  But having learned that it was possible to so it, I realised that you could probably also use those lovely laser-cut designs too.  I have a few pieces of SnipArt that have come in kits and I thought it was worth trying the idea out with this swirly tree.
To use the SnipArt shape as a hot foil plate, heat your machine and cut foil to size cutting off any corners as usual,to leave a 'softer' outline.
Now build your stack on the hot plate; 
*your cardstock
*the foil (sticky side onto the card)
*the SnipArt piece
*a shim 
Close the lid.  Leave to heat for a minute or so then run back and forward SLOWLY through your die-cutting machine a couple of times 
(I use my ancient Cuttlebug)
Allow to cool slightly before peeling the foil from the card.

This shape worked really well and I love the foiled tree. I used green foil on the top card and gold on the lower one - but they both look similar in the photo! If you are careful you can get several uses out of the SnipArt shape before it begins to get a bit too tatty.  It might be worth buying two of the ones you like best!

I was going to show you an example of foiling using a SnipArt piece that didn't work so well but I can't find it atm.  It was a lovely laser cut, but probably a bit too intricate to work as well as I'd hoped.  When I unearth it from the junk heap I fondly call 'my craft desk' I will show you thouhg.

All for this time, thank you for visiting

Wednesday, November 07, 2018

Silver Snowflake: Hot Foiling Adventures no 1

Hello
After a damp and drizzly start to the day, the sun is trying really hard to break through the gloom.
I'm still trying to catch up with un-blogged projects, so you might have seen today's pictures already. A blog post gives more chance to tell you about them though.

For Christmas last year my OH gave me a hot-foiling machine and every now and then since it arrived on my desk, I've been playing around with it and trying to get to grips with what works and what doesn't.  What I've discovered for myself, and what I've read, or seen on videos, is that it's very much a case of trial and error. The card that works, the shims you need to use and the dies etc that work, even the die cutting/embossing machine you use to roll the hot plate through - all are a bit 'liquid' as to which combination works best and you just have to try things out.
There are loads of ways to use a hot-foiling gadget - just do a bit of Googling to find out more about them.

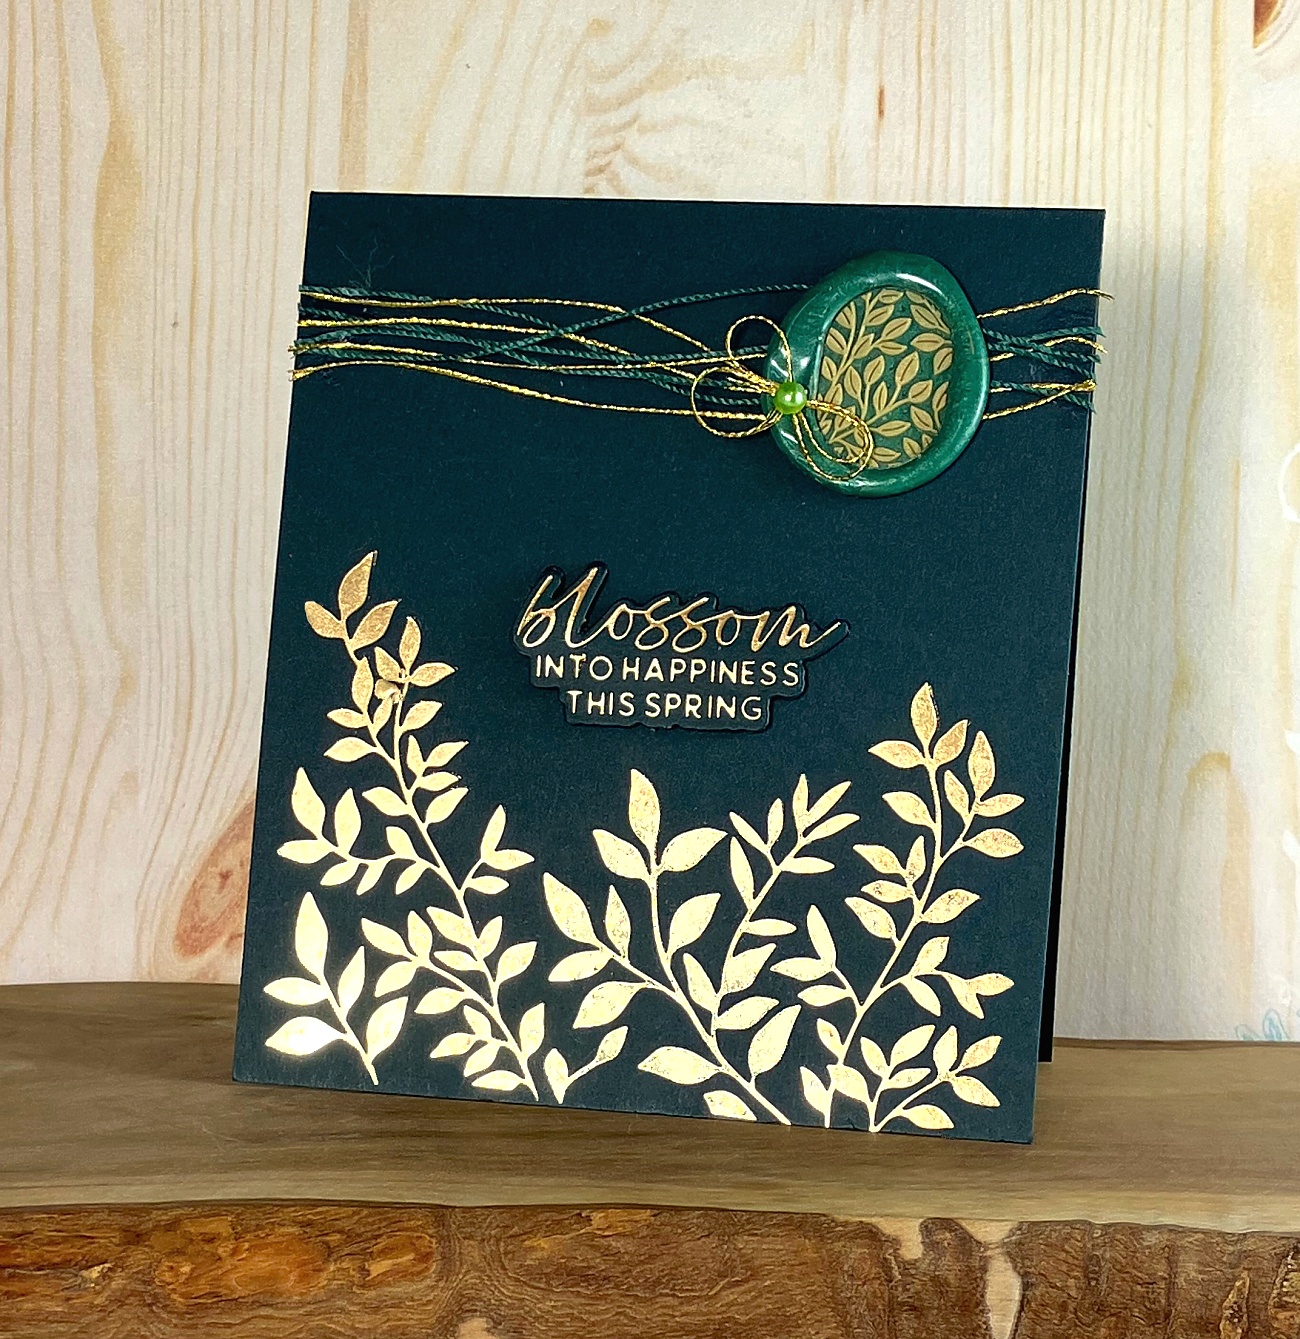
For the cards I've shown above I used once of my favourite dies from last Christmas.  It's the largest die from this 'normal' die set


When you use your existing metal dies, the parts that are foiled will ONLY be the raised cutting lines.  This means that some dies work better than others when used for foiling - you just have to experiment.

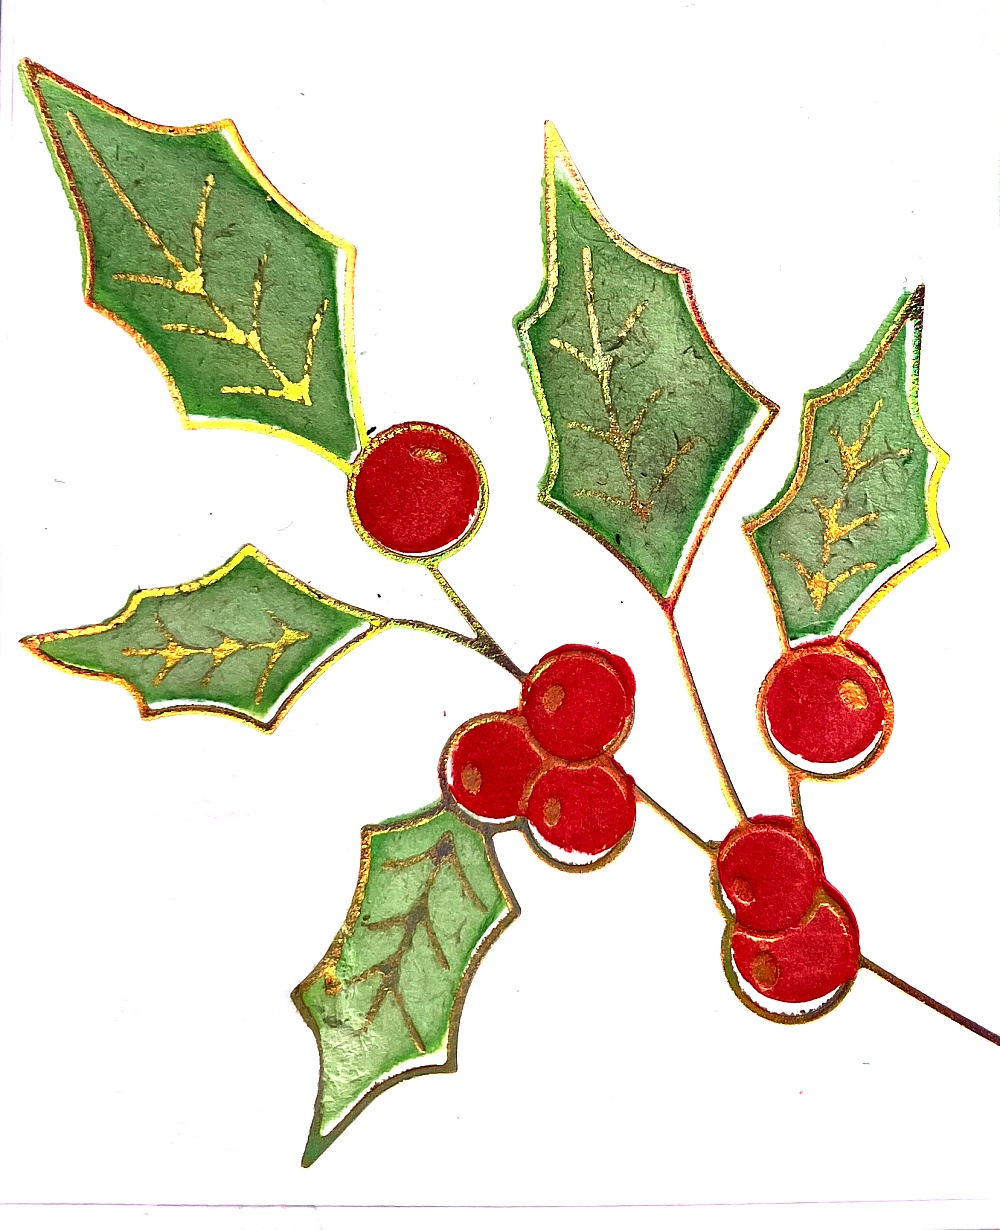
You can also buy 'hot foil 'stamps (aka plates)  which work in a similar way to regular stamps - the raised parts of the stamp will give the pattern on your paper.  If you look at this next photo the red example is a made for purpose hot foil 'stamp', the silver tree on the blue example is a normal cutting die.  You can see that the space between the cutting lines on the tree stays blue, but the foiled areas on the hot foil stamp are more like a regular stamped impression. 
 

I would advise anyone buying one of these machines to also buy a couple of the made for purpose hot foil stamps.  I didn't do this straight away and just used cutting dies and found the process frustrating and disappointing because it was hard to get a decent result right from the start. 
The other basic issue I had was that I just couldn't get the foiling to work using my electronic die cutter (ebosser).
Once you've done the heating part of the foiling process you need to roll the removable platform of the foiling gadget through your die cutting machine.  The platform is about 2.5cms thick so it needs to be one with a fairly deep 'mouth'.  The tolling process fixes the foil to the card and must be cone fairly slowly and usually a couple of times through.  I've found that my ancient Cuttlebug works perfectly so keeping it as a standby cutting machine was a good move!

Going back the cards I'm sharing here this time, they were the result of an experimenting session, so I took a picture of what I ended up with after the foiling was done. 
The photo shows the die I used (see above for details), next to that is the piece of silver foil I used, then the navy and black pieces of foiled card. The interesting thing about this is that I used this same piece of foil for all three of the foiled images and could probably use it again, its worth knowing that you can often get more mileage from a piece of foil than just a single image.
I made all three into quite simple cards, using apertures, silver card, silver twine, a few gems or a die cut snowflake to embellish them.  I think they are quite effective so will make a few more in the same style.
Here's the silver foil on black version

Thank you so much for looking, I hope you found it interesting to read of my hot-foiling 'adventures'!  My main problem is that the experimenting tends to take over and I've hardly any completed projects to show for it!  
Oh well, its just another way the Bad Fairy of Procrastination makes her presence felt!

See you again soon
Happy Crafting