Sunday, April 30, 2017

Feathers, Flowers and Foamiran - Spellbloggers


Hello
Thanks for joining me for another Spellbloggers Post.
I'm back from a week at the seaside after a  a lovely week in Southwold (Suffolk), which has to be one of my favourite places - its just like a great big, friendly warm hug of a place!

So a little late with my weekly project using gorgeous Spellbinders products new and old, and this time its a mix of both.
First though I'd like to introduce you to my wonderful new baby die cutter!  So, meet my Spellbinders Prizm - isn't he the cutest little machine?  I've sat a little ink pad on top to give you an idea of now dinky he is.  Now obviously, at this size not all my dies can go through, but loads of them do, and it's so much quicker than using my big machine when all I want to cut is something small!  He does the job quickly and quietly too - I can even use this little fella when my OH is doing a skype call at the desk next to mine, without getting told to shush! 😜


If you've got a big, do-it-all machine and think you don't need something dinky like this, think again because all I can say is that after just a couple of weeks with this on my desk I'm completely besotted with my Prizm

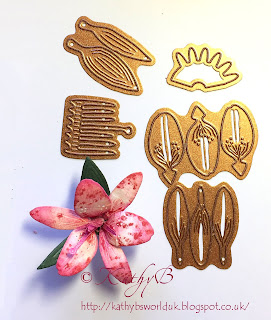
A couple of weeks ago I made this flower using a couple of dies from the Spellbinders Carnation Creations die set and some Foamiran - this was the first time I'd used this thin foam product and I loved the result - there's no doubt that I was assisted by choosing to start off with a fabulously realistic die set!
Well, it's been sitting on my desk waiting to be used for a project since then, so it was time to do something with it.
Gaving just received a beautiful new embossing folder and some gorgeous feather shaped dies I thought they'd all work together very nicely, and I came up with this card
Spellbinders Products:
'Blistered' -Embossing Folder Tammy Tutterow Designs

Feathers On The Wind - Shapeabilities Inspire Etched Dies
Sprigs  Die D-Lites Etched Dies
Other:
Card: White, Black, Green, and Peach (various shades)  
Foamiran for flower
Real feathers mixed in with the die cut ones
2 shades Peach Seam Binding
Border Punch to edge peach matt


I hope you can see the gorgeous embossing design - I have a feeling this will soon be one of my favourite go-to folders.  I'm absolutely useless at "white space" so will often turn to an embossing folder to lift what I feel is too much 'flat white'!

Thanks for visiting, if you click on This Link  you'll find yourself at the Spellbinders store and you can get your hands on the things I've used!


Happy Crafting
Friday, April 28, 2017

Super Heroes!

Morning!

Here we are at Friday again, and another Bank Holiday to look forward too!

This week at The Daring Cardmakers is all about Super Heroes - apparently it's Super Hero Day, so that's the theme Nat has chosen for us to play with this time.
It can be a card celebrating your very own Super Hero, or featuring a Super Hero theme - that is up to you.

I decided to tackle another of the My 'Boy' Birthdays for mine
It's just a simple card really, I found some suitable images using a google image search, made them into templates and cut them out using my Silhouette machine.  Then it was just a case of layering them up and deciding how to stick them to a card!
KAPOW!!!
There's not much more I can add really - except to say, do head across to the Daring Cardmakers blog to see all the fabulous cards the DT have made, you won't regret it!

Thank you for coming to visit, please leave a message before you head off


Tuesday, April 25, 2017

April Sketch Rosette

Morning All 
Today I've another card made using the April Sketch File LO.  I was planning to get another of my May 'Boy' Birthday cards done and dusted, but it didn't work out that way.  Instead I made this


 Info
Papers 'Hooray' 6x6 (MME) 
(are you bored seeing them yet? haha)
Pointed circles die set (Spellbinders)
'birthday' cut in foiled card
Petite Dots 6x6 embossing folder 


 The LO is the April LO from The Sketch File Blog
The Sketch File April 2017
 
 Thank you for looking in today, I hope you'll leave a comment before you go 
 

Saturday, April 22, 2017

Flower Favour Box - Spellbloggers Saturday

Hello
Thanks for joining me for another Spellbloggers Saturday.
I'm having such a great time using lots of lovely new Spellbinders products and revisiting those that have been in my stash for ages.
Today though it's a brand new die I've been playing with, and makes such a lovely little box - perfect for Wedding Favours, small gifts or as a little treat box.

These boxes are hexagonal in shape, with sweet little petal shapes at the top which you can gather in with ribbon or twine to close up the box.
All you do is cut the die twice, crease along the fold lines to form the shape, then use glue on the tabs to make the box.
I used a download paper collection and printed my chosen designs on both sides of some white card.  Each of the boxes is different, but they all match because the designs are compliment each other;
For the box in the middle I added little rectangles of another design to each segment.  The rectangle die comes with the box die set
To close mine I used some silver elastic threaded with a few beads and added a tiny pink bow but really you can let your creative juices flow!


Flower Top Box  Celebrate the Day by Marisa Job Shapeabilities Etched Dies (Spellbinders)
Download papers by MichelleR via Etsy
Elastic, Ribbon and beads from my stash
You can see the petal top better in this photo

That's it, a very quick and pretty little box.  It's so lovely that it looks lovely without making too much effort!  Handy if you've a lot to make.....  I wanted to keep my version really simple so that you can see how just cutting in pretty, heavyweight paper and tying up with a bow is all this one needs to look good.

Thanks for visiting, now head over to the Spellbinders store and get you mitts on this one ;)  You know you need it.....

Happy Crafting

Friday, April 21, 2017

5 Pattterns

Morning All!

These short weeks can be tricky, can't they?  I had so much crafting to do this week and less days to actually get it done - I'm not a quick crafter, I can't just knock out multiple cards a day like some can - however do they do that?  I guess you just have to be more decisive and go for it rather than faff about going through every paper pad, every die cut, every possible LO, every font etc.  I have pushed paper around in such an ineffectual way this week, so have failed big time in ticking everything off my to-do list,  Darn it,

So  I think it'll be quick blog posts for a while in the hope of clawing back some time.
Today is Daring Cardmakers day and it's our lovely Miri's turn to challenge everyone
5 Patterns
This week it's Miri here with a new challenge I'd like to see lots of colours on your cards.
Use at least 5 different patterned papers (maybe from your scrap box) and create a colourful card.
Even better if there are lots of “spring colours” (and it’s okay if your create your own patterned papers).
Have a look at the blog {HERE} to see our design team members’ brilliant ideas for big and small scraps of patterned paper.

I don't have a scrap paper box.  I tend to keep the sets of papers either in bags for the 12x12s, or I just tuck scraps inside the cover of 6x6 pads.  The real issue is how small is too small a scrap to keep?

Anyway, I thought I'd see if there were enough of these scrap pieces inside the cover of my current favourite MME "Hooray" 6x6 paper pad.  I banned myself from cutting into any new sheets, using only leftovers from other projects

Info
Linen textured card blank (PDA Woodward)
Papers Hooray 6x6 (My Mind's Eye)
Scraps of coloured card to match
Jade seam binding for ribbon and double bow
EK Success border punch
EK Success Flower Punch
Sprigs  - Die D-Lites Etched Dies (Spellbinders)
Flower centre from a Memory Box die set
Metal filigree bead cup, filled with small beads, glitter and Glossy Accents
Faux brads punched using a small Xcut punch


The team have come up with some fantastic ideas this week - so if you're looking for ways to use up all those odds and ends the Daring Cardmakers blog would be a great place to start!


Anyway, that's all for this time
Thanks you so much for taking the time to visit 

Tuesday, April 18, 2017

Ohhh Referee...................!

Morning All 
Back to 'normal' after the Easter weekend eh?
I hope you had a lovely few days and got plenty of time to relax, or whatever makes your perfect Bank Holiday!

We are fas approaching the month of May - Boy Card May, when I have a whole bunch of Boy/Man birthdays to make cards for.  Not my most favourite theme, I admit.
I've managed to use the April Sketch File LO to get one of them done, and there may be another one coming next week if I can make the idea in my head come out on paper!


 Info
The referee is Silhouette-cut with a template I made a few years back
Dark green card blank (PDA Woodward)
Scraps of black, white, peach and green card
Circle made with 2 sizes of circle dies
Decal sentiment on a punched circle
Football and stars are from a packet of table confetti
 The LO is the April LO from The Sketch File Blog
The Sketch File April 2017
 
This card will be for one of our nephews who has just qualified as a football referee, so the image is suitable!

 Thank you for looking in today, I hope you'll leave a comment before you go 
 

Saturday, April 15, 2017

Lovely Lilies - Spellbloggers Saturday

Hello there
Welcome to my second post for Spellbloggers.  Ohhhh I'm having so much fun being part of the Spellbinders family.
This week's post is all about lilies, I used them to decorate the box I shared on last week's Spellbloggers post but then I decided I'd make another one to show more clearly on this week's post.  It seemed a shame not to make something with it though, so one thing led to another....as it does
So. here's the card I've made with the new lily
 Info
From Spellbinders:
Create A Lily   - Shapeabilities Inspire  Etched Dies 


Sprigs  - Die D-Lites Etched Dies
A few 'waste' circles for the faux brads cut using Nestabilities Eyelet Circles 
Accent piece on the right is from an old Shapeabilities set; Lace Doily Motifs, but there are many pretty narrow accents that would work (such as in the
Shapeabilities Ironwork Motifs Etched Die set)

other

Paper Download "Faded Beauty" from Funky Hand (no longer trading) - resized and printed directly onto card front, plus extra designs for die cutting

White and green card (Bazzill) for Lily 

Inks  

This photo shows the various dies in the set.  One great thing is that if you need 3 of something (like with the two petal shapes) you get three, the different dies are separate so you can lay them out, cut pieces of your various coloured papers (I use a bit of Washi tape to keep everything in place) then you can cut everything you need in one pass through your machine

There's a step by step on the back of the packet showing how to create the flower.  Ink up your petals before you start, it's much harder once they are shaped and attached!  I like to add a bit of shape to petals using a ball tool.  I have them in various sizes - my favourites are solid stainless steel and are actually from a sugarcraft (cake decorating) supplier

Although this pink lily was made simply from card, those I used to decorate the box I shared last week were cut from 'foaniran'.  This is a very thin sheet of foam, easy to cut, die cut etc and it makes beautiful soft to the touch flowers.  You can use an iron set to a low heat to help mould the petals, but if your flowers are small then just crumple them in your fingers or use a ball tool to create some shape.  I used the iron method for the lilies but another time I wouldn't bother 
  Here is the box lid, followed by a list of the items I used


'Foamiran' foam sheet for flowers
various gems and dots

I think the Die D-Lites Sprigs die set is one of my most-used dies ever! Hardly a week will go by when I don't use it.  I love the twirly one on the left for adding an extra flourish of its own, or 'filling out' a dull space on a design. The leafy die on the right though, is just brilliant used with tiny flowers as well as a whole piece - I usually cut the sections apart and tuck the pieces in behind my small flowers.  If you were to scroll back though this blog you'd spot these two all over the place!


Anyway, I think that's probably quite enough of my warbling for one day, I hope you weren't too bored, and have enjoyed your visit!

Have a great Easter weekend

Happy Crafting 


Friday, April 14, 2017

Narcissistic?

Hello
It doesn't take much to throw what routine I have out of sync and completely confuse me!  Friday is usually a Work from Home day for OH so having him at home is no different today.  But the alarm didn't go off at 7.45 and he didn't get up and do the "long" commute across the landing to the study and I'd soon forgotten it was Friday because it felt like a Saturday.....
Never mind eh?  Some kind Daring Cardmakers DT member, obviously more awake and 'with it' than me stepped in and pressed the button to publish today's post!  It's my own challenge too - ooops!!

🎕  Spring Garden  🎕
 It's Easter weekend and also time to celebrate the coming of Spring (fingers crossed). so this week I'd like to see Spring flowers take the starring 
role on your cards this week. 
 All the gorgeous Daffodils, Tulips, Irises, Hyacinths and twigs with blossom etc. that herald my favourite season.
The team have really pulled out all the stops this week, just look {HERE} to see our very own Spring Garden of Flowers.
I can hardly wait to see what gorgeousness you'll share with us this week.......

You already know I never miss the chance to make or use some flowers on my cards, don't you haha
For this week I thought I'd have a go at making some tiny daffodils, actually I'm not sure whether these multi layered ones are truly daffodils or more in the general Narcissus category.  I could look it up, but I'm  not going to, I just like the way they've turned out,  And yes, I got a bit carried away and tried them in different colours


Info
For the daffodils I used an old Kikyo flower punch that I have had since the beginning of time.  It's by Carl (I don't know if they still exist)but others are available
The trumpets are just a curved narrow strip with a fluted edge (I just used scissors).  You could do a neater job and use punched or die cut circles and cut away the excess (you'd get 2, maybe 3 trumpets from one 'ring') but I'm impatient so just used scissors
Two of my flowers are made with scrap card, all the others are made using the thin foam sheet known as 'foamiran'  I added some hint of colour with ink pads.  Can you tell which are which?
Hand cut stalks and leaves
Patterned paper for the flower 'done' and mat "Summer Days" 6x6 (Echo Park)
Organza ribbon and double bow (I used 2 shades of the same ribbon)
A few matching pearls

That's it.
We'd love to welcome you to The Daring Cardmakers this week- it would be fab to have you joining in with us.

Thank you so much for visiting
Happy Crafting


Thursday, April 13, 2017

Rollin' Rollin' Rollin'

Good Morning!
How are you this Maundy Thursday morning?  Looking forward to a lovely Easter weekend with lots of sunshine?  Well we have to hope, don't we hahaha
A couple of weeks ago my nephew and his girlfriend completed on the purchase of their first flat - quite an achievement these days for a couple of people not long out of university.  I was thrilled for them and remembered the excitement of moving into my own first flat.   I'm looking forward to visiting soon. 
Of course I wanted to send a New Home card, and I wanted to make it a bit different and fun.  This is what I cam up with
Info: I made the paint roller first - because if I couldn't get it to work 
I'd need a new plan!

The handle is made with paper clay, which I just moulded in my fingers and inked black. When it was dry I coated with Ranger's Enamel Accents (black) because I didn't like the dull finish of the inked handle
The metal section is formed from a paper-clip
I made a fairly tight spiral with a white pipe cleaner for the roller part 
For the card I used a smooth white square card blank. 
 I cut a white square panel from Bazzill card, then wiped blue ink over another piece of the same card. 
 Once dry I cut two lengths of the inked card and glued them in place on 
the white square.
Next the whole piece was embossed with a chevrons embossing folder (Crafters Companion), and matted onto a piece of matching blue Bazzill card
The sentiment is pc generated and matted onto a Nesties Labels 18 die (Spellbinders
It looked a bit unfinished so I added a few wayward paint drips - cut with
 (also Spellbinders
I do like it when you can find ways to use dies for purposes other than the original, it means you get more use from them, doesn't it?


I have to say, I was really chuffed at how this turned out!  That little paint roller and the "roughly" painted lines do make me smile for some reason.  Probably remind me of my own haphazard painting attempts!

Thank you for coming by today