Friday, September 13, 2013

Signature Style Crafting

Friday, as always is Daring Cardmakers Day and this one set us all a right old challenge!  I don't think there was a single DT member who didn't struggle with Lythan's dare.  Hopefully other people won't feel the same hehehe
    "I (Lythan) sometimes wonder if my cards are all rather repetitive and boring.
But I have decided to embrace the fact that there are certain elements that I have 
to include on my cards and call it my signature style (sounds soooo much 
 better than samey samey!).
 And being the nosey type I thought it would be fun to make you analyse what 
are the go to features that you like to add to a card - what is your,,,,
    Signature Style"

I definitely should have started on my card before yesterday,  Yesterday turned out to be rather fraught.  It was a bit like Friday 13th coming a day early, But in the end I managed to cobble together this card;
i think there is actually more to my "signature style" than you can ever see on the finished card. 
The main criteria for my Signature Style seems to be "Now how difficult can I make it for myself this time".  No-one ever sees just how complicated and time-consuming a crafting project is, do they?
Look on my desk and you'll see a stack (stack sounds far too organised for the mess) of punched out, chopped up 12x12, punches, dies, discarded bits of card.  Look in my bin and you'll find a whole load of  torn, gooey and discarded petals and flowers that were rejected.  So much wasted paper! 
Then there was the embossing - that didn't go well either, this card is actually the fourth attempt just at that bit!.
Hey ho, never mind - let's move on....

Well, what is my style? Well, don't ask me; it changes all the time, I think - maybe YOU are the better person to ask.
So I thought about the things I like to use most and the way I like to arrange them.
Obviously it had to have handmade flowers on it, I use a lot of dies and punches, I'm not good at "white space" but add some embossing and all that emptiness takes on a whole new "feel" - in more ways than one ;), I like a bit of pretty ribbon, some swirls and pearls, and I really love to go "off page" by cutting a few cms off the edge of a card then extending the embellishing over the edge.  A whole new "dimension" but it still fits in the regular envelope.. And speaking of dimension, I like adding that...a LOT!  Which makes it not fit in that regular envelope anymore, of course!


Materials
15cm sq smooth white card, top fold, 2cms removed from side. Embossed with "Corner Swirl" folder
Extra smooth white card for upper "Petite Dots" embossed panel
 WMRK "White Out" Promenade papers
Wired Pearls, Wired Acrylic flowers, Flat-backed blue pearls, Ribbon
Tools
Embossing Folders: "Corner Swirl"and
"Petite Dots", both Crafters Companion
Dies:  Spellbinders Labels 18,  MFT Die-Namics "Fancy Flourish"
2x SU flower punches 

The WRMK papers are some of my favourites. I used mainly plain ones for this card, but the patterns on the other side are soooo pretty - I hardly ever use them because I doubt they are still around to buy more.  However, I was covering some boxes to store paper pads in the other day and decided that as they were so pretty I should use them for something I'd be keeping!  Having them out on the desk reminded me how Summery and pretty the colours were - perfect for some flower making.

I've tried to get a better photo of the gorgeous swirly embossing on the card blank - failed pretty much, but hopefully you can get the idea

I hope you like my card for this week - I very much hope you'll give some thought to your own "signature style" and share it with us over at The Daring Cardmakers - do check out the fantastic cards my Teamies have made this week and see if you agree with what we all think of as our signature style.
Thanks for looking, please leave a message.....


Saturday, September 07, 2013

Funky Hand Blog Hop

hello!
A huge and special WELCOME to you if you have found your way here from Debbie's blog because you're taking part in the Funky Hand 2013 Christmas Launch Blog Hop!

As usual with these things, you can find out all you need to know by visiting our Launch Pad - in this case it's Anice's BLOG which you can find HERE

Anice will give you the first letter of an anagram, and will direct you to the next Blog you need to visit to get the next one.  In a minute I'll give you "my" letter and direct you to your next port of call, but first, here's the project I want to share with you today
You can see quite a lot of tiny examples of papers from the Sleigh Ride set on this card, Created from lots of little rectangles of  papers left over from making my other projects, just cut to size then rolled around a bamboo skewer  - I had loads of fun making this one, and I hope you enjoy seeing it!

So, why join in with our Blog Hop? 
Well, there will be this fab prize from Funky Hand for someone.....
a complete set of downloads (backing papers and wordbook) from either Sleigh Ride or Silent Night and all four Christmas digital image downloads
to qualify and be in with a chance of winning that little lot, you need to visit and leave a comment on the blogs of all who are taking part, collect the letters and solve the anagram - when you reach the final destination you'll find out what to do next.  On the way round all the blogs you'll get a sneaky peek of what to expect from the new Christmas downloads and hopefully get some great ideas and inspiration along the way!

If you've never tried digital crafting, let me tell you why I'm a convert! 
I love that all those wonderful Funky Hand papers are at my fingertips and I'll never run out! 
I love that the choice is mine as to what sort of paper, card, vellum, canvas etc that I print them onto - and what size I print them at can be chosen too - even the specific bits of each design I want to use can be selected with a bit of cropping and resizing - you don't get that with a paper pack!
I don't do much stamping so digi images are perfect for me - they are always there for those occasions when I need to use something like that - and I don't need to embarrass myself with my lousy colouring skills as I can take a bit of time and colour them in my graphics program on the pc {wink}

Okay, that's enough of the waffle - it's time for you to leave your message for me here, pick up my letter 
"P" 
for your collection and then hop on over to Lou's blog to see what she has to share with you

Thanks for visiting and for taking part in our Big Blog Hop

Hope you are having a lovely weekend, thanks for visiting, Please come back soon - it would be just fab to see you again :)

Friday, September 06, 2013

Summer Berries

Beckie has chosen a beautiful, Berry-licious colour palette for our September colour combo over on the Daring Cardmakers - and the blog looks absolutely stunning!  It definitely works for the season - these colours match the juice on my fingers after I've been out in the garden picking blackberries and blueberries!
It's been a busy week craft-wise as there's a Crafters Companion show coming soon, with new goodies to make samples for....{wink}.  I was nearly down to the wire for getting my DCM card done, but it went together as quick as can be - which is always a such shock whenever it happens because it's so rare!
I had a feeling my luck was in when the first piece of card I grabbed - the deep pink one - was such a good match, next I pulled out the pale lilac one and that worked too - so I quit while I was ahead and shut the cupboard, knowing I could be sure to find plenty of flowers and ribbon etc to make something for this colour palette:
 

Ohhhh! I've just realised that the pink "gladioli" type petals are a great match for the flowers in the photo!
I used "Petite Dots" my absolute favourite of the growing stash of Crafter's Companion embossing folders I now have on the shelf.  It really adds light and shade to what I think would be a rather over-the-top expanse of  deep pink card!
The sentiment was printed onto thin card and slotted into place. I would have just printed direct onto the card base and then cut the oval if I hadn't already sliced the edge of the card blank having decided to make it a bit less square.
I made a sort of rose flower using another of my new punches - it's a bit of a hybrid as I used techniques from different places and flower tutorials
Materials and Tools
Smooth White card blank
Bazzill Card Shoppe card, Bazzil lavender 12x12 for  rose
Various pre-made flowers, Gems and Pearls,
 Ribbon from November Rain collection by Funky Hand
Embossing Folder "Petite Dots" 6x6 Crafter's Companion
Spellbinders Plain Oval Die
 SU Flower punch;


That's it for now, I hope you'll click the link to head over to the Daring Cardmakers BLOG and check out all the fabulous cards this week - it really is quite a treat.

Thanks for visiting, please come by again soon


Thursday, September 05, 2013

Salt and Pepper

I've made a card using fabulous Funky Hand papers and the new LO on the Sketch File this time.


This is a gorgeous paper download called "Salt and Pepper" - I love this set and it's always good to find a good excues to use them.
To start with I printed 8 designs to fit 4 on either side of a piece of a4 white Bazzill card.  This way the designs are nice and small for using on small images.
All the cutting out was done on Craft Robo from some templates I made quite a while ago - it makes the work of making templates worthwhile when you can trot the same ones out again....and again, especially as it's easy to slightly alter the shapes and sizes to get the smae shape looking a little bit different.
Here's my card

Materials and Tools:
All patterned papers "Salt and Pepper" download from Funky Hand
Kraft card blank, Smooth white card
White Bazzill for printing on to
Bakers Twine, Black cord, Natural Twine
Craft Robo for Gifts, Balloons and Zig-zags etc
Crafters Companion Petite Dots embossing folder used on the diagonal
September LO from The Sketch File

That's all for today, I've got to get on because it's Daring day tomorrow and I've not started my card yet .....panic.....

Thanks for visiting - hopefully there'll be something new here tomorrow too.....

Saturday, August 31, 2013

Funky Hand Special Code for You!


Do you fancy a bit of a bargain?
Starting on Saturday 31st August through to the evening of Monday 2nd Sept there's a fantastic 50% off sale at Funky Hand.  Yes, that's right - EVERYTHING on the website, that is in stock, will be 50% off during that time period.
BUT you can only get the discount by using this special code:
 FH50B


www.funkyhand.com

Friday, August 30, 2013

Heavy metal

It's Friday again and that means Daring Cardmakers Day.  This time it's Svenja's turn and she says:
  "I’d like you to go for some
  Heavy Metal
Use metal in any way, metallic cardstock, metallic paints, tinfoil, wire… whatever! I’m looking forward to seeing what you come up with."


I was a bit of a Last-Minute-Minnie again - the BFoP (Bad Fairy of Procrastination) was responsible, it wasn't my fault.

In my defence I was playing with ideas in my head, but just hadn't actuall started making anything.  In the end it all came together without too many hiccups and I'm actually quite pleased with the end result for once!
I bought a roll of metal foil - I think it might be by Spellbinders, a couple of years ago and haven't used it - mainly because it's such a horrible, brash shade of gold.  Anyway I dug it out again and decided to force it into submission
My lovely DCM Teamie Sharon is now selling SU stuff and I ordered a few punches which arrived on Wednesday so it was only right and proper that one of them got roped in to help with this card.

Flower made, metal panel cut, embossed and inked to a lovely coppery colour, the only real problem was finding the right background.  Plain card didn't look right and nor did any of the papers I put behind the metal piece.  Then I remembered the pile of background pieces I made a few weeks back for the Paint Effects Challenge.  One of them had warm coral and copper shades along with some turquoise ones and if I just pulled them together with some matching turquoise ribbon then all would be good. There's more about how I made this very dimensional background HERE

A couple of months ago I was bemoaning the fact that I hadn't updated my collection of embossing folders probably for years.  Well, all that has changed rather suddenly with the arrival of my huge and wonderful Design Team starter box of goodies  from Crafters Companion!  I now have a fab set of 6x6, 8x8 and A4 folders in lots of gorgeous designs.  I managed to squeeze 2 onto this card :).  Well, if you've got it, flaunt it!


Materials;
15cm sq smooth white card blank
Coredinations card (flower) 2x Bazzill card (flourish)
Gold coloured metal foil, 
Versamagic Ink, Cats Eye Ink pads, Fresco Finish paints, Texture paste
Turquoise satin ribbon, turquoise gems
HomeMade Sticker sentiment
Tools;
Embossing Folders: "Swirl Corner", "Floral Frenzy" 6x6  Embossalicious by Crafters Companion
Punch: Blossom by SU
Dies: Spellbinders Labels 11, DieNamics Fancy Flourish  
Jus-Cutz A4 die cutting and embossing machine

To make the foil panel I first added a layer of ink, then ran it through the machine in the Floral Frenzy embossing folder. Next I cut the shape with the Labels 11 die. I left it in the die while I inked it again (stops me being too heavy-handed and squashing the fancy pattern ), After removing the shape from the die I went around the edges with more ink.

There's a great sense of satisfaction when you get to use such a lot of new stash on one project - and even manage to use up a bit of the "bits" pile too.  Or maybe that's just me - anyway, I had fun with this and I love the way everything worked out.....which is also a very satisfying feeling.  I should quite while I'm ahead, but I have a rather long to-do list so can't just sit on my self-satisfied botty any longer!

Do please head over to see the metallic marvels on the Daring Cardmakers Blog - they are sure to inspire!  

Thanks for visiting today, I hope you'll take a minute to leave a message ;)

Wednesday, August 28, 2013

Beach Notes

I'm not having a great time with photography just now.
I sent a batch of samples off to Crafters Companion ahead of a Create and Craft show they are doing soon - only remembering after they went in the postbox that I hadn't taken a single photo of them.   This on top of taking photos of something I made and sent at the weekend where, though I did remember to take photos - I didn't check what they were like....and of course the camera settings were all wrong and the photos looked as though they'd been taken in a dark cupboard. 
At least I could do something about that - even though it's taken ages fiddling about with the tools in Paint Shop Pro.
Anyway.  Remember the rejected card I made for Friday's daring Cardmakaers challenge?  Well, I've pulled it to bits and used some of the little icons to decorate a notebook and make a little gift card to go with it.
 Materials and Tool:
Notebook from Paperchase
patterned papers; Funky Hand (from my scraps pile)
Plain card; Coredinations and Bazzill
Blue and green dewdrops, Pink, yellow and Clear dewdrops
Flip-flops pewter charm, Ribbon,Stickles and Ice Stickles
Black Gel pen
Craft Robo to cut all motifs except the tiny bunting which is hand cut
 
I know the photo is a bit rubbish, but it's a whole lot better than the original version!

I quite like the way the notebook turned out so I'm pleased I didn't throw that card straight into the bin. 
That's all for now. thanks for visiting

Friday, August 23, 2013

Beaches and Cream

Well, just the "Beaches" bit actually, but I just thought of the pun and couldn't resist using it for a titla.
It's my turn to set the challenge for The Daring Cardmakers this week
   Life's a Beach!
I'm hoping that you'll be just as inspired by my challenge - we're staying at the seaside for another week, but this time, instead of working with seaside hues I'd really like your cards to feature some Beach Paraphernalia; deckchairs, parasols, swimwear, flip-flops, buckets and spades, surfboards and sun-cream....the list of possibilities goes on, and on...
Our fabulous design team have really come up trumps this week with a host of wonderful beach-inspired cards to share on our BLOG
We'll soon be celebrating the end of a full seven years of dare-setting and you'd think that by now I'd have learned to have a card mapped out at least in my head BEFORE I announce the challenge, wouldn't you?
So once again I struggled with my own challenge - and it wasn't helped as day by day the other girls shared their wonderful creations with the rest of us!
The card I finally made didn't look much like the layout in my head - but I'll save that idea and hope to make it work another time.  I really wasn't happy with my card but didn't think I had time to do anything else so it would have to do. 
Then I thought "No, it won't do" and grabbed a few pieces of card, switched the Craft Robo back on and started cutting again.  I will share the first card in a minute, but I'm pleased I had another go as I like this card much better, even though it's much simpler and missing some of the elements I spent hours making for the first one!

Materials and Tools:
Scraps of card in various colours
Ric-rac braid, Gel Pen
Craft Robo

It did give me a chance to use some new beach-hut templates I'd been making (you didn't think I'd manage a seaside card without one, did you? haha). The little yacht is a template I made a while back and is oooo cute!
This reminds me of some of the pictures and ornaments you can buy in the nicer gift boutiques and  RNLI shops in coastal towns and villages.  I love all that stuff and the house would be full of even more beach huts and seaside inspired nicnacs if I wasn't reined in!

All the little shapes for the flag bunting were hand-cut, but Mr Robo did the rest of the cutting


So, do you want to see my first attempt?  I made so many new templates to use on this - making the templates doestake a while, so it probably took most of Wednesday just to do that bit.
The LO is nothing like I had in my mind's eye.  I think I started from the wrong end by making all the little "icons" - I should have sorted out the placement of the tiles first, then made the pictures to fit.
You live and learn, don't you?


Materials and Tools:
Scraps of plain and patterned card from the pile on my desk!
Teal card is by Coredinations, Backing paper 6x6 "Clippings" from Basic Grey
Flip-flops pewter charm, Scraps of yellow and red narrow ribbon, 
Black Gel Pen, Decal sticker sentiment
Craft Robo: Beach Hut, Yacht, Surf Boards, Beach Ball, 
Bucket and Spade, Sandcastle
Tiny flags for bunting are hand-cut

That's it for today, thanks for visiting - please don't forget to pop over to the DCM BLOG to see this week's amazing range of cards.


Wednesday, August 21, 2013

Heffalump 2

So. today it's my turn to try and inspire people to get crafty with Funky Hand via our BLOG and I've been playing with left-overs again!
As I've mentioned on here last week it was our wedding anniversary a couple of weeks back and I had a little stack of "I Love You Sew" leftovers from making OH's card I wanted to see if I could use up.
Last time I showed the first of the elephant cards I ended up making, you can see that post HERE,  so here's the second;


Materials and Tools
All papers:   "I Love You Sew"download from Funky Hand
Elephant Image from  Colour Me Happy CD also Funky Hand
Black Bazzill card. Pink Twine, Black gem
Tiny heart punch

I thought I'd just show where the actual elephants went before I go - they formed a border for the inside of my card - they were cut out using my Craft Robo, but the same idea would work for the "holes" left after cutting out a punchie shape


That's it for this time, thanks for popping by :) It would be fab if you'd head over and leave a message HERE if you've time

Happy Crafting

Friday, August 16, 2013

Sea Shades

Gez's challenge this week on The Daring Cardmakers is simple - and perfect for this time of year. 
The Colours of the Sea
Any sort of card - not necessarily seaside-themed, but making use of those gorgeous sea colours; aqua, blue, green and all the shades in between.

I'm having one of those times when actually making anything is like getting blood out of a stone - and here was Gez, offering me the chance to use my favourite colours and still my creativity wasn't stirred.  Not good.
My one idea was to make a mosaic background and I wanted to use diamond or hexagon shape - but an unexpected extra OH-working-at-home day meant no Craft Robo yesterday and I don't have any dies in the shapes I wanted.  Hey ho at least I have the Neties scalloped squares, they'll have to do


The card I used for the background was made with various inks swooshed around with a baby wipe.  I made a couple of pieces, one lighter than the other, then sprayed over the lot with some of my new Crafters Companion "Spray and Sparkle " silver shade - I love this stuff - it gives quite a subtle sheen to the card and an extra glint to whatever is underneath = nicer than that dull look you sometimes get when you play with ink

I saved some of the lighter card for the upper section, then cut the squares from different parts of the rest, turning the die randomly as I didn't wnat the "stripes" going all the same way.
Materials and Tools
14cm smooth white card blank, A4 of the smae card for inking
Various inks applied with a baby wipe
 Crafters Companion "Spray and Sparkle " (silver)
Turquoise Seam Binding, Dew Drops in sea colours
Decal sticker sentiment (home-made)
Spellbinders scalloped squares die-set Fancy shape from Lace Doily Motifs set
Memory Box Rosette die - cut down to about 3c,s wide

It may have taken most of the day, and meant getting out and rejecting most of my stash but I got there in the end.  Please please let my crafty mojo come back soon

Do visit The Daring Cardmakers Blog to see some gorgeous sea shade inspiration from our fab design team

That's all for this time - please leave a comment :)

Wednesday, August 14, 2013

Heffalump Scraps

Well it was our wedding anniversary a couple of weeks ago and after I'd made a card to give to Hubby, I was left with a small pile of scraps from the Funky Hand  "I Love You Sew" designs I'd printed to use on his card.
Although they were small pieces, I still wanted to use them up, so this is the first of a couple of mini cards I managed to make without resorting to printing anything else. 
This is a 10cms square card, so you'll see that the pieces I've used are quite small

Remember the line from The Feeling's song "Fill My Little World" that goes "All I wanted was some evidence that you really loved me"?  Well OH always changes evidence to elephants, so it's become a sort of tradition that there'll usually be an elephant or two somewhere on the cards I make for him,  In this case the elephants were on the inside and I cut them on my Craft Robo using  Funky Hand image from the Colour Me Happy CD - I've used the elephant shaped hole I was left with to make this card!

Materials and Tools
All papers:   "I Love You Sew"download from Funky Hand
Elephant Image from  Colour Me Happy CD also Funky Hand
Black gel pen, 2cm circle punch, tiny heart punch, 
Tiny black square gems (Prima)

I hope you like this cute little chap, because he'll be back, wearing another "suit" next week sometime!
Thanks for looking

Tuesday, August 13, 2013

Splodging

The August LO on The Sketch File is called "Splodge Away!" because the main part of the sketch looks a bit like cloud shaped ink splodges.  What you use the "spoldges" for is up to you.  For my first project using this sketch I made them hot air balloons.

The main reason for this was that while I was flicking through my newest paper pads I spotted this lovely design with a couple of balloons in the left hand corner and thought "hmmm two down, three splodges to go!" haha

The other 3 balloons were cut using my Craft Robo. The balloons are slightly curved then adhered with 3D glue.   I wove a paper strip through some fairly random slits cut along the lower edge of the card and added some toning dark brown paper strips and some yellow and white Baker's Twine. 


Tools and Materials
Papers: MME 6x6 Sky's the Limit "Find Your Wings and Fly"
Brown paper from another paper pad
Yellow and White Baker's Twine
Decal Sentiment

Please visit The Sketch File to see this week's and last week's ideas from our DT - we'd love you to play along with us.
Thanks for visiting today

Friday, August 09, 2013

The Sweetest Things

 We've just returned from a little holiday to celebrate our 20th Wedding Anniversary.  We had a couple of nights in Hereford, followed by a week in Shropshire.  I've wanted to go to Hereford for ages, because that's where the amazing Mappa Mundi is kept.  It didn't disappoint - what an amazing thing it is, you could spend weeks looking at it and still find new things you'd not noticed before.  It's so interesting to see how Medieval scholars "saw" the world, and how they interpreted the things they'd been told.  The fascinating thing from a crafter's point of view are the little drawings of buildings and animals, both real and mythological - today you can find loads of stamps, digital images and other things that look so similar to those drawn hundreds of years ago.  If you go to the link, then click on the images to the side of the text you'll see what I mean.
In Shropshire we stayed just outside  Much Wenlock - hope of the modern Olympic Games - they were doing it here well before de Coubertin cottoned on to the concept - in fact, that's where he got the idea from.
Anyway - it's a brilliant place to stay with so much to see and do within about 30 minutes drive - we didn't actually manage to fit everything on our to-do list in to the week.  No doubt I'll bore you rigid with photos over the next lottle while :)

Now though, I have a question; why is it so hard to get back into crafting when you've had a break?

Zuzana set a lovely challenge  for The Daring Cardmakers this week but I still struggled to come up with anything until the last minute - and even then I'm not particularly happy with either of the attempts I made.  hey ho.
This week it's Zuzana here with a Sweet Things challenge:
We are invited to our dearest friend's wedding, so I 
came up with the idea to create cards with something 
sweet on. 
It can be wedding cake, cupcake, lolly, sweetie, ice cream... 
everything sweet and eatable.
Zuzana found a fabulous inspiration photo to go with her challenge - it's had us all licking our lips all week - I'll share that in a minute.
My plan was to make a card with cup-cakes and ice creams on it, but when I started assembling the bits I couldn't figure out a layout - so I just used the ice cream cones to make this one
 I ended up hand-cutting some lollies to "bulk" it out a bit.  I think the background looks a bit too busy and swamps the focus things, but I couldn't think how to put it right :(
Tools and Materials
Patterned papers; from "Wishes and Kisses" Funky Hand CD
Plains are all Bazzill card
White lace, Pink and Blue narrow ribbon, Pink Baker's Twine, Glamour Dust glitter, Tiny seed beads
EK Success Border Punch
Craft Robo for cones, Lollies are hand-cut
 So, as I was left with some cut and assembled cupcakes I thought I may as well use them up and make something else - in the hope it would turn out better, really, vut I'm not sure it did :(

Tools and Materials
Patterned papers; from "Wishes and Kisses" Funky Hand CD
Plains are all Bazzill card
Glamour Dust glitter, Heart button. Tiny ribbon bow
Tiny bunting is all hand-cut
Craft Robo for cup-cakes
Here's a peek at Zuz's inspiration photo:
 
 So there you go, 2 cards made and neither quite as I saw them in my head.  I need to get my mojo back as I have just this morning taken delivery of a giant box of goodies for a new and rather exciting development....I'll spill those beans later, I promise! 
That's it for now though.  Please head over to the Daring Cardmakers blog where you will find an array of tasty treats from our fab design team.
Thanks for visiting today

Friday, August 02, 2013

So Citrus

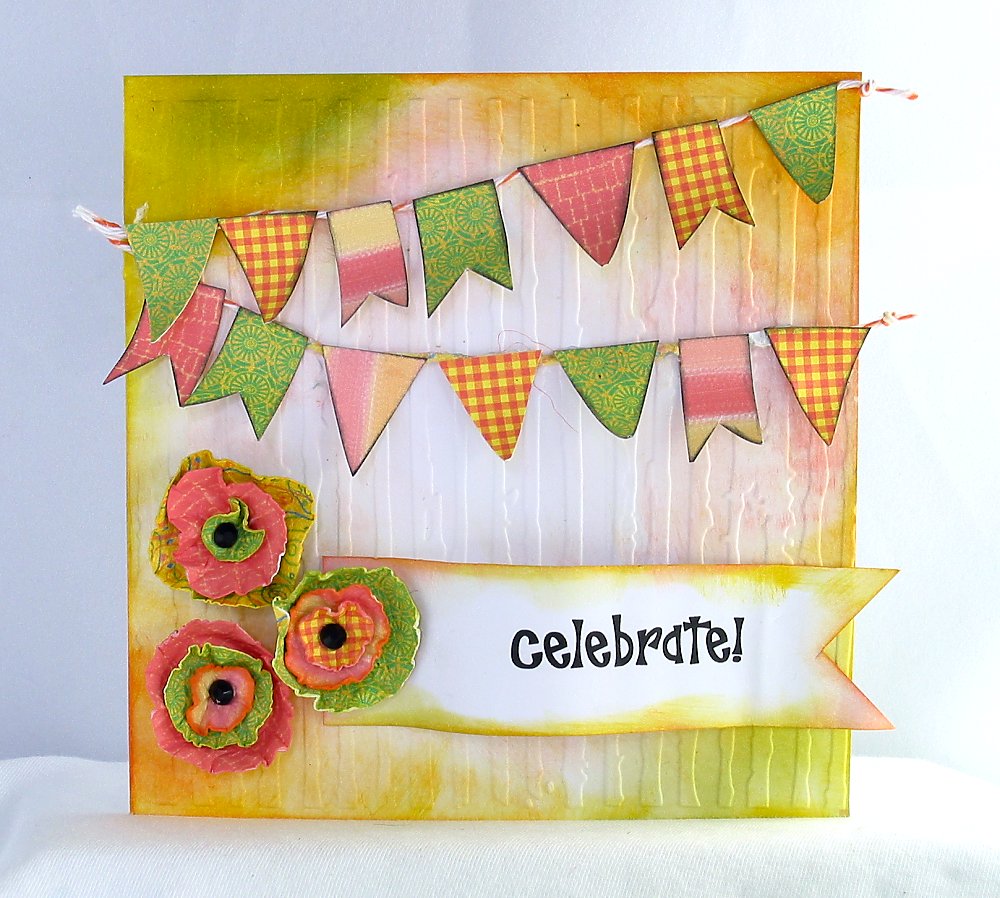
Our newest DT member Svenja has chosen the August colour palette for us over on the Daring Cardmakers this week.  It's a sharp and tangy palette of Lime, Lemon, Orange, Pink Grapefruit and a dash of White - just perfect for summertime!  Sorry if you're in a part of the world that's  currently in the depths of Winter....


Here's my card

Materials and Tools
Direct to paper Inking for the background
Papers: mix of designs from "Glad Rags" and "Barbadian Ecstasy" both from
 Funky Hand "Colour Me Happy" CD 
 Bakers Twine in orange and white
Small Black gems
Embossing Folder; Distressed Stripes (Cuttlebug)
PC generated sentiment

The bunting, flower shapes and the banner are all hand cut


Our clever Svenja has even arranged and taken the inspiration photo herself

 I really enjoyed using these colours - they aren't ones I use very often so it made a refreshing change - oh dear, I can never resist the chance of a pun, however small and however poor!

Please pop over to the DCM BLOG and see what other zingy creations the team have come up with this week.
Thanks for visiting today, it would be fab if you'd leave a comment