Friday, May 04, 2018

Initially

Hello
I've been a bit MIA this week - a long 'to-do' list, with quite a bit of crafting on it, but no time left for blogging or chatting!  It would be good to report that the list had more ticked off items than still-to-be-done items, but sadly, that's not the case! But I do need to get some blog-posts done, so let's see if I can cut the waffle!
It's new challenge day on The Daring Cardmakers and here;s the card I ended up with - I say "ended up with" because it needed a bit of a tweak to get it right
 

It's the First Friday of a new month, so it's an Elemental Inspiration Challenge this week. 
Our lovely Ruth has chosen this pretty set of pictures to inspire you with this time; you just  need to choose a minimum of THREE elements to use when you make your card.
Some suggestions to get you thinking: stars, flowers or petals, the 9 square layout, hand drawn patterns, twigs, sunset, handwriting, monogram, large letters, fur, woodgrain ..... lots of inspiration!

It's a while since I made anything with a monogram being an integral design feature, so choosing to use the large letter as one of my elements was easy, as was the lure of using some pretty flowers.  The third element had me stumped for a while, until I spotted the sunset in the square with the sentiment in it. Deciding to make an inky sunset background also meant my colour palette was also decided.
 Info:
I made the sunset background first, using watercolour card and several suitable shades of ink
Using the same colours I inked up a few small pieces of  card for die cutting my flowers later.
Next I chose a letter shape I liked (I always dither!) and on my Silhouette machine cut one in black and one in white to see which I liked best on the inked background.  Having decided the white looked best I cut 4 more of the letter, then glued them altogether.
matted the inked piece onto black card, and then the white card blank, die cut the flowers and leaves and used a ball tool to create the flowers.
The various vine shapes were cut into small pieces to entwine the monogram, then I arranged my flowers and added a few more vine and leaf pieces.
To finish I added some gems and pearls, and made three faux brads for the corner

All the flower and leaf dies I've used here are from Spellbinders

This is where it all went a bit wrong!  I didn't like the balance between the black and white areas, the decorated square looked just a bit too big for the card.  I wondered whether I could change it, but just in case it all went really badly I took some photos so I'd at least have something to share if it did!
See what you think of version 1
I didn't have a large enough black card so I matted some black card onto a larger white card blank, then carefully took the first version apart as best I could.  Some of the black mat was left behind so I trimmed the square down a bit, then matted onto white before adding to the new card blank.  I think the wider black border looks so much better and more balanced now.

Something like this would look great in a frame, don't you think?
Anyway, I should go - I sort of failed when it came to cutting the waffle, didn't I? hahaha
Never mind, I'll try harder next time ;)
Have a great weekend
Thank you for visiting - please pop across [HERE] to see how our DT took on this challenge!

Friday, April 27, 2018

We'll weather the weather!

Hello
It's all about the weather this week on the Daring Cardmakers Blog - fitting really as we've had quite a lot of it this week - for instance on Wednesday afternoon we had blue skies and bright sunshine - then it suddenly went really dark and we had a hailstone storm, then sun again and then, still not content there was the sound of distant thunder rumbling accompanied by some very heavy rain.  All in one afternoon - which all reminded me of this little 'ditty'
Whether the weather be fine
Or whether the weather be not,
Whether the weather be cold
Or whether the weather be hot,
We'll weather the weather
Whatever the weather,
Whether we like it or not. 
No real surprise that I ended up making a 'Sunshine and Showers' card for Miri's challenge 
It’s Miri here and I suggest a little bit of small talk:

Let’s talk about the weather!
Use anything weather-related on your card: clouds, sun (rays),  rain (drops), snow etc.

And maybe you can tell us about the actual weather outside your craft room. Can you already see, feel and smell spring?
I've just used a lot of inked up white card, and a whole bunch of Spellbinders dies to make this one,  The text was pc generated and the words cut up with scissors to fill that space in the corner 😉
  
 Info:
Smooth white card blank plus extra for all inked pieces. 
Background panel inked with Tumbled Glass DI
Piece for the sun was inked with a couple of the yellow DI shades
The pots, stems, flowers, clouds, raindrops were all inked using 
Versamagic ink pads
Dies used:
Plant Pots and stems: Green Thumb Die D-Lites Etched Dies
Flower Heads: Prims Die D-Lites Etched Dies (house, flowers, heart and star)

That's it for this time, it would be fab if you'd join in with us - Click HERE for more info and to see all the weather related cards from our wonderful team 
Thank you for popping by
 

Monday, April 23, 2018

Visitors BooK

Hello there!
I hope you had a great weekend and you're feeling fine and dandy this Monday.  I'm not actually sure where the morning went, but it's definitely gone and I even forgot to have a mid morning coffee.  It's taking a while to get into any sort of routine again!
Anyway, my crafting project today was actually finished a couple of weeks ago but the photos have been waiting to be blogged since.
One of the things on the inventory of things we needed to leave in the Southwold holiday flat (Alice's, Southwold) was a Visitors Book, and  couldn't bring myself to just leave a ready made one - plus of course, I knew it would be a fun project to get stuck in to!
 I started with one of the lovely Kraft ring-bound books from Paperchase, then gathered a load of seaside themed bits and pieces that I might find a home for on the book.
The papers are from a couple of Studio Light paper pads I bought last year and absolutely adore!To make the 6x6 papers work on the larger area of matted black and white card, I adhered some areas onto card, then tore the edges and overlapped and inked the various pieces to layer up a bit.  The larger base layer was stencilled with my favourite stencil in a rather random and overlapping series of inks, glitter gel and also for some areas I added gilding flakes. 


I threaded some seaside themed charms onto a few strands of silver thread to decorate the left side, and also added some plaster shells and a couple of shell brads.  The 'beach' sign was created in Paint Shop Pro, and raised on a piece of chipboard to keep the silver thread in place.  I used Glossy Accents behind the charms so they stay where I want them to be. 

The letters were cut with a Spellbindrs Alphabet Die Set  - I cut each letter 4 times from plain white card and glued them together so that the stand out.
The little beach hut was hand cut, except for the window die which comes from a Spellbinders set. I scanned a piece of the patterned paper so that I could use exactly the same colours to make some striped digital paper for the walls and trim of the beach hut, and some in the plan cream and aqua for other parts.
I added some aqua and clear dewdrops to finish the cover, then tied little pieces of ribbon, twine, fibre etc around the wires to finish the whole thing off.

I had a load of fun making this!
Before it was taken over by one of the big companies, we loved travelling with Simply Travel - all their properties had simple exercise book style Visitors Books where precious guests left lovely messages about the places they'd found and enjoyed visiting.  The books were always fun to read and a great source of
recommendations for where to visit, good places to eat and other local info.  Often these places were off the beaten track and we'd never have found them on our own - like the amazing restaurant, up a hillside track near Gumusluk in Turkey, where you sat on rugs and big cushions and watched the sun go down as you ate wonderful, home-cookled food!
 Ah, the memories!
That's the sort of thing we'd love people to leave in our Visitors Book too - their  recommendation for interesting and favourite places to go in Southwold and the surrounding area,
Enough of my waffling - I hope you like the book,
Thanks for looking

Link to Holiday Flat is here:


Saturday, April 21, 2018

Sketched Blooms set 2 - Spellblogger post for Spellbinders


Hello
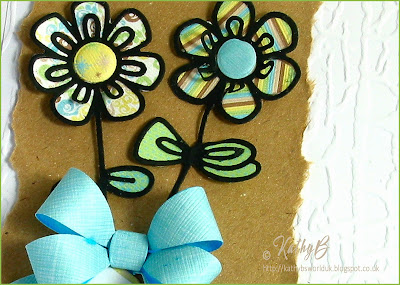
I loved the Sketched Blooms collection as soon as I saw them and soon acquired two of the sets.  Last week I shared a card made using set 1 so today I've another card, this time using Sketched Blooms 2 to share for my Spellbloggers post. 
Info:
Smooth White card blank, with extra of the same card for the embossed panel (Blistered embossing folder)
Black card to cut the Sketched Blooms 2
I chose some Digital papers, resized a few of the designs so they would print in a very small size, plus one larger piece to cut the Petite Double Bow from.  The designs were then printed onto white textured card
The torn Kraft paper background is actually an envelope
 Decal sticker sentiment was added to a little tag cut from scaps of the printed paper
The circles in the corner were cut using just the centre of one of the flowers, and shaped with a ball tool


Here are the details of all the Spellbinders products used this time 

Sketched Blooms 2 
Die D-Lites Etched Dies


 Petite Double Bow and Flowers  Elegant 3D Vignettes by Becca Feeken Shapeabilities Etched Dies

Embossing Folder  by Tammy Tutterow Designs
Platinum Die Cutting and Embossing Machine
 
  I love these die sets!  I've another card using set 1 to share, and something else I'd like to try out, so don't be surprised to see more
 Sketch Blooms projects popping up on my blog!
In case you missed it, here's how I used Sketched Blooms1 last time 
Anyway, that's it for this time. Thank you for visiting. 
Click on This Link to visit the wonderful Spellbinders store where you will find lots of lovely dies, stamps and other goodies, plus a huge amount of inspiration
to get you motivated

Happy Crafting