Wednesday, January 30, 2013

Box of Secrets

I thought I'd show what I spent the weekend making - yes I know it's Wednesday already, but some bad fairy flew past and stole away the first 2 days of the week.  Did you see them? :-o

The new Funky Hand download went on sale at the weekend and they are soooooo pretty - but the lovely grey shades really soften the pink ones so that they'll appeal to those who just LOVE lots of PINK, and for those, who like me, like a bit of pink but in a more subdued way!

That said this box is quite heavy on the pink - but I used mainly the softer designs and stayed away from the full-on Bubblegum ones.
This is how the box looks when it's all closed up
Take the lid, and the base away and the whole thing opens out to reveal a stack of small trays.  When I've made these before there's been a stack of 4 boxes, but I wanted to try it with three this time - and just as well because when I started filling the trays with chocolates I was amazed at how many it needed to look as though there were any in there at all!  Two full of those cellophane bags of Thorntons choccies went in here - and you can hardly see them.  Might need to try a two tier one next time!
As usual, given the chance to go wildly dimensional on a project (and what better than a box lid for doing that), I didn't waste the opportunity.  I used die cuts for the "streamer" bits and made a large paper rose on the top, and a border punch, sem binding and plenty of bling to trim around the lid.
Materials and Tools
Papers: "Just for Jen" download from Funky Hand (printed on thin card)
Pink Seam Binding, Silver gems, Silver-grey organza ribbon (around trays)
Punches: Large Flower punch (Woodware), 
Broderie Anglaise style Border Punch (EK Success)
Die: Memory Box Honeysuckle Border
I hope you like it.  I'm off now to empty those choccies....into my tummy!

Thanks for looking

Saturday, January 26, 2013

Scraplings

Scraplings are cards made from that bit you have left over when you cut down a sheet of A4 card to make say, a 14cm square card.  I think that if you use any old scraps of leftover card to make mini cards they can justifiably called "Scraplings" though.


With my turn to post on "Get Funky and Craft" Inspiration blog coining up it was a happy chance  that I found myself with a little stack of narrow card strips perfect to make into Scraplings this week.  Another very happy coincidence was that Anice has just given us a new download to play with - it will be on sale from the Funky Hand website sometime this weekend and it's gorgeous! 
I've made three scraplings using the papers and I had such a fun time using all my favourite things - quite took my mind off the horrible snow, it did!

 All the info about the fabulous brand new
download collection papers I used on these cards, plus lists of the other things used on each is over on the GFaC BLOG and it would be wonderful if you would head over there and maybe even leave a message....we know loads and loads of people visit, but it often feels very lonely when so few visitors leave a comment!


Thanks for visiting, I hope you enjoyed seeing my cards today :)

Friday, January 25, 2013

Scenic

It's Daring Day again and this week not only do we have we've got a brand new to the market  product to give away as a prize - but we were sent some to play with and use for our cardmaking this week!
"It's Sharon here to set this weeks challenge and this week we have a fabulous prize on offer thanks to Docrafts!
Firstly, the challenge - the theme is:
Setting the Scene
We'd like you to make your card your canvas for creating your own miniature world!  The theme is totally your choice and you can use whatever you like to create your scene - die cuts, stamps, embellishments - but please use various elements for the 'scene', don't just use one stamp!
Our challenge this week is sponsored by Xcut – the exciting die-cutting and tool range from Docrafts. The winner of the challenge can choose one of the 4 exciting new sets of Build-A-Scene Dies each worth £19.95. Each set features a collection of dies that work together to let you build up layered designs to create a beautiful or fun scene! Choose from Vintage Hot Air Balloon, Nautical, Garden Party or London."
I've been playing with the Vintage Hot Air Balloon set and came up with another "box front" card
 The 2 not air balloons, fancy trims, hills (or cloud shapes) and the birds (you'll need to look carefully to fond them!) are all from the dies set, but there are several more pieces that I didn't use.

What is really nice about these sets is that you can lay the pieces out to make quite a long continuous background - if you've got some extra long cutting plates it'seven easier to do that.  

For the hills I just cut the elements separately so that I could build up some dimension with layers of different papers.  The cloud shapes make great landscape pieces, especially as the dies are just the upper section of the cloud so you can make them as tall or as short as you like just by the way you place them on the paper and then trimming with scissors.
 
     Materials and Tools
Papers are all from MME 6x6 pads: Lime Twist (sky and hills) and Howdy Doody (Balloons, birds and trims)
Black card
Thin wire
Dies: Vintage Hot Air Balloon Build a Scene die set
Craft Robo for little girl and her balloon

The large balloon is fixed to the front ection of the "box" and wobbles about on wire, the small balloon is fixed to the back of the card with a box hinge so that it stands off the card too.
The little girl silhouette has popped up again because I needed something for the foreground and couldn't think what to use - I thought the idea of her holding her own small balloon and watching the huge ones floating past was quite a sweet idea. Her balloon is also on wire, but it wouldn't behave nicely and kept falling forward, so I had to add a spot of glue to keep it in place.  I should have used stronger wire really
The following photo give more of an idea as to how the card works.  Pushing the "box" section upwards means it fits flat enough to fit in a large envelope
 Right, I finally got to the end, sorry it ended up so long - why is it that some blog posts take forever to write?  Despite all the interruptions I got there in the end though
Thanks for visiting - please go and see the fabulous "Scenic" cards the Daring Cardmakers team have made this week - they are absolutely fantastic!


Please leave a comment, it would be lovely to hear from you.....

Wednesday, January 23, 2013

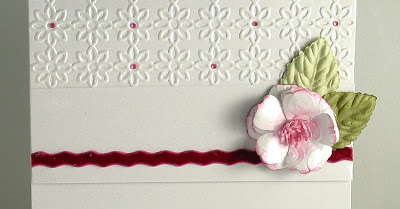
More Embossing

Bit of a late blog from me today, but I meant to post this earlier and just forgot - I've been working on something else and it's not been going well....so fingers crossed it all comes together tomorrow or I'll not be a happy bunny

If you saw my card for the current Daring Cardmakers challenge you might remember that I mentioned I made another card featuring embossing - actually it was the first one I made but I decided to go with the second on the DCM blog in the end as I liked the way the die cut worked.  
Anyway, here is the other card
Materials and Tools
Oyster Pearlised card blank, plus extra for the layers and the flower
Prima Leaves, Prima Pink Chalk Ink pad
Velvet ric-rac braid, Pink gems (Anita's)
Memory Box Hibiscus Die
Cuttlebug embossing folders
Craft Robo for Sentiment
Ball tools to form the flower

I cut the embossing folder along the fold to allow me to use it across my card like this.  The panel with the ric-rac and flower on is a separate piece.  I ran the pieces of the flower through my Cuttlebug in an embossing folderas the card is quite heavy and needed a bit of "breaking down" before I could add some shape to the petals with a ball tool
I inked up some scraps of spare card to cut the flower centre.
 
I hope you like it. Scarily CAS don't you think? hah hah 
 I have another card made with leftovers from Friday's Embossed card to share next time - I've not touched my embossing folders for months and now it's as though I'm addicted - mind you if it's going to go on I'll be needing to find some new folders as mine are all a bit old.....honestly, any excuse to go on a spending spree, eh?.....Your suggestions of your own favourites would be very welcome :)

Thanks for popping by today, I hope you'll visit again soon


Tuesday, January 22, 2013

Wise Words

I've been a bit lazy with the old blogging again lately.  I think maybe needing to get all the Christmas stuff done provided the stick for getting down to some crafting - I'm not sure what the carrot was, mind!
Anyway, I do have quite a lot of things I need to make so I'm going to try harder to get back into the crafting swing - and hopefully the blogging will follow on too.

It's Update Day on The Sketch File and there are lovely cards to see from Brenda and Jackie, and a page for my little maze book of quotations.  Even though I've chosen a very short quote this time, it was quite tricky to fit into the small oval shape I wanted to use.
The rest of the page is kept simple

 The sketch for January looks like this - I twisted it around and cheated ever so slightly by adding the ribbon
 The sketch is used on the right hand page, the left page is just an excuse to use that Memory Box butterfly die again and some more pearls


Materials and Tools
Papers: Bo Bunny, White card scrap for quote piece,
Narrow yellow gingham ribbon,
Pearls in carious sizes, inked to match the colours in the papers
Dies: Spellbinders plain and scalloped ovals, Memory Box Butterfly

Thanks for visiting, please come again soon :)

Friday, January 18, 2013

Embossability

This week the Daring Cardmakers challenge is all about embossing - be it dry embossing, using embossing folders, or getting busy with embossing powders - Keilly just wants to see lots of embossed texture on this week's cards.

Do you times when you injure yourself a lot - cut your fingers, stab your thumb, bang your head - well as I seem to be in the middle of one of these phases I decided against getting the embossing powder out - firing up the heat gun could have had nasty consquences hehe

Once again it was a two card week for me.  I made the first a few days ago, but then yesterday I had another idea and made this one

Both pieces of embossed card are made as "wraps" - In the end I did stick the cream wrap down, but the yellow one is loose - I left it that way because I couldn't decide where the strip looked best - I took a few photos of it in different positions and decided somewhere in the b=middle of the the cream section looked best.

Making them as wraps meant I had to be brave and cut the folders apart so that I could do the embossing lengthwise.  Now though I can tape them up either way to use them, can't I?


Materials and Tools
Smooth cream card blank
Bazzill card: 2x shades of green, Cream, Yellow
Scraps of pink paper fr the flower centres
Pink gems
Embossing folders both by Cuttlebug
Die: Honeysuckle Border (Memory Box)

The main problem with using embossing is getting a decent photo,  I must have taken about 20 of this card before giving up and waiting for OH to bail me out.  
So I had a little lesson in photographic lighting last night - let's just hope I can remember for next time, or it'll be "I've told you all this before....." and I'll be sent to stand in the corner

I'll blog the other card another day - after I've had a go at getting a better photo than the one I managed pre-lesson ;)

So that's it for today - I hope you'll head over to the Daring Blog to see the wonderful cards the team have made this week.  I love it when the blog goes live and I see it "properly" for the first time - all the cards look so fab grouped together in a lovely long row!

Stay warm and safe in this chilly old weather - hope you have a good weekend


Wednesday, January 16, 2013

More Frills

I found the "Frills" challenge over on the Faring Cardmakers this week more of a challenge than I was hoping and at one point I had two unfinished cards on my desk - neither of which I was particularly happy with.  I did get both finished in the end and the one I put on Friday's blog was the second of them.  This was the one I made first though - a sort of frilly vintagey number.
Materials and Tools
Various papers from the MME Lost and Found range (12x12)
Gathered lace, Various paper flowers, Pink Ribbon flower, Narrow deep pink velvet ric-rac braid
Dies: Spellbinders large Scalloped Circle, Labels (I forget which one) Die-mamics (MFT) Doily


The aqua flower is made using a wired flower layered with several different types of Prima flower.  The ecru flower is made by cutting and coiling several "flat" paper flowers.
I think I should probably  have added a little bit of bling with a couple of pearly gems too

That's all for today, thanks for visiting, please leave a comment if you've a minute :)


Monday, January 14, 2013

Another Shamballa Bracelet

Just a quick post with the last of the bracelets made for Christmas presents for my 3 nieces.
This one was for the youngest who is 14.   I used more of the beautiful beautiful Silver Plated Czech Crystal and Enamelled beads from Beads Direct.  The first photo is a close up of the beads so you can see just how sparkly they are!

I used a silvery grey thread for this one as  the black seemed a bit "heavy". The end beads are clear crystals as again the plain black beads I have to use for this purpose looked wrong.
Thats all for this time, I hope you like it
Thanks for visiting

Friday, January 11, 2013

Absolutely Frilling!

No, I've not forgotten how to pronounce my th's (I'd never have got away with such lazy speech when I was growing up!).  No, it's because this week's challenge on the Daring Cardmakers is all about adding frilly bits of some type or other to our cards.

It's Leo's turn to set the dare and she said:
This week your challenge is:
The 'Frill' Of It All
I would like you to incorporate some kind of frill on your card. It could be a frilly embellishment or background or maybe a stamp you have that would work. Anything that's fun and frilly! When you're done pop back here to leave a link to your uploaded project so we can come and see what you've made.
We also have a new Guest Designer on board - none other than 
Beckie Dreyer  who creates fab stuff for the companies My Little Shoebox, Ruby Rock-it and Docrafts among others.  How lucky are we to have her playing along with us for the next few weeks, eh?
I'm still struggling to get back into crafting and ended up with two half-made and unsatisfactory cards on my desk.  I did manage to finish them but tbh they are both still a bit unsatisfactory.  Hey ho, I ran out of time for trying anything else so here's the one I've added to the Daring Blog today - I'll save the other one to share another time...sneaky, but needs must hehe
 I used:
Ribbed Kraft card blank
Smooth Cream card
Papers MME Stella Ruby
Sating Ribbon from Creative Treasures
Lace and velvet ric-rac both from my lovely Charmed Cards and Craft forum Secret Santa gift
Inaginisce i-Rocks gems, Label is a sticker from my stash, the sentiment is a decal sticker from a sheet I made.
Here's a closer look at the beautiful ribbon, ric-rac and lace


 There are some beautiful frilly concoctions over on the DCM BLOG this week and we hope you'll b inspired to join in with us.
Just a quick reminder about the aCaD crting/blogging group - you'll find it here and we'd love for you to add your link there - and of course visit the blogs of others who are trying to blog more of the things they make

Thank you for visiting 

Thursday, January 10, 2013

Sparkly!

I made a Shamballa bracelet for each of my three nieces for Christmas. 
I found these beautiful beads at Beads Direct.  They are  Silver Plated Czech Crystal & Enamelled Rounds and are so pretty and sparkly - I bought more than I needed so might even get round to making something for myself....
This is the bracelet I made for niece Izzy


The pink beads were a bit more "Barbie" than I was expecting, but teamed with the white and black ones they worked really well and I was happy with the result.  I had planned to use some pink in the version I'll show next time, but they were too bright so I had a change of plan

Anyway, that's it for now - I have two unfinished cards sitting on my desk - it's not going well and I need to find a way to make at least one of them workfor adding to the Daring blog for tomorrow :-o

Happy days!

Tuesday, January 08, 2013

Between the Lines

Darn it!  I slipped up and forgot to do a blog post yesterday. Oh well, I guess every single day might be a bit of a tall order anyway!  In my defence I did actually do a bit of crafting though, and can share what I made today as I used the January "Between the Lines" sketch which is new today on The Sketch File- hop over there to see what our clever Brenda has made too

I used the sketch as the basis for four of the Thank You cards I need to get making.  It's a start, anyway!


I started by printing the sentiment directly onto the card, then I borrowed an idea from Joanne of Angelnorth fame and used my scoring board to create the embossed parallel lines - I placed a ruler where I wanted the gap in the lines to be at right angles to make it easier to get the stop/start position correct on each line. They show up better on this photo
The little silhouette image is a Craft Robo template I made a few weeks ago for a Daring Cardmakers challenge.  I usually make a "blank" version of my templates to use as a base for fitting all the other layers on to - and sometimes even that piece comes in handy!  The stem, leaves and flower are also cut with Craft Robo


The Sketch File January LO
 I used:
The Sketch File January LO
Grey papers from Colorbok 8x8 paper pad "Memories Made Easy"; Metro (very old!)
Bazzill card various colours for the flowers
Various gems to match
Scoreboard
PC generated sentiment


I was really happy at how they turned out - I love the tiny splashes of bright colours on the otherwise monochrome card.  I might be seeing what else I can find to use this basic idea with!

Thanks for visiting, I hope you'll leave a message before you go - and that you'll come again soon


Saturday, January 05, 2013

Another Butterfly

I'm sure there was a reason I made this card, but I can't remember what it was.  I'm sure it will find someone to fly off to with some happy birthday wishes soon though
It's the same Memory Box butterfly I used on my Daring card yesterday - I don't think I have any other butterfly dies actually.
Tools and Materials:
papers Echo Park (I think)
Black card for body
Gorgeous satin ribbon from Creative Treasures
Silver gems in various sizes (Anita's)
Memory Box Butterfly die
Sentiment: home-made decal sticker

That's it for this time.  I think next time it'll be one of the Shamballa bracelets I made for Crimble pressies :)  I'm going to have to do some new crafting if I want to keep up with this blogging lark :-O
Thanks for popping by today, please come again soon - and don't forget you'd be very welcome to join in with our crafting/blogging group - see HERE for more info

Friday, January 04, 2013

Colours for January


We're having another Colourful year at the Daring Cardmakers with the first challenge each month being given over to a colour palette chosen by one of the Design Team.
Leo is first to choose and has found  this gorgeous photo for our January colour combo inspiration
I always find it quite hard to get back into "regular" crafting after all the Christmas stuff and I did struggle to get something done this week.  You'd think it would be a breath of fresh air after all the trees, stockings and baubles!
I treated myself to a new Memory Box die not long before Christmas so thought I'd give it an airing.  I should really have bought the matching plain shape as well as the fancy frilly one but I didn't so to make the background piece for the butterfly on the left I cut it a second time while the first (fancy) layer was still in the die (sometimes the reluctance of the little bitty bits to come out of the shape is actually a help!), then I covered the back of the shape with sticky tape before removing the die so that all the pieces stayed put.  I hope that makes sense.
Now I could remove both from the die and had one die cut with no "holes" and the second fancy cut butterfly too
I used:
all papers My Minds Eye 6x6 - various collections are used
Imaginisce iRocks (turquoise), Anita's dark gold gems
Narrow velvet ric-rac (from a Secret Santa gift - lucky me, eh?)
Dies;  Memory Box Butterfly, MFT Doily
Craft Robo; sentiment

We'd love you to join in with us this week, please visit our BLOG to see some beautiful inspiration from the team, to learn about our new Teamie and to hear who won our Prize Voucher from The Ribbon Reel

Thanks for visiting today, please come back soon

Thursday, January 03, 2013

Wrapping Wrap Up

Just a quick post for today.  I thought I'd show some photos of some of the presents all wrapped up and ready for Christmas morning.  I tend to forget some of my ideas for making gifts look pretty by the following year so putting them on here will (hopefully) be a good reminder.
The first photo is of our tree and gifts all nicely arranged (well, you can at least start off like that, eh?)  The reason the pile looks so huge is that there are a couple of giant boxes in there - great for standing all the others on!

Next a few ideas for decorating the parcels
This was a small present in a big box!  I made a concertina fan in the same paper as the wrapping, then added some berries, ribbon, leaves and flower from Creative Treasures, and some regular silver curling ribbon to finish it off

I also used one of the Memory Box Rosette dies a lot this year to make rosettes from wrapping paper. Topped with a large glitter card snowflake I think they worked really well
Snowflake Punches: EK Success and Martha Stewart

 I've used the rosette die cut "flat" to decorate the corner or the dark-blue parcel (lower right), adding a strip of silver ribbon to brighten it up a bit more. The box in the top right corner has a border die cut used around it - this one is a spellbinders die.
I did remember that I tried to use my border punches with wrapping paper last year and it was a nightmare - the paper just kept ripping - so I didn't bother trying this time - dies are much safer, even if it does mean you need to join two together sometimes!


The Tree die cuts were a last minute idea - I've used them instead of tags to remind me which presents were from me to OH.  He liked the idea and wanted to have snowflakes on those for me - but didn't fancy the fiddliness of my Spellbinders snowflakes so used the same punches mentioned already instead.

  Finally I thought I'd mention the gift bag you can see in the centre of this photo - it was made by finding a box the right size for the gift then using it as a "former" to create the gift bag.  This is a trick I read years back and is a really useful one to know.  You can use anything - - raid the kitchen for finding something the right size - you're only using it to wrap the paper around to get the shape - just make sure you don't actually stick the wrapping paper to it by mistake!  Once you've got the edge stuck down, and have turned the paper in to make the base (just like wrapping a regular parcel), remove the former and fold in the sides slightly to make the gift bag.  punch holes in the toip and add some ribbon and it's ready to use

I'm hoping this post will help get me back into the blogging habit - I've been a very bad blogger over the Christmas and New Year holidays and I need to get back into good habits!

Happy New Year from the WaffleZone!
Please come back soon


Join in and share what you make with the Daily Crafty Blogging group HERE