Wow, its a bit on the warm side here in the UK - looks like summer might have arrived with a vengeance - we've even had to get the fan out of the loft, I'm just hoping we've not jinxed the sunshine by doing that!
We've just got home from a weekend on the Isle of Man (In-Law visiting) in time to drive over to my Bro's house and wish nephew Dan a Happy Birthday. Actually we had to buy his present too before we went - and though I'd made his card last week I didn't have time to do a photo before we left - another little job for yesterday afternoon.
Quite incredibly, it didn't rain the whole time we were on the IOM - I've been visiting for the last 15 years or so, and I think that's the first time we've stayed dry! It was even warm and sunny most of the time, though cloudy and hazy at times too. No doubt there'll be a few photos to bore you with soon......
I made another of those fab pop-up cards for Dan - tbh I was a bit stumped as to what to do and didn't really have a lot of time to think of something new. Never mind, he liked it and I noticed my bro having a quiet little look at how it works - he's not one to show much enthusiasm for my cards, he works for a Greeting Cards manufacturer and I think he regards handmade cards as cheating him out of custom lol lol Tough, I say!
Here's the card
I used:
Cosmo Cricket "Get Happy" paper pad
Bazzill card in matching colours
Craft Robo to cut all letters and numbers
Sizzix Trophy Die
thin red wire to make the springs
Now I really should stop procrastinating and make some new stuff!
Thanks for visiting
Your visits and comments are always valued
Tuesday, June 30, 2009
Sunday, June 28, 2009
Crafty Templates Again
Ooops!
I completely forgot to add my other cards made with the latest set of Leo's wonderful Crafty Templates
The first one uses a really lovely frame template, I love the fancy design the top of the frame has so I cut the pattern several times so that I could add lots of dimension. I was trying for a shabby chic, distressed look to the frame for this one
I've used paper and fabric from the Crafty Goodies kit to make this card, adding a vase of flowers isnide the frame. I think it still needs something else added inside the frame but I can't decide what. A little butterfly perhaps?
This next template reminded me of my Grandma who would often serve cakes on a cakestand at Sunday teatime. Oh yes, and when we were in Bath a few years back we went to the Pump Rooms for Afternoon Tea (well, you've just got to, hgaven't you?) and they brought the scones and cakes on one of these:
I couldn't resist making mini cupcakes to display on the tiers, decorated with sparkles, Glossy Accents and some "cherries"
Find out all about the Templates HERE.
Friday, June 26, 2009
Post Pals
We're doing something a little different over on The Daring Cardmakers this week and we are hoping that lots of our fellow cardmakers will join in and help us with this wonderful idea.
Post Pals is a fantastic scheme which aims to put a smile on the faces of some very very poorly children indeed. All they ask is that you look at their website, and send a card to one of the hospitalised kiddies you'll find listed there. How easy is that?
The children all have a contact/forwarding address to send the cards to, and a little biography so you can maybe tailor your card for a particular child. Just browse that website and your heart will go out to these little boys and girls - choosing just one to send a card to is sooooo hard!
If you look through the lists you'll also see messages from those who've received cards through Post Pals and read how valued those cards were.
It was Sue's who suggested we do something for Post Pals, so our challenge this week has been to make
This is a UK scheme, but we're sure that there are similar organisations/charities in other countries - or maybe you could donate your card to a charity sale or something like that instead.
Of course I'm sure that Post Pals children would be over the moon to receive a card from another country if you wanted to send one through Post Pals
This is the card I've made to send to one of the Post Pal children
I decided to have a go at a different sort of pop-up card for this dare. The Flying Saucer is cut on the Robo using one of the first templates I made. I've added lots of silver stars and a few tiny Anita's gems for some extra sparkle.
Inside there's a Little Green Man waiting to say "Hello"
But it's OK he's not at all scary!
Please try to join in and support this wonderfully worthwhile scheme along with The Daring Cardnakers
Thank you
Post Pals is a fantastic scheme which aims to put a smile on the faces of some very very poorly children indeed. All they ask is that you look at their website, and send a card to one of the hospitalised kiddies you'll find listed there. How easy is that?
The children all have a contact/forwarding address to send the cards to, and a little biography so you can maybe tailor your card for a particular child. Just browse that website and your heart will go out to these little boys and girls - choosing just one to send a card to is sooooo hard!
If you look through the lists you'll also see messages from those who've received cards through Post Pals and read how valued those cards were.
It was Sue's who suggested we do something for Post Pals, so our challenge this week has been to make
Childrens' Cards
you can see the cards we made on our BLOGThis is a UK scheme, but we're sure that there are similar organisations/charities in other countries - or maybe you could donate your card to a charity sale or something like that instead.
Of course I'm sure that Post Pals children would be over the moon to receive a card from another country if you wanted to send one through Post Pals
This is the card I've made to send to one of the Post Pal children
I decided to have a go at a different sort of pop-up card for this dare. The Flying Saucer is cut on the Robo using one of the first templates I made. I've added lots of silver stars and a few tiny Anita's gems for some extra sparkle.
Inside there's a Little Green Man waiting to say "Hello"
But it's OK he's not at all scary!
Please try to join in and support this wonderfully worthwhile scheme along with The Daring Cardnakers
Thank you
Thursday, June 25, 2009
Andrea Victoria Cards
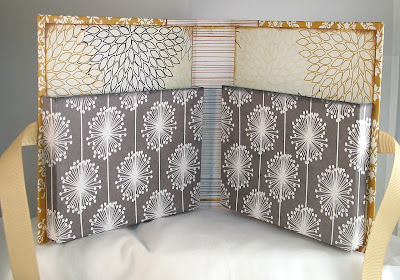
Over the last few weeks on Bubbly Scrumptious I've been making something which I'm planning to use as gift when the C-Word comes along (you know the word I mean....) The first week was spent making the folder with its rigid inner pockets and preparing it for decorating - which was the second part of the project and appeared last week. This week I've been making the cards to go inside. I could have sworn I'd made six, but when I went to do the photos there were only 5, so either one is hiding among the craft clutter, or more likely - I just can't count! So, for the moment there are 5 cards and envelipes in the folder - I must remember to make another one before putting the folder away - and as soon as I've finished it, the lost one will turn up. Sure as eggs is eggs! Pop over to the BLOG and see this project and lots more ideas for using the fab June kit from Bubbly Funk, plus loads of other crafty ideas for making good use of all that stash.
Wednesday, June 24, 2009
Sketchy!
I've added this new sketch to my Sketch File Blog
I used a tall thin mini DL card to make my first card using the sketch.
The papers I've used on this card are the lovely Pompeii collection from Dream Street Papers I just love the colours and designs in this set.
I reverted to my favourite 14cm square card to make a second version. This one is a commissioned ard which I've left almost to the last minute - no change there, then!
More Dream Street Papers for this one - this time the Rue collection.
Instead of the squares I've used some Cuttlebug hearts, cut from paper covered chipboard, the large word is cut with the Craft Robo, gorgeous satin ribbon from Ribbon Oasis, and I've added some hints of red to lift the browny shades a bit.
Now I just need to get it in the post to my customer in time! I hope she likes it. I hope you do to.
I'd love you to join in and have a go at my sketches, I try to add a new one every week or so and the older ones are all there for you to play with and add your links any time you like.
Thanks for popping by
Friday, June 19, 2009
Missing You
Over at The Daring Cardmakers Lythan is feeling sad because her lovely daughter is going to be away for the weekend and Lyth is already missing her. awwww. So we were asked to make cards with the sort of message that says "I Miss You" , "I'm Thinking of You", "Just to Say I Care" and that sort of thing.
These are the sort of "Just Because" cards that I always mean to make and send more often, but I never get round to. I feel bad about that because I know what a lovely thing it is to receive a card that comes through the letterbox for no reason other than to say "Hello"
Well, I today I highlighted the "Missing You" theme by missing the 10am Go Live time for the dare. Ooops!
This was because the card I made yesterday was just a catalogue of errors and I had to do a different version this morning.
The card incorporates a bookmark, which has the main message for the card on the reverse
I've used MME "Pretty Please" papers, a Cuttlebug die to cut the little flowers, tiny gems from Anita's Gem Wheel and some Stickles glitter glue.
The first effort ended up a DL card because I failed to measure and cut the bookmark down to fit the original card I made (fundametal error, that one, eh?)
I had stuck all the flowers and gems on by this time so couldn't just lop a bit off.
The next problem was that I made it too bulky for the laminator to cope with and it's gone all wrinkly - so I now have a new bookmark, albeit a wrinkly one!
I've not had the lamintor long - this is only my second atempt at using it - so I was experimenting a bit too. I had some space in the laminator pocket so put some Prima flowers in too - I've used them to make the dangles for the bookmark., along with some threads, fibres and buttons.
I do love this Cosmo Cricket paper, but I really struggled to figure what to do in that long empty space on the right side of the card. In the end I resorted to making some "tiles" from different designs of the patterned paper adhered to faux chipboard then I trimmed the corners with my "Round it-All" and gave them a layer of Glossy Accents
I've not plucked up the courage to laminate the 2nd version of the bookmark yet. I think it'll be ok as I've fairly sure it was the flowers on the first that were the problem - it wasn't a good idea to cut the flowers from card, and then add more card layers for the centres - I knew that really, but somehow couldn't stop myself!
Hey, you live and learn.
Thursday, June 18, 2009
Adding the Pretty Stuff
Last week on Bubbly Funk's emag I made a wallet-folder type thing which I plan to fill with some cards to make a gift for someone at C-word-time.
I left it looking like this:
All a bit boring really, so it definitely needed a bit of "prettifying" or "tarting-up"
I used more papers and chipboard (that gorgeous swirly-scrolly-leafy thing and one of the set of peony flowers) from Bubbly Funk's delicious June kit plus some of my own stash (you see, I do use the stuff I buy and hoard,...eventually) to decorate the front of the folder.
My next task wil be to make something to fill the pockets inside with, but that'll be another week's project.
If you've never visited Bubbly Scrumptious before, you're missing out on a fab crafty magazine. There are new projects most days and they're building up into quite a library - ideas for fabulous scrap pages, books, albums, wall-hangings, cards - all sorts of things which can't fail to inspire your creativity - definitely worth grabbing a coffee before you start browsing!
That's my advert for the day.
Thanks for visiting
Wednesday, June 17, 2009
Tea Time Treats
Glanced out of the kitchen window a little while ago to see one of the greenhouses lying across the patio. It's one of those temorary ones - a frame that slots together and then the plastic cover goes over the top and ties on. This one is quite tall which doesn't help when its blowing a gale out there like today,
Fortunately there's not an awful lot of plnats in it at the moment, just a few of my sunflowers that are still waiting to be planted outside - but now there are less! Some were planted up in my nice terracotta pots though and now I've got less of those too :(
Took me ages to put everything to rights and clear up the mess. Flipping greenhouse kept trying to escape all the time I was trying to ram enough bricks and ballast in there to hold it down, too. Ungrateful contraption.
I've wedges the bin beside it now in the hope of making it stay put.
Last year I planted a couple of peonies in the garden. One is yet to start flowering but the other is looking fab - though not sure it'll still be so pretty after today! Fortunately I took some photos earlier in the week.
This week I've been busy working with the DT set for the new Crafty Templates collection. This month there are cupcakes, teapots, butterflies, picture frames and a whole lot more. Even though I don't actually like strawberrie, I love Leo's strawberry cupcake template!
I decided to use it alongside the cute teapot template to make this Teatime Treats" card.
I've used one of the papers from the Crafty Goodies Kit to make the border and the lettering is made with rub on letters from several sheets. I thought the cake really needed a plate to sit on, so I cut one in white using Mr Robo, then cut a rim for it by placing a smaller oval inside the first and cutting in red to match the strawberries.
Here's a close up
I've got more Crafty Template cards to share, but I'll save them for another time;) so that's all for today
please come and visit again soon
Monday, June 15, 2009
Breaking Free
My fave paper manufacturer of the moment seems to be My Mind's Eye. I can't stop buying their stuff at the moment. Last week I showed on here some cards made using the gorgeous "Pretty Please" collection, this time it's "Breaking Free" - which are just soooo summery and delish - totally irresistable.
I love the colour mix on these papers - and the designs are fab - a great set of florals, stripes, spots and fun stuff.
I made the flower for the above card just by cutting out some of the images from one of the floral papers, inking the edges, then pinching up the petals to add some dimension
I just adore the scalloped edge cardstock ice-cream design - it'll make a wonderful scrapbook LO (well, it would if I was a "proper" scrapper, anyway!). I'm going to have to buy another sheet, so that I can have a go at making a page because as soon as I saw the design, I knew what I wanted to do with it. Ijust had to use it as a background and make a Robo template of an ice-cream cone to match.
I searched and searched for the "right" colouring page to use to make a template, but none of them were quite what I wanted, so I used the best one, then used it as a guide to "draw" exactly what I wanted using Paint Shop Pro
I'm quite pleased with the finished template, I think I'll make some more summer-themed shapes in the hope that the last two days of blazing hot sunshine weren't just a fluke!
last week Hubby had to go to Middleburg, Holland for some meetings. I don't think he enjoyed the journey very much, mind you, if they'd planned it better it wouldn't have been so bad! nuff said!
Anyway, oooh I thought, what would be a good present he could bring back for poor Wifey left behind. Lots of diamond merchants in Holland, aren't there....
I did get a present.
Would you like to see it?
ah well....... :) :) :) :)
Thanks for visiting
Friday, June 12, 2009
Some Like it Hot!
Another Daring Cardmakers' Day and another little challenge, this time it's Keryn's turn to set the dare:
Anyway, the sun is shining this morning so maybe we're in for a better weekend.
As is getting to be a habit, I struggled to come up with an idea for with this one.
Eventually I thought I'd have a go at something new and have a bash at a "slider" card.
I used the same Sunny Face Robo template that I made for last week's dare, and also used the Robo to cut the slot it moves along.
I don't think its quite right yet though as it doesn't move as smoothly as I think it should.
I'm not sure if its because the slot is too narrow, the gap between the upper and lower card pieces isn't high enough, or the gap between the two discs isn't deep enough. I'll have to experiment some more!
I was very brave ;) and did some paper mixing here!
Papers used are from K&Co Berry Sweet, MME Breaking Free, and a yellow one I can't remember which was way to acidic looking so I oranged it up with some inking.
The DT cards should help warm you up nicely for this challenge, so do head over to The Daring Cardmakers Blog and check them out - we do love to pop in and visit your blogs, so please leave a message if you make a card for this dare, so we can come and see what you've made
My crafty task for today is to finish at least some of the half-made cards I started while trying desperately to think of something to do for the DCM!
I'm also looking at the DT set of Crafty Templates which arrived in my mailbox this week and trying to decide how to use them. I know what you're thinking...Life can be soooo hard, can't it.... lol!
Hi it's Keryn here this week and in New Zealand we're in the middle of winter. Not snow like some of you get but we think it's cold all the same. I want to see card creations using only sizzling hot yellow based colours like red, orange and yellow to send some heat out to us through the web.
Well, it's not so hot over here in the UK at the moment. I heard them on the News the other day saying we were in what is called the European Monsoon!!!! Just when you thought they couldn't come up with another excuse for rubbish weather, they hit us with that one.
Not sure what they are planning to call all the rain we have at other times of the year.....
As is getting to be a habit, I struggled to come up with an idea for with this one.
Eventually I thought I'd have a go at something new and have a bash at a "slider" card.
I used the same Sunny Face Robo template that I made for last week's dare, and also used the Robo to cut the slot it moves along.
I don't think its quite right yet though as it doesn't move as smoothly as I think it should.
I'm not sure if its because the slot is too narrow, the gap between the upper and lower card pieces isn't high enough, or the gap between the two discs isn't deep enough. I'll have to experiment some more!
I was very brave ;) and did some paper mixing here!
Papers used are from K&Co Berry Sweet, MME Breaking Free, and a yellow one I can't remember which was way to acidic looking so I oranged it up with some inking.
The DT cards should help warm you up nicely for this challenge, so do head over to The Daring Cardmakers Blog and check them out - we do love to pop in and visit your blogs, so please leave a message if you make a card for this dare, so we can come and see what you've made
My crafty task for today is to finish at least some of the half-made cards I started while trying desperately to think of something to do for the DCM!
I'm also looking at the DT set of Crafty Templates which arrived in my mailbox this week and trying to decide how to use them. I know what you're thinking...Life can be soooo hard, can't it.... lol!
Thursday, June 11, 2009
Another Andrea Victoria Project
As usual on a Thursday its my turn toadd a project to Bubbly Scrumptious, the shop blog for Bubbly Funk.
I've been using the June kit which is based around the lovely MME Andrea Victoria collection.
The kit options are available HERE, some are sold out already but there are still some options in stock.
Its very unlike me, but I've been thinking about the C Word (you know the one....) and wondering if there's anything I could make to give as gifts.
This week I've done the first part of a folder-wallet type thing which I plan to fill with some notecards or greetings cards - it would work for hand-stamped notepaper etc too. There's nothing new really - you've all seen things like this in the shops, but if you'd like to have a go at making a truly personal version to feill with your own cards then maybe you'll enjoy this project.
My wallet starts like this:
Eventually you end up with something like this - all ready to be decorated
Inside it looks like this, with the pockets ready to be filled with more goodies
You can find out all the info by visiting the Bubbly Scrumptious emag. You'll find masses of other projects using the various Monthly Kits, (new) Page Kits and mini special Kits all created by our dedicated Design Team - well, I would say that, wouldn't I :) lol
Right, I've got a few half-made cards sitting on my desk, and a dcm card to make for tomorrow which hasn't even developed into so much as a germ of an idea yet! I suppose I'd better see if I can hatch something!
Tuesday, June 09, 2009
Pretty Please
Well, I eventually managed to stop procrastinating yesterday and settle down to making some cards.
I've somehow managed to be enticed into buying quite a few new sets of papers recently - not quite sure how that happens, but it does. Maybe you know....
Anyway, going through the boxes that were stacked by my desk was like getting the parcels all over again, and hopefully they'll all get a turn to be used over the next few days.
First out of the boxes came a gorgeous pack of paper by My Minds Eye called "Pretty Please"
I made these 3 cards using some of the designs, but I don't want to use too much because I feel a mini-book coming on....hahaha
All papers used are from the MME Pretty Please paper pack
Base card is 12x12cms embossed with CBug "Swiss Dots" folder
Scroll & Flower Centre; Spellbinders Flourish Accent die set
Rub On: BG Wholly Cow "Thank You" set
Flower: Prima
Ovals; Spellbinders scalloped Ovals set
Punched flowers
Tiny buttons
Tiny gems; Anita's Gem Wheel
Rub Ons: Maya Road
Everything here is made with paper from the paper pack with the exception of:
Tiny buttons coated with Stickles
Rub On letters: Maya Road
Hopefully I'll get crafting again today now that I've put the P word away for a while! Thanks for dropping in today, I hope you'll come back soon
Monday, June 08, 2009
Procrastination Round Up
Yes, its one of those days again - the sort when I have a list of things to do, but will do anything else but knuckle down to them....Actually the whole weekend was a bit like that.
So Procrastination no1: A Bit of Waffle
Saturday was quite busy what with one thing and another, but Sunday was an empty day - and it was absolutely bucketing down so no guilty feelings of "I should be doing something in the garden" to prevent a nice long-lie-in! Lovely - the perfect Sunday morning!
Once I'd finally dragged myself out of bed I thought I'd do some crafting; I've a few birthday cards to make a start on and a commissioned wedding anniversary card. I'm ahead on DT projects for Bubbly Funk and the new stuff for other DTs hasn't arrived yet so I have some free crafting time at my disposal.
So what did I make?
Nothing. Zilch. Nowt!
Procrastination no2: Sorting is always Good for it
I looked at the stack of pizza boxes fo new paper stacked by the desk - and the stuff just lurking in bags propped up by the shelves and thought it might be a good thing to have a tidy up and a clear out.
When I say "clear-out" I really mean "move some of it to a place where I can avoid seeing it", as in avoid a proper clear out - which is really another bit of Procrastination
I re-labelled the boxes that live on my shelves but as I'm always moving the contents around depending on which company is producing more stuff that I like and needs more space in the boxes, I decided that little acetate pockets would be a good idea.
The pockets are fixed to the boxes with clear parcel tape and I made some tags with the names of the companies on them just to slip inside the pockets.
I know my storage system isn't purpose made and flash like some peoples' is, but it suits me - at least until I find something better!
Procrastination no3: One Thing Leads to Another...
I know the tags look a bit of a mess - I think I need to do them on the pc instead of putting up with my rubbishy scrawl - now that the boxes look tidy, I'm finding the tags quite offensively tatty!
So how fab - another little bit of procrastination dreamed up with very little effort. Will I resist? I'm trying to, honest! You'll know - because I'll have something new to blog tomorrow if I do!
Something I've not got round to blogging is this little gift card wallet that I made to present Aimee's main present for her 18th in. We decided that as she's the first of our batch 0f 8 Nieces/Nephews to hit 18 it would be a good idea to think of something we could roll out for each of them as they reach the milestone birthday. So we're going to give them Premium Bonds.
I made this wallet roughly following a You Tube tutorial suggested by Joanne when we did a "Relaxed Mini Cyber-Crop" on a forum the other week.
I must admit I didn't follow the instructions properly and went off on a bit of a tangent but there's nothing new there!
The front of the wallet looks like this
Inside you find a little holder for the gift card - they are meant for the sort of credit card style gift cards you get from places like WH Smiths, but the idea would be easy to tweak for other types of vouchers or tokens.
The gift card fits into a little slotwhich is disguised by adding a circle for a message, or as I've done the addition of a flower sahpe cut from the paper
The papers are lovely - they're "The Cotton Shop" by 3 Bugs and I love the unusual and striking colour combo.
Making the little gift card gave me the perfect excuse to use my new laminator for the first time!
I downloaded the logo of the NS&I, printed it out, stuck it on a piece of the paper, printed out our message for the other side then put the whole thing through the laminator.
I think everyone will be getting something like this come the time of the "C-Word" - mainly because its such fun doing the laminating bit!
Well, this particular bit of procrastination must end, I suppose, so I'll Love You and Leave You till the next time,
Thanks for calling by....
Subscribe to:
Posts (Atom)