Friday, March 22, 2024

Oh So Square


 Hello!
Welcome to my little crafting place! 
 
Today I’m sharing my card for the new Daring Cardmakers challenge set this week by our lovely Shabneez. 

Happy Friday!

It's Shabneez here today and this week I'd love to see squares!
Perhaps a square shaped card, a few squares or a multitude of them.
The more the better!

You never really know where an idea for a card will spring from, or how the grain of an idea will turn into a rabbit hole do you? 

Shabneez's challenge came up and reminded me that I've not used my small square punches much recently and got me thinking I could use little squares to make a square shaped frame on a square card - is that already too many squares? Well, there's more to come!


I was thinking about this as I was working on another project and using one of the lovely reall deep embossing folders - why not add some embossing to the little squares?  And, oh, I've got a square shaped wax seal stamper....


 I started by covering a peice of card with Nuvo Embossing Mousse in, pinks, corals and a tiny amount of aqua.  I sprated with water then embossed it with one of my deep embossing folders, this one is Flowers & Foliage 3D Embossing Folder from Spellinders and because the design is busy with lots of small patterns its perfect for punching 1.5cm squares from.  After embossing I swept a deeper coloured ink pad gently over the top to highliht the embossed.pattern.

 Next I punched the squares, keeping the punch upside down and the coloured side of the car visible in the window of the punch - this way you don't flatten the embossing and you can choose the best bits of pattern to punch out.

I raped a square die to my card front to help arrange the little squares into a frame then glued them in place, then cut two more squares from card coloured with the same shades of mousse for the centre section

I used several shades of wax beads to make the seal, then cut around the square shaped stamper.  I chose some wax beads I thought would match the aqua ink, melted and poure a rough (very rough!) square shape and placed the detail seal into the hot wax square.  

Once cooled I added gold highlights, and when it was dry used a hot pointy tool to make a tiny hole at the side. I added a tiny sentiment tag and bow with d twine and fixed to the card with a wax seal double sided sticker - you can buy them ready to use and they work really well for adding wax seals to projects.

******

Just a Note

If you buy from Spellbinders and you're happy to help out a crafty
 friend with a stash addiction...
  HERE is my Affiliate Link to the Spellbinders store - you can use it to access the store any time, and I'd really appreciate it if you did, don't worry, it doesn't cost you anything!
There's a UK based shop now, so you can use the 'Visit Our UK Store' button at the top right of any page on the Spellbinders site  

******

Thank you so much for coming by.
 I took the chance of a blue sky yesterday to take some camellia and magnolia pictures in my garden so I'll add some at the bottom of this post
 
 Happy Crafting, Take care of yourself,
Kathy xx


Monday, March 18, 2024

Wise Owl Bookmark


 Hello

Welcome to my little crafting place!

I've another Spellbinders Monthly Club project to share this time and I'm using dies from the March Small Die of the Month club and the seal from the  from the Wax Seal of the Month club

Don't forget.... 

The March "New Subscriber" registration window closes on 27th March and is avaiilable while supplies last. Join in March and receive the pictured kit. Clubs will ship by the end of the month.

This time the book themed dies from the club kit and the theme of the wax seal gave me the idea of making a bookmark - which I suppose is an obvious jump!


Once I'd made all the various elements and fixed them together, including the ribbon at the top and the cords and tassels at the bottom, I drew around the owl and books section making a template to cut a backing piece to hide away all the messy bits and overlaps on the reverse

I managed to use all the dies except the little envelope ones - but you can see them on the picture below


~~~~~~~~~~~~~~~~~~~~~~~~~~~~~~~

  THIS is my Affiliate Link to the Spellbinders store 
-  you can use it to access the store whenever you buy from Spellbinders
It doesn't cost you anything, but I may get a little reward for pointing you there.
There's a UK based shop now, so you c use the 'Visit Our UK Store' button at the top right of any page on the Spellbinders site 

~~~~~~~~~~~~~~~~~~~~~~~~~~~~~~~

Thank you so much for coming by

 Happy Crafting, Take care of yourself,
 
 Kathy xx

Coffee, Books and You


Hello

Welcome to my little crafting place!

I've another Spellbinders Monthly Club project to share this time and I'm using some of the dies from the March Small Die of the Month club
and a sentiment from the Glimmer
of the Month club

The March "New Subscriber" registration window closes on 27th March and is avaiilable while supplies last. Join in March and receive the pictured kit. Clubs will ship by the end of the month.


Thanks to a book themed challenge we hadover at the Daring Cardmakers a while back I had some digi downloads that were perfect to pair with the fabulous book dies from this set.  Here's a pic of what the whole set can make so you can see what else you get!
As you can see, I only used the book dies for this card but I've something else to share later!
I wanted to use the cute "Coffee, Books and You" sentiment from the Glimmer of the Month club so resized and cut out the little cup and saucer icon from my paper to pull everything together.  I think this would be great for anyone with book club friends!

~~~~~~~~~~~~~~~~~~~~~~~~~~~~~~~

  THIS is my Affiliate Link to the Spellbinders store 
-  you can use it to access the store whenever you buy from Spellbinders
It doesn't cost you anything, but I may get a little reward for pointing you there.
There's a UK based shop now, so you c use the 'Visit Our UK Store' button at the top right of any page on the Spellbinders site 

~~~~~~~~~~~~~~~~~~~~~~~~~~~~~~~

Thank you so much for coming by

 Happy Crafting, Take care of yourself,
 
 Kathy xx

Friday, March 15, 2024

A Bunch of Pink Tulips

 
 Hello
Welcome to my little crafting place! 
 
Today I’m sharing my card for the new Daring Cardmakers challenge set this week by our lovely Nat. 

It's Nat here with this week's new challenge!

Here in the Northern Hemisphere, the astronomical Vernal Equinox will soon mark the official start of Spring - so let's welcome the official changing of the seasons  with colours, florals, or any of other elements that shout SPRING to you!

Spring is my favourite season, you never really know from one day to the next what the weather will be like (especially here in the UK!) but its so full of promise, and even on the bad days you know that it WILL get better

I love how the Spring flowers brave the wind, cold and rain - its so cheering to see the snowdrops, daffodils and now the tulips letting you know that winter is almost done!

So it had to be tulips for Nat's challenge, and a wonderful excuse to combine the brilliant new background Glimmer plate from Spellbinders' March Glimmer iof the month club  with the tulip dies that were part of the February  Small Die if the Month club kit

"The March "New Subscriber" registration window will be available March 6-27th

I hot-foiled the 'Sketched Lines' plate with the blue foil you also receive in both horizontal and vertical directions to get a check pattern on part of my lovely blue background panel.
I inked cardfor the tulip petals using various shades of ink and also some Nuvo paste to get some shine going.  For the leaves I sarted by colouring a piece of card on both sides using Faber-Castell Gelato colours
I made my tulips into a bunch, adding extra pieces of stem and then hiding the join under a double bow of pink organza ribbon
To complete I added a sentiment and some pink wax dots

******

Just a Note

If you buy from Spellbinders and you're happy to help out a crafty
 friend with a stash addiction...
  HERE is my Affiliate Link to the Spellbinders store - you can use it to access the store any time, and I'd really appreciate it if you did, don't worry, it doesn't cost you anything!
There's a UK based shop now, so you can use the 'Visit Our UK Store' button at the top right of any page on the Spellbinders site  

******

Thank you so much for coming by.
 I took the chance of a blue sky yesterday to take some camellia and magnolia pictures in my garden so I'll add some at the bottom of this post
 
 Happy Crafting, Take care of yourself,
 
Kathy xx


Friday, March 08, 2024

Journal for the March Wax Seal of the Month

Hello

Welcome to my little crafting place!

 Its Spellbinders Monthly Club time again

 This time I'm sharing a project which was completely inspired by the Wax Seal of the Month set for March.. The lovely 'New Chapter' seal just seemed perfect for  journalling a journey, or maybe a new start of any sort.  This thought then
 reminded me that I had a digital download with a Paris Journal theme that would be the perfect match!
 So I made this
 
I altered the colour of the butterfly to match the wax seal beads that come in this month's club set and made extra copies of the print out so that I could cut out the spare butterflies to give dimension.
 
I did buy a silicone mold for getting perfect 'rounds' with the wax, but after making a few I've decided that I actually prefer the 'freeform' look, and I especially liked this rather wiggly pattern with its sticky-out bits!
I made holes in the finished seal so that I could add a tie to the top, and a tassell to the bottom and use matching colours of waxed thread to decorate it.
 
What do you think?
~~~~~~~~~~~~~~~~~~~~~~~~~~~~~~~

  THIS is my Affiliate Link to the Spellbinders store 
-  you can use it to access the store whenever you buy from Spellbinders
It doesn't cost you anything, but I may get a little reward for pointing you there.
There's a UK based shop now, so you c use the 'Visit Our UK Store' button at the top right of any page on the Spellbinders site 

~~~~~~~~~~~~~~~~~~~~~~~~~~~~~~~

Thank you so much for coming by

 Happy Crafting, Take care of yourself,
 
Kathy xx

Just Sew!

 
 Hello
Welcome to my little crafting place! 
 
Today I’m sharing my card for the new Daring Cardmakers challenge and its my turn to set the challenge this week.  I'd decided on my theme and added it to our calendar before I realused that I'd got my dates in a muddle and couldn't make what I'd planned.  Never mind eh!
I can't remember actually learning to sew though as a very little girl I spent a lot of time with my lovely Aunt and she had a sewing machine so I think she may have put a needle and thread in my hand as soon as I could hold one! It certainly wasn't my mum as she loathed sewing and could barely sew a button on! Funny really as in later life she loved doing embrodery.  She and my Grandma were absolute fiends with a set of knitting  needles and I was never short of woolies
Anyway, I waffle...!

So this week I thought I'd ask you to add some kind of stitching to your cards.
It doesn't have to be much and it doesn't have to be 'real'
Just Sew!
For example you could add a 'real' stitch or two (or a whole lot of them!), or add something like a stitched embellishment.
Or go down the faux route with a stamped, drawn, stencilled or die cut stitching effect.
We're looking forward to seeing your ideas, but here are some from the team to help get you thinking


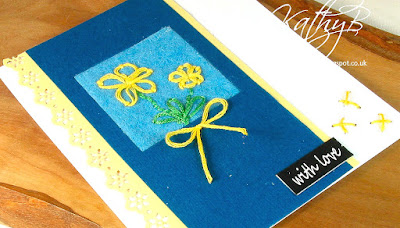
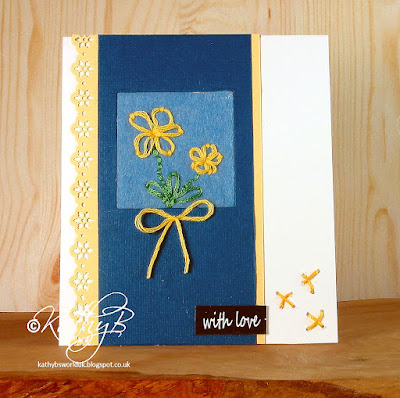
When I realised Plan A was a non-starter I was a bit stuck and time was running out!  So I thought I'd try a bit of simple hand-stitching, never my forte, so forgive me!
This is very 'old-school', with the stitching, aperture and the border punched panel! 
I stitched a couple of daisies onto a piece of felt, then added stems and leaves.  The felt was a bit crumpled so I glued it to some card then left it under a paperweight overnight, which worked a treat.
 
I cut an aperture in the dark ble card and used a daisy border punch on one edge of the yellow panel before adhering it to the card. To complete I added a bow, some cross-stitched 'kisses' and a little sentiment piece.
 
Its not the best card I've ever made, but it did send me on a lovely trip down Memory Lane, which made me happy

Thank you so much for coming by
 
 Happy Crafting, Take care of yourself,
 
Kathy xx

******

Just a Note

If you buy from Spellbinders and you're happy to help out a crafty
 friend with a stash addiction...
  HERE is my Affiliate Link to the Spellbinders store - you can use it to access the store any time, and I'd really appreciate it if you did, don't worry, it doesn't cost you anything!
There's a UK based shop now, so you can use the 'Visit Our UK Store' button at the top right of any page on the Spellbinders site  

******


Friday, March 01, 2024

March Elemental Inspiration Challenge


 Hello
Welcome to my little crafting place! 
 
Today I’m sharing my card for the new Daring Cardmakers challenge and Miri has chosen a beautiful moodboard for the
March Elemental Inspiration Challenge 
It's Miri here to host this week and my mood board just oozes a feeling of calm and peace! There's lots of lovely inspiration in there, and hopefully you'll enjoy a feeling of well-being and tranquility as you craft!

Remember just choose at least 3 elements to use when you make your card.

I chose to use the leaves, the colours and the window-screen pattern from the chair in picture on the bottom row.  I got a new die set at the end of last week so it had to have an outing, didn't it?

 I used the winsow screen stencil from The Crafters' Workshop for the background, its one of my favourites. I used some scraps of old wet wipe and lots of little green ink pads to make a vareigated background for my flowers.

The die set is The Botanical Solarium (from windows with a view) by Spellbinders.


I inked the card before cutting out the pieces I wanted to use, then added extra colour if needed. 

Lastly I made the sentiment pieces on the pc. 

I use Paint Shop Pro and create first in black lettering on the white background making a sheet of several sentiments in various fonts.  Next I click the command 'negative colours'.  If I want white on black sentiments I stop here and decide what size I want to print the sheet (usually something like a 12cm piece cut off a landscape A4 sheet), then print.

If I want a coloured background I use a tool in PSP called 'colour changer'.  First go back to the black lettered version and change the white background to the colour required. Second use the same colour changer tool to change the black lettering to white.

There's probably a better, maybe even a 'correct' way to do this operation but this is the way I worked out how to do it! The picture shows the 3 versions of the same sheet of sentiments.  I always save the sentiment sheets I make because its fairly easy to edit them when you wnat something more specific and I can add to my stash of ready made more usual ones at the same time


 I made a few tiny tags (they are a bit bigger than I'd hoped but never mind!) in the same way as above as they are quite useful to havre to hand.

I glued it to the jug's handle and added I tiny gold twine bow

******

Just a Note

If you buy from Spellbinders and you're happy to help out a crafty
 friend with a stash addiction...
  HERE is my Affiliate Link to the Spellbinders store - you can use it to access the store any time, and I'd really appreciate it if you did, don't worry, it doesn't cost you anything!
There's a UK based shop now, so you can use the 'Visit Our UK Store' button at the top right of any page on the Spellbinders site  

******
Thank you so much for coming by

 
 Happy Crafting, Take care of yourself,
 
Kathy xx