Wednesday, October 11, 2017

Paris Album; Carousel (BF Through the Letterbox)

Hello!
Thank you for visiting my blog today, it's lovely to see you here  on this sunny October morning!
Today I'm very excited to be sharing my first project for

Over on the Bubbly Funk Blog the new Design Team have been introducing themselves and are beginning to share the projects they've been making with the October Letterbox box.
It's my turn today and I've made a new page for my Paris mini album.  Yes, the same one that's been a work in progress for the last couple of years!

Info:
From the October Letterbox Box  I used:
Die-cut label
Chipboard frame and flourishes
Zig Zag Washi tape
Grey Ribbon (I love this stuff - its so soft and pretty!)
Holographic Sequins
Clear Gems
Paris Stencil is also available from the shop HERE
Extras from my Stash:
Glamour Dust, Gems in other colours and shapes to tone with the photo
The photo below shows the contents of the October BOX
 About Bubbly Funk Through the Letterbox
Bubbly Funk itself isn't new, though recently Caroline took a bit of a 'sabbatical' while she did other things....like getting married, moving house and other 'real life' stuff
Anyway, Bubbly Funk is back at last but with a fabulous new concept in crafting kits - boxes of crafting goodness that fit through your letterbox!  How good does that sound?  No more parcels left on the doorstep, or having to collect from the sorting office, or asking a neighbour to take it in etc

Each monthly Letterbox box will be sent out around the middle of the month
 and is available to order from the 1st of the month.  Numbers will be limited, so early ordering is a very good thing!
 
As you can see, there's a lovely, coordinated mix of goodies - you'll find beads, fabric, die cuts and chipboard to name just a few. 
Bubbly Funk Through the Letterbox - October 2017
 Thank you for visiting. You can see more over on the BLOG and I would really love you to pop over to leave some messages there as well as here -  greedy, eh? 
Anyway, that's it for this time

Happy Crafting

Tuesday, October 10, 2017

Big Letters!

Hello
Welcome to my blog - thanks for visiting today, it's lovely to see you 😊
Today I'm sharing a card using the October LO from The Sketch File.  It's a bit different from the usual as the main feature is the text area.  If you're a scrapper, this could be the journalling, or if you like to use a quotation this sketch would be perfect.  I've gone with some BIG letters!

I've  pretty much kept to the Sketch for this card, but it's fine to move things around and make it work your way. Here's the basic sketch:
The Sketch File October 2017

Info
Coloured card; White, Black, Silver,  Aqua,
Glitter card; Red, Aqua
Large letters created in Paint Shop Pro and cut on the Silhouette Cameo
The small word is a die-cut
The trees are also die-cut
Punched stars

I'm really pleased at how this turned out and I love the crisp, sharp design - it really catches the eye even though its pretty simple to put together.  Which, of course is a definite plus when you have a lot of cards to make.
We'd love to see what you could do with the sketch, so do join in

Thanks for looking in today

Saturday, October 07, 2017

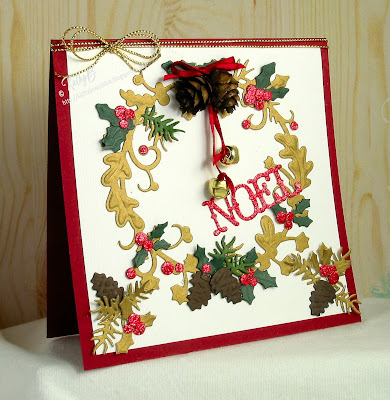
Holly Berry Wreath - Spellblogging for Spellbinders


Hello there! 
Welcome to another Spellblogging post for Spellbinders

This weekend sees 'World Cardmaking Day', 
so it really had to be a card this time - in fact 2 cards, actually!

They are Christmas cards and I've used a very beautiful Christmas die set; Holiday Holly Wreath.  Both cards use the same basic ingredients, it's just that for the second version I 'upped the ante' a bit and raided my 'Christmas Bits' Box for some added extras!

I used the same creamy white, linen wove card as the background for both cards - its the complete card blank for card 1 and for card 2 a smaller piece was adhered to a dark red, heavier card blank.


 Info 
White lined wove card, soft old-gold card,
scraps of green and brown card, red glitter card 
NOEL cut using one of the dies from the
 Ho Ho Ho Holiday 2017 die set


For the 2nd version, I cut a square of the white linen card to fit on my red card blank, as before I die cut and embossed the wreath in the gold card.
Next from my 'Christmas Bits' Box I used some little jingle bells and some real, but tiny pine cones 
The bells were tied onto narrow red ribbon, and glued to the top of the wreath.  The die cut leaves and the real pine cones hide the glue and ends of the ribbon.  
Using the die set I cut extra leaves etc and added them to the wreath and some in the corners too.  I absolutely love the embossing on the pine cones, it makes them look so real!  
I used the same 'NOEL' sentiment, the finished the card with some gold twine and bow around the top of the card, and a red ribbon bow at the top of the wreath 


Here are the gorgeous Spellbinders die sets I've used this time, with links so you can find them in the store 
 
Holiday Holly Berry Wreath Shapeabilities Etched Dies


 Ho Ho Ho Holiday 2017 
die set


I love a die set that works so beautifully in simple fashion, but also lends itself to adding some extra pizzazz.  I think this one is just fabulous and you really need it in your collection!

That's it for this time - thank you for visiting, if you click on This Link  you'll find yourself at the Spellbinders store where you will be tempted by lots of lovely dies, stamps and much much more!

Happy Crafting


Friday, October 06, 2017

Lavender Blue Dilly, Dilly

Hello!
It's a beautiful, Autumnal morning here, with sunshine and a very blue sky, I hope its as nice where you are too.
As it's Friday, it's another Daring Cardmakers Day and today is the first Friday of the new month so we have an Elemental Inspiration Challenge this time.  
Here's my card
 
For October Leo has put together a little mood board for you and we hope you'll find plenty of inspiration to draw your three elements from.
Just pick at least 3 elements from the picture to use when making your card 

I chose the pastel stripes of the wall hanging, the lavender, and the Kraft card from the box or ribbon or washi tape
Info
The pastel striped pattern was made using Gelatos, which I 'softened' with damp pieces of baby wipe
The pink dei-cut pot is also coloured with Gelatos
For the lavender I started by adding various purple, lilac and some aqua shades of ink to a piece of card.  I thought I had a lavender flower die, but it seems I don't, so instead I used a Delphinium die, then cut them down a bit.  The stems are from another flower die set - Lily of the Valley, I think.
The white circle and the scalloped Kraft circle are both from Spellbinders Nesties sets.
The sentiment was stamped in black ink and the whole panel was matted onto black card before adding to my white card blank

It would be great if you'd check out all the lovely cards the DT have made - honestly, it always surprises and delights me to see how our talented team respond to the challenges each week, they are so fab!  You can CLICK HERE to see what they've made this week
Well that's all from me today, except to show you the photo I took from my bedroom window this morning - just check out that blue sky!


Thursday, October 05, 2017

Say Something

Hello

The week has rushed by and I've not had a minute to update my blog.  So this is a bit of late catch up for my first project with the new October LO from The Sketch File.
I quite like the idea of making the word element the main feature.  Often the sentiment is a bit of an after-thought, but this month I have to think about that bit first.
When I was going through my box of Christmas stash and leftovers I came across a few of these quotation panels I made but didn't use all of last year.  Perfect for the new sketch!

Here's the sketch
 The Sketch File.October 2017
 I liked how it turned out, so I made another one in red and white this time


This is the sort of card I tend to make at Christmas when I have a lot to do.  I try to keep the design simple and dare I say, stylish. 
I think I'll make more like this - maybe use a different Christmassy quotation, and I could switch the snowflakes for my other favourite element; stars!

Anyway, that's it, two very simple cards ready to go in the Cword card box!  I hope you like them.
Thanks for looking, please let me know what you think....

Tuesday, October 03, 2017

And the Winner is.......(Blog Candy Give-Away)

Hello!

I have good news for one lucky person this morning!
I've just used a random number generator to choose the winner of the fabulous Naughty or Nice Holiday 2017 Christmas sentiments die set from Spellbinders 
The generator picked comment no 6 which came from Lea AKA Brawny 
So, Lea, get in touch and I'll send your prize asap!
There's an email addy in my sidebar or you can message me via FB 
with your info
Congratulations

Monday, October 02, 2017

Renaissance Jubilee - Spellblogging for Spellbinders


Hello there! 

Thank you for joining me for another Spellblogging post for Spellbinders
This time I've been using the beautiful Renaissance Jubilee dies to do a bit of partial die-cutting.

Info
Using one of the dies from the
Label 56 Nesties set (
Renaissance Jubilee by Stacey Caron)

I made a partial die cut on my piece of white card
By doing this the back of the card looks like this:

Next I used a couple of the dies from the matching Decorative Elements set in white and deep aqua to create the upper panel.
Before adhering this in place I added some beautiful Flower Lace Borders  across the lower section of the card - this is a stunning die set designed by Marisa Job.  I used the little flowers to decorate the card too
'Thank You' is from Simply Said Phrase Set Two
Leaf and Flourish details from Sprigs Die D-Lites Etched Dies

Here's how it looks when folded flat


Here are all the gorgeous Spellbinders die sets I've used this time, with links so you can find them in the store

Renaissance Jubilee Label 56 
 by Stacey Caron Nestabilities Etched Dies 
  
Renaissance Jubilee Label 56 Decorative Element
 Nestabilities Etched Dies by Stacey Caron


Flower Lace Borders  
 Timeless Heart Collection by Marisa Job
Shapeabilities Etched Dies
 Simply Said Phrase Set Two 
 Shapeabilities Etched Dies
 

 Sprigs   Die D-Lites Etched Dies


Don't forget, today (Monday 2nd October) is your last chance to enter my Blog Candy prize draw.  It closed tonight at 12 midnight (UK time)
Here's the die set I will be giving away to the winner
 Naughty or Nice Holiday 2017


That's it for this time - thank you for visiting, if you click on This Link  you'll find yourself at the Spellbinders store where you will be tempted by lots of lovely dies, stamps and much much more!

Happy Crafting

Friday, September 29, 2017

In Apple Pie Order

Hello, Happy Friday
Hope you've had a good week!
Thanks to Shabneez's challenge at The Daring Cardmakers this week I've been taking a trip down Memory Lane and remembering how I loved Harvest Festival time back in my home village when I was a little thing.  The front of the Church would be decorated with cloths, and miles and miles of crepe paper in Autumn colours, there'd be those wonderful huge bread loaves in the shape of sheaves of corn, and pikes of fresh produce.  Everyone would decorate baskets, punnets and boxes and fill them with produce to hand over to the Monitors who'd then add them to the wonderful display.  All of us little people from the Sunday School would process in with our various decorated containers, and it all looked so beautiful!  It was always such a happy occasion.
Actually, thinking about it, crepe paper played quite an important part in my early years!

For my card, I decided to go with either apples or pears, then thought I could 'make' an apple pie, so ended up sticking just to apples.
The elements for this one were made into templates for cutting on my Silhouette Cameo and that part went according to plan.  As is so often the case, it was deciding on the background that caused more stress.  In the end, those apples and pie were torn of more than once and finally ended up on the third attempt at creating a background I was happy with - and of course the simplest of those I tried!

Info
Large white card blank, with inked edges.
The quotation was printed onto white card and square cut  around it using my Nested Scalloped Square set from Tonic.
The pie and apples are clipart and made into templates in PSP for cutting on the Silhouette Cameo.  There are lots of layers and I used various coloured card then added inks to give more depth and texture.  The group of red apples were adhered to scraps of chipboard before gluing to the card.  The pie has a 'box hinge' behind it so it stands out more, and the green apples at the front are on a larger 'box hinge' behind so they stand out further and their base sits on the surface when the card is standing up.
The apple pips were just a bit of 'waste' from an EK Success Scalloped edger punch - they were just perfect, and much easier 
than trying to cut in other ways.
I gave the little 'pastry' apple decorations a coat of Glossy Accents

I could really eat a slice of apple pie right now......with a big dollop of ice cream

That's it for now - just want to remind you that I have some blog candy on offer at the moment - click HERE to get a chance to win this die set:
Well, the "What's for lunch?" call has gone up from OH so I'd better go and answer him.  Thanks for coming by, see you soon

Monday, September 25, 2017

Christmas Sentiments Blog Candy - Spellblogging for Spellbinders


Hello there! 

Thank you for joining me for another Spellblogging post for Spellbinders
 and this time I've some more lovely Blog Candy to give away - keep reading to find out more!

I've got three simple Christmas cards to share this time each using one of the sentiments from a fabulous little set called Naughty or Nice Holiday 2017 from the Die D Lites Etched Dies Range.  I've used each sentiment with a different Spellbinders die set from the 2017 Christmas collection 


'Be Merry' Card

Info:
I cur the bauble using one of the fancy bauble shapes, then taped the plain circle in place around it  and ran through the Platinum machine for a second time, but this time using the embossing mat to emboss the circle and the details on the bauble shape
A square of silver glitter card was adhered to the inside of the card front, silver twine and a red satin bow were added
Be merry cut in silver glitter card and adhered in place
Gilded Ornaments Holiday 2017 Shapeabilities  Etched Dies

'Believe' card
White card blank stamped with It's Snowing Holiday 3D Shading Stamp using a magenta ink pad
I cut the largest of the Snowflake Snippets from white, adhered to a smaller pearlescent card square and trimmed around the edges. 
I made a frame by using 2 nested squares to conceal the edges and glued in place
Snowflake Snippets Holiday 2017 Shapeabilities Etched Dies.
'Believe' cut in the same pearly card and various gems used to add some bling


Snowflake Snippets Holiday 2017 Shapeabilities Etched Dies.

Naughty or Nice Card
Red pearlescent paper panel added to white card blank, smaller white panel added on top
Stocking etc cut using  Build a Stocking Holiday 2017 Die D Lites  Etched Dies 
'Naughty or Nice' cut in red pearlescent card
Build a Stocking Holiday 2017 Die D Lites  Etched Dies

And so to the Give-Away!

I have one set of the Naughty or Nice Holiday 2017  sentiments die set to give away and the winner will be randomly drawn from those who abide by the following:

1. You must leave a comment on this post
2. Closing date is midnight Monday 2nd October 2017 (UK time) 


Thank you for visiting, I hope you'll leave that all-importnat comment, it's a lovely, useful set to have handy for your Christmas crafting, isn't it?
if you click on This Link  you'll find yourself at the Spellbinders store where you will be tempted by lots of lovely dies, stamps and much much more!

Happy Crafting