Wednesday, September 16, 2009

Creative treasures and a Birthday Treat!

I've been working with the fabulous new flower kit from Creative Treasures for a couple of weeks now, but haven't blogged any of the things I've made with it yet. There are some I can't show quite yet, but here are a couple of cards that I can share.

The colours this month are a lovely mix of Black, Turquoise, Aqua and Red, with a little bit of Cream in there for good measure. The flowers are gorgeous as ever, and there are also ribbons, buttons, and card candy that all match up perfectly with the flowers. Delicious!

Supplies
C6 Landscape folded Gatefold card
Paper; "Lucky in Love" Black Market Paper Society
Nestabilities Die: Labels One
Ribbon, ball blooms and card candy for flower centre all from Creative Treasures September kit

For this next card I couldn't resist going all romantic!
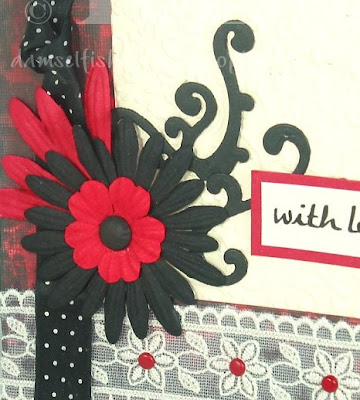
I absolutely adore this beautiful lace from the CS kit - isn't it just gorgeous? I've already used every scrap of it from my kit. The blooms, and the lovely spotty satin ribbon are also from the kit, as are the little red and black card candy "cups" (for want of a better word) that I've used in the centre of the flower and for the faux brads at the right edge. These little things are fab - you can use them glued straight onto your projects, on a tiny square of foam tape or they are the perfect size to cover those ordinary brass paper fasteners you buy in stationery shops.

Other Supplies:
14cm sq cream card blank
BMPS paper from "Ebony & Alabaster" - I ran a red ink pad over it to cover the white bits and get the red/black background I was after.
Cuttlebug Textile Texture embossing folder
Spellbinders Flourish Accent to make the swirls
Small red brads

Just had to add a cloe-up of the lovely lace!

It was my birthday yesterday, and unbeknown to me Hubby had taken the day off work so we could go out for the day. So not only did I get breakfast in bed, but I got to choose how we spent the day. Bless his heart, he didn't bat an eyelid when I said I'd rather like to go HERE

He armed himself with his car magazine and a pile of CDs and said I could take as long as I liked.....

When it came to paying the call "Paper Addict in the Shop" was heard. I've just looked at the paper stack I came away with and I reckon it must be an inch thick.
Here's just a couple of glimpses of what I bought

Nice, eh? I'd offer to share, but I'm really too greedy for that. hehe

I received lots of lovely, lovely cards and will photograph them soon so that I can pop them on here.

Last for today, it's WOYWW over on Julia's blog so I took a deep breath and aimed the camera

Yes, I know I work in an appalling mess - but look, underneath the chaos there is a certain amount of order:

I'm feeling really bad because not only has my blogging been lax lately, but I've not had any time to go blog-hopping. I'm hoping that the next few days will see things easing up a bit - and then, I promise I'll be visiting lots and lots of blogs to see what all my favourite crafty people have been up to. I'm really looking forward to sitting here with a coffee and having a darned good blog-browsing session!

For now though, back to work for me....
Thanks for visiting

Friday, September 11, 2009

Oh We Do Love to be Beside the Seaside

I've so much on my "Crafty to-do" list that I don't know whether I'm coming or going - I certainly don't know where to start - everything seems to be needed by yesterday. You know the feeling, I'm sure.

Sometimes my Hubby calls me "Kathy Half-Jobs", because I have times when I've made a start on so many things (not just craft stuff) and managed to finish none of them. I think it's because they're all important and I can't decide which should be at the top of the list! I do get there in the end though.

This week on the Daring Cardmakers we're heading to the seaside. Actually I wish I really was heading there, I could use a breath of fresh seaside air atm!

The cards the girls have made are lovely and all so different. It's such a great starting point as there are so many ways to run with the Seaside theme.
Down by the Sea

Over on this side of the world we're coming to the end of the Summer, and on Keryn's side they'll soon be dusting off their buckets, spades and sun-hats.
We don't just enjoy being by the sea in the Summer, it doesn't matter what the season is, the seaside is a great place to be, so this week we'd love you to make cards with any sort of seaside theme.
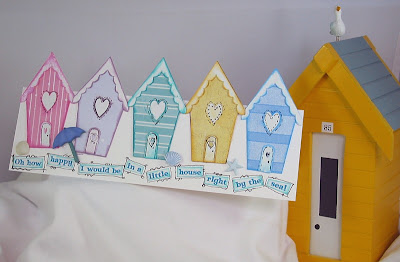
After a bit of thinking time I realised that there was only one way for me to go. It just had to be beach huts!
One of my favourite days out is to head over to Southwold and have a walk along the prom. It's very wide, and lined with an ice-cream sundae of beautiful beach huts. Every so often one comes up for sale and they cost an absolute fortune!
I think they are fab!
I actually made this Robo template a while back to make my set of houses for a swap, but now it's made a row of beach huts for my card, I couldn't resist photographing it alongside something from my beach hut themed collection!
I sliced a few cms off the long side of a DL card so that the roofs of the huts would stand out above the fold, then cut them in layers of plain card and in the patterned papers. The wording is my own - at least I think it is, but you never really know if it's something you heard and filed away in deepest recesses of your mind, do you?
My greatest regret on this card is that I didn't stop myself adding the black doodling on the beach huts. Why oh why can't I leave well alone?

Supplies: Buttons, beads and papers from stash - no idea who made any of them, sorry

Please visit the DCM BLOG and see the other seaside cards - they are all so lovely - we hope there'll be lots more to see around the Darer's blogs over the coming week (that's a hint for you to join in with us!)

Oh go on then, since you asked so nicely ;) here's another picture of some Southwold beach huts!

Thanks for popping by
Right, now where's that to-do list?

Thursday, September 10, 2009

It's Amazing - part 2

Just a quick blog post before I head off to tackle my "to-do" list. Just when I thought I was on top of it, I remembered some other stuff I hadn't actually noted down - maybe I was just conning myself into thinking I didn't have toooooo much on that there list!


Anyway, Thursday is my day on the Bubbly Scrumptious e-mag (blog for the Bubbly Funk online shop), and I've been filling up the pages in the Christmas maze book I made last week. The September Kit from Bubbly Funk is based around the MME "Colourful Christmas" collection and as always Caroline has worked hard to find all sorts of extra bits and pieces to add into the kit and make it such fun to work/play with.

What with a Bank Holiday last Monday and sorting out the house and guest room ready for MIL's visit at the weekend there's not been as much crafting time available as usual. I've managed to do something on all the pages in the book, but tbh some of them need a little bit more work before they are properly finished. I've not done the back cover or made the tags for the hidden pockets either, so this project will run another week!

As you can see from the photo above, it's already getting quite fat! That's why I always make a good 5cms or so gap between the covers with the ribbon that attaches it all together - the book ends up more of a cube shape in the end!

I love having hidden or extra bits to open within my books and this one is no exception - this photo shows a little book inside the book. I'm not very good at planning what's going inside my books - I usually just have a vague theme in mind (some would say I have a vague mind, actually lol), so my books just sort of grow by themselves! That could be why adding little booklets or fold-outs becomes necessary, but they are fun to find inside the pages, I think.
That's my excuse anyway!

You can find the photos of the pages, and info on how I made them and what I used HERE,
I really hope you like it
Right, to work with me....
Thanks for visiting

Monday, September 07, 2009

Charlie's Aunt

That's me!

I've made a couple of cards for my lovely nephew in the last couple of weeks. First up was a congratulations card to say well done, and how proud we were when his GCSE results came through and he got exactly what he wanted for getting on to his A level courses.

I've always thought he was a star, but then I'm very biased lol lol

Letters and star shapes all cut by Mr Robo. I managed to squeeze a teeny bit of ribbon and a glittery star brad - not too girly, though, eh?
The papers are from "The Black Market paper Society" and I've used them again for Charlie's birthday card.
How the blazes did he get to be 17 in a mere blink of an eye?

I hand-cut the numbers, used the Robo for the letters and a Quickutz football die for the, er, footballs! The colour scheme is all based around those of Newcastle Utd. I spent quite a while colour-matching that blue shade to the one on their website. Yes, I really am that sad! As if anyone but me would actually even notice!

Realised as I was finishing it that there was very little space to actually add a greeting, but just managed to get a narrow strip of paper hidden behind the bottoms of the numerals to write the message on! This is what it looks like standing up.

I've a couple more cards to share, but I'll save them for next time.

Off now to make a coffee and try and warm myself up. It's freezing here this morning!

Have a great day

Friday, September 04, 2009

Hello Sunshine!

It's our lovely Rein's turn to set the dare for the Daring Cardmakers this week:

SUNFLOWERS

We love their happy, sunny appearance, somehow seeing them never fails to cheer, does it? So we'd like to see lots and lots of glorious, cheerful sunflowers on your cards.

Poor Rein has had a nasty fall and is very sore and bruised, so hopefully a great big bouquet of sunflowers will cheer her up and bring a smile back to her face.

You'll find some wonderful cards on the blog this week and we'd love to see the cards you make too - so please join in and then leave a message on the blog so that we can see what you've been making.

I love sunflowers. This year I've got quite a lot in my garden - lots of little ones that have several flowers on each stem and also some bigger ones too. There's one near the bottom of the garden which has lots of flower heads, but is very tall and stands well above the other shrubs - it catches the morning sun and catches my eye as soon as I open the curtains. I took a photo from there this morning
Not a great pic - I didn't have a very big lens on the camera and it's really windy so all the flowers are getting blown about a lot!

The photo on my "sunflowers" card is one of hubby's from a year or two back.
I made the sunflowers using Mr Robo and a lovely template from CRAFTY, le Craft Robo
Each sunflower has two layers of petals and they took absolutely AGES to cut, the template must be very intricate - much more so than the ones I make, anyway!
The petals were inked a little bit and tweaked to get some shape.
For the flower centres I punched a circle from a darker yellow card, added a layer of Glossy Accents then sprinkled a few amber coloured beads onto the GA
I really love the way these sunflowers came out - I need to come up with another excuse to make some more!
I hope you like the idea of our sunflowers dare and will join in and make some cards to share with us.
We've a new Guest Designer too this week - you'll find out who it is by popping over to our blog. lol
Thanks for looking

Thursday, September 03, 2009

It's Amazing

Such a Bad Blogger I've been this week!

Just having one of those times when there's more to do than there is time to do it - you'll all know what I mean, I'm sure.

Anyway, one of the things I've been doing is starting a new project with the September Bubbly Funk Kit (it's in the shop now and it's lush!), and as it's Thursday the first part of it is up on Bubbly Scrumptious as of about 5 minutes ago.

Although Maze Books are one of my most favourite kinds of mini book, and I've made loads of them - some are listed in the Labels section in the sidebar, I've never made one specifically for BubScrump, This gorgeous "Colourful Christmas" Kit is just perfect for a maze book project so that's what I'm making and sharing over the next couple of weeks.


Despite the name this collection isn't so overtly “Christmassy” that you can’t use them for other occasions or projects, so even if you don’t want a Christmas or Winter themed little book, you can still use this kit to make a cute and clever little book for whatever purpose you want.

This week I'm showing how I made my basic book and covers and hopefully by next time, I'll have finished decorating the inside and can share that too - I need to make my mind up as to what to put in there first though! lol


You can find the first part of this project HERE, I hope you'll join in and have a go at making one of these Maze Books, they're really not difficult but they are rather addictive and once you've made one, you won't be able to stop!

Apologies for the poor photos one of the bulbs blew in our little photo studio and replacements haven't arrived yet. plus I took them before the Stickles and Glossy Accents had dried so those bits look a bit murky!

Anyway, thanks for visiting, Please leave a message if you can, it's so lovely to read them and to see where you all come from :)

Friday, August 28, 2009

Give 'em an Inch.....

What with holidays, house-moving, poorly people and poorly computers and goodness knows what else we're a rather depleted DT over on the Daring Cardmakers this week - but that hasn't stopped Our Sue from issuing another of her Very Scary Dares!
This week it’s my turn (Sue) to dare you and I was having a bit of trouble finding a challenge that would stretch the imagination and get those creative juices flowing.
The idea for Inchies came to me when I was chatting to a friend about people taking liberties and she uttered the old saying, “give them an inch and they take a mile”……..Ahh. Inchies I thought!!
"Inchies" are 1 inch (or 2.5cm) squares of card, inked, painted, papered and decorated in any way you like, they are often made to a theme then swapped with others in a group rather like ATCs are.
So my dare this week is to make inchies and put just five of them on your card.
There’s no set theme, colour or shape, I’m just intrigued to see how many different ways you can arrange the five tiny squares.
I've only ever made one set of inchies - that was a while ago for a swap on one of my favourite forums. I enjoyed making them and they do make lovely embellishments for cards. They can be as simple or as intricate as you want - there are some amazing teeny tiny pieces of artwork out there, if you google on "inchies" you're sure to find some fabulous examples.

I went down the "simple" route!
I decided I wasn't keen on the birthday card I'd already made for Emily (the flip-flop/swing card from a couple of weeks back) so I made this one instead.

The inchies may have been simple byt the spring (pardon the pun) flowers were not - they took ages to put together. This was not helped by my going a bit bonkers and deciding that they should still look good from the other side! Sometimes I do wonder about my sanity.....

Anyway, Primas and other blooms are layered up with Cuttlebug ones and the occasional punched flower too. Glittery buttons, blobs of Glitter Glue and little gems are used for the centres of the flowers and they are attached to the card with tiny springs made by winding coloured wire tightly around a cocktail stick.

I made the inchies from card, covered them with different MME "Pretty Please" papers, inked the edges then drew a line on the card so that I could align them properly (I couldn't really get away with my usual slapdash for this design lol). I used little Primas on the inchies, then applied Glossy Accents and Stickles to get some more interesting effects.
Here is what the back of the card looks like

The letters are stickers that come in the "Pretty Please" collection pack, stuck on to more Cuttlebug flowers
I can't say I'm particularity pleased with my inchies for this challenge but time ran out before I could have another bash! If you want to seem some really fabulous ones, head over to the DCM BLOG and see what the others have been doing - they are just wonderful!

That's it for today, it's a Bank Holiday this weekend, we've nothing planned but fingers crossed the weather in nice and we can get out in the garden.

Back soon probably with the cards I've made to say "well done" to my nephew and niece, who got their GCSE results yesterday and did really well.
(Proud Auntie Moment!)

thanks for visiting, have a great weekend,

Thursday, August 27, 2009

Scary Stuff

A lovely warm. sunny day here in Hertfordshire :).
If you read this blog at all regularly you'll know I have a bit of a problem talking about
Christmas too early in the year. I just can't bring myself to make C-cards in the Summer - it's just NOT right! Actually, I don't like starting to make them till after my birthday in the middle of September - to my way of thinking it's still Summer till then and not a time to be thinking of cold manky weather and long dark nights.
It's also a fact that if I make C-cards earlier than the Autumn I rarely like them and those ones are either left unsent in the box or go straight to the bin without passing Go.


So it was with mixed emotions that I opened my new DT kit from Bubbly Funk.
On the one hand the papers and extra goodies are absolutely beautiful - well they are based around one of the MME collections and at the moment MME can do no wrong, can they?
On the other hand the collection in question is called "Colourful Christmas"
aaaaaggggggh, or oooooohhh? I'm soooo confused!

I think I need a bit more time before getting into the C- card making zone, so I've dipped a toe into the water of "thinking about Christmas" and made myself a little memo block to sit on my desk. The plan is that now I have a place to jot down gift ideas for me as well as other people, ideas for crafty things, reminders on what I need to buy, and any other seasonal notes I might want to keep safe. I've got a useless memory and forget most "good ideas" that I might have, so maybe this notepad and it's own matching pencil might help me be super-organised this year. Yep, I know.... that would be in my dreams lol

If you're interested in seeing how I made this little memo block, pop over to Bubbly Scrumptious (the emag for the Bubbly Funk Shop) and you'll find all the project notes for this and many other carfty makes listed there. The new kit will be available soon from Bubbly Funk

I hope you like it - it's dead easy to make too!

Lastly, I thought I'd join in again with "What's on you desk Wednesday" - I know its Thursday but this is exactly how I left my desk yesterday and what I have to face when I pluck up the courage. Julia seems to think that my desk is the wobbly white background on the photos in the post below hahaha, no, that's the little photo "lab" I do most of my pics in.
No, I have this truly spectacular mess on my craft desk..........


So, do you dare to share? Your own desk, that is?

Thanks for visiting today, I hope the sun is shining where you are too

Wednesday, August 26, 2009

Em's Book 2

Cor!
It's blowing a hoolie out there today. At least the rain we started the day with has been blown away and it's quite sunny again. I don't like windy days though - plays havoc with my hayfever, even when I'm indoors most of the time.

I'm back with the rest of the photos of the little book I made as part of Emily's birthday present. For some reason this one took ages to make and kept throwing up problems, maybe it was because I've made a couple of these already and wasn't concentrating so hard on what I was doing - wouldn't be the first time that happened!

Never mind, it's all done, in the post and on it's way so fingers crossed it arrives in time.

I discovered that names with an even number of letters are easier to deal with on a zig zag book like this. An odd number means you can't make it nice and symmetrical, so I made a little beach-hut style house to put on the back of the front cover and then a photo page either side of the letter pages.

This is a closer look at the letter pages - I used a mix of chipboard letters (from Bubbly Funk Shop) and their negatives for these.

Side 2 of the book is given over to photo display pages.
I asked my SIL if she had any nice pics of Emily as when I looked at ours she's always pulling a daft face! It was great when a few photos arrived in my mailbox because it meant I could crop and print out a few to pop in the pages - nicer in this instance I think than leaving it blank.

Rather than just glue photos into this book, I've made all the display pages with corners and other holding devices so that the pics can be taken out and changed easily.

I even added one of Em with her little brother - but I've kept it small - not everyone wants their little brother's daft grin plastered all over the place, do they?

Papers and die-cut flowers are "Pretty Please" by MME
Chipboard alpha from Bubbly Funk
Ribbons, flowers and other bits and pieces from my stash

I hope you've enjoyed seeing this album - thanks for the comments left yesterday, they are very, very much appreciated - Thank You

Tuesday, August 25, 2009

I finished it!

Yesterday morning I finally completed the little standing album I've made for Emily's birthday. The idea is that she can print out and display her own choice of photos in it, but just to make it look better than an empty album I've popped some photos in there to start her off.

Here are the first photos - I'll spread them out over a few days (it'll save me making anything else to put on here for a while hehehe)

I used "Pretty Please" papers from MME throughout the book - I've now only got a few small scraps left from this set - I think I'll have to replenish though, because they are soooo fab!

This is the front cover:

When it's stretched out, one side looks like this

All folded and tied up this is the side view - it's a very fat book, as you can see!


More photos tomorrow. Now I'm off to play with my September Bubbly Funk DT kit which arrived last week. I need to think of a project for Thursday....

Thank you for visiting, I hope you like what you see here

Monday, August 24, 2009

Result!

Does anyone know where weekends go?

Nothing exciting going on, just the usual list of errands and "stuff". The really fun bit over the last couple of weeks has been doing a spot of house-hunting with my cousin, who's finally decided to take the plunge and buy himself a house. Obviously we offered to step in and help - well you just have to, don't you! He's pretty keen on the one he saw on Saturday and took us along when he went for a second viewing yesterday. Fingers crossed it all works out for him.
Obviously as it was lunchtime and we were already out it would have been rude not to indulge in a pub lunch before coming back home. After that Hubby watched the GP and I got on with Emily's book
Yes I know I've been "getting on with Emily's book" for a while now - but.....this morning I actually finished it. I am not going to do any more tweaking, I am not going to add any more flowers, ribbon on glitter, I am not going to make a box for it, I am not going to think up any more ways to give myself more work. It is finished. Really finished. Honestly, it is.


This is the card I made to send to our eldest niece to say "Well Done" on getting such good results in her "A" Levels.

Papers are by My Little Shoebox, the word is Robo cut, I think the owl is from 2 Crafty but I'm not sure. MS border punch, red "hearts" ribbon and the little bow on the owl's head from my stash.
The flowers, orange ribbon and the heart pin are all from the fab Flower Kit from Creative Treasures. I was just about to reach for some beads to cover the point of the pin (I've mentioned before how I worry about these things!) when I realised that if I placed it all together correctly the sharp point of the pin could be safely hidden under the word, which meant I didn't have to do battle with superglue - what a result!

This kit is called "Hot and Spicy" and is stuffed full of flowers in hot colours plus some great ribbons, buttons and pins to go with them, it's a wonderful kit and really great value for money too - a fab way to boost your flower collection!


Just waiting for the last Stickles to dry on Emily's book then I'll take some pics and share them on here.
Thanks for visiting