Showing posts with label a Card a Day Blogging. Show all posts

Tuesday, July 02, 2013

Getting In a Swirl

Today sees July's new LO published on The Sketch File Blog.
We have some lovely ideas for making great use of the sketch over on the blog and more to come each week. 

Recently I've taken to printing my Funky Hand papers onto white Bazzill - I absolutely love the marriage of the gorgeous designs on the textured card.   Obviously printing on stuff like that is a little more expensive than just printing on regular card or paper - but I think it's worth it.  A couple of other good things are that it makes me plan more what I'm going to make, then print on both sides even of quite small pieces of the card (with a cunning bit of cropping and resizing)  and finally it makes me think more about really getting the best out of that print run and using as much of the printed card as I can manage.
For instance, this card is made using scraps and off-cuts left over from the other things I made with the Summer Wedding collection

I've shrunken the July sketch - it didn't start out that way, it was going to fill the whole card when I started out, but things never seem to turn out as originally planned haha


 Materials and Tools
Cream smooth 14x14cm card blank, left edge trimmed off
All papers: Summer Wedding download collection from Funky Hand, rinted on to...
White Bazzill
Peachy pink organza ribbon, Pale pink pearls
Sketch; July In a Swirl LO from The Sketch File
Dies: MFT Oval Doily, 
Memory Box Fabulous Phlox, Elegant Swirl 9some pieces trimmed off)
EK Success Border Punch
Circle Punch to shape the spotty paper strip
http://kathyswafflesketchfile.blogspot.com/

There's something particularly satisfying about making something from scraps - or maybe it's just me that loves turning a little pile of paper and card, with the largest being no more than 12x7 cms, into something pretty and useable.
The problem is, there are still scraps left - albeit much smaller scraps....how low can you go I wonder?
Well, my parcel from Charmed Cards and Craft arrived while I was in the middle of writing this, and like a good girl I put it on the chair and didn't open it until this post was finished.  It's now screaming "Open Me" though, so I'll sign off and do as I'm told.


Thursday, February 28, 2013

Better Late than Never

I've just realised that I forgot to blog the card I made for The Sketch File last week.  T to share so please pop over and have a look through the things we've been making and sharing over Februrary.
The sketch was perfect to use alongside an image and papers from Funky Hand.  This little fairy house is one of a series Anice is busy creating - isn't it cute?  The papers are all from trhe latest download collection "Just For Jen". - I love that there are soft and bright pinks and that the grey and white colours they are teamed with are soooo stylish!
I really can't colour in by hand so I've been practising my digital colouring skills - I think I'm getting better at giving some shade and colour depth so that the various areas aren't just flood-filled with a single "flat" colour - what do you think?

I turned the sketch upside down to make my card


Materials and Tools
Sketch from The Sketch File
All papers and Image Funky Hand
Flowers: some cut from one of the paper designs, for other's I've used the flower shape as a template to cut some from scraps of different papers
Lace, pearls and gems from Creative Treasures
Dies: Spellbinders; Lacy Scallop Circles, Plain Circles
Sentiment; made with decal paper from Crafty Computer Paper

Did you know that twice a week the members of the Funky Hand Design Team take turns to add some new inspiration to the "Get Funky and Craft" blog?  It used to be about challenges, but now it's all about sharing the things we make using Funky Hand products - it would be great if you would add the blog to your reading list and visit regularly to see what's new on there - and it would be even better if you'd take a minute to leave a comment every now and then!  There's still an Inlinkz gadget so that you can share anything you've made with Funky goodies too - we'd love to see what you're making!

Thanks for visiting - please come back tomorrow when it'll be time for the Daring Cardmakers' March Colour Combo Challenge


Monday, February 18, 2013

Spot the Butterflies

....I wonder if you can?


Busy week this week, but I really want to get back to blogginh more regularly - it's slipped again in recent weeks!
Today I have another scrapling to share - I'm really enjoying making these - even though the surface area of the card is quite a lot smaller than a regular card, they bring a bit of extra creative ooomph with that interesting elongated shape - plus as envelopes aren't really made to fit this size. you've also got the opportunity to go a bit off-piste so to speak!  You might as well take the design off the edges of the card and use the available "envelope space"
So where are those butterflies then?
Yes - the back layer of the flower is created from 4 butterfly die cuts!

Tools and Materials
All papers, inc birdie tag; MME Lost and Found "Rosy" 6x6
Ribbon and layered up Prima flowers, black brad all from stash
Die: Memory Box Butterfly
Punch: EK Success border punch

To make the butterflies into the flower, join the ends of the larger wings together to form a ring, punch a card circle for a base and apply PVA-type glue to the circle. Gather in and onto the lower wing shapes till you achieve a shape you like - using wet glue gives you time to fiddle about till you're happy with the flower shape.

Hope you like it and will give the idea a try - let me know if you do
Thanks for looking in today

Tuesday, February 05, 2013

Hardwick Hall

I'm still working my way through the photos of the places we visited when we added a year with the National Trust to our Life English Heritage membership,  It would be nice if I got the whole lot finished before too long. I've still a few places to do and then will need to do the facing pages and put the whole thing together.  Amazing really that I've stuck at it, however intermittently as usually long-tern projects like this end up in the "never finished" pile - some before they've even really started!
So, anyway, I've reached March 2011 and we're staying at the English Heritage holiday property The Lodge at Hardwick Old Hall.  Hardwick Old Hall is "next door" to Bess of Harcwick's New Hall, which was begun in 1590,
The Old Hall itself is still closed to the public for the winter, so we have that part to ourselves for the week we are "in residence",  Hardwick New Hall is open for part of the week so fortunately we are able to visit during our stay - and look how the sun shone!  Mind you the rest of the time it was thick fog!
Mini book page for Hardwick New Hall:
 I've used the new February Sketch File LO for this one.
  Instead of putting the photo on the top, I fixed all the background rectangles together then cut the circle aperture using a Spellbinders die to make it into a frame.  The photo was then slid underneath and fixed to the yellow paper.
I used:
Papers; Carta Bella "Beautiful Moments" 12x12 and 6x6
Lace, Red Pearls; Creative Treasures
White Pearls; Imaginisce 
Glossy Accents on mosaic squares
Spellbinders plain circles Die
Punches: 2 sizes of squares
Craft Robo for title


I thought I'd pop another couple of photos in too.
This is The Lodge, our home of the week
Part of the Old Hall:
The view from our bedroom window:
The nice thing about taking so long to get this book done is that it's lovely to re-visit these beautiful buildings via the photos, I hope you don't mind seeing a few of them!

That's all for now

Friday, February 01, 2013

February Colour Combo

It was my turn to choose the colours palette for the Daring Cardmakers this time, and as Valentines Day isn't far away I thought Id go for something traditionally romantic.
The colours are
Cranberry, Slate Grey, Pale Grey and White
My card took so long!  Not because it was tricky to do, but because I wanted to use the velvet ricrac braid on it as its gorgeous!  Problem was I have it in brown, deep aqua and raspberry pink....not cranberry or dark red.  So I inked over the pink one with the Fired Brick Distress ink and got a really good colour.  DI takes a long time to dry doesn't it?  I am impatient and went ahead making my card, covering any inky finger blotches (oops) with flowers and gems.  It wasn't till I photographed it and went to "develop" the that I realised that I'd managed to get the red ink all over the white lace grrr how could I have missed that?
So back to the desk to fix it and then more photographs.and here's the finished card
Materials and Tools:
Papers - various including Hot Off The Press, Funky Hand, Colourbok. Bazzill
Pink Velvet ric-rac braid inked with Fired Brick DI
White Lace, Deep Red Organza ribbon, Gems and Pearls (dark red, Grey, Silver) - all these from Creative Treasures
Punches: Small Square, Hearts are "waste" from MS Doily Hearts Border Punch
Craft Robo cut "Love"


This won't be my Valentines card for Hubby - far too heavy on the flowers and ribbon for him hehe.  I'll keep this till someone asks me for a wedding card and it'll be just the job ;)

That's it for today, thanks for visiting - I hope you'll pop over to the DCM BLOG and see the other cards - it really looks gorgeous today with all the colour coordination!

Have a great weekend


Wednesday, January 16, 2013

More Frills

I found the "Frills" challenge over on the Faring Cardmakers this week more of a challenge than I was hoping and at one point I had two unfinished cards on my desk - neither of which I was particularly happy with.  I did get both finished in the end and the one I put on Friday's blog was the second of them.  This was the one I made first though - a sort of frilly vintagey number.
Materials and Tools
Various papers from the MME Lost and Found range (12x12)
Gathered lace, Various paper flowers, Pink Ribbon flower, Narrow deep pink velvet ric-rac braid
Dies: Spellbinders large Scalloped Circle, Labels (I forget which one) Die-mamics (MFT) Doily


The aqua flower is made using a wired flower layered with several different types of Prima flower.  The ecru flower is made by cutting and coiling several "flat" paper flowers.
I think I should probably  have added a little bit of bling with a couple of pearly gems too

That's all for today, thanks for visiting, please leave a comment if you've a minute :)


Wednesday, December 19, 2012

Tagging

I think tags are my least favourite Christmas "make", but for some reason I can't just go and buy them - occasionally I do buy a few totally plain ones in silver or gold, but mostly I just harrumph and grumble and cut some tag shapes which I then use with whatever bits of paper ands die cuts are leftover from the cards - stupid, isn't it?  Why bother when I don't enjoy it?
I love to see the beautiful tags made by Tim Holtz and those who follow those 12 Tags of Christmas ideas - they are stunning and relly, they are a gift in themselves - I hope they are treasured by those who find one on their parcel under the tree.
Anyway, mine are always rough and ready - and tbh I'm usually a bit ashamed of them - but they'll go straight in the bin so why worry?
This lot are also a bit rough and ready, but actually they don't look bad - they'd probably look better if I had the willpower to add a bit of bling, but I don't.
To make these I cut sheets of white A$ card into 3 pieces approx 9cms wide, then cut lots of shapes using the Memory Box "Frostyville Border" with various colours of card from my scrap box
Working on my non-stick craft sheet I used spray mount on the die cuts and then adhered them to the white card.  A piece of baking parchment is great for placing over the top while you rub your hand over to make sure all is stuck down.
Once dried I cut each of the die cut sections into 3, (there's a similar sized section left over from each strip for making a different sort of tag if I feel like it) then trimmed the plain end to tag shapes and used my cropadile to make the holes in the top.
The pile of tags grew really quickly, which made me happy :)
That's me for today.  I'm waiting for the bracelets I've been making to dry and then I suppose I'll need to make some boxes.....of maybe I could actually hunt out some of those I save for just such a reason and then can't bear to use....I know, it's madness.
Happy Days...


Join in and share what you make with the Daily Crafty Blogging group HERE 
Celebrate the Occasion
Craft Room Challenge
Die Cuttin' Divas
Card Mania

Tuesday, December 18, 2012

Wallington Hall

Have you noticed how things go a bit haywire around this time of year? hahaha
That's my excuse for missing a couple of blogging days - stuff just got in the way - stuff like finishing off the gift-shopping, getting the cards written out, getting the trees decorated, trying to make headway with the wrapping... Well, I think the tree is done (always room for a "tweak") and I think I've finished the gift shopping (hope the online stuff arrives in time), but I've not finished putting the other decorations up or finished the card-signing, or anywhere near finished wrapping.  Actually, I've not even finished making those beady presents I set myself to do - I've a feeling the notebooks I planned to do will just stay a "plan"

Anyway, it's Sketch File Update day and I'm sharing the  layout I've done for my mini album- yes it's the same one I've been working on for the last year or so, but I think I'm getting near to the end now.
As an Anniversary present to ourselves we took out  a years' membership of the National Trust in July 2010, so the book will show all the NT properties we visited between then and the end of July 2011.  I don't work quickly, do I?
This is Wallington Hall in Northumberland
 I used
December Sketch File LO - see below
Bazzil card, Bo Bunny papers
Assorted paper flowers for layering
Green leafy braid, Pearls and Gems

December Sketch File Layout
There are som great ideas for using the sketch - for Christmas and other occasions over on the blog, so please pop over to see them - scroll down through the last few posts to see them all.  It would be fab if you'd join in and play along with us.

Right, it's back to a beading project for me now.  I hope to goodness that you are better organised than I am, because this is n o fun - but it happens every year, despite my annual promise to myself to do better! :o  hey ho

Friday, December 14, 2012

Cheeky Little Monkeys!


It's Samm's turn to set the challenge for the Daring Cardmakers this week and this one is definitely a bit "off the wall"!, She says:

"...well, it's International Monkey Day today, 14th December, so what better way to celebrate than to set a challenge to include some   Monkeys  on your cards this week"
We also have a lovely treat for one lucky Linker to start 2013 off with a 
£10 Gift Voucher
to spend at
 Our last challenge of 2012 is on the 21st Dec, but  you'll be able to add links for this and next weeks' challenges right up to the first dare of 2013 going live on January 4th - that means you have three weeks to make a card for either (or both), add your links and be in with a chance of winning some lush new stash from The Ribbon Reel to get your new year crafting off to a flying start.


The team have come up with some fab cards - they are just amazing at rising to a challenge that initially makes you go "whhhhaaaaaa>"
My own first thought was to check out my "library" of templates from Crafty Templates - Leo often adds some really quirky designs to the kits so I checked back through the archives and found this "Monkey in a Tutu"!
I cut the various layers with my Craft Robo, mirroring some to make the back view of the monkey, then added a length of silver thread between the layers so that she twirls in the aperture.
I used:
Image: Monkey in a Tutu from Crafty Templates (September 2010)
Papers: Everyday Eclectic 6x6 (Echo Parl)
Bazzill Card (Brown, Ecru, Pink, Black, White
Silver thread
Dies: Spellbinders Nesties Circles, plain
Craft Robo: to cut the monkey and also the fluted circle background for the sentiment
PC generated sentiment

Visit  the Daring Cardmakers blog to see lots more cheeky little monkeys this week - we hope you'll join in and have a bit of fun with this challenge!

Thanks for visiting, Please come back soon - Don't forget you're welcome to join in with the aCaD  Daily Blog roll and leave a link to your crafting HERE


Thursday, December 13, 2012

Colour Pop Mini Baubles

I was busy making my DCM challenge card ready for tomorrow's tricksy dare yesterday and completely forgot to blog this one,
I've used more of the bits left over from last week's DCM and I really like this design.  Why is it that the ideas I'm most pleased with arrive right at the end of the Cword card-making season?  This is almost always the way and the main reason I don't make Christmas cards throughout the year -I know without a doubt it would be a waste of time as I'd hate any that I'd made pre last minute!
The baubles are tiny - only about 1cm diameter, so they are very cute, and the layer of Glossy Accents makes them look so much more real - this would be the part that might prove a bit too time-consuming for making in bulk though
I used:
Distress Inks in various shades to build up the colours on smooth white card
Gold pen, White pen
Glossy Accents.
Gold thread
Black and White card for the panel
Decal sentiment sticker (home made using printable decal paper from Crafty Computer Paper)
Gold Glitter card for stars to secure thread ends
Craft Robo to cut the baubles
EK Success star punch (6 stars in a circle shape)
I've now pretty much run out of cut out bits to use, and there's not much of the inked card left to cut any more - but bearing in mind I only used one A4 sheet for the inky bits I don't think I did badly to get these cards made.  I might be able to squeeze one more if I do some very careful die-cutting!

I'm off to add this to today's Linky on the aCaD blogging group and to the FB group before I forget!


Thanks for visiting, Please come back soon
Don't forget you're welcome to join in with our aCaD Daily Blog roll and leave a link to your crafting HERE


Monday, December 10, 2012

Cheers Bro!

After a considerable amount of BFoP (Bad Fairy of Procrastination), plus a lack of willpower and a lack of inspiration I finally got my brother's birthday card made. I'm quite pleased at the way it turned out in the end, which makes a pleasant change!


I used:
Image from "Happy Happy Birthday" CD from Funky Hand
Ribbed, Kraft card (PDA) for the base
Bazzill:  grey, cream, various shades of brown
Paper from scrap box for the sentiment background
 Ice Stickles
Thin gold wire
Craft Robo
There are lots of layers on this one to build up the dimension.  I used pieces of wire to attach the "splashes" fixing the ends between layers of card
The sentiment stands out from the card on a box hinge

That was my crafting at the weekend - I have loads more to do but that BFoP is here and I really need to kick her out.  I also need to clear my desk - that "6" square space left  to work" in thing has happened again!  Wish me luck.....I may be gone some time...........


Thanks for visiting, Please come back soon
Don't forget you're welcome to join in with our Daily Blog roll and leave a link to your crafting HERE


Friday, December 07, 2012

Colourful December

 Today is the first Friday of December and time for a Colour Combo Challenge on the Daring Cardmakers
This time Gez has chosen the combo and it's such a pretty palette of colours!

They may be a little unusual for a Christmas card, but the baubles in the photo inspired me to make some of my own
Here's my card
 I used:
Various Distress Inks to create the colours on a sheet of white card
Craft Robo to cut the fairy lights and baubles
Trees are cut using a Cuttlebug die 
Stars are cut with an EK Success
6 stars in a circle punch
Baker's Twine inked with darker green for the strings
Matching Stickles shades on the stars
Gold, White, Black gel pens
Gold thread
Glossy Accents
The lights and baubles are raised slightly on tiny scraps of cereal packet chipboard
This is our Inspiration Photo for this week's challenge:


And a bit of a closer look at the bits and bobs on my card


I've got a small amount of the coloured card left over - hoping there's enough to make a couple more cards using these gorgeous colours
You can see more cards made using these pretty shades over on the Daring Cardmakers blog, and we're hoping you'll be inspired to join in and make something to share with us this week.


Thanks for visiting, Please come back soon - Don't forget you're welcome to join in with our Daily Blog roll and leave a link to your crafting HERE


Thursday, December 06, 2012

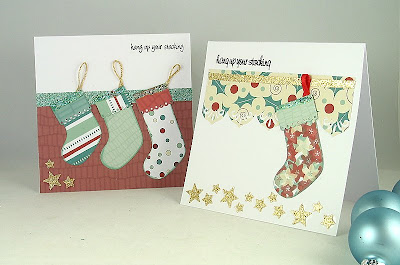
Hang up Your Stockings

For today#s cards I've used up the last few scraps from the papers I printed to use on my canvas for last weekend's Funky Hand and Tiddly Inks joint Blog Hop.
These are just the extra Funky Hand papers I printed to make the borders, banners etc, I didn't over-print with the houses image on these.
I used:
papers: Funky Hand "Stylish Tree download
Gold thread, Red Ribbon, 
Gold and Aqua Glitter card, Stickles Ice glitter glue
Gie: Memory Box Stocking
Decal sticker sentiment
Punches: EK Success Border punch, various star punches

It's a funny thing, but I've not really found this die easy to use - maybe it's just a bit big for the card size I like to use for my Christmas cards. I played around a bit with it on the first card making different lengths of stockings - I'm thinking that actually the smallest one which is cut down quite a lot looks the best.
  I might dig out my old QK die again, or maybe I should cut some with Mr Robo!

Thanks for visiting today I hope you'll come back soon 
Don't forget to join in with our Daily Blog roll and leave a link to your crafting HERE

Tuesday, December 04, 2012

Hanging Out

Well, I'm pleased to say that I've finally started my Christmas shopping - I'm aiming to keep it really simple this year because I'm struggling to get into any sort of Christmas Spirit and maybe not letting it all get too stressful and complicated is the best way to cope. I keep saying that it's because I'm still waiting for the Summer to arrive - how can it be Christmas when we haven't had a summer yet this year? hehe
Classic FM have started playing Christmas music though, so maybe that will help - I do love a good old sing-along!

It's the first Tuesday of the month so there's a new LO idea on The Sketch File
Here's my first project using the new sketch


 Materials and Tools
Papers: Carta Bella 6x6
Glitter card; Red, Gold
Gold Crochet thread
Gies: Spellbinders snowflakes from several sets
Punches: Martha Stewart, EK Success, Woodware

This is the sketch
Or maybe you could use it like this:

Thanks for popping by today, I hope you'll visit again soon - Don't forget to join in with our Daily Blog roll and leave a link to your crafting HERE