Showing posts with label Other Books and Albums. Show all posts

Saturday, May 06, 2017

Dutch Flowers Notebook and Card - Spellbloggers

Well, hello there! - how are you?
Welcome to another Spellblogging Saturday!
Here's what I've been making this week - I broke open one of my newest Spellbinders die sets - well, eventually you do have to stop just looking, and open up the package, don't you? haha
This one is the sweetest little set of rather funky flowers and a little butterfly - two of my favourite kinds of embellishments, so what's not to love?
I don't think my photos do the die cuts justice really, as the embossing on the flowers and the butterfly wings is really pretty.

Anyhoos, I mentioned to a friend that some really dull, really cheap little notebooks are very easy and quick to pretty up for a tiny cute gift, or maybe to make and sell at table-top sales, school bazaars etc and I thought the best way would be to find the ones I have stashed away and actually do a sample.

Here's how my notebook started out.  It's about 5x19cm and I think they cost about 10p each

Having cut a strip of Kraft card the right size to wrap around the notebook, I used strong glue to stick it in place. First adhering the back of the book in place, then using a bone folder to make the creases on the spine before gluing that and the front cover of the book into the card wrap.  
I matted a piece of white corrugated card onto black card and then onto the notebook

The die set I've used to decorate the book is this one:
Dutch Flowers Die D-Lites Etched Dies (Spellbinders)

 To finish I added some ribbon to keep the book closed, but tbh that was just a bit of extra, necessary frippery, it didn't need it.  But I do like a bit of ribbon.

Then I thought I'd make a matching card, just because I could.
I just used a piece of old wet-wipe to rub ink over a piece of white card, matted onto black then Kraft and added this panel to a plain white card blank
Using the same coloured card as before I cut some more flowers and another butterfly to decorate it.  This time I didn't stick everything down as firmly as I wanted the wings and the leaves to stand out a bit - I love sticky out, dimensional bits on cards, but you wouldn't want that on a notebook as they'd get ripped off in no time!
I added some little black gems to the flowers (which don't really show up in the photos 😠), some ribbon and a triple bow.

That's it, a cute little notebook and a card,  all done!  I hope you like them
 
Thanks for visiting, if you click on This Link  you'll find yourself at the Spellbinders store and you can get your hands on this cute little die set too!


Happy Crafting


Wednesday, May 14, 2014

Family Favourites


If you saw the "Tool Shed" programmes on Create and Craft this past weekend you might have seen some of the things I made using a couple of the Crafters Companion "Create a Card" dies.


These dies are just fab!  What they don't do is cut any sort of outline shape - instead they cut all the little shape details and a centre piece out of the card stock, then with a second pass through your machine they emboss more of the pattern.  This means that you can actually cut the pattern anywhere you like on a piece of card, with the only limitation being the size of card your machine will take.

For instance, if you have a machine that takes A4 card, you can put the design in the centre of an 8x8 card blank just be leaving the card blank open then carefully placing the die in the centre of  what will be the front of the card ( a few bits of washi tape will help to keep it in exactly the right place) and running through your machine.
Fold the card and it's ready to embellish - though if you like a clean and simple style, it won't take much of that  as the designs are so pretty and intricate already.


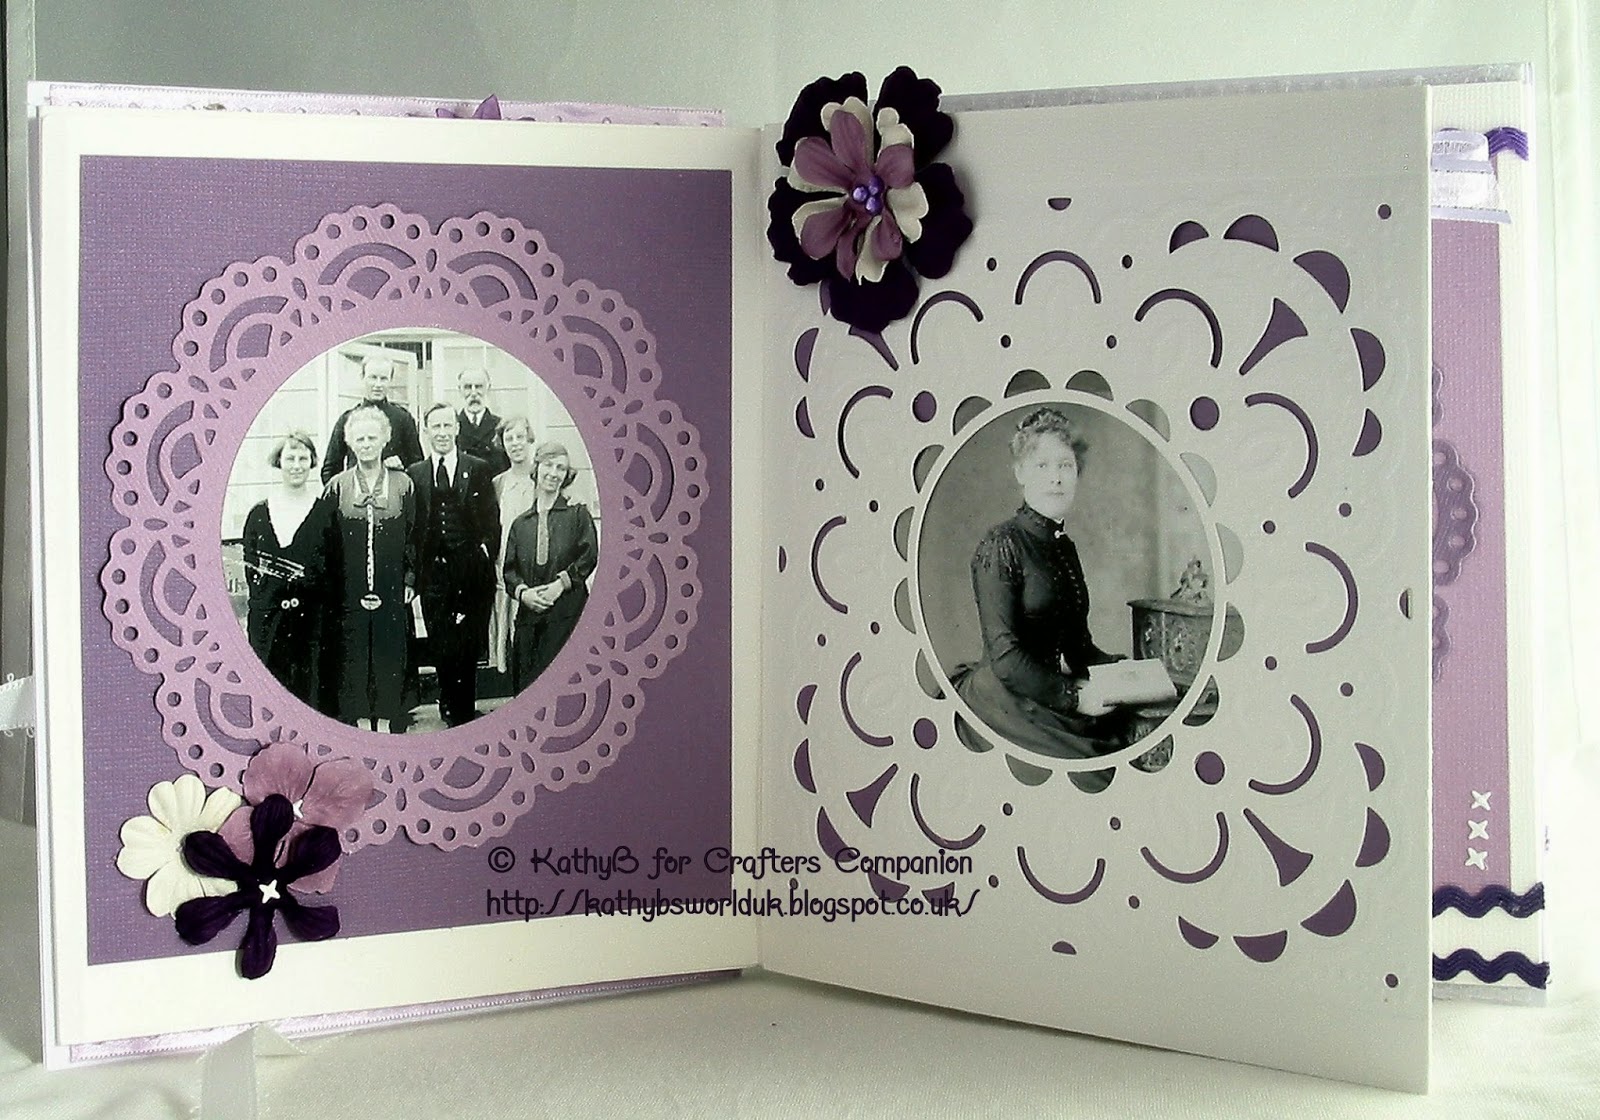
I wanted to try something a bit different with the dies, and as the centre apertures make the perfect frames I thought a zig-zag album might work.  I'm lucky enough to have quite a big collection of old family photos through some family history research I've done and I thought they would be perfect for using in this album

The book is constructed from folded and die cut pages which are overlapped and then inserts of coloured cards are slipped between the layers.  I assembled the book leaving the upper layers unglued so that I could just slip the photos in and then seal the edges. 
As the book folds out completely and there are photos on both sides, it is all kept together with a ribbon that is fixed on the back cover then tied at the front


I used Centura Pearl with a Hint of Silver card for the cover pieces and white Bazzill for the pages.  The coloured inserts behind the pages, and the extra coloured die cut "pages" are Coredinations card.
All the dies used are from Crafters Companion - I've used:
Create a Card Precious
Create a Card Extravagance
Chantilly lace Stamping Frame
Also from
Crafters Companion
Centura Snow White with a Hint of Silver
Coredinations card in two shades of purple
Collal Glues

I wish I'd checked the photos before I sent this off - I'd have taken better photos - or got OH to do them for me ;)
I should probably have set up the bigger photo cube to do them in as the one I usually use is a bit small to show off the album and all the folds.  Hey ho, maybe one day I'll remake it for myself and learn from my mistakes........yes, I can hear you saying it....."that'll be the day"!


Thanks for popping by, I hope you like my album - please leave a message, it's always lovely to hear from you!

Tuesday, February 05, 2013

Hardwick Hall

I'm still working my way through the photos of the places we visited when we added a year with the National Trust to our Life English Heritage membership,  It would be nice if I got the whole lot finished before too long. I've still a few places to do and then will need to do the facing pages and put the whole thing together.  Amazing really that I've stuck at it, however intermittently as usually long-tern projects like this end up in the "never finished" pile - some before they've even really started!
So, anyway, I've reached March 2011 and we're staying at the English Heritage holiday property The Lodge at Hardwick Old Hall.  Hardwick Old Hall is "next door" to Bess of Harcwick's New Hall, which was begun in 1590,
The Old Hall itself is still closed to the public for the winter, so we have that part to ourselves for the week we are "in residence",  Hardwick New Hall is open for part of the week so fortunately we are able to visit during our stay - and look how the sun shone!  Mind you the rest of the time it was thick fog!
Mini book page for Hardwick New Hall:
 I've used the new February Sketch File LO for this one.
  Instead of putting the photo on the top, I fixed all the background rectangles together then cut the circle aperture using a Spellbinders die to make it into a frame.  The photo was then slid underneath and fixed to the yellow paper.
I used:
Papers; Carta Bella "Beautiful Moments" 12x12 and 6x6
Lace, Red Pearls; Creative Treasures
White Pearls; Imaginisce 
Glossy Accents on mosaic squares
Spellbinders plain circles Die
Punches: 2 sizes of squares
Craft Robo for title


I thought I'd pop another couple of photos in too.
This is The Lodge, our home of the week
Part of the Old Hall:
The view from our bedroom window:
The nice thing about taking so long to get this book done is that it's lovely to re-visit these beautiful buildings via the photos, I hope you don't mind seeing a few of them!

That's all for now

Tuesday, December 18, 2012

Wallington Hall

Have you noticed how things go a bit haywire around this time of year? hahaha
That's my excuse for missing a couple of blogging days - stuff just got in the way - stuff like finishing off the gift-shopping, getting the cards written out, getting the trees decorated, trying to make headway with the wrapping... Well, I think the tree is done (always room for a "tweak") and I think I've finished the gift shopping (hope the online stuff arrives in time), but I've not finished putting the other decorations up or finished the card-signing, or anywhere near finished wrapping.  Actually, I've not even finished making those beady presents I set myself to do - I've a feeling the notebooks I planned to do will just stay a "plan"

Anyway, it's Sketch File Update day and I'm sharing the  layout I've done for my mini album- yes it's the same one I've been working on for the last year or so, but I think I'm getting near to the end now.
As an Anniversary present to ourselves we took out  a years' membership of the National Trust in July 2010, so the book will show all the NT properties we visited between then and the end of July 2011.  I don't work quickly, do I?
This is Wallington Hall in Northumberland
 I used
December Sketch File LO - see below
Bazzil card, Bo Bunny papers
Assorted paper flowers for layering
Green leafy braid, Pearls and Gems

December Sketch File Layout
There are som great ideas for using the sketch - for Christmas and other occasions over on the blog, so please pop over to see them - scroll down through the last few posts to see them all.  It would be fab if you'd join in and play along with us.

Right, it's back to a beading project for me now.  I hope to goodness that you are better organised than I am, because this is n o fun - but it happens every year, despite my annual promise to myself to do better! :o  hey ho

Wednesday, July 06, 2011

Ickworth House

Feeling happier today as Hubby is back home after a couple of days away on business in Düsseldorf.  Thankfully, he doesn't have to go away very often.  You'd think I'd be able to get down to some "serious" crafting on those occasions but in actuality I find I can't really settle to doing anything much and end up faffing around all over the place.  I push paper around my desk a bit but not much else.  Two whole days to myself and all I actually managed was to stick a few "finishing off" bits to projects that were lying on my desk.

Yesterday the July LO idea went "live" over on The Sketch File blog, so I thought I'd blog a bit here about my first project using the sketch.  It's another page for my "A Year with the National Trust" album - this makes three whole pages, I'll have you know - which is something of a record for my books!
I've used the sketch for the right hand page of a double page LO
 Materials:
Papers: Prima 6x6 "Jack and Jill" collection, Spellbinders Dies: Ovals, photo turn
Flower made using brown Seam Binding from Creative Treasures - I just ruffled and glued the binding straight on to a circle of scrap card (I love how it turned out!). 
large pearl brad, small brad, small circle punch
Here's the left hand page which has the title and info


 Materials:
Papers as above, EK Success Border Punch
Ruffled brown Seam Binding from Creative Treasures  
Title is cut with Craft Robo,  
flowers made with loose mulberry paper petals, along with some punched from the Prima papers, small green brad, Blue gems are hot fix "i-Rock" gems by Imaginisce

Here's how they look in the album:
That's all from me for today, I hope you'll pop over to The Sketch File and see what Jackie and Lynda have made so far using the July Sketch - and I'm hoping you'll feel inspired to have a go at making something too.
Thanks for visiting


Monday, April 18, 2011

Look! a Book

Ok, so it's an album really but that didn't rhyme so well :) or at all!
I decided that maybe the way to kick-start my crafting mojo was to do something other than a card, so I've made this album - or at least the cover for it.  Whether any of the pages get used remains to be seen, but I enjoyed putting this together so I hope I'll manage to do something with it.  Just don't hold your breath.
Actually the design for this is something I've been meaning to do ever since I "drew" the current Sketch File sketch.  I thought it would lend itself really well to a book with a wrap around closure.

I've another idea for using the sketch too, so with a bit of luck I might even get round to making that too before the new sketch is due up.

Incidentally, if you have time, please pop over to The Sketch File
and see what Jackie and Lynda have made with the same sketch - and we'd love it if you'd join in and make something using the LO too.  There's no "closing time" on the sketches so pick any of them that appeal and see what you can make - leave a link and we'll add it to our sidebar and come to see what you've made.

So, back to this album. I made the wrap around flap nice and wide so that if I want to make my pages bulky it should still fasten nicely.  I may have to change the Bind-it-All wires it'll do for now.
As you can see there's no title - that's because I've made loads of things like this in the past - full of grand plans for what will go inside - then two pages later (if it's lucky enough to get that far) it's gathering dust on the shelf, so I'm not committing myself to anything hehehe.
 I have, however added some card pages all ready for action.....the pages are big enough for 6"x6" layouts or photos.
I made the rosette decoration with layers of organza ribbon, lace and a couple of gorgeous flowers.  The ribbon is about 4cms wide and navy blue.  The lace started off white, but I sponged it over with ink to get a better matching colour - it's gathered already and has a bound edge, but I ran a thread through the binding to pull it into a tighter shape.  One of the two flowers was already this perfect orange colour, the other is a soft creamy-beige but I gave the petals a bit of orange  ink to pull the two together.
To make this album I used:
Cereal packet chipboard, Bo Bunny papers, MS edging punch
Lace, flowers and some ribbons from Creative Treasures
Faux brads, Chipboard photo corner, Large eyelets for ribbon closure,
Bind-it-All tool and wire, Glossy Accents, 
Bazzill card in toning colours for pages

Thanks for looking, I hope you like what you found here and will come back soon :)

Wednesday, November 17, 2010

WOYWW and TTSJU

Oooh it's a bit chilly today - I've got a severe case of CMH (Cold Mouse Hand) and no mistake, hang on while I go and get a coffee to warm me up....
Ok, I'm back - actually, I made a drinking chocolate instead

As it's Wednesday, its WOYWWednesday, so here's my rather surprisingly clear craft mat - ok, the periphery might not be clear, but the mat itself is looking quite spruce, don't you think?  If you're wondering what WOYWW is all about, then visit Julia's Stamping Ground and read all about this fab and fun weekly wander around web world. (ohhhh did you get all that alliteration? hehehe)
You can click on the photo for a really close inspection!

I thought  that as it made it's début here last week,  I'd add  my 'Tis The Season Journal Update today as well.  So far so good with the daily jottings, but I've jiggled the pages around a bit already, and added some extras, so a good job I didn't do the binding properly straight away. 

I've added a recipe and photos for the chocolate brownies I made during the week too.  It was impossible to write what happened in such a small square, but it should serve to remind me!  I took them out after the specified time at the fan oven temp, left them to cool for a bit and turned out onto the wire rack as instructed - only to discover that the thing to collapse as it was still far from cooked. aggghhh.  I didn't really want to waste it so I switched the oven back on, re-lined the tin, scooped all the mixture back into it and spread it out again then cooked it for a bit longer!  Well, surprisingly it turned out fine - probably not in the traditional Brownie style, but it tasted pretty good - I'd have felt really peeved if I'd used all that dark chocolate for no reward!
I've got my journalling pages ready for this week, though I've not written in them yet.  The Websters
6x6 pages work really well - I trim around the picture bits first, then cut the remainder of the page down to fit the journal page and glue into the book, then I ink around the image sections and glue them into place.  I'm mainly using the cut off scraps to make the journalling spots, and adding some Stickles for a bit of glitz.

And finally.....a couple of Christmas cards - yep, they've got baubles on - there's a surprise, eh?
I made the template for the garland from a free colouring page I found somewhere on the net - I can't find it now, which is a shame because I think there were some other nice ones I could have used too
First card uses: 2 shades green Bazzill, Spellbinders Nesties Baubles, Kaiser Dear Santa papers, Stickles (red, gold), gold crochet thread
First card uses: 2 shades green Bazzill, My own Craft Robo Baubles templates, Kaiser Dear Santa papers, Stickles (red, gold), gold crochet thread
I've added a "Shares" list in my sidebar of images and CR templates I can share with my Blogmates - click the links to see them, and in the case of Craft Robo templates, email me if you'd like a copy as I haven't a clue how to add them for instant download!  Obviously the CR templates are for personal use only and not for passing on to any third party.
Thanks for visiting, hope you'll have time to leave a message and to come back soon :-)

Wednesday, November 10, 2010

'Tis the Season 2010

For one reason or another I've not been able to join in with Julia's WOYWW fun and games for a few weeks, so I was determined to add my photo today - just hang on a minute and I'll get to it....
One of the things that's kept me away from my blog for a few days is my Christmas journal/album.  I made a little pocket album of the run-up to Christmas last year and enjoyed it - ok so I'm not sure I actually finished it all but this time I'm going to try harder.
I've loved seeing the daily journals that some of my forum friends have been making - I sort of wish I'd joined in now, even though my track record for completing these things is pretty atrocious!  What I really like is that you don't need to write a load of stuff every day because you only have about a 1" square to write in each day.  So I thought I'd try to incorporate this idea into my Seasonal album.  I've called it "tis the season" because it's not just an Advent album, I want it to be more about all the things that go on in the run up to the Big Day and hopefully right up to 12th Night.  That's the plan anyway - and as I spent an age sitting here on Sunday ordering up a load of Christmas pressies (thank goodness for internet shopping, I say!) it seemed a good day to start keeping my journal

 As well as the daily notes I'll add photos, a record of the gifts we get for our friends and family and pretty much anything else I fancy adding in.  The house shaped tag above has the names of one of the family groups on the reverse all ready for me to fill in with the presents we've got for each of them.
I'd also like to make some of the pages purely decorative - I have an idea to use some of the designs I'm making as Christmas cards as mini scrapbook pages.
I've decided against sticking just to one paper collection and as long as the colours work together I'll use whatever I fancy, the idea being that I'll be using lots of the papers that I'm using for my cards too - and hopefully making a better stab at getting them used up that I do most years!

The double page  above will be for next week's daily journalling, I need to "tart" them up a bit though - thinking that the circle journalling spots will be fab dressed up as Christmas baubles!
If you're reading this and fancy joining me in this project it would be wonderful to have your support, and great fun to compare our progress - let me know if you're going to join in and I'll make a links list in my sidebar so I can keep up with your pages.
My book is quite small - the pages are 6" wide and 5" high, which allows a bit of space for binding - I'll add Bind-it-All wires when the whole thing is finished, but I'm just using book rings in the meantime so I can add in extra papges as I go.
And finally here's What's on My Workdesk Wednesday - I had a little tidy up last night (yes, I know it doesn't look like it - just imagine how bad it must have been before!) which is why there's a little pile of stuff in the middle and no scraps of paper lying about.  The journal I've been yattering on about is on the top of the pile - and if you really want to have a closer look at the general mess you can click for a big no-holds-barred version!


I've got loads of Cword cards that I've not shown yet and I'll get to them soon.  Please pop over to Julia's and see what all the WOYWW stuff is all about and to check out all the workspaces that are linked there each week.
I hope you'll come back soon - and that at least some of you will join me in making a tis the season mini book.
Thanks for visiting