Wednesday, August 14, 2013

Heffalump Scraps

Well it was our wedding anniversary a couple of weeks ago and after I'd made a card to give to Hubby, I was left with a small pile of scraps from the Funky Hand  "I Love You Sew" designs I'd printed to use on his card.
Although they were small pieces, I still wanted to use them up, so this is the first of a couple of mini cards I managed to make without resorting to printing anything else. 
This is a 10cms square card, so you'll see that the pieces I've used are quite small

Remember the line from The Feeling's song "Fill My Little World" that goes "All I wanted was some evidence that you really loved me"?  Well OH always changes evidence to elephants, so it's become a sort of tradition that there'll usually be an elephant or two somewhere on the cards I make for him,  In this case the elephants were on the inside and I cut them on my Craft Robo using  Funky Hand image from the Colour Me Happy CD - I've used the elephant shaped hole I was left with to make this card!

Materials and Tools
All papers:   "I Love You Sew"download from Funky Hand
Elephant Image from  Colour Me Happy CD also Funky Hand
Black gel pen, 2cm circle punch, tiny heart punch, 
Tiny black square gems (Prima)

I hope you like this cute little chap, because he'll be back, wearing another "suit" next week sometime!
Thanks for looking

Tuesday, August 13, 2013

Splodging

The August LO on The Sketch File is called "Splodge Away!" because the main part of the sketch looks a bit like cloud shaped ink splodges.  What you use the "spoldges" for is up to you.  For my first project using this sketch I made them hot air balloons.

The main reason for this was that while I was flicking through my newest paper pads I spotted this lovely design with a couple of balloons in the left hand corner and thought "hmmm two down, three splodges to go!" haha

The other 3 balloons were cut using my Craft Robo. The balloons are slightly curved then adhered with 3D glue.   I wove a paper strip through some fairly random slits cut along the lower edge of the card and added some toning dark brown paper strips and some yellow and white Baker's Twine. 


Tools and Materials
Papers: MME 6x6 Sky's the Limit "Find Your Wings and Fly"
Brown paper from another paper pad
Yellow and White Baker's Twine
Decal Sentiment

Please visit The Sketch File to see this week's and last week's ideas from our DT - we'd love you to play along with us.
Thanks for visiting today

Friday, August 09, 2013

The Sweetest Things

 We've just returned from a little holiday to celebrate our 20th Wedding Anniversary.  We had a couple of nights in Hereford, followed by a week in Shropshire.  I've wanted to go to Hereford for ages, because that's where the amazing Mappa Mundi is kept.  It didn't disappoint - what an amazing thing it is, you could spend weeks looking at it and still find new things you'd not noticed before.  It's so interesting to see how Medieval scholars "saw" the world, and how they interpreted the things they'd been told.  The fascinating thing from a crafter's point of view are the little drawings of buildings and animals, both real and mythological - today you can find loads of stamps, digital images and other things that look so similar to those drawn hundreds of years ago.  If you go to the link, then click on the images to the side of the text you'll see what I mean.
In Shropshire we stayed just outside  Much Wenlock - hope of the modern Olympic Games - they were doing it here well before de Coubertin cottoned on to the concept - in fact, that's where he got the idea from.
Anyway - it's a brilliant place to stay with so much to see and do within about 30 minutes drive - we didn't actually manage to fit everything on our to-do list in to the week.  No doubt I'll bore you rigid with photos over the next lottle while :)

Now though, I have a question; why is it so hard to get back into crafting when you've had a break?

Zuzana set a lovely challenge  for The Daring Cardmakers this week but I still struggled to come up with anything until the last minute - and even then I'm not particularly happy with either of the attempts I made.  hey ho.
This week it's Zuzana here with a Sweet Things challenge:
We are invited to our dearest friend's wedding, so I 
came up with the idea to create cards with something 
sweet on. 
It can be wedding cake, cupcake, lolly, sweetie, ice cream... 
everything sweet and eatable.
Zuzana found a fabulous inspiration photo to go with her challenge - it's had us all licking our lips all week - I'll share that in a minute.
My plan was to make a card with cup-cakes and ice creams on it, but when I started assembling the bits I couldn't figure out a layout - so I just used the ice cream cones to make this one
 I ended up hand-cutting some lollies to "bulk" it out a bit.  I think the background looks a bit too busy and swamps the focus things, but I couldn't think how to put it right :(
Tools and Materials
Patterned papers; from "Wishes and Kisses" Funky Hand CD
Plains are all Bazzill card
White lace, Pink and Blue narrow ribbon, Pink Baker's Twine, Glamour Dust glitter, Tiny seed beads
EK Success Border Punch
Craft Robo for cones, Lollies are hand-cut
 So, as I was left with some cut and assembled cupcakes I thought I may as well use them up and make something else - in the hope it would turn out better, really, vut I'm not sure it did :(

Tools and Materials
Patterned papers; from "Wishes and Kisses" Funky Hand CD
Plains are all Bazzill card
Glamour Dust glitter, Heart button. Tiny ribbon bow
Tiny bunting is all hand-cut
Craft Robo for cup-cakes
Here's a peek at Zuz's inspiration photo:
 
 So there you go, 2 cards made and neither quite as I saw them in my head.  I need to get my mojo back as I have just this morning taken delivery of a giant box of goodies for a new and rather exciting development....I'll spill those beans later, I promise! 
That's it for now though.  Please head over to the Daring Cardmakers blog where you will find an array of tasty treats from our fab design team.
Thanks for visiting today

Friday, August 02, 2013

So Citrus

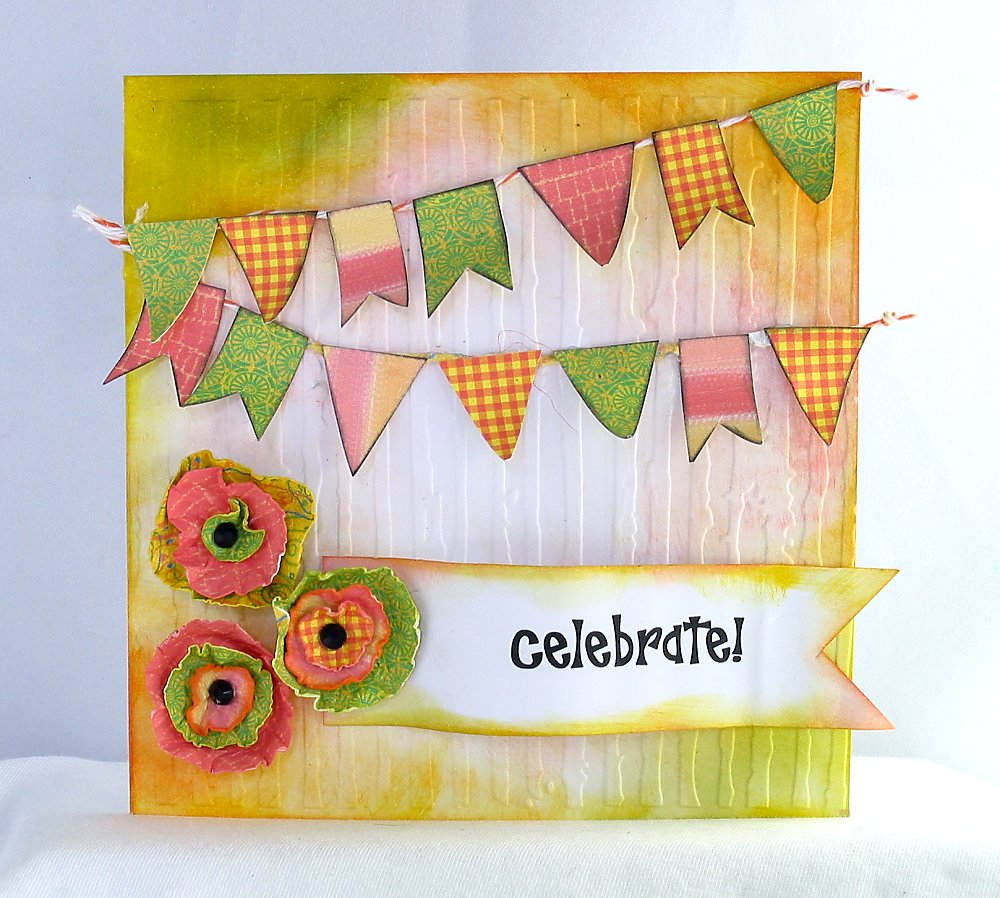
Our newest DT member Svenja has chosen the August colour palette for us over on the Daring Cardmakers this week.  It's a sharp and tangy palette of Lime, Lemon, Orange, Pink Grapefruit and a dash of White - just perfect for summertime!  Sorry if you're in a part of the world that's  currently in the depths of Winter....


Here's my card

Materials and Tools
Direct to paper Inking for the background
Papers: mix of designs from "Glad Rags" and "Barbadian Ecstasy" both from
 Funky Hand "Colour Me Happy" CD 
 Bakers Twine in orange and white
Small Black gems
Embossing Folder; Distressed Stripes (Cuttlebug)
PC generated sentiment

The bunting, flower shapes and the banner are all hand cut


Our clever Svenja has even arranged and taken the inspiration photo herself

 I really enjoyed using these colours - they aren't ones I use very often so it made a refreshing change - oh dear, I can never resist the chance of a pun, however small and however poor!

Please pop over to the DCM BLOG and see what other zingy creations the team have come up with this week.
Thanks for visiting today, it would be fab if you'd leave a comment

Wednesday, July 31, 2013

Lots of Dots

A couple of weeks ago Leo issued a "Paint Effects" challenge to us on the Daring Cardmakers.  I spent most of a day playing with paints and inks, trying to come up with something I liked and could use for my card.  In the end I shared one with a background made from acrylic paint mixed with Texture Paste and squidged into a die-cut stencil.  I made a few background this way and most are still in the "to be dealt with" pile
The other paint effects rechnique I tried out was one I found on Pinterest - it was in a "good to do with little kids" category, so I reckoned it might be something that even I could have a go at!

 I had a couple of goes with this technique and have to say I had a lovely time just painting with dots!  All you do is use a cotton bud dipped in paint or ink and gently "print" the dots all over the card, or maybe add the dots in a simple pattern - for a tree, or a heart etc
I made a paint palette from an empty hay-fever  pills strip (neat, eh?) for all the ink and paint colours I used here - it meant I didn't waste loads of paint and ink when you need so little to cover a big space.
I cut an aperture in the dotty card and added a frame, then placed it over a piece of card with the quotation printed on it 
The "crayons" are made from rolled coloured card and  the bunting hand-cut from the same colours

I've got something else made with the same technique in that "to be dealt with" pile, so hopefully I'll get that ready to share sometime soon

Thanks for popping by, hope you'll have a go at this technique - I'd love to know if you do and see what you make


Monday, July 29, 2013

Itsy Bitsy Teeny Weeny

I'm sharing another of the projects I've made with Funky Hand's lovely Season-themed wedding collections.  They may have "wedding" in the title, but don't let that put you off as these paper sets are wonderfully useful for sooooo many occasions.

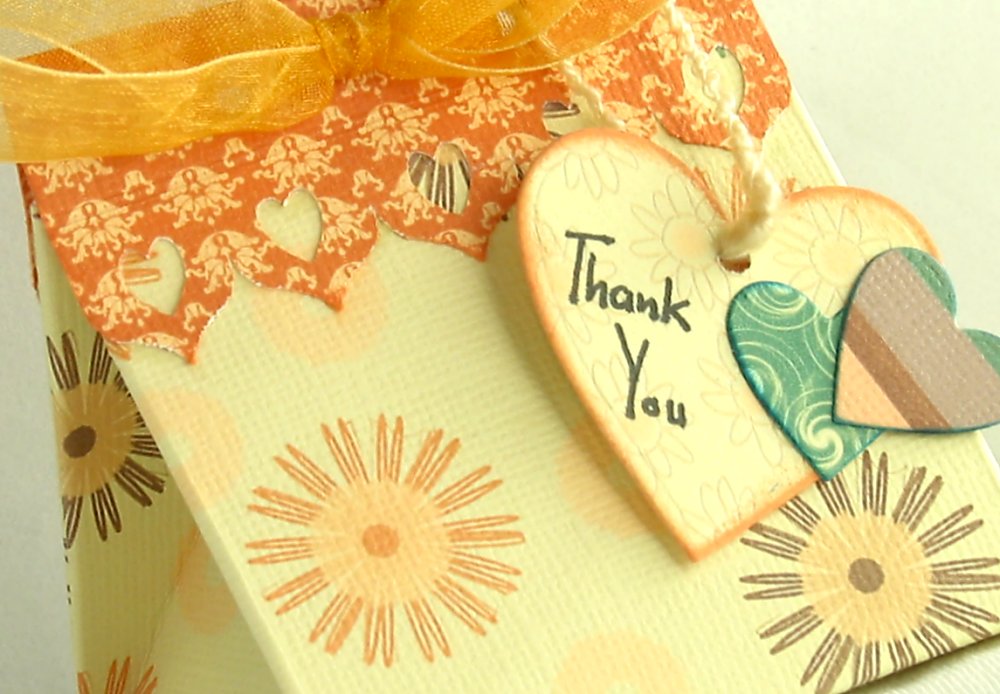
Today it's a tiny little triangular box made with the "Autumn Wedding" collection 


Materials and Tools
All papers: Funky Hand Autumn Wedding collection 
printed onto Bazzill white card.
Ribbon
MFT Die'Namics Nested Hearts die set
Border created with Craft Robo

I found the tutorial for this box on Splitcoast Stampers - I don't have the direct link, but if you search for Triangular Box, I think you'll find it.  I used an 8" square rather than the 6* they used (if I remember rightly) and it still turned out tiny - I think you'd maybe get one nice chocolate inside this one!


That's it for this time, thanks for popping by :)


Friday, July 26, 2013

Creature Comforts

Nat is dog-sitting at the moment, and inspired by that, her challenge for the Daring Cardmakers this week is to add something pet-related to our cards

Its no secret that cats are not my favourite creature and I really don't "get" why people like them.  However, this was too good an opportunity to miss for giving a sneak peek of some new Digital Image downloads coming soon to the Funky Hand website.


This is Kendrick Cat - I'm told he's a fat, lazy and rather disgruntled animal - you'd never have thought that from the pictures, would you......, 
My card uses two of the first images to feature him.
I've resized and pasted the images on to a new document to make a border design for my card. With the digital work done, all I had to do was print the panel to the correct size for my card and mat it onto some bland and white cardstock . 
I printed the sentiment (borrowed from Rhe Hitchhikers Guide to the Galaxy) directly onto a DL card, added some ribbon and a little bell, the Kendrick panel and it was all done.

Materials and Tools
2x Kendrick images (coming soon) from Funky Hand
Black and white card for matting
Spotty satin ribbon, small silver bell
PC generated sentiment

There are some fun cards to see over on Daring Cardmakers BLOG  and we're hoping you'll join in and make a card featuring something pet related.

So that's it for this time, not much waffle for once, eh?
Thanks for looking in, please come back soon 

Monday, July 22, 2013

Fun(ky) in the Sun

I thought I'd share a postcard I made for a swap today,  The idea is that all postcards are sent "naked" - as in, no envelopes - a bit "shock horror" for anyone who loves adding dimensional stuff, or bits that are only partially adhered and meant to stick up and out from the card -  like I do with flowers etc., but it all adds to the challenge, eh? 
Our theme this time was "Summer" and tbh there was no real doubt as to what I'd be putting on my card hehe
It had to be Beach Huts!  
I knew exactly which papers I'd be using too!
 
The two Funky Hand downloads Rainbow Stripes and Rainbow Polka Dots are absolutely the ticket for a bright, Summery, Sunshiney scene like this.  Making the beach huts was a great way to show off how they can be "tweaked" to change the printing size and get bigger (or smaller) versions of the spots and stripes - this is my favourite "thing" about Funky Hand downloads!  My second favourite is being able to print them on different mediums (or should that be media?) 
Materials and Tools
Papers: Funky Hand  Rainbow Stripes and Rainbow Polka Dots collections
printed onto Bazzill white card.
Background created with various Paints and Inks, Ice Stickles, White gel pen, Glossy Accents
Plain card in matching colours for matting the Beach Huts
Beach Huts and "Just Beachy" sentiment cut with Craft Robo
Circle Punches for Parasol and beach ball, Surf board, and other bits are hand cut

That's it for this time, Don't forget to visit the Funky Hand website and blog for lots more ideas and inspiration and great value stash of course!
thanks for popping by :)


Saturday, July 20, 2013

Learnng to Love my Scraps!

It's my turn to do the Funky Hand Weekend Inspiration slot this week, and here's what I'm sharing over there


I know I keep banging on about how fab it is to be able to crop and resize Funky Hand papers, but it's true - it may seem daunting at first but it's worth getting to grips with your graphics package and your printer settings because you will soon be customising your Funky stash and really making the most of it all.
As I've been using Bazzill card to do a lot of my printing on recently I'm thinking much more carefully about what I print, and trying to get the best from each sheet.  I'm much less likely to throw the unused bits away once the pile gets a bit high, and much more likely to see what I can make using those offcuts.
So today I'm sharing one of my "Scrappy Cards" - it's actually a lot of fun working out how to make the smallest pieces of paper turn into something pretty - and often I find I like these creations the best.  I really like this card and I hope you do too.

Pop over to the Funky BLOG for more info about how I made this card using scraps of the Funky Hand Winter Wedding collection left over after making the heart shaped box I showed HERE, plus a few bits from my stash.  

Thanks for visiting, please leave a message....and can I be greedy and ask you to leave one over on the Funky Blog too ;)

Have a great weekend

Friday, July 19, 2013

Paint Effect Playtime

Another Fan-tastic Friday (Fan, because it's my constant companion atm, hehe), another Daring Cardmakers Day:
This week it's Leo here and I'd like you to have a go creating:

Paint Effects

I've recently been looking through all the new product catalogues and sneak peeks and seen lots of watercolour and other paint effect looks out there so I'd like you to take inspiration from that but rather than use ready made products I want to see you having a go at using an actual paint effect or painting technique on your card if you can. Use any kind of paint or ink you want or even brush markers, just to get the look of paint.
First I had a look around for some ideas, then got out my Fresco Finish paints (all 5 of them - must buy more...they are lush) and spent a fun afternoon having a bash at some of the ideas I saw. 
The first few ideas were total disasters - mainly because I didn't have the right stuff to do them and had to improvise.  Sometimes improvising gets great reults, other times it's just a bin-filling exercise - as it was on Wednesday.
So, next I went back to using some die cuts as stencils, this is something I've done a bit of lately, and yes, boring to do the same again, but my confidence was waning!  To make it a bit different though, I dug out the texture paste (like the Fresco paints, I bought this on the suggestion of Arch-Enabler Slightly Wonky Crafts Kaz.) - it was actually bought for a project I'm yet to make a proper start at.
Anyways, I mixed a bit of paint in with the paste and squidged in with my finger into the gaps of the "stencils".  This was lovely, gooey, messy fun and whiled away a happy hour - and the results made me feel a lot better.  I've used one of the bumpy, stencilled pieces to make the background for my card.  I painted the card in a lighter shade before using the paste-paint mix

Here's a close up which I hope shows just how bumpy the stencilled sections are - click for a bigger image-loser look
  Materials and Tools
Paints: Fresco Finish (PaperArtsy) Beach Hut, Mermaid
Heavy Carvable  Texture Paste (Galeria)
Smooth White card, Purple card x 2 (Bazzill)
Purple gems and pearls (stash), Purple ribbon with multi-coloured dots (stash)
Butterfly die used for stencil and to cut the 3 layered butterfly (Memory Box)


I now have a little batch of textured backgrounds so hopefully I'll actually use some in the next few weeks.  I also tried another technique which I loved - plus, it was dead easy!  I'll save that for another post though ;)

If you head over to the Daring Cardmakers BLOG you will find lots of fab ways to use your paints and inks  - you'll need to click on the links for the DT members' blogs to get the lowdown on how they were all created.  I know I'm going to be doing that because it's always good to learn new techniques, tips and tricks

Thanks for visiting today

Monday, July 15, 2013

Top Hats

Last week I shared a little heart shaped box made using the mauve and purple tones for Funky Hand's lovely "Winter Wedding" collection.  This time I've got a card which uses the gorgeous deep blues from the same paper set.
I've kept this one fairly crisp and simple to show off the lovely pinstripe and polka dot papers.


Materials and Tools
All papers: Funky Hand Winter Wedding collection 
printed onto Bazzill white card.
Ribbon, Pewter charm, clear stones on the ribbon, tag and on the right side of the card. Computer generated sentiment
Craft Robo to cut the Top Hats

That's it for this time, thanks for popping by :)


Challenges:
Little Claires  Weddings and Anniversaries
CAS-ual Fridays Polka Dots

Friday, July 12, 2013

Ombre

It's Daring Cardmakers Day and this week Sharon is setting our challenge:
"Ombre"
 "I'd like to see the Ombre effect used on your card somewhere (an effect where the colour gradient goes from light to dark, like on a paint colour chart).
 This can be blended colour, or in blocks. 

 It seems this effect is really popular at the moment - not just
 in the craft world but in hair colouring too."

As soon as I saw Sharon's challenge, I knew what I'd be using as the "Spring Wedding" collection from Funky Hand has a few ombre papers in the various colours of the set.  I chose the stunning yellow to orange to green colourway to base my card around

I absolutely love these sunshiney colours and the lovely ombre polka dots.  The green and orange  leafy designs set the ombre paper off perfectly.  My current favourite flower die and border punch also make an appearance in this one.
Materials and Tools
All papers: "Spring Wedding" download from Funky Hand, 
printed onto white Bazzill
Yellowy orange organza ribbon, "upside down" Card Candy, Tiny pearls, Decal sticker sentiment 
EK Success border die
Memory Box Fabulous Phlox die set

For the Carrd Candy flower centres I used a couple of different greens.  I used the  paler one with the inside facing upward, the darker one I turned inside out - if that makes sense!.  All 3 were then rolled with an embossing tool to "ruffle" them a bit


That's it, nice and simple.  There are some fabulous Ombre effects to see on ur blog - lots of clever ideas for creating the effect with papers, inks, paints etc so please take a look and see what our wonderful team of Daring Cardmakers have made this week.

Thanks for visiting

Tuesday, July 09, 2013

Hearts, Flowers and Swirls

I really need to do a bit of catching up on blogging some of my recent Funky Hand makes, so  I thought I'd share this little box today.

I made this box from scratch, using a DieNamics Nesting Hearts die set and some Funky Hand designs printed directly onto card to make the whole process easier. Printing onto the card means you don't have to make the box and then faff about covering it with pretty paper, and you can print on both sides so the inside and outside of the box will look good.
This lovely Winter Wedding collection is such a pretty and useful set of designs with a gorgeous purple, mauve and blue colour palette.  I kept to the purple shades for this box

Materials and Tools
All papers: Funky Hand Winter Wedding collection printed onto smooth white card.
Ribbon, pearls inked and glittered to match the papers, Stickles
Hand made rose created from more of the FH printed card
MFT DieNamics nesting hearts die set
Spellbinders Swirl die

Here's a closer look at the top of the boxto show the rose, swirl and offset heart embellishment


This picture gives you an idea of the size of the box - well for fellow crafters it does!  For anyone else, these little ink pads are about 5cms tall.


It was the first time I've made this type of box and I learned that it would be a good idea to use more layers of the small inner base and lid size of hearts to give more stability to the finished box.
It was fun to make and even more fun to prettify.  I hope you like it,

Find out all you need to know about Funky Hand (and there's lots to discover, including FREEBIES!!!) by clicking HERE
 
Thanks for visiting, please leave a comment.....

Friday, July 05, 2013

July Colour Combo

Lythan has chosen the colour palette for our July Colour Challenge on the Daring Cardmakers this week.  When I first saw the colour palette I was a bit unsure, but after looking at it for a while it began to remind me of that mix of deep, intense colours and sun-bleached shades that you often get at the seaside.  So that's what I went with
In real life the aqua colour is much deeper and greener, but somehow it's lost some intensity on the photo.
The aqua and the deep blue colours were created using quite a few inks  from my little stash of Distress Inks, Versamagic Chalk Inks and Cat's Eye chalk ink pads.  I also used the fab Ink spray from Kesi'Art that came in my recent Quirky Kit.  The "waves" are squiggles of Crystal Ice Stickles.  There's a bit of white Posca paint pen in there too.  Once the Stickles were dry, I used a paint brush to wipe more of the Posca White pen over the glitter glue.

I've also used a bit of ink around the edge of the card blank, and to add a bit more "distress" to the Distressed StripesCuttlebug embossing folder I used for the background.
Materials and Tools
Aqua and Deep blue backgrounds; inks (as mentioned above) on smooth white card
Pale Grey, Orange, Yellow and Green card,; all Bazzill
Yachts are hand cut from scraps of card
Crystal Ice Stickles, Posca White pen, Sateen Ric-rac braid
Spellbinders Dies; Lace Doily Motifs (outer section of frame), Labels 26
Memory Box Dies; Fabulous Phlox, Cherry Blossom

When we were in Cornwall last year we visited the beautiful Minnack Theatre.  Lythan's colour choice really reminded me of the lovely gardens clinging to the various levels of the theatre.  It's got to be one of my favourite places and this has got to be a good excuse to pop a couple of photos on here!


As ever, our design team have made some fantastic cards to try and inspire you to join us this week.  You can see them all on the Daring Cardmakers BLOG

Thanks for looking, I hope you have a fabulous weekend