Friday, February 07, 2025

For My Valentine

Hello!

Welcome to my little crafting place! Here's where I share the things I've been making, and sometimes other bits of waffle!
This week the Daring Cardmakers are back with a new kind of monthly challenge in the First Friday spot.

This year, on the first Friday of each month 
there will be a
Monthly Sentimental Challenge
We all find ourselves needing a card for a particular 
or special reason, don't we? And sometimes it would 
be good to have just the thing ready to send. 
So once a month we'll concentrate on a specific sentiment.

With it being the first friday oif February there was only 
one sentiment to choose, don't you think?
 
Be My VALENTINE
 (or celebrate enduring friendship with a GALENTINE)
As usual, we'll share our ideas and we'd love you
to join in and keep the inspiration going. 
 

Back in November I was sent what would be the December Wax Seal iof the Month club kit from Spellbinders.  I made a bunch of seals using it but didn't get round to using many of them on projects, It was the run up to Christmas and life was hectic!
But I knew I'd revisit this fab seal as it was going to be really useful for all those romantic occasions and even just for sending a hug  
 
The seal has an indented heart shape in the centre of a scalloped oval and is sooo pretty! 
I remembered that an earlier Glimmer of the Month Club had a 'cross stitch' plate and thought I could put these two things together and make a Valentine for my hubby


I made a tassel from gold thread and used an alphabet set from Sweet Dixie that he'd added to my Christmas Stocking.  Its such a lovely font, but oh my, is it fiddly!
 I matted the red fancy panel onto gold card, then onto a card blank of the same red card.
If you are interested in the monthly kits I've used, use my link to Spellbinders below and look in the Clubs section for 'Past Clubs' and you may be lucky enough to find them still available.
 I'll let you in on a secret - this section is a real treasure trove, and definitely worth hunting through for past gems!
 
Note
~~~~~~~~~~~~~~~~~~~~~~~~~~~~~~~

THIS is my Affiliate Link to the Spellbinders store
-  you can use it to access the store whenever you buy from Spellbinders
It doesn't cost you anything, but I may get a little reward for pointing you there.
There's a UK based shop now, so you c use the 'Visit Our UK Store' button at the top right of any page on the Spellbinders site  

~~~~~~~~~~~~~~~~~~~~~~~~~~~~~~~
Thank you so much for coming by.
 
 Happy Crafting, Take care of yourself,
Kathy xx


Hello!

Welcome to my little crafting place! Here's where I share the things I've been making, and sometimes other bits of waffle!
This week the Daring Cardmakers are back with a new kind of monthly challenge in the First Friday spot.

This year, on the first Friday of each month 
there will be a
Monthly Sentimental Challenge
We all find ourselves needing a card for a particular 
or special reason, don't we? And sometimes it would 
be good to have just the thing ready to send. 
So once a month we'll concentrate on a specific sentiment.

With it being the first friday oif February there was only 
one sentiment to choose, don't you think?
 
Be My VALENTINE
 (or celebrate enduring friendship with a GALENTINE)
As usual, we'll share our ideas and we'd love you
to join in and keep the inspiration going. 
 

Back in November I was sent what would be the December Wax Seal iof the Month club kit from Spellbinders.  I made a bunch of seals using itbut didn't get round to using many of them on projects, It was the run up to Christmas and life was hectic!
But I knew I'd revisit this fab seal as it was going to be really useful for all those romantic occasions and even just for sending a hug 
The seal has an indented heart shape in the centre of a scalloped oval and is sooo pretty! 
I remembered that an earlier Glimmer of the Month Club had a 'cross stitch' plate and thought I could put these two things together and make a Valentine for my hubby
I made a tassel from gold thread and used an alphabet set from Sweet Dixie that he'd added to my Christmas Stocking.  Its such a lovely font, but oh my, is it fiddly!
 
I matted the red fancy panel onto gold card, then onto a card blank of the same red card.
If you are interested in the monthly kits I've used, use my link to Spellbinders below and look in the Clubs section for 'Past Clubs' and you may be lucky enough to find them still available.
 I'll let you in on a secret - this section is a real treasure trove, and definitely worth hunting through for past gems!
 
Note
~~~~~~~~~~~~~~~~~~~~~~~~~~~~~~~

THIS is my Affiliate Link to the Spellbinders store
-  you can use it to access the store whenever you buy from Spellbinders
It doesn't cost you anything, but I may get a little reward for pointing you there.
There's a UK based shop now, so you c use the 'Visit Our UK Store' button at the top right of any page on the Spellbinders site  

~~~~~~~~~~~~~~~~~~~~~~~~~~~~~~~
Thank you so much for coming by.
 
 Happy Crafting, Take care of yourself,
Kathy xx


Tuesday, February 04, 2025

Flight of Fancy

 Hello!

Welcome to my little crafting place! Here's where I share the things I've been making, and sometimes other bits of waffle!
This week the Daring Cardmakers are back after our break with this challenge:

IN FLIGHT

We would love to see your IN FLIGHT creations;
Flying things, Flights of Fancy, Time Flies... Birds,
Planes, Balloons, Magic carpets....
Create anything you like cards, tags,
or 3D project. Its up to you!
Here’s some inspiration to get you thinking.
Get in touch if you are interested in seeing your work on
our blog - we are always looking for guest designers
and new teamies who would love to...
Create - Inspire - Share!

So today I'm sharing the card I've made - and its my first project using something from the Spellbinders 2024Advent Calendar I picked up in the sale!
I think I managed to get it at an even lower price in the sale just before Christmas than it is now.  I thought it would be the perfect little helper for getting me through these nasty depressing winter months. The very first door opened to reveal a sweet little hot air balloon die set - perfect for this challenge!


I made up two of the balloons, then decided to make an aperture card with them.  The sunset or maybe sunris background is just made with various shades of ink, but I added some hand cut vellum 'clouds' before adding the balloons. The frame was cut from a piece of dark teal card and raised from the main card lauer using some offcuts of thick card'

 For the bunting I hand cut triangles of leftovers from when I cut the background down to size and some blue twine

Die set used:

 
Note
~~~~~~~~~~~~~~~~~~~~~~~~~~~~~~~

THIS is my Affiliate Link to the Spellbinders store
-  you can use it to access the store whenever you buy from Spellbinders
It doesn't cost you anything, but I may get a little reward for pointing you there.
There's a UK based shop now, so you c use the 'Visit Our UK Store' button at the top right of any page on the Spellbinders site  

~~~~~~~~~~~~~~~~~~~~~~~~~~~~~~~
Thank you so much for coming by.
 
 Happy Crafting, Take care of yourself,

Kathy xx


Glimmering Sprigs of Spring (Feb GOM, WSOM)

   Hello

and welcome  to my little crafting place! 

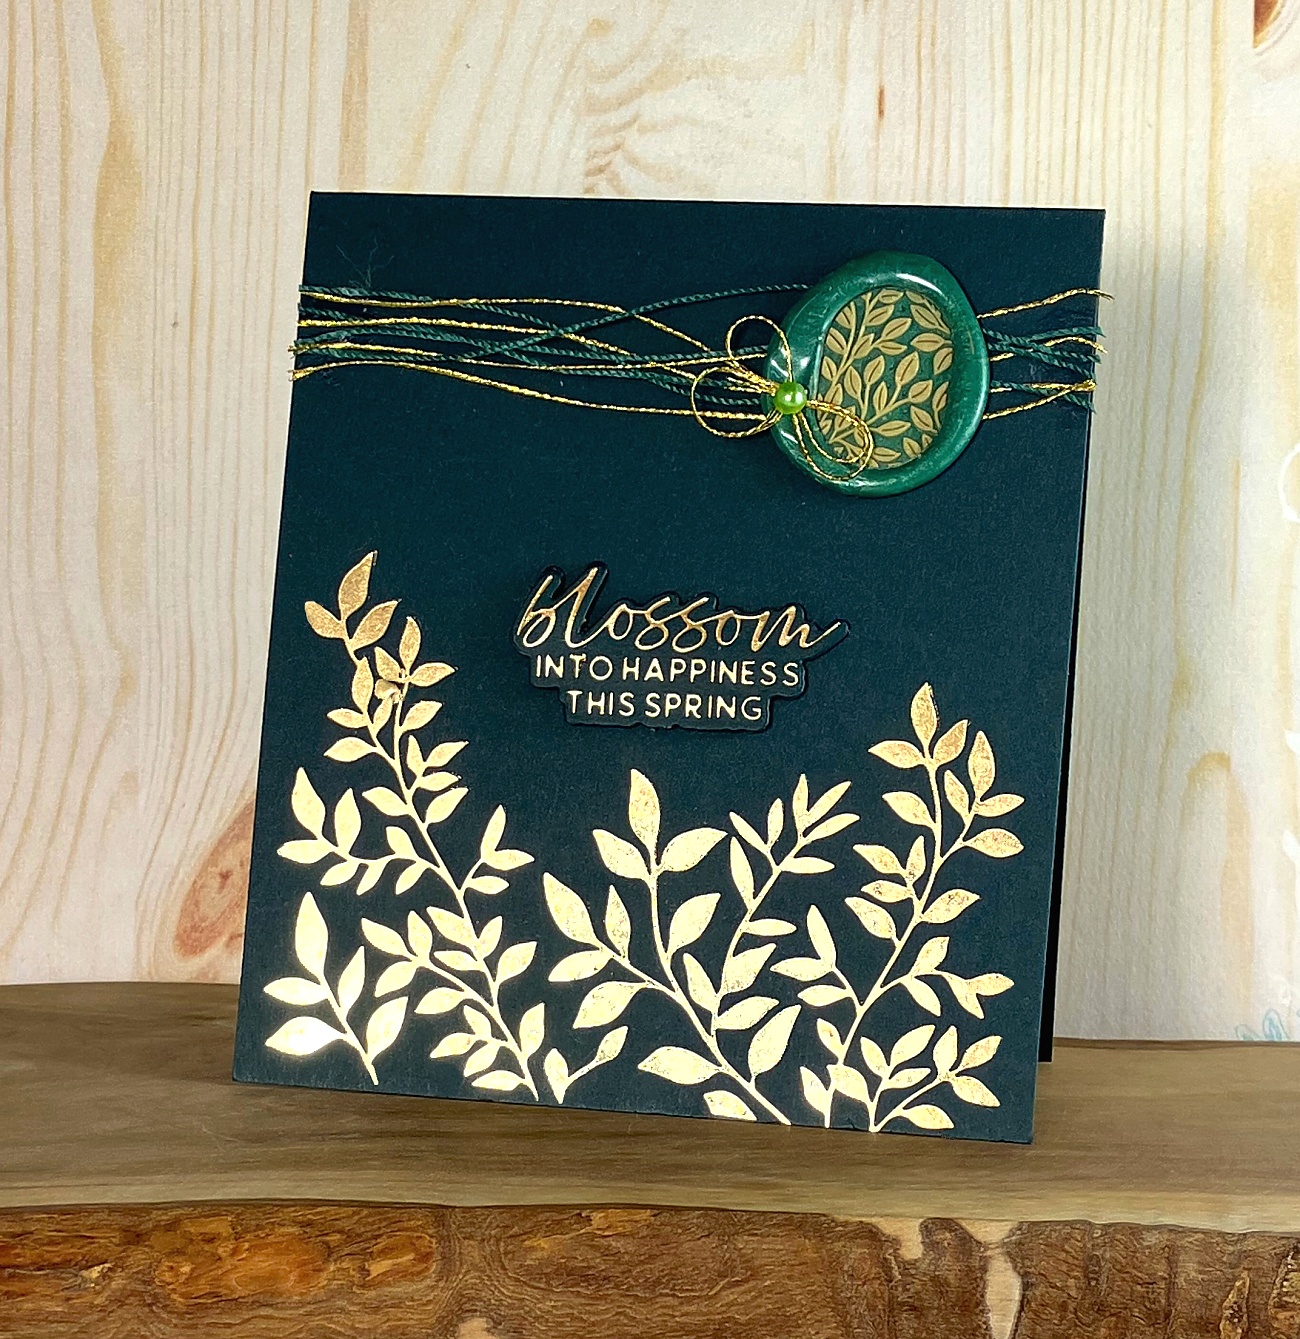
Having just about survived January month, I'm trying hard to look forward, beyond the cold drary days of February towards my favourite time of the year - Spring


I've been using the Spellbinders Glimmer of the Month for February and it really lifts the spirits with its beautiful leafy sprigs design

For my first project with this set I decided to go for a dark green card blank and gold foil.  I simply used the beautiful glimmer plate for this card, but in the  set you also get a cutting die to cut round the tops of the leaves and some lovely sentiments - one of which I used on this card

The February Wax seal of the Month from Spellbinderslso has a Springtime feel, and decided to make one to use on this card.  

I poured gold wax into the warmed seal and used a heated scraping tool to scrape oiff the excess. Step 2 was to stamp the motif into a mid green mix of wax and step 3 was to highlight with shiny gold leafing pen

 I used:

 leafy design plate and sentiment

February Wax seal of the Month

Dark Green card blank

Green and Gold twine and light green pearl
 

More examples of this seal

 
  Just a Note
~~~~~~~~~~~~~~~~~~~~~~~~~~~~~~~

  THIS is my Affiliate link to the Spellbinders store 
-  you can use it to access the store whenever you buy from Spellbinders
It doesn't cost you anything, but I may get a little reward for pointing you there.
There's a UK based shop now, so you can use the 'Visit Our UK Store' button at the top right of any page on the Spellbinders site  

~~~~~~~~~~~~~~~~~~~~~~~~~~~~~~~

Thank you so much for coming by

 Happy Crafting, Take care of yourself,
 
 Kathy xx

Signs of Spring (Feb WSOM)


 Hello

and welcome  to my little crafting place! 

Well, we made it through January (just about) and althopugh not my favourite month, at leas in February the days are getting longer and there are little shoots of hope apopearing in the gardens

The February Wax seal of the Month from Spellbinders celebrates this hope, with a lovely, leafy seal to use on our projects.

I teamed it with dies from one of SB's January releases;

 'Vivid Expressions Collection'

For this card I used Seal no.2 from the set shown below. The seal was stamped into the copper-peach coloured wax and the image highlighted  with gold and green marker pens.  I actually used a couple of different gold pens on the flower

The card blank was inked with copper then the pale aqua panel added. 

 I used:

February Wax seal of the Month

from the Vivid Expressions Collection.
 

White card blank, plus extra card for panel

More  scraps of white card inked in shades of lilac and yellow for the flowers and green for the stems

Lilac twine and pearls
 

More exaamples of this seal

Some of these are simply the seal stamped into wax and colour added afterwards using pens

most are 2 layers, using the pour and scrape technique for the first (leafy) layer, with excess wax scraped off using a hot scraping tool.  The seal, with the leafy design still in it, is then stamped into another pouring of wax

Extra colours are added with pens

 
  Just a Note
~~~~~~~~~~~~~~~~~~~~~~~~~~~~~~~

  THIS is my Affiliate link to the Spellbinders store 
-  you can use it to access the store whenever you buy from Spellbinders
It doesn't cost you anything, but I may get a little reward for pointing you there.
There's a UK based shop now, so you can use the 'Visit Our UK Store' button at the top right of any page on the Spellbinders site  

~~~~~~~~~~~~~~~~~~~~~~~~~~~~~~~

Thank you so much for coming by

 Happy Crafting, Take care of yourself,
 
 Kathy xx

Tuesday, January 28, 2025

Winnie the Pooh and the Blue Balloon


    Hello!

Welcome to my little crafting place! Here's where I share the things I've been making, and sometimes other bits of waffle!

I've always loved the Winnie the Pooh stories by A.A. Milne, and the drawings by E.H. Shephard that are just perfect.  I have prints of several of them in the house, two just above my desk here in our study!

I was thrilled when I found that Spellbinders and Simple Stories have got together and created a beautiful range of crafting goodies using the original pictures as their inspiration - I really hate the Disney versions of Pooh and Co, and have avoided anything crafty using them like the plague!


Winnie the Pooh and the Blue Balloon

 I've used dies from the Pooh and Piglet set to make this card, based on one of my favourite Pooh tales "Winnie the Pooh and the Blue Balloon" in which Pooh rolls in a [puddle to disguise himself as a rain cloud and floats in the air on the string of a blue balloon as he tries to raid a bee hive for the yummy honey.

 I made a large card, coloured the outside and inside with shades opf blue ink and mousse, then cut an oval aperture in the front of the card. I cut sprig dies using Winter Evergreen Foliage die set in various shades of green card to make the overhanging tree branches then added Pooh and his balloon. 

I printed out the words from the story to add to the card, then assembled Piglet, some flowers and some honey pots at the ready to the lower edge, and a few extras to the inside  the card. The bees were cut out from some paper I had in my stash


I used:
Pooh & Piglet Etched Dies from the Say Cheese Classic Pooh Collection 


Note
~~~~~~~~~~~~~~~~~~~~~~~~~~~~~~~

THIS is my Affiliate Link to the Spellbinders store
-  you can use it to access the store whenever you buy from Spellbinders
It doesn't cost you anything, but I may get a little reward for pointing you there.
There's a UK based shop now, so you c use the 'Visit Our UK Store' button at the top right of any page on the Spellbinders site  

~~~~~~~~~~~~~~~~~~~~~~~~~~~~~~~
Thank you so much for coming by.
 
 Happy Crafting, Take care of yourself,


I've used dies from the Pooh and Piglet set to make this card, based on one of my favourite Pooh tales "Winnie the Pooh and the Blue Balloon" in which Pooh rolls in a [puddle to disguise himself as a rain cloud and floats in the air on the string of a blue balloon as he tries to raid a bee hive for the yummy honey


Tuesday, January 21, 2025

Ink, Glimmer and Wax


Hello,

 Welcome back to my little crafting place! 

Today I'm sharing this card using Spellbinders'January Glimmer of the Month and Wax Seal of the Month club kits.  

I created the background first - a white square card blank cut to fit the Glimmer plate, whixh I inked with many shades of blue and purple ink pads. I then used the Glimmer plate and the Aura foil that forms part of the kitI was really happy at how it turned out - the Aura foil really shimmers and dazzles as it catches the light

For this wax seal I first heated some blue wax, stamped then cut out the flower head. Next I heated gold wax, warmed the seal and pushed the blue flower head back into it, poured the gold and stamped the seal in.

I left the image in place and removed the excess wax from round the edge of the seal while warming a mix of blue and purple shades of wax beads, Once ready I poured it into a rough oval and pushed the seal into it.  I liked the way the flower shape kind of melted a little into the gold.  I looks kind of faded and vintage - well I think so anyway!

I finsihed this card off with some strands of blue and purple waxed twine and a snetiment using one of those in the Glimmer kit and some plain dark blue card


I used:

January Glimmer of the Month

January Wax seal of the Month

Blue, Purple, Gold wax beads

White card blank inked with various blues and purples

Blues and purple twine

 
  Just a Note
~~~~~~~~~~~~~~~~~~~~~~~~~~~~~~~

  THIS is my Affiliate link to the Spellbinders store 
-  you can use it to access the store whenever you buy from Spellbinders
It doesn't cost you anything, but I may get a little reward for pointing you there.
There's a UK based shop now, so you can use the 'Visit Our UK Store' button at the top right of any page on the Spellbinders site  

~~~~~~~~~~~~~~~~~~~~~~~~~~~~~~~

Thank you so much for coming by

 Happy Crafting, Take care of yourself,
 
 Kathy xx

Wonderful Wellness Wednesday and Simply Red (well, shades of)


Hello,

and welcome back to my little crafting place - I've a card to share today but first a little bit of waffle!

OH's company encourages everyone to take Wellness Wednesday off in the middle of each month and do things that make you feel better and last week was January's Wellness Wednesday  

OH usually goes out for a bike ride (it was too wet this time), does some Lego or a jigsaw or whatever, and we always go out for lunch to one of the villlage pubs nearby,  Its just a lovely thing to do, its quiet and relaxing and sometimes just a bit exciting - like last Wednesday, when these feathery beauties turned up at our favourite go-to pub!


The big guy on the left is a beautiful Eagle Owl and the Huge ball of white fluff on the right is a  Snowy Owl, who is just 4 months old! 

Check out his feet!


I suspect February's WW will have to really go some to beat January's!  I love owls

However, enough of the waffle! Today I'm sharing this card 


I used January's Glimmer of the Month  club kit for this one.  The  Glimmer plate makes not only a beautiful backgroundbut in a strong colourway it stands as the main feature too.  I used scissors to cut out the shape at the centre and a couple of different kinds of gold card, a matte gold in the paerture I'd created amd mirror gold to back the glimmered section. The sentiment is also in the club kit and is one of several really useful sentiments. You get  'hello', 'smile', 'thanks, congrats' and 'for you' in the set


I used:

January Glimmer of the Month

Aura Gold foikl (from the January kit)
Red(ish) card to foil onto

Pearlescent Red-pink card blank

Pink shades of waxed twine

 
  Just a Note
~~~~~~~~~~~~~~~~~~~~~~~~~~~~~~~

  THIS is my Affiliate link to the Spellbinders store 
-  you can use it to access the store whenever you buy from Spellbinders
It doesn't cost you anything, but I may get a little reward for pointing you there.
There's a UK based shop now, so you can use the 'Visit Our UK Store' button at the top right of any page on the Spellbinders site  

~~~~~~~~~~~~~~~~~~~~~~~~~~~~~~~

Thank you so much for coming by

 Happy Crafting, Take care of yourself,
 
 Kathy xx