Friday, June 30, 2023

Just My Type


   Hello
Thanks for visiting. 
 
 I’m sharing my card for the latest Daring Cardmakers Challenge today and this week Nat says: 
For the last challenge of the month, I'd like to see you
    feature a typewriter or typewriter-style fonts on your card.
    I have a much-loved typewriter set that is my go-to for fun and special cards, and I absolutely love the look of type-written sentiments. They work perfectly for so many designs from the clean and simple to the super ornate.
   Click Here for some ideas from the design team

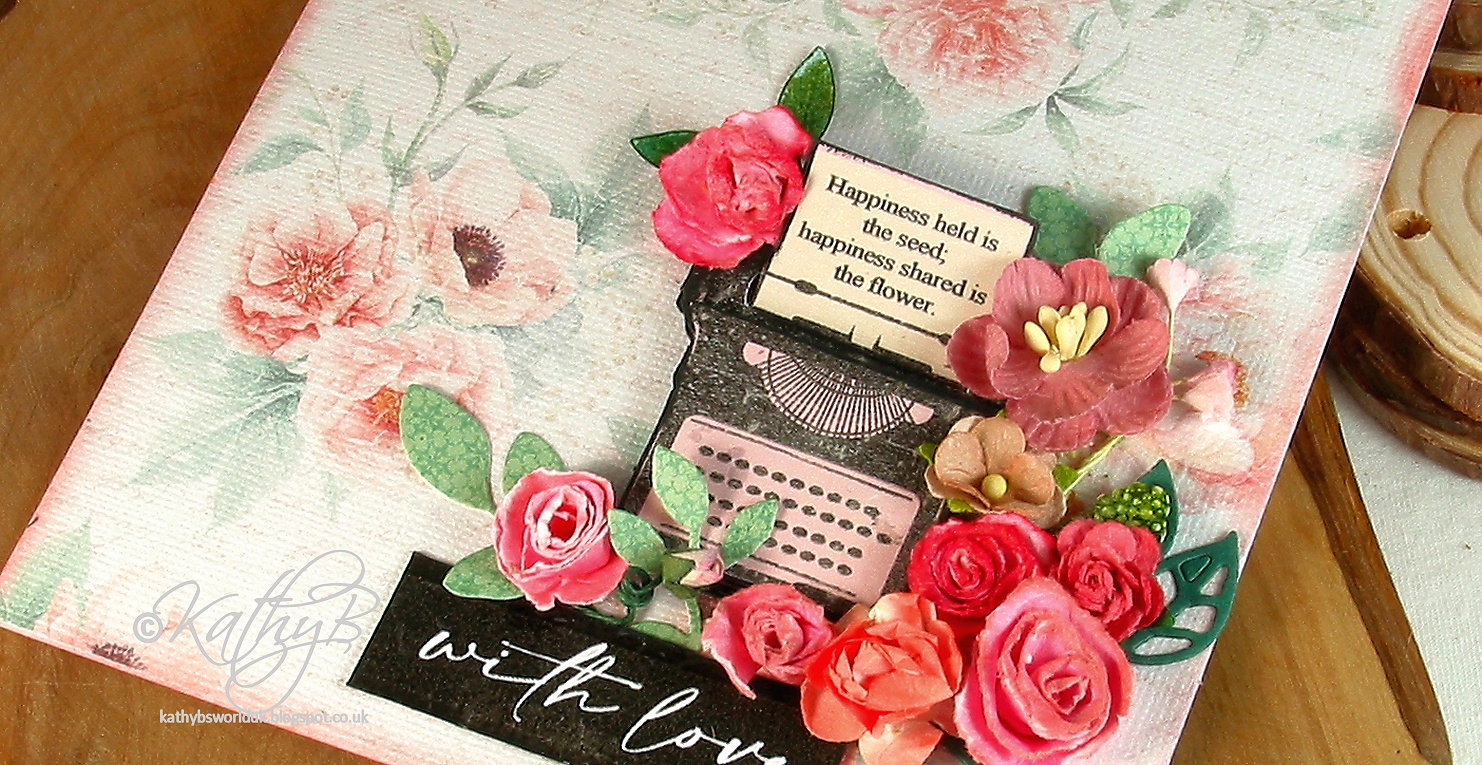
I started by folding a rectangular card with a top fold, then covering the card front with a lovely vintage floral design of digital paper resized to fit and printed on Bazzill Avalanche White card
The vintage style typewriter is also a digital download  - I'll add links for both later as I don't have the info to hand atm.  
 
I added some text to the paper 'in' the typewriter, resized and printed three copies on white card. I cut different parts out from each to layer up with thick card or foam dots between the layers.
The flowers are a mix of rolled roses and leaves left over from other projects and a few ready-made paper flowers.
To finish off the card I added a black and white sentiment


Thank you so much for coming by

 Happy Crafting, Take care of yourself,
 
Kathy x


Friday, June 23, 2023

Ladybird, Ladybird Fly Away Home...


   Hello
Thanks for visiting. 
 
This week I’m sharing my card for Shabneez's Daring Cardmakers Challenge and we're out in the garden playing with creepy-crawlies and fluttery, flying critters!

Shabneez says:

I have been spending a lot of time in the garden recently so I decided to incorporate it into my challenge this week. 

Garden Bugs

It's the time of year when a variety of bugs visit gardens so I'd love to see which bugs are in yours! 

   Click Here for some Manly Makes  from the design team
 
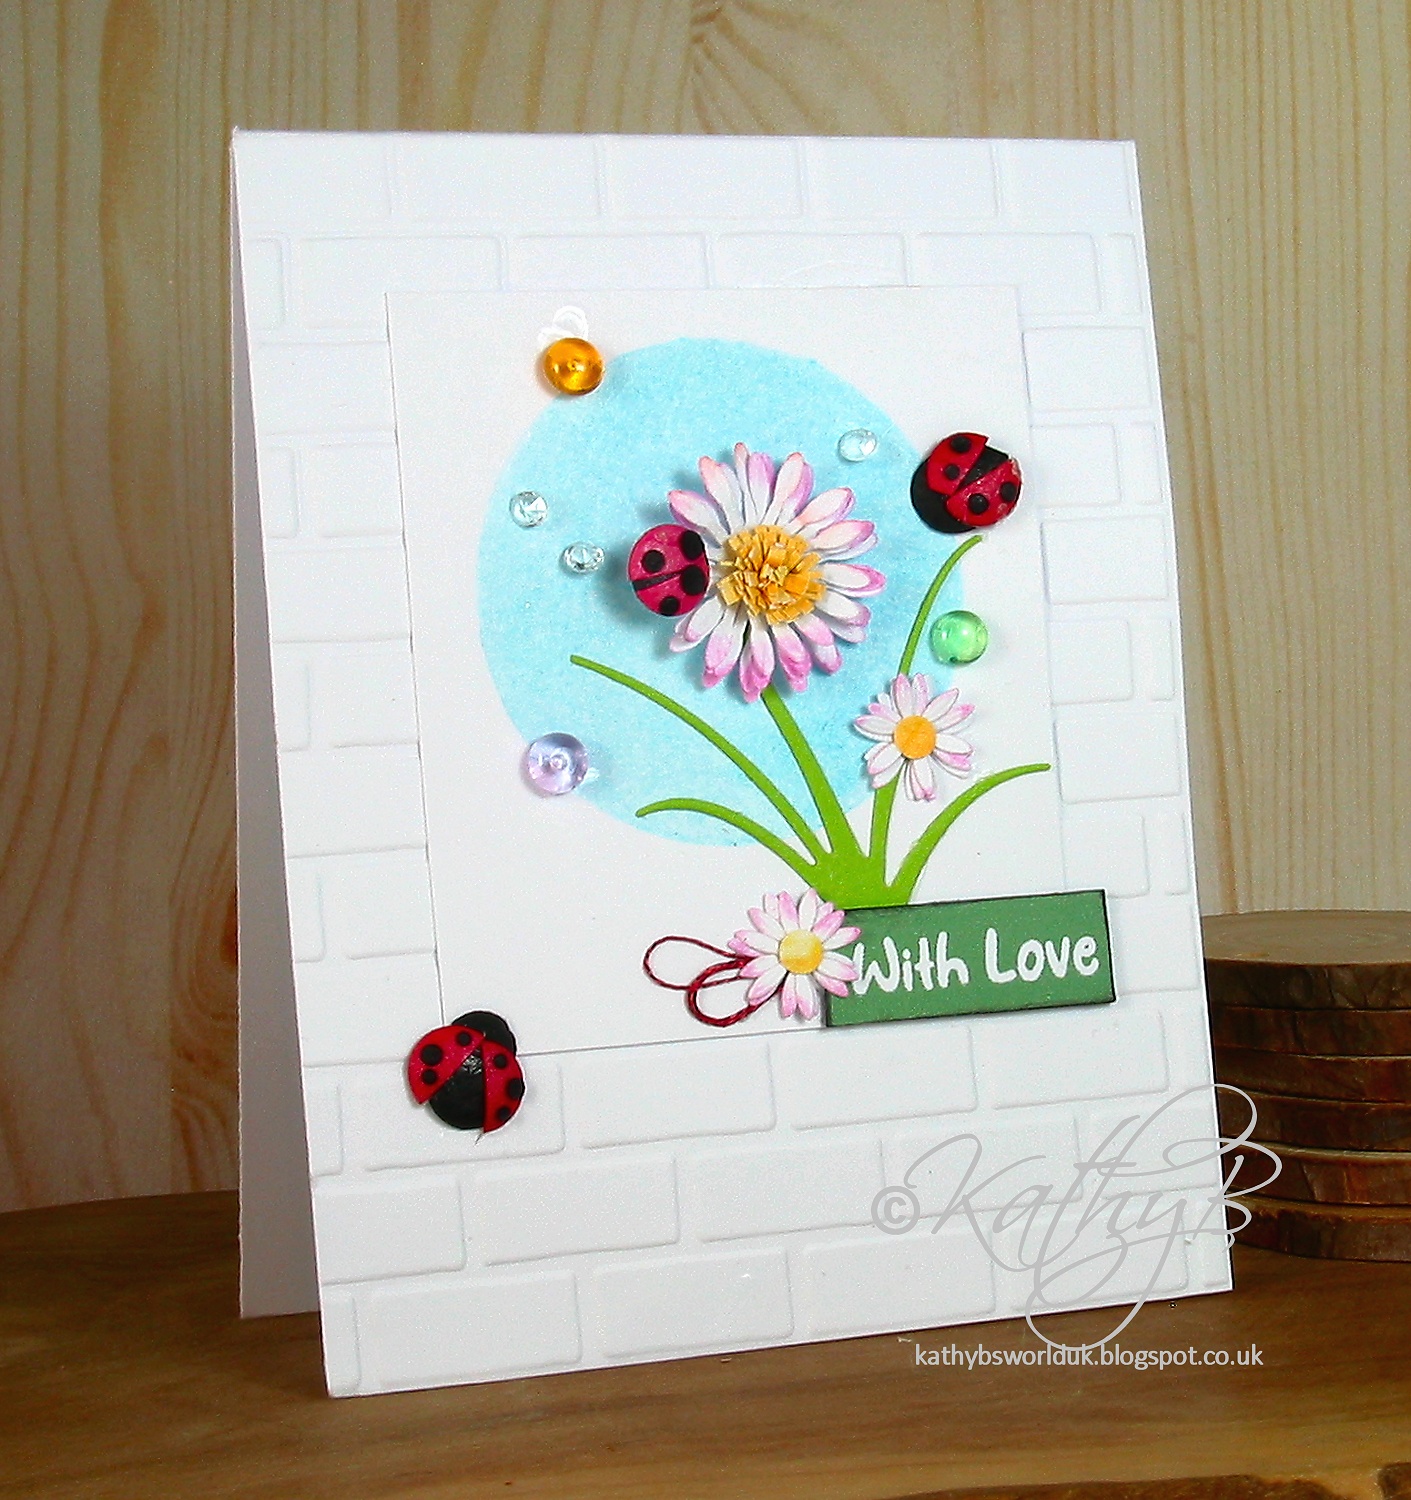
I started by folding a rectangular card with a top fold, which I embossed with an ancient Cuttlebug brick wall patterned folder
On a separate panel of the same card I stencilled a circle using Nuvo mousse.
I was a bit stuck for 'bug' dies - I only have a couple of suitable sets and I've used them so often I needed a change! So I came up with a plan to make some tiny ladybirds using Card Candy - I have loads of the stuff but rarely use it - not really sure where it all came from tbh!
AI used one black and one red Card Candy dome for each ladybird, plus an extra smaller card circle for the head. 
To assemble I glued the small black circle to the underside of the larger one, leaving just a small section sticking out for the head part. Next I cut the red circle in half and glued in place over the black 'body' leaving a space between them. I used a die that has really tiny circles on it to cut the spots and glued them on to finish
 
 
The flower dies are all from Spellbinders; the large daisy head is from an old set 
but the stem and small flower head are from a fabulous Garden Builder set I bought recently - look at all the stuff you get in this set!
Once I'd arranged all my die cuts and ladybirds I glued them in place on the small white panel and adhered this to the brick background.
I added some dewdrop stones for extra interest, then used one of the green and white sentiments I made a couple of weeks ago tucking some coils of red thread to match the ladybird wings under one end and another tiny flower on top
 
 
Please note that if you use any of the Spellbinders direct links in this post I may receive a small commission - it doesn't cost you anything at all but its a nice treat for me!

Thank you so much for coming by

 Happy Crafting, Take care of yourself,  

Kathy x


Friday, June 16, 2023

Sorry Sir!


  Hello
Thanks for visiting. 
 
As usual on Fridays I’m sharing my card for this week’s Daring Cardmakers Challenge, and this week it's Dawn's turn to set the theme!

Make It Masculine

As it is fathers day on 18th June I would like to see a masculine card to celebrate the men folk.  It doesn't have to be for fathers day but I know we all struggle with a more masculine card so lets have some made for the card stash.

    Click Here for some Manly Makes  from the design team
 

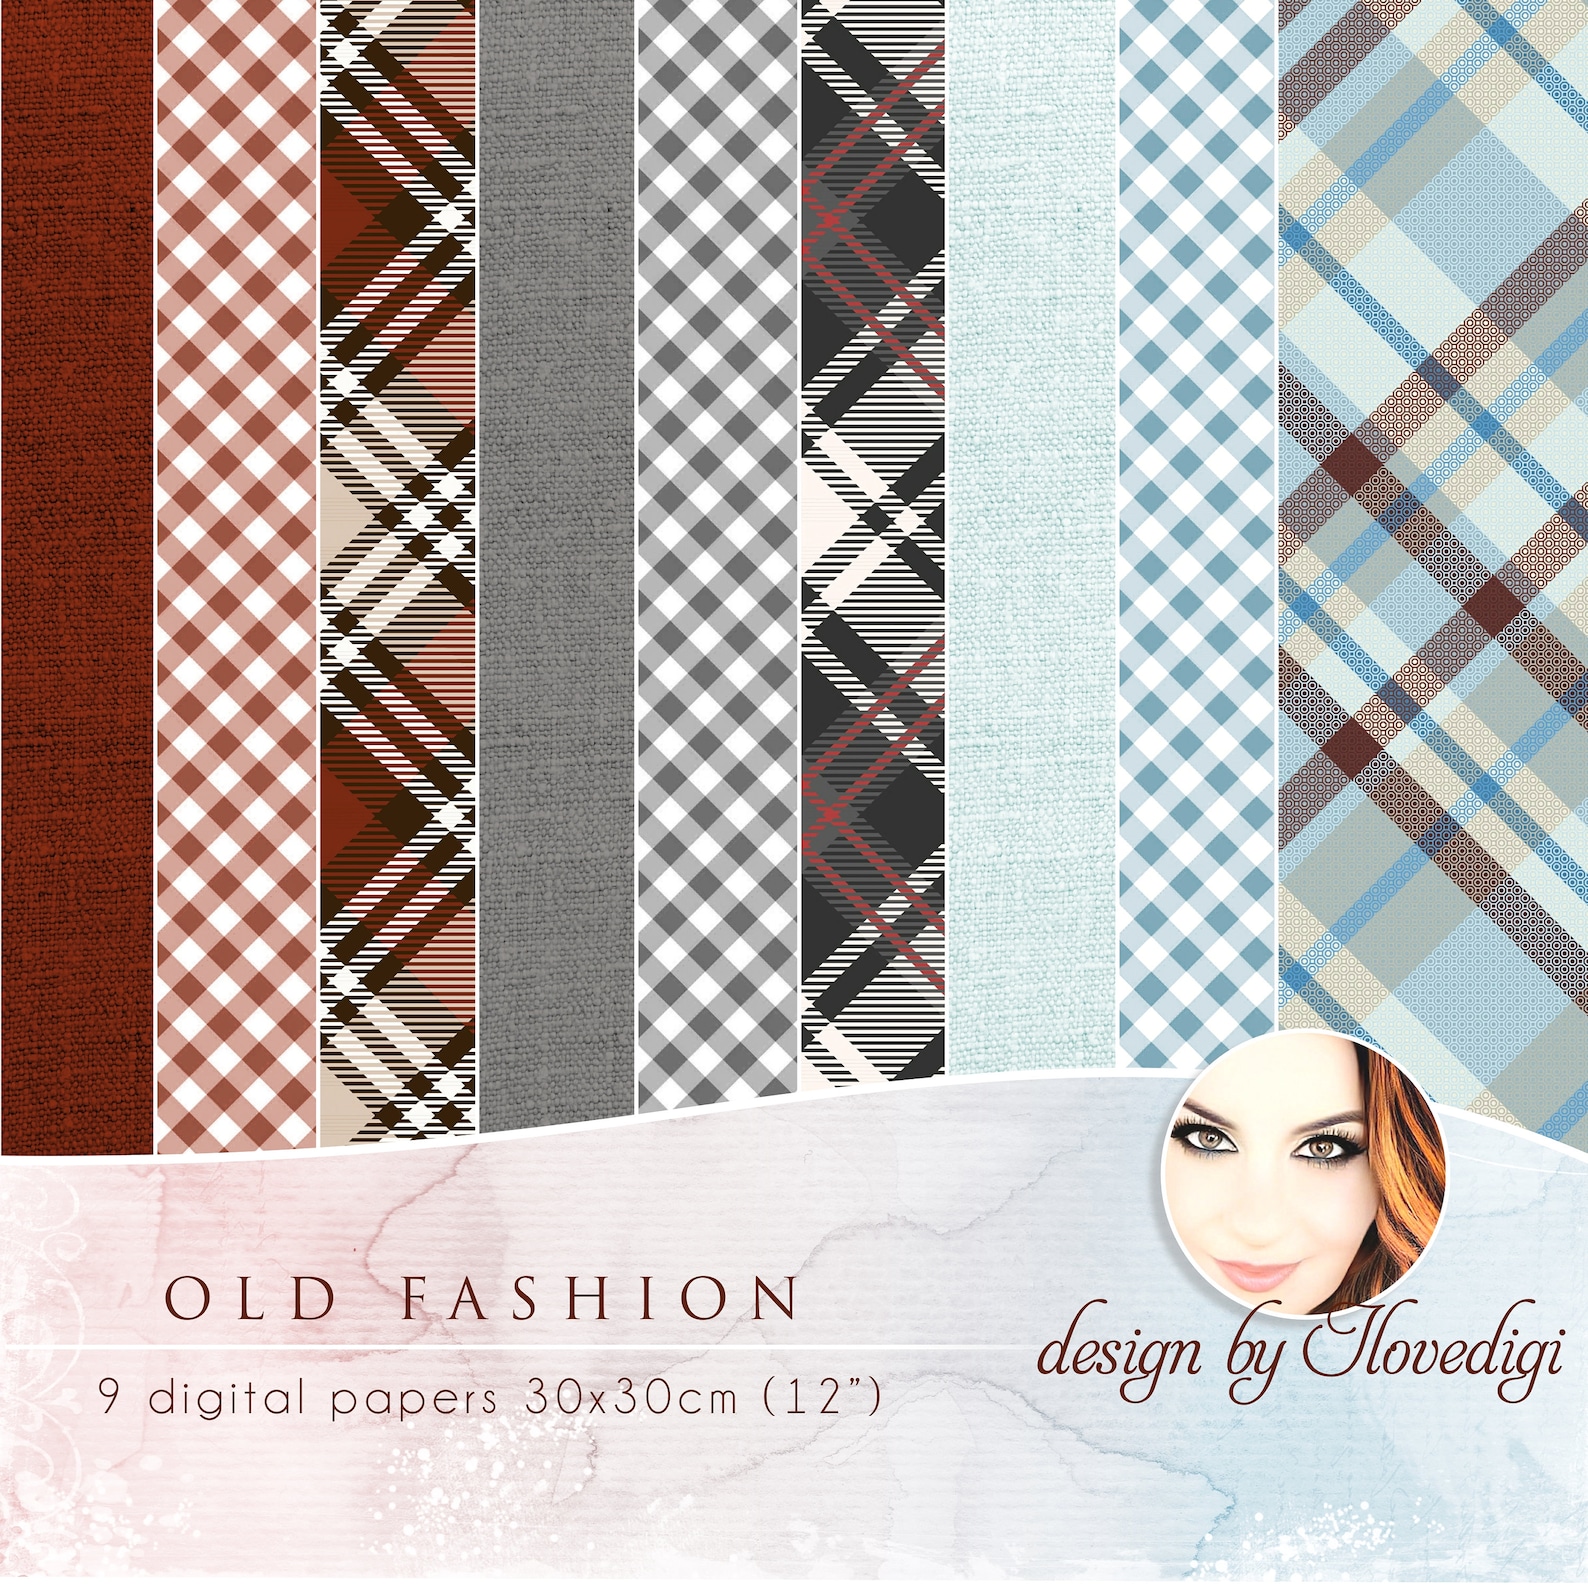
 I had a really disorganised and 'out of sorts' time a few weeks ago and felt as bot guilty about not getting cards into the post - although in most cases I'd already made them! I ended up also needing a 'belated' birthday card for a man, so I put this one together.  I was inspired by a digital paper collection I found on Etsy to go with a Steampunk/ hipster kind of vibe

In fact most of this card was created on the pc, starting with paper from this collection by ILoveDigi
Printing onto a textured white card gives it a lovely fabric look
 
Next I used my graphics program (Paint Shop Pro) and some icons to create the hat and moustache on a blank white background, leaving a big space below for the text, I then copied and pasted the moustache a couple of extra times to make sure they were exactly the same size for adding dimension later.
 
Now I added in the text, and 'drew' the black line frame around that and the picture section and resized for printing.  So here's what I printed out

Once printed I cut around the black line frame, leaving a narrow margin.  I hand cut the extra moustache shapes and glued them in place, putting glue only on the centre line and bending out the ends for dimension

Thank you so much for coming by

 Happy Crafting, Take care of yourself, 
 
Kathy x


Friday, June 09, 2023

Coming up Roses


 Hello

Thanks for visiting. 
 
As usual on Fridays I’m sharing my card for this week’s Daring Cardmakers Challenge, and this week it's Joanne's turn to inspire us!

Everything's Coming up Roses 
 
As roses are one of the two birth flowers for June, this week I’d like to see roses somewhere on your project.
 If you’re not in the mood for flowers there’s another way to play; Yellow roses symbolise friendship so include yellow in your colour palette with any image or technique you like as a nod to crafty friendships. 
Extra brownie points if you manage both and show us yellow roses!

    Click Here for yellow and Rosy examples from the design team
 

For the base card I used a smooth white square

The grungy distressed stripes were created using a stencil.  I taped it in place then applied PVA with my finger through the stripes. After removing and cleaning the stencil I added gilding flakes over the glue and left it to dry before removing excess flakes with a stiff brush.

For the roses I used a small die set that I've had for ages and can't remember where it came from!  I like this one because there are 5 identical sized petal sets on the die - so you can cut all your need for each rose in one cut! The flower shapes were cut from a piece of thin card inked on both sides. 

The stems, and other green parts were cut from scraps of green card and paper.

I decided to stick to green for the sentiment so created a new strip of green sentiments on the pc and printed them out.  So I need to make more things that need green finishing touches now!

To complete the card I added a few enamel dots and a gold thread bow


Thank you so much for coming by

 Happy Crafting, Take care of yourself, 
 
 
 Thank you so much for coming by
 Happy Crafting, Take care of yourself, 
 

Friday, June 02, 2023

June Elemental


Hello

Thanks for visiting. 
 
As usual on Fridays I’m sharing my card for this week’s Daring Cardmakers Challenge, and this week it was my turn to come up with a mood-board for our June Elemental challenge

June Elemental Challenge

I love all turquoise and aqua shades and as gold goes so well with them, I've based my mood-board around those colours. I've added 'pops' of  other colours too because it seems to me that turquoise makes every other colour look better!

 All you need to do is choose 3 elements from the board to use when you make your card.

 If you use them, the colour combo would count as 1.  


    Click Here for some sunny examples from the design team
 The main elements I chose were Wood-grain texture, Mosaic and the Flower (no surprise there!)

For the base card I used a smooth white square and embossed the front with a wood texture embossing folder
I inked 2 pieces of thin (80gsm) white card with lots of shades of Nuvo mousse, keeping one side a little paler than the other
When dry I used a gorgeous Spellbinder Peony die set to make a large peony and a couple of small buds, plus some leaves
For the mosaic tiles I started by inking white card with the various colours. Next I applied a little glue through a stencil with my fingertip, removed the stencil (and cleaned it) then added some gilding flakes.  Once completely dry I brushed away the excess, punched out the tile shapes from the parts I liked best and arranged them on the card.
 
Once I'd decided on the placement of the flowers I glued them on, added the leaves, and finished off the card with a black and white sentiment and some loops of gold thread

 Thank you so much for coming by
 Happy Crafting, Take care of yourself, 


Wednesday, May 31, 2023

She Sells Seashells on the Seashore


 Hello

Thanks for visiting. 
 
Today I’m sharing my card (a bit later than it should be) for this week’s Daring Cardmakers Challenge, and this time it's Rizwana's turn to inspire us!

Seashells on the Seashore
  Create a card with seashells. Use images, dies, stamps or even real seashells on your cards this week. You can even draw or doodle your own seashells. Have fun creating!!
Here is some amazing DT inspiration.

    Click Here for some sunny examples from the design team
 

For the base card I used a smooth white square and covered it with a gorgeous wood grain effect paper from a favourite old beach themed paper pad by Studio Light. I used another scrap of paper from this pad to make the little wall hanging' - and added the same sentiment as on last week’s card, but this time it was one of the decal stickers i made a while back

It seems that I need to replenish my stash of seaside themed odds and ends as I've almost run out of them.  In the end I decided to use what I had left to build up a bit of a collage corner, using some die cut 'driftwood', shells and seaweed to pad it out. To finish I added a little banner in the opposite corner!


Thank you so much for coming by

 Happy Crafting, Take care of yourself, 


Thursday, May 25, 2023

Ceramic Vases


 Hello

Thanks for visiting. 
 I was a 'Spellblogger' with Spellbinders a few years ago and loved every minute! I was really sad when that program was closed down so I was thrilled a few weeks back to be invited to join the Affiliate team and showcase some of the latest products. It was so exciting to take delivery of my chosen items from the Photosynthesis Collection by Simon Hurley!
 
I've been using
  
Floral Stems etched  dies
and
 
 Please note that if you use any of the Spellbinders direct links in this post I may receive a small commission - it doesn't cost you anything at all but its a nice treat for me!

 
This time I'm showing sharing some info and more photos of a card I've made using the  Ceramic Vases die set 
 I started by using a mousse with a subtle pearlised finish to colour some pieces of white card ready to cut and emboss the vase shapes I wanted to use. 
For the background I used a couple of shades of blue mousse on a larger piece and embossed this with 'Tufted' embossing folder from Spellbinders, then adhered it to my card front
Next I inked more white card in the colours I wanted to use for the flowers, plus some in green for the stems and leaves. 

Once cut and embossed, I decorated the vases with some matching tiny gems, made up my flowers and spent a while moving them all around until I found an arrangement I liked before glueing in place.  I've used small pieces of foam tape and some scraps of thick card to  get more dimension
 To complete I tied a Baker's Twine bow around the handle of the urn and added a small black and white sentiment


I really love these die sets and will be using them again and again!

Thank you so much for coming by

 Happy Crafting, Take care of yourself, 


Friday, May 19, 2023

Hello Sunshine


 Hello

Thanks for visiting. 
 
As usual on Fridays I’m sharing my card for this week’s Daring Cardmakers Challenge, and this week it's Miri's turn to inspire us!

    This week I want you to celebrate and enjoy
    SUNSHINE
and hopefully this will encourage the sun to show up a bit
more often in the next few weeks and months 😊.
Put a sun, bright yellow circles or sun rays on your card. It might be a 
sun as a focal point or in the background or as part of a scene.
So dig out your dies, stamps etc. and send some sunshine into the world!
(And after your crafty session go outside and enjoy some sunshine!)

    Click Here for some sunny examples from the design team
 
This was a really simple card to make, but I really love how it turned out!

For the base card I used a smooth white square

I inked 2 pieces of the same kind of card, one in shades of blue Nuvo mousse, the other in shades of yellow ink. The circle for the sun was die cut, the sun rays were hand-cut. The 'waves' were ales just cut with scissors

To complete the card I added a black and white printed sentiment


Thank you so much for coming by

 Happy Crafting, Take care of yourself, 


Tuesday, May 16, 2023

Flower Box!


 Hello

Thanks for visiting. 
 I was a 'Spellblogger' with Spellbinders a few years ago and loved every minute! I was really sad when that program was closed down so I was thrilled a few weeks back to be invited to join the Affiliate team and showcase some of the latest products. It was so exciting to take delivery of my chosen items from the Photosynthesis Collection by Simon Hurley!
 
I've been using
  
Floral Stems etched  dies
and
 
 Please note that if you use any of the Spellbinders direct links in this post I may receive a small commission - it doesn't cost you anything at all but its a nice treat for me!
 
Today I've some extra info and photos for the Flower Box Card I made using the Floral Stems etched  dies 
 
I started by making a regular pop out box card, which folds (relatively) flat and goes into a normal envelop[e for posting.
I inked both sides of some 80gsm plain white card in the yellow and orange tones I wanted for my flowers. I also inked some 300gsm card in green for the stems and leaves as they needed to be stronger to support the flower heads. Next I die cut all the pieces, made the flowers and arranged them on the bars inside the box
 
I cut pieces of green card to fit the three flaps of the box and glued them in place. I then cut three panels of blue card slightly narrower than the flaps, On each of these I die cut the leafy stem shape in a different position, then adhered them over the flaps with foam tape


I really love how this turned out and I really love this die set!

Thank you so much for coming by

 Happy Crafting, Take care of yourself,