Friday, February 25, 2022

In the Nick of Time


Hello!

I've surpassed myself in my lateness with this one.  Earlier today I posted my Daring Cardmakers project for this week - and now here I am posting the one I made for last week's challenge.  I'm so sorry Rizwana. how ironic though that the subject of this challenge was Time!
 
In the Nick of Time

It's Rizwana here with this weeks new challenge. 

Time is of the essence! 

Use clocks or anything to represent time on your card, including watches, hourglasses, sundials or pocket watches.


Click here to see the lovely projects the design team made:
 
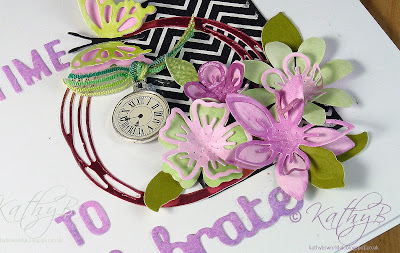
I used one of my precious little pocket watch charms on my card - though I doubt it will still be there when I send the card!  I find it hard to part with tiny treasures like these!
 
 
Info
I've used a smooth white card blank, but trimmed about 1.5 cmx off the edge to make a fat rectangl. 
In my bag of black and white printed bits I found a small piece with a chevron pattern on to use to offset the pastel colours I wanted to use for the rest of the card.  The Tonic Scribbled Circles die was  cut from a pearlescent pink card.
For the flowers I used inked card and a lovely Hunkydory set of flower dies.  The butterfly is also from a Hunkydory die set
For the lettering I cut 'Time to' in a block capitals font and the word  'celebrate' (Spellbinders) tin a script font
I threaded some green ribbon through the loop of the pocket watch charm and fixed it in place, then to  complete the card I added some die cut leaves behind the flowers

 
Thank you so much for coming by
 
 Happy Crafting, Stay Safe, 


FEB Word Play

 
Hello!
Hope you've had a good week.
The last few weeks have been 'trying'.  I don't know whether its  really February's fault or my preconception that February is always a pain in the derrière!
That is my excuse for feeling fed up, under pressure and not managing to get anything done all at the same time.
 
This week it was Joanne's turn to choose a challenge for the  Daring Cardmakers - and this one stretched the brain cells a bit.  Rather klike a crafty Wordle!

Word Play
 As we wave farewell to February, let’s use the month for inspiration in a different way. Make a FEB card! 
Use something beginning with each of those letters in your creation. 
So it might be a foiled elephant juggling a ball, a blue fairy with an embossed background, a baby card with flags and embroidery thread… 
what can you come up with that’s FEB? 
Don’t forget to tell us which items you’ve used in case we don’t spot them!
 
 To help get your creative cogs turning, click here to see the clever ideas the design team came up with!

Four Easter Bunnies

Info
I've used a smooth white card blank, cut to fit the four bunny die cuts - I wanted to use five, but that would have made the card a bit of a weird shape! It already means I'll need to make a custom sized envelope, but never mind!
I taped off a border using Washi tape and filled in the remaining area with a couple of shades of Nuvo Embellishing mousse
The Rabbits are cut using a vute Spellbinders die set from a few years ago.  The ears, eyes and noses were stencilled through the dies and I folded a few of the ears for a quirky look
The eggs are made using a Poppy Stamps die; I glued a few pieces of patterned paper to bits of card before cutting them out.
To finish I coloured some white card with pink Nuvo Embellishing mousse then die cut the 'HOPPY EASTER' letters


Thank you so much for coming by
 
 Happy Crafting, Stay Safe, 


Friday, February 11, 2022

Heartfelt!


Hello! 
Happy Friday
 
Hope you had a good week - to be perfectly honest, I'm not sure where this one went!  Maybe too much time spent watching the Winter Olympics!  I do love watching - though you wouldn't catch me throwing myself off those ramps and doing death defying multiple spins and somersaults!

Anyway, its Friday so time for a new Daring Cardmakers challenge

Its Dawn here with this weeks challenge

My Sweet Valentine

Valentines day is nearly here so I would like you to show me the love and share your Valentines makes.  Make sure your cards feature lots of shades of red and pink and of course love hearts.

We can't wait to see what you make you can see what the Design Team made HERE


 Info
 
I used a tall thin card for this one, and cut a panel of the same kind of card for the upper layer.
The 'squares' were created by using torn Washi tape to mask the borders and filling in the 3 unmasked areas with a couple of shades of Nuvo Embellishing Mousse
I punched and die cut lots of hearts from red, pink, blue and silver card (the ones that look black are actually silver)
I added some loops of silver thread to the reverse of the sentiment before gluing it in place
A row if silver gems was adhered down one edge and more gems glued randomly around the hearts for a bit of bling
 
 Thank you so much for coming by, it would be fab to hear what you think of this one.
 
 Happy Crafting, Stay Safe, 


Monday, February 07, 2022

February Elemental Challenge


  Hello! Happy Friday

So, we made it through January!
However,  February has never been my favourite month - which upsets my Hubby as its the one with his birthday in it 😃😃
I've a busy couple of months for cardmaking and present shopping coming up. with a few birthdays and of course Valentines day too
I should be coming up with some ideas, but I'm really not that organised!

Anyway, its Friday so time for a new Daring Cardmakers challenge
 
This week we welcome in the new month with Enfys's beautiful mood-board

February Elemental Challenge

 I've chosen a leafy mood-board with cool greens and aquas, warmed up with pink red and yellow.  But its not just about colours, check out all the little details on the image and you're sure to find the minimum 3 elements you need to use when you make your card.
 As usual if you use the colour combo it counts as 1 element 

 
 For my card I chose the pleats of the skirt, the leaves and the thread that weaves around in the background.  I've also used a simialr colour palette of pinks, greens and yellows (well gold in my case) and a tiny splash of red

 Info
 
I've used patterned papers from a Studio Light 6x6 pad for the background and the rosette.
  The filigree flowers are cut in gold vellum paper using a die set - I can't remember where its from, I bought it, put it in my folder and threw away the packaging (oops).  This is the first time I've used it despite owning it for several months!
The leaves and the rosette die sets are both by Spellbinders, the flower on the centre of the rosette by Hunkydory and the small flowers in the upper right by Tonic
To complete the card I added some loops of gold thread over the small sentiment, plus a bow made with the same thread, then some coloured 'pebbles' scattered around

 Thank you so much for coming by, it would be fab to hear what you think of this one.
 
 Happy Crafting, Stay Safe,


Tuesday, February 01, 2022

Is it too late for....

Hi there
Is it too late for just one last Christmas card share? I hope not, as I've just found this one while checking through my photos.


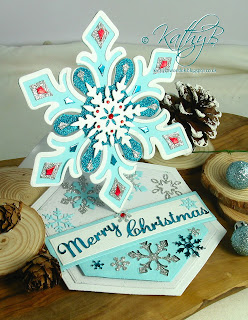
 I shared a snowflake easel card made with  this lovely  Card-making Magic die set, sometime before Christmas. you can see it HERE.  But another of the ideas suggested on the video that accompanied the die set was a kind of overlapping gatefold design that I wanted to try out too.


This time I used a white, silver and royal blue combination and a selection of paper and card with different finishes including pearlised, mirror and glitter

Some of the snowflakes used are die cuts from the set, others are from my ever-growing snowflake die collection

As with the easel card, this one folds up relatively flat to send in a normal square envelope.

 Thank you so much for coming by, please don't go without leaving a little message, I do love to hear from you.  
Or maybe I really am just talking to myself
 
 Happy Crafting, Stay Safe,


Easel Card


Friday, January 28, 2022

In the Frame


Hello!
Hope you've had a good week.
I've been feeling a bit sorry for myself as I've got a cold, but getting through the Winter without one would be a bit of a miracle, I suppose!

This week it was Nat's turn to choose a challenge for the  Daring Cardmakers it took me most of the week to make my card as this cold has made me feel very tired and headachy.  I was late posting because I just didn't have the energy to stick the last few dots on and photograph it, so that was this morning;s job.
 

In the Frame

It's Nat here, ready to set my first dare for 2022!

I want you to feature a frame on your card.

You can use it to spotlight a sentiment or image, or you can go the whole hog with a large frame that showcases your entire card design.

It's totally up to you!

To help get your creative cogs turning, here are the lovely projects the design team has made:
 

Info
I've used a smooth white card blank, but trimmed about 1.5 cmx off the edge to make a more interesting fat rectangle shape. To add some texture to the background I part-embossed the card front with Cuttlebug's Distressed Stripes folder - an old one, but still a favourite! By placing the folder and card at an angle on the platform I was able to get a diagonal embossing on the the left of the card/
The frame is created using a couple of nested rectangles form Tonic.  The backing piece is a remnant left over from my card for January's Inspiration challenge card.
For the flowers I inked one side of a piece of thin white card in yellow shades and the other in peach tones, then die cut the  petals using a Hunkydory die set..  For the leaves I used a couple of different dies and shades of green inked card. s

The sentiment is another of my pc generated ones and the tiny dots are the 'waste' from using a border punch on gold glitter card and the scraps of that used for the flower
 Hopefully you can see the embossing better on the photo below


Thank you so much for coming by
 
 Happy Crafting, Stay Safe, 


Monday, January 24, 2022

HAPPY card 2


Hello
So, last week I shared a birthday card made using a Crafters Companion HAPPY shaped die set.  Today's card is in a similar vein, but in a different colour palette and with some different flowers.   Shabneez and Sarah's birthdays were in December and the opportunity to get away from Christmas colours and shapes and "go girly" with pretty colours and lovely flowers was just too good to miss!
But one day I shall use this set to make something more masculine - I have loads of 'boy' birthdays coming up so watch this space!

Anyway, back to Sarah's card


 Info

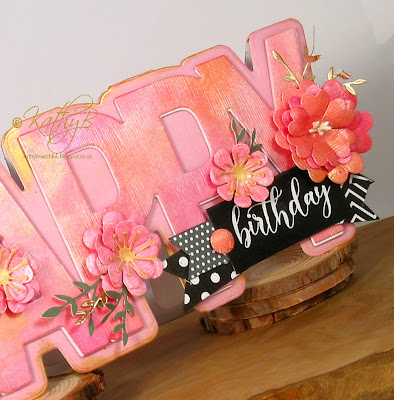
This time I chose a yellow, orange, peach mix of colours for the background shaped card, the upper layer of the letters and also for the thinner card I needed for making the flowers.  I used inks and Nuvo Embellishment mousses for this both sides of the thin card were coloured as the flowers would be 3D
 

I've not had the chance to make a big rose since the card and box I made for my nephew and new niece in law's wedding in July. so as this card would be hand delivered I took the chance of going ultra dimensional with my flowers!  Well, it would be rude not to, wouldn't it?
There is something so relaxing and satisfying about making a paper rose, I always enjoy making them. 
I cut the petals for this one using an extra large flower punch.  I have instructions on how to make paper roses HERE
 
 
 To balance the large rose I used a little trio of small coiled paper roses on the 'H', and added some green die-cut leaves to set them all off.

 To complete the card I made e sentiment piece using black and white sentiment and patterned pieces from my bag of bits.  I can't remember what font I used on this one, but I really love it!
Obviously, with the big flowers this was never going to fit into a regular DL envelope so I custom-made one to fit it. If I'd needed to post it I'd have made a box for it instead


Thank you so much for coming by, please don't go without leaving a little message, I do love to hear from you.  
Or maybe I really am just talking to myself
 
 Happy Crafting, Stay Safe,


Friday, January 21, 2022

Think of a Number

Hello!
Hope you've had a good week - its been pretty chilly here - we've had a frosty start to every morning. but a bit of sunshine occasionally too.  Lots of very clear moon-y nights too.

This week was my turn to choose a challenge for the   Daring Cardmakers 
 
Think of a Number
I'd like you to make one or more numerals the stars of your card in some way this time. 
It could be for one of those 'special number' birthdays or anniversaries. using a background formed from numbers or perhaps you could even make a number shaped card.
 
Info
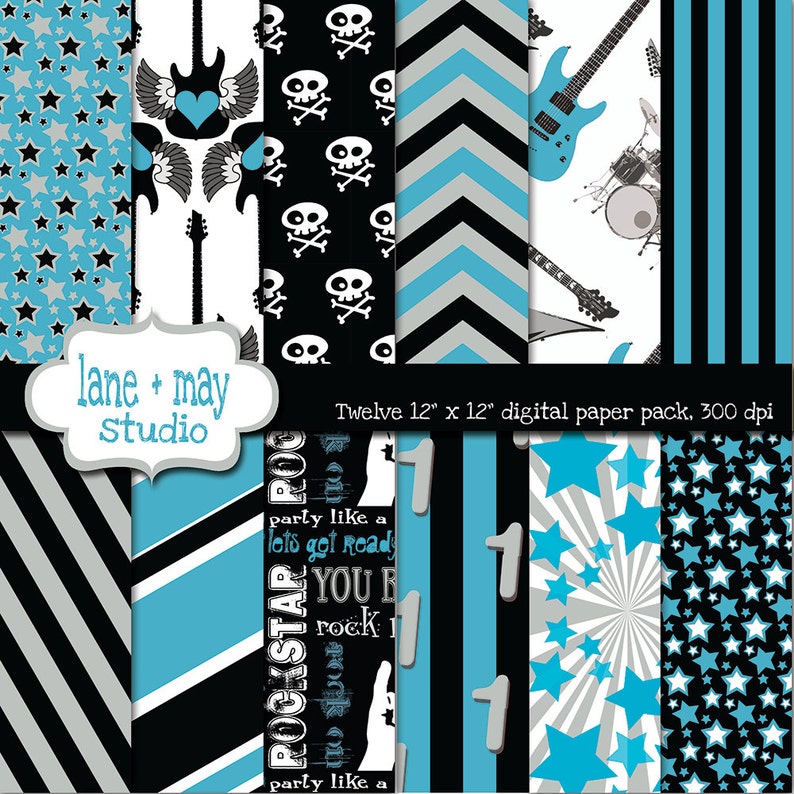
I've used digital papers from the Rockstar set by . via Etsy for this 16th birthday card, they were resized and printed onto white Bazzill card. 
I also gave my Silhouette Cameo an airing for the first time in a couple of years - with hubby working full time from home now and in the same room as me and my noisy gadgets I've avoided using the ones that take the longest time.  But this time I wanted supersized numerals so managed to be organised enough to download the papers and set up the Cameo to cut all the number layers at the weekend!
The numbers were cut three times in navy blue and once in the patterned cardstock
The base card was covered in a drums and guitars design and the numerals glued in place.
I added some silvery threads across the top and some stars punched from matching  colours, plus the happy birthday sentiment
Finally I die-cut the letters SAM from a couple of layers of white card and a top silver layer. and inked around the edge of the card with black ink for a bit of teenage grunginess

 
Thank you so much for coming by
 
 Happy Crafting, Stay Safe, 
 

Monday, January 17, 2022

HAPPY card 1


Hello
No, don't panic, you've not slept through the week and its Friday already - it is actually me posting on a Monday and trying to get back to a couple of blog posts a week, at least while I have catching up to be done.
Back in September, Shabneez sent me a lovely birthday card made using a Crafters Companion HAPPY die set.  Obviously I had to buy it myself 🙄, but then it sat in the box as I got on with other things.
Then when it came to making a card for Shabneez's own birthday I couldn't resist using it!
 

 Info
The first die in the Crafters Companion HAPPY die set cuts your shaped base card and the second die cuts is used for the word on the top.  I was pleasantly surprised at how well the first die cut through two layers of 280gsm card with only a couple of runs through my eBosser.
I used a Hunkydory pale pink card for the base layer and added a bit of Tonic Indian Gold Embellishment mousse around the edges.
Next I used pink and peach inks and Embellishment mousses over both sides of a sheet of thin smooth white card to use for the top layer of letters and for the flowers. I also cut a couple of layers of letters in my regular cardstock, gluing these on top of each other and finishing with the coloured layer of letters.
The sentiment piece was made using black and white sentiment and patterned pieces from my bag of bits - I never throw any of the bits I make away as they always come in handy eventually! 
Once this was in place I make the flowers and decide where they would look best.
For the flowers I used a couple of different Spellbinders flower die sets to make layered flowers in a few different sizes, plus a few leafy details in green and gold. Some of the flowers have pre-made stamens, some have die cut ones.
To finish I shaped a small punched circle to create a faux brad.
 
And then I realised that my love of going 'over the edge' meant the card wouldn't fit in a regular DL envelope.  Doh!! 
So I grabbed a sheet of 12x12 card and made one.  I would say that you live and learn, but I'm not sure I ever will do the 'learning' bit now!
 

I've another of these cards to share, but I'll save that for next time

Thank you so much for coming by, please don't go without leaving a little message, I do love to hear from you.  
Or maybe I really am just talking to myself
 
 Happy Crafting, Stay Safe,