Friday, July 26, 2019

Talking of the Weather....


Good Morning!
This week's  challenge at The Daring Cardmakers is all about the weather.  How very apt - considering that the weather has been the 'hot' topic of almost every conversation over the last week or so!  Yesterday we were due to have some fence work done, but at about 10.30 in the morning, with the temperature already at 35C the guys gave up and went home.  I really didn't like the idea of anyone collapsing with heatstroke in my garden, so I was happy enough to see them go! The temperature eventually went up to 38C yesterday afternoon, which is ok if you're just sitting on a balcony at the seaside, but otherwise not!

The last few nights we've had the fan going all night and its still been uncomfortably hot, we had quite a lot of thunder overnight, and as I'm writing this I can still hear it rumbling, and its getting closer again.   
So the scene is set for this:
This week the Daring Cardmakers have a sponsored challenge so we hope you will play along, and maybe win one of our fab prizes!

Whatever the Weather
 
Just make any weather-themed card this week, and link it to our blog to be in with a chance of winning a prize.  
We have 2 collections (worth about £12.50 each) of Julia's wonderfully fun images to give away. 
Our 2 prize winners will be drawn at random next Friday after the challenge closes.  
To qualify, Please mention www.jmcdesigns.co.uk in your post and remember we're on UK time!
 
I decided to make a sunshine themed card with a simple design
Info
White card blank with white and yellow squares matted onto it
I inked some spare card with shades of yellow ink for the circle and the rays. I die cut the circle and just sliced random widths using my guillotine to make the rays.  I added some warm yellow-orange to the circle to heat up the sun even more.
Using the circle as a guide I lightly inked around  the white card where the sun shape would eventually be placed.  Next I adhered the sun rays in position before covering all those ends with the sun shape.
the two words were created in Paint Shop Pro and cut out on the Silhouette Cameo in two shades of grey card.
To complete, I added lots of dewdrops and other jewel embellishments in grey and yellow

 
We'd love to have you join in with us this week, just click on the Daring Cardmakers link to find outall about the challenge and the prizes we have this week


Thanks for looking in today

Happy Crafting!


Monday, July 22, 2019

Another First

Hello
How are you?  It's lovely and sunny here today, I've been down the garden to the veg plot and picked some runner beans and some carrots to have with our dinner later.  Hopefully there will be enough coming in the next few weeks to freeze lots of beans for later in the year.  We've had a couple of courgettes so far too and the tomatoes have 'set' and are coming along nicely.

A few years ago I was thrilled to bits when my nephew Charlie graduated with a First from university.  Well, now it's happened again, this time it's our niece Emily who's taken the honours with her First in Psychology!
I wanted to make the same kind of card for her as I did for Charlie, but when I looked back at my photos I found I didn't really take any that actually showed how I did it!  If only I was organised to note down what I did when I come up with something like this! I had a vague idea about how the folds worked and after a couple of tries just using paper it all clicked into place, thank goodness.  

 Info
Card: Black, Yellow, Pale Blue, White, Gold
White paper and narrow ribbon for the scroll
Black and Gold Twine for the tassel
The sentiment and mat are cut from my own template using my Silhouette Cameo
The base card is folded to provide a hinged section for the mortar board section.  Before adhering the mortar board in place the tassel, made from fringed and tightly rolled card is added; the twisted together twines are threaded through the centre and concealed when the upper square is glued in place.
The mortar board stands up in a similar way to an easel card, whit the scroll acting to keep it in place
It folds down for posting - not exactly 'flat' but okay for sending with a 'large letter' stamp


Congratulations Emily, you worked so hard for what you've achieved and your uncle and I are thrilled that it's all come out so well for you.  We're so very proud of you.

That's my lot for today, hopefully I can keep up with this twice a week blogging - I mean this is two weeks running.  Go me!!!!

Happy Crafting!

Friday, July 19, 2019

Stay Sharp

Morning All!

Hope you're feeling well today.  We've had a bit of rain today - the garden will definitely be thankful, I can almost here the grass pleading for more.

As usual, on Fridays it's Daring Cardmakers day and we're in a prickly kind of mood this time!

It’s me, Miri, bringing you a new challenge and I would love to see a cactus or several cacti on your card!
cactus/cacti
Cacti always remind me of summer, sunshine, deserts and holidays… and I just can’t wait for our summer holidays to begin and for the sunshine and heat to come back again.
Luckily cacti are a huge trend at the moment and you can find them on many stamps and patterned papers. 

Click HERE to see what the team made this week
 
I made a window box card this time.  The lower edge of the front of the card blank is folded to make a kind of box shape, which folds flat to go in an envelope but when opened up stands out. The back of the card needs to be trimmed down accordingly.
To make the little plants stand out, I made a separate section for the 'sandy' base with slits cut into it to tuck the plants into.  I added  scrap pieces of card to the lower edges of the little plants and poked these tabs through the slits, then folded and glued the tabs to the underside.  When they were all in place I used double sided tape to secure the whole plant section to the window box/
Info
White card blank folded to create shape, back section trimmed to match.
The background was inked in blue and the front of the window box was made from a piece of yellow card.  I used an EK Success border punch to create the fancy edge
A strip of sandy coloured card was used to make the base for the plants.
The plants are die cut in various scraps of green card using a Spellbinders die set, some of the flowers are dies from the same set, others are made using a small punch
On this photo you can see the box effect and how the plants are standing 'proud' better.
To finish I tied strands of Bakers Twine around the front section of the box and added a multi loop bow.

We'd love to have you join in with us this week, just click on the Daring Cardmakers link to find out more

Thanks for looking in today

Happy Crafting!


Monday, July 15, 2019

The Shape of It

Hello!

I've been a really rubbish blogger in recent weeks so have a few un-blogged cards, so I'm going to try to do some catching up.  If I can grove enough willpower to blog a couple of times a week, I'll be happy!

Today's card is one I made for my maths geek nephew's birthday.  I really wanted to do something with a fancy and meaningful equation on it but I'm too dreadful at maths to work anything like that out, so I went for a bit of a pun with some geometric shapes instead.  
Believe me, creating an equilateral triangle when I couldn't find my set of compasses was enough of a challenge!


Info
White square card blank with horizontal panels in white, yellow and orange.
Circle and triangle shapes inked on edges, tiny googly eye embellishments with other features drawn in pen.
I used some speech bubbles preset shapes in Paint Shop Pro with the text added inside, then I resized them to fit my card
The Happy Birthday sentiment is from Spellbinders


He didn't 'laugh out loud' when he opened it, just gave a nod - which is about as good as it gets for my quiet nephew !

That's my lot for today

Happy Crafting!

Friday, July 12, 2019

The Wedding Season

Morning All!

Hope you're feeling well this sunny Friday morning!
My hayfever has been an absolute mare this week, so if you're a fellow sufferer I feel for you.  Thank Heavens for Kleenex Balsam tissues, I say!
Yet again it's Daring Cardmakers day and I have failed to add another post here since last week's.  I've just been chatting with the lovely Shabneez (she of the Happy Hijabi) and I told her I was planning to write 2 posts today, one to publish now and another to schedule for another day.  
What do you reckon?  Can I do it?
On an aside, I do wonder what her happy hijab looks like....maybe covered with smilies? Or just a fabulous mix of zany patterns and colours? At Portmeirion last year I saw a woman wearing the most beautiful arab dress (abaya?) in peacock colours that shimmered when she moved.  It was stunning.
Anyhoo, as I said it's Daring Cardmakers day and we have Ruth in Romantic Revelry this week
 As we are in the season for Weddings, and plus its always good to have a few Wedding cards in your stash!
So this week's theme is:
 Weddings
CLICK HERE to see what the design team came up with
As our Wedding Anniversary is coming up I had a plan to get ahead and make OH's card for this challenge.  However "plans" don't always come together, do they?  So I thought I'd keep it simple and make a wedding card after all.
I went looking on Etsy for some inspiration by way of digital papers with a wedding-y theme and found a lovely set by CherryWorkshop2 and one design just screamed out to be used for (another) eclipse card:


Info
I resized one of the designs from the
Cherry and Mint In Bloom Digital paper download set and printed it onto white Bazzill card 
The letters were cut using a Spellbinders Alphabet set.
4 more of each letter cut from mint coloured card, all layers were then glued together. The inner waste bits from the 'D' letters were adhered to small pieces of clear tape then attached to the back of the letters so that they showed through.  
I attached the background paper to my base card, then all the letters were  glued into their correct placesA piece of white satin ribbon, along with some silver twine was wrapped around the top of the card. 
I die cut small hearts from back to back pieces of more of the papers in the set and fixed them together with one end of pieces of silver twine between the layers.  The other ends of the twine were adhered behind the ribbon.
To finish I tied a double bow from the ribbon and glued in place on the ribbon above the dangling hearts 
We'd love to have you join in with us this week, just click on the Daring Cardmakers link to find out more

Thanks for looking in today

Happy Crafting!


Friday, July 05, 2019

July Elemental Inspiration


Hello
How are you?  
 We've been enjoying some lovely sunny and warm weather this week, so I hope you are too, wherever you are!  

Dawn has chosen a fab picture for our Daring Cardmakers challenge this week - its perfect for Wimbledon, who can resist a lovely Cream Tea with jam, cream and scones while watching the tennis?  Sadly, I don't have the cream tea, and I only have the tennis on the telly - but hey, you can't have it all....
Anyway....

It's the first Friday of the month which means its time for 
July's Elemental Inspiration Challenge.

We have a lovely Summery picture for you to be inspired by
this week .
Just remember you need to pick at least 3 elements from the picture to be featured on your card. (the colours count as one element)
ideas: Layout, Colours, Fruit, Jar, Tea-set,  Woodgrain, Gingham, Fabric....

I chose the tea-pot (but used a coffee pot instead), Gingham, a Spoon and some Fruit (the very tiny cherries on my cupcake!).  I also kept largely to the colour scheme, though that was more because the first gingham fabric style paper I found in my stash was blue!

Info
Gingham stylw paper from an old MME 6x6 paper stack
I also used an embellishment piece from another of the papers in the stack to cut the matching cup shape.
Red, White, Silver and Brown cardstock
The cup, coffee pot, spoon and cupcake are all cut using various Spellbinders die sets
The plain circle and the oval for the plate are from Tonic nesting sets and the scalloped circle from a XCut nesting set
I couldn't think what to add for a sentiment, so have left it without one for the moment (because actually I didn't have time to find the perfect one to use because I was so late getting it done!)

We would love you to join in with us.  You can link your creations to our BLOG - HERE. or find us on Instagram - or better still, link to both!
I'm going to try much harder to do a couple of blog posts a week - I've been failing dismally lately.  I have a few things lined up - I just haven't managed to blog them yet.  

Anyway, that's all for this time, thank you so much for visiting, please leave a message...
Happy Crafting

Friday, June 28, 2019

Paper Dreams

Hello!

I hope you're well and enjoying this sunny spell we're having just now.  Not as hot here as in some parts of Europe, mind!  My lovely friend 
Our Daring Cardmakers challenge this week is set by Dawn, who lives in France and I see the temperatures over there are getting silly.  Stay cool, Dawn!
For my challenge I would like to see you use up your beautiful designer papers.
Cut It Up
I know we all like to save our lovely pretty papers but I want you to make them the main focus.  Your could simply use a lovely big piece and just add a greeting, cut out lots of pieces and make a pattern or just use elements from the papers to make a topper for your card.
Click Here to see what the team made this week
 When I read Dawn's challenge I knew I would make an 'eclipse' card.  I've meant to do one for ages and this was the perfect excuse to have a go. I still had last week's Midsummer Night's Dream thing in my head and one thing led to another and I came up with this
You know I love using digi papers, don't you? Well, rather than spend hours trawling through my paper pads looking for the 'right' design, I thought I'd check first to see whether any of my downloads might be suitable - and found the perfect picture paper to use.

Info:
Digi background paper design is from "Seascape" my MicheleRDesigns, but sadly this shop doesn't seem to be operating any more.
I love the faded, torn effect around the image, so resized it to completely fit my card and printed out onto white Bazzill Bling cardstock.
 "DREAM" letters are from a Spellbinders Alphabet set.
Save the cut out letters and the little 'waste' bits for later!
4 more of each letter in a darked blue shade of card and glued together. Corresponding letter from the patterned paper on top.  
I glued the tiny bits from the D, R and A I onto small pieces of paper then adhered in place on the back of the relevant letter stack
The background was adhered onto the card blank then the letter stacks glued in place
 The parasol and the deckchair  were cut on the Silhouette Cameo from my own templates
The sun hat was hand cut and I trimmed with a knotted piece of narrow ribbon
The lighthouse and little tug boat are painted wood embellishments I've had in my stash for years, as are the little shells

That's it, all done for this time, I hope you like it
Thank you for looking, please leave a message.....

Happy Crafting!

Friday, June 21, 2019

A Dream for Midummer

Morning All!

Hope you're feeling well this sunny Friday morning!
How did we get to the Longest Day already - and without much sunshine to show for it so far....remember the long, hot summer of 2018? A bit of a dim and distant memory, eh?
  
It is of course, Daring Cardmakers day and Nat's challenge this week celebrated the day.
Midsummer's Day 

This week I'd like to see your cards in celebration of Midsummer's day - the longest day of the year here in the northern hemisphere and sometimes one of the prettiest summer sunsets to boot...

There are so many summer themes to choose from, but you will get extra gold stars if you make a card inspired by Shakespeare's play, A Midsummer Night's Dream. :D

CLICK HERE to see what the design team came up with
This is a completely different card to the one I set out to make.  So I filed all the attempts I made at that one in the bin, cleared my desk and started again.
Flicking through my scraps box looking for an off-cut of white card to use for a background I found instead a spare piece of card that I'd printed out when making a card some time ago. Perfect!


Info
Digital paper download set from RomanticLetters,printed onto white Bazzill card. This panel was cut down and matted onto some olive green card before adhering to my card blank.
I inked up scraps of white card in yellow and orange shades ready for cutting out the pineapple and the glass.
I used two Spellbinders die sets the glass from one and the leaves and pineapple from another.
I found the silver metal 'dream' word in one of my "might come in useful one day" boxes. I know it looks black in the main picture, but 
this one shows the colour better

Once all the bits were glued together, and I'd added a few bits of thick card behind them to give some dimension and definition it was just a case of arranging them into a group and glueing down.


I'm hoping that adding the 'dream' will just nudge me into winning Nat's virtual gold star for the Shakespeare's A Midsummer Night's Dream 'nod'

That's it for this time. I spent hours trying to make Plan A work, whilst Plan B went together in about half an hour thanks the serendipitous background find!

Thanks for looking in today

Happy Crafting!


Friday, June 14, 2019

Flying High

Hello!
It seems that 'm back to my bad blogger ways!  I'm not quite sure what happened to his week, but updating my blog since last Friday obviously wasn't one of the things that got ticked off the to-do list.

We did have a lovely evening at our local cinema to see the live-stream from the Royal Opera House of the ballet Romeo and Juliet.  Without giving anything away, the story didn't end well ;)

This week on the Daring Cardmakers challenge blog we have our lovely Svenja in the hot seat:

It's Svenja here with a new challenge for you:

Come, fly with me!

I'd like to see all kinds of things that fly on your cards: birds, bees, planes, kites, superheroes... whatever comes to mind.
And of course the Design Team members have already taken to the skies to inspire you - see their cards HERE

Probably the obvious choice for me was to make some butterflies for this one.  Or bearing in mind the weather we've been having recently I thought of making a flying carpet and flying off to somewhere dry!
In the end though I decided to make a kite, and when I found the inky background while sorting through a box of 'stuff' I thought I could incorporate it into the design
 
Info
Inked background was  made for another project but not used in the end
Pieces of card were inked up in the colours I wanted to use for all the other components
The various pieces for the house was hand cut, as was the kite
The clouds were die cut with a Spellbinders die set
I used my own template and the Silhouette Cameo to make the little girl 
The kite is attached using wire, I added a piece of gold twine with knotted pieces of coloured Baker's Twine for the tail
The upper cloud, and the little girl are both attached with folding 'box' hinges behind them so that they can stand right out from the card
To finish I added a rub on decal sentiment


I quite like the simple and 'naive' look to this one.  Not that it was actually simple to make!

Anyway, that's all for this time, I hope you like it, I'd love to know what you think so please leave a message

Happy Crafting!

Friday, June 07, 2019

June's Elemental Inspiration Challenge.

Hello there!
We're having one of those "sunshine and showers" kind of days today.  When I say 'showers' I mean 'downpours', though.  I'm glad I'm not needing to go out today!
After a week staying with my family in Northumberland it's been really hard to get back to my craft desk - or anything else, for that matter.  So my card for the Daring Cardmakers was a bit last-minute this time.
 
As usual our first challenge of the month is an
Elemental Inspiration Challenge
For June we have this beautiful Mood Board. Remember, you just need to pick a minimum 3 elements  from the picture to use when making your card.  

If you choose to use the colour palette, then that would count as one of your elements
We also have the very talented Sonja Kaufmann joining us for the next few weeks as Guest Designer.  We've been waiting for Sonja to have a Daring Cardmakers-shaped gap in her schedule for ages, and finally it's here!
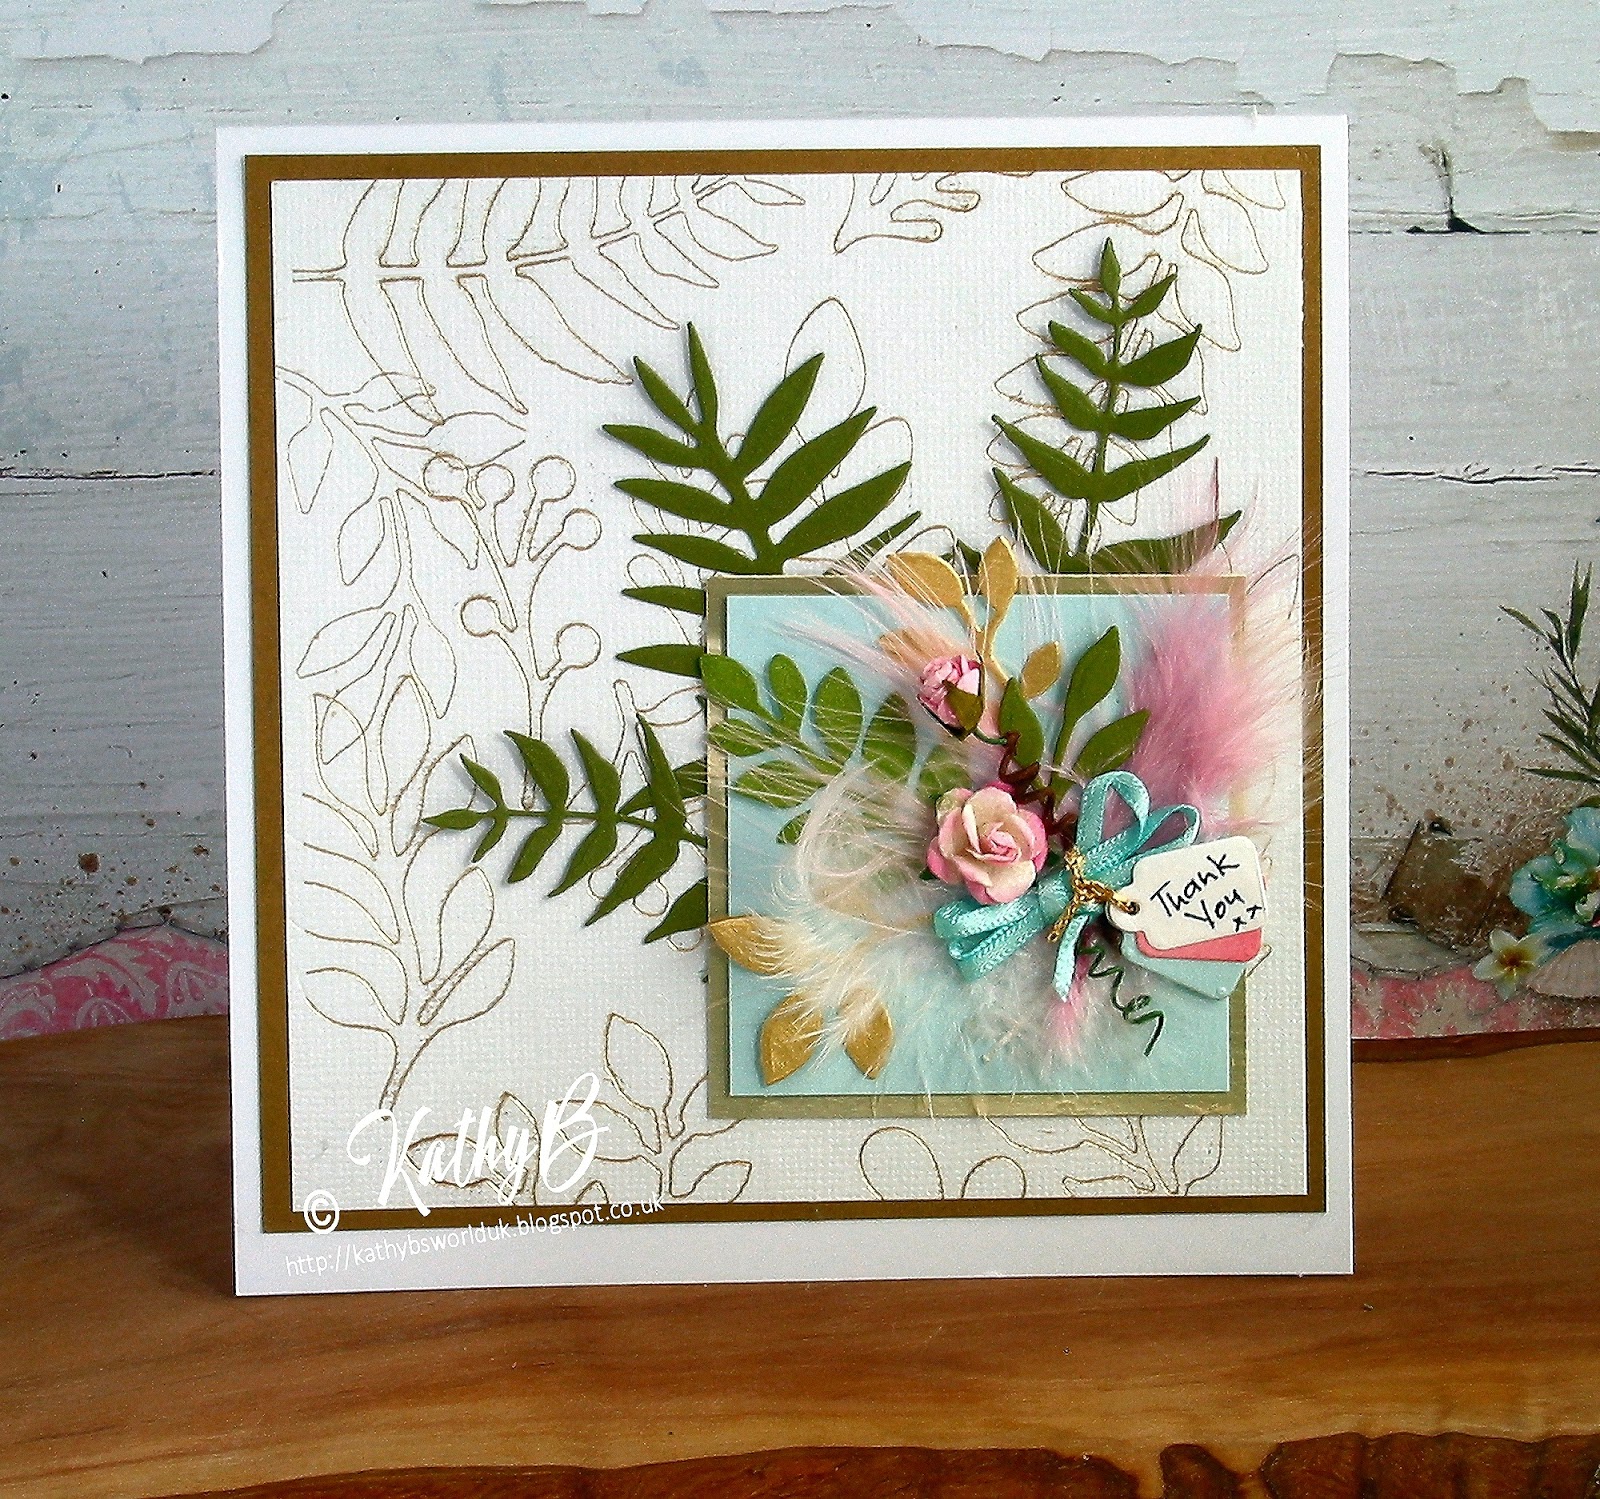
  I chose the leaves, feathers, the tags and the squares from the picture to use on my card, and decided to keep largely to the colour palette too


Info
For the background I set out lots of different leafy dies on my GoPress & Foil machine, added the soft gold foil, a piece of white Bazzill card and a couple of shim layers.  After heating I rolled the sandwich through my trusty old Cuttlebug, brought out of retirement for using with the GP&F as my eBosser just doesn't do the job!
Next I cut down and matted the foiled piece onto gold card and then adhered this to a plain white card blank.
 I cut several of the leaf dies in shades of green and gold, and sorted out 3 small pink and white feathers to use on the focus square.
A square of aqua pearlescent card was matted onto a slightly larger gold square and 3 of the larger die cut leaves were arranged behind before gluing in place
 in the lower corner of the card.
The pink and white feathers were arranged along with some of the smaller die cut leaves and adhered to the aqua square.
The stems opf a couple of roses were coiled around a bamboo skewer then glued on top of the feathers.  I tied a triple bow from narrow aqua ribbon and glued it across the stems, then die cut three tiny tags in matching colours to add to the 'bouquet'

Do you have stuff in your stash that you bought years ago and hardly ever get out to use?  The feathers are one of these things for me - I have bags of different colours bought when it seemed a good idea for some reason or other.  It was good to use some - even if it was just three of the smallest!

It would be great if you'd join in this week, we'd love you to share your creativity with us.
I hope you'll take a minute to leave a message, it's always good to read them - and I always try to reciprocate and visit your blog too.

Thanks for looking, have a great weekend

Happy Crafting!
Friday, May 31, 2019

Secret Hideaway

Hello 

I hope you’ve had a good week and have a lovely weekend planned. 
If it’s a bit dull and dreary where you are, as it is here this morning, perhapsa spot of crafting would be good- like joining in with our new challenge!
Maybe thoughts of warm sunshine were in my mind when I made my card for Joanne’s challenge to The Daring Cardmakers this week!
Secret Hideaway

This week I would like you to create a card with a hidden element.
Perhaps a camouflage/eclipse sentiment with
die cut words or letters, or a pocket to tuck
something into.,
Or add a flap to conceal a surprise image or sentiment...
My card for this week features a Secret Hideaway in two ways, firstly the doors hide the secret element then they open to reveal my own perfect Secret Hideaway!

L

Info

I started by making the doors, hand cutting the shape and adding various shades of ink to both sides to create the old, distressed wood look. I drew lines to look like the planks then cut the piece down the centre.  I added ‘hinges’ to the outer edges (because I forgot to allow for them w hen I cut the original
shape!)


For the wall I adhered paper to a piece of card the same size as the base card


cut out the doorway shape and glued the gate in place using the hinges. Next I cut pieces of paper covered card and glued in place to make the stone archway, added a latch to the gate and a potted plant to stand by it. 

..

open the gates and you find a lovely view of a terrace overlooking the sea and a couple of potted plants. 
I found the picture online and resized it to fit the aperture made by the gates. It was slid up between the card base and the top layer before everything was stuck in place. 

I wouldn’t mind opening my doors to this view, would you?


Anyway, that’s it from me for this time, I’d love to know what you think, so please leave a message in the comments


Thanks for looking 

Happy Crafting!