Friday, May 31, 2013

Making it Myself

It's my turn to set this week's challenge for the Daring Cardmakers:


"I think we've probably all saved links to wonderful projects and ideas that we'd like to try out....one day, so this week I'd like you to.....
 Make It Yourself 
It's all about making your own embellishments. You can use one of those saved "I'll try this one day" ideas, or come up with your own decorative element and use it on your card.
 Use felt, card, paper, fabric, ribbon, lace, wire - anything you like, but no cheating and using a ready made one LOL 
 If the idea is your own, it would be especially good if you could add a little tutorial when you add it to your blog, and if not then a link to where you found the idea would be great, so we can all be inspired!"


Well, I quite often use my dies, Craft Robo and fussy cutting to make flowers and other embellishment - I love using ribbon and lace and other bits and pieces from my stash to make the decorative elements, so I had a look around for something a bit different.  
It was while browsing around Pinterest that I spotted some beautiful beaded pins and thought that one of these might do the trick.  I already had the pins - bought months ago and unopened, and what a good excuse to delve under the desk and drag out the crate with my bead boxes in it.
Obviously I completely forgot to take photos of the making of and of the finished pin before it was fixed onto the card.

 I used a couple of Distress Inks to colour the card I used for the background of the butterfly, and also used this piece as a stencil to add some shading to the background - this didn't turn out as planned - it was supposed to be wispy and ethereal, but you can't have it all, eh?
I've used Glossy Accents to keep the various beads in place, and then a needle with silver thread to fix it to the butterfly wings.  Once the wings had been glued into place, I made another stitch down near the catchy-fastener-thing.  The threads can just be snipped off to remove the pin.
Materials and Tools
Deep pink "Best Creations" Glitter Card (from Craftz Boutique) 
Distress Inks on both sides of smooth white card for the butterfly wings and to stencil onto white background card
Bazzill Bling turqoise card for fancy wings
Long Pin and Dewdrop jewels from Charmed Cards and Craft
Beads from stash
Silver thread and narrow braid, Glossy Accents
Craft Robo for Plain wings
Memory Box Butterfly Die for Fancy Wings
Spellbinders Die for tag, pc generated sentiment
Woodware Butterfly punch 
Circle Punch

This took ages to make - not because there was anything difficult or time-consuming, not even because of the difficulty of choosing which beads to use. No!  It was trying to get the background made and get the little sentiment to fit the circle I wanted to use that took the time - you know, the stuff we do all the time that should be the simplest to get right.  
Anyway I hope you'll head over to the DCM BLOG and take a look at some truly beautiful embellishments, all handmade by our wonderful design team.  We'd really love for you to join in with us and share your own embellishment-making tips and techniques with us this week.

Thanks for visiting, please leave a message....

Tuesday, May 28, 2013

Crafty Templates Blooming!

I'm posting on the Crafty Templates/Quirky Kits Ideas Blog today.
My card actually used templates from the March set of Crafty Templates but it's one I didn't get round to sharing till now.  
Hopefully the warm weather we had at the weekend, and now the rain we've had today will have all the gardens blooming soon!

After I'd used the "Watering Flowers" template to make this card, the top left area looked a bit bare, so I added a mini garland of flowers and leaves from the "Flower Garland" template to add a little more floral decoration
For a change, I used a tiny snowflake punch to make the pink centres for the flowers on the garland.  The printed leaves were leftovers from a card I shared here a week or two ago.  So glad I saved them just in case.... ;).  It's nice when just for once that notion works....

These papers, along with the chunky flocked letters all came from recent Quirky Kits.  From my stash I added the green ribbon for one of the flower stems and a turquoise gems

Find out all you need to know about Crafty Templates and Quirky Kits by clicking HERE!

Friday, May 24, 2013

Tree-mendous


 This is my card for our lovely Zuzana's theme over on The Daring Cardmakers blog this week:
Zuz says:
As we learned at school trees are essential to life. 
They come in all variety of shapes and sizes and they look so interesting 
throughout the year. So
Let's Plant a Tree! 
I would like to see trees on your cards. It's completely up to you what kind of technique, colours and 
material you will use. Can't wait to see your creations!
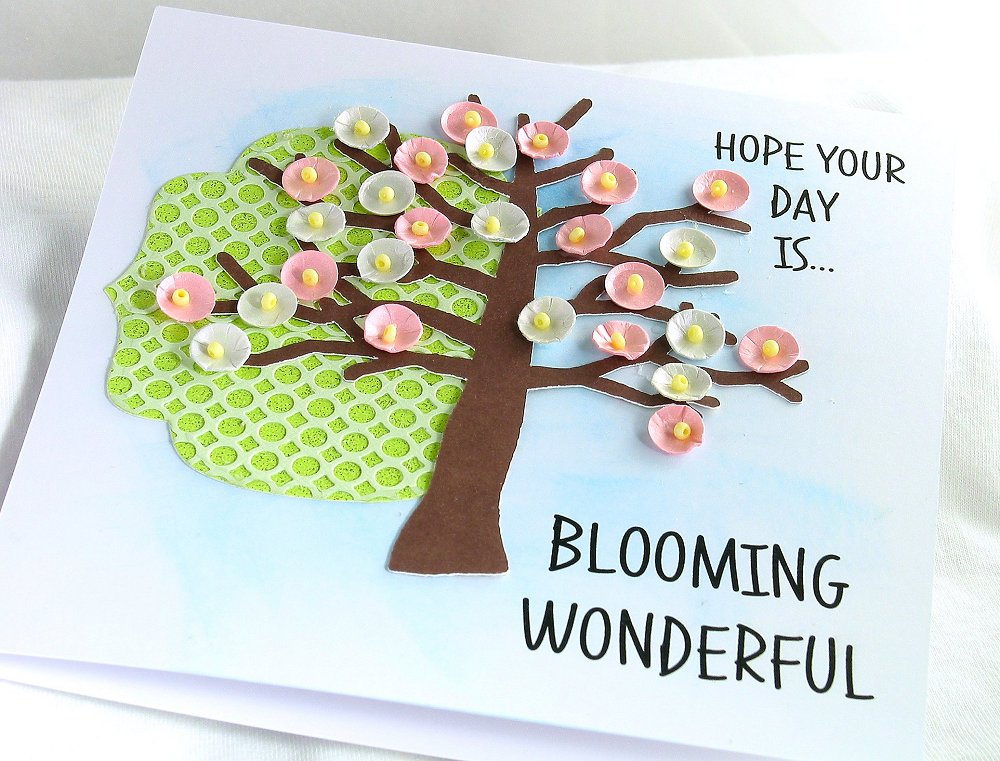
I love to see the blossom on the trees - it really lets you know that Spring is here.  Mind you, no-one seems to have told the Weather-Maker yet as it's been damp, chilly and miserable for the last couple of weeks!
I've used |Pink and Cream Card Candy to make the tiny blossoms on my tree.  Some is just used "upside down" and some I've turned inside out and used a quilling ball tool to make a more random, fluted shape.
Materials and Tools
Background: 2 x blue Distress Inks used directly onto the card blank, then the card was run through the printer to add the sentiment
Pale Green card, Deeper green card with embedded glitter, Brown card
Pink and Cream Card Candy. Yellow beads
Craft Robo to cut the tree
Memory Box Contempo Circle Die
Nesties labels 9
Medium headed Ball tool

I'd wanted to use a Memory Box tree die, but it looked a bit small for the card so I found a similar image on Google Images and converted that to cut on the Craft Robo

For the green background I used a couple of the Contempo die cuts, lined up and glued to the darker green card, then cut out with the Nesties die - another for the list of "Ways to use this die"!
I did have another card in mind - a bit of a painty experiment - but it went all to pot so you won't be seeing that one!
Might have to have another go one day though....
I hope you'll join in with us this week, it's such a lovely theme to work with - check out the cards the rest of our fab Design Team have made HERE
Thanks for visiting, please leave a message....


Tuesday, May 21, 2013

Balloons

Today is Sketch File Update day and Jackie and I have new projects to share over there, I hope you'll take a look and maybe also follow the links that have been added to see what others have made too.

I've been playing with new downloads from Funky Hand.  There are four collections, themed for weddings, a different set for each season of the year.  Actually they have a much wider appeal than the title "Wedding" suggests, so don't think you won't be able to use them unless there's a wedding in the air.

For my Sketch File card this week I used the "Summer Wedding" set - I really love this pink, peach and creams paper set.  So far I've made a little gift box which I'll share on another day, and this card using the May "Cascading Circles" Sketch File LO


 Tools and Materials
All papers Funky Hand Summer Wedding download (available soon)
Cream Satin ribbon
Various fibres
Rub-on sentiment
EK Success Border Punch

This is the sketch from The Sketch File that I used for my birthday card.

I printed the papers on Bazzill textured card - the effect is really lovely so I'll be doing this again.  I only had 12x12 so cut them down to A4 size for printing.  I then did some cropping and resizing of the designs so that I could also use the strips I cut off the 12x12 sheets - cunning, or what? ;)

The balloons are hand-cut, then shaped using a quilling Ball Tool.  I added scraps of chipboard under the balloons to keep the dimension.


That's all for today, I hope you like what you see hear and will come again soon

Thanks for visiting


Monday, May 20, 2013

Glammed Up Notebook


Just before Christmas I bought a few gorgeous plain notebooks with Kraft covers from Paperchase.  The idea was to decorate them as "Little Extra" gifts.  Well, in the usual way of these things, I didn't get around to doing any at all - nothing really surprising there, eh?
Anyway, I remembered them when I was trying to think of something extra to add to the birthday parcel for one of my SiL's .
This didn't take long to do and was fun too.  I hope she liked it
Materials:
Notebook from Paperchase
Bazzill card: White, Black
Various "silk" petals fixed with Black Flocked brad 
Large black feather, Tiny Black Prima gems


That's it for today, thank you for visiting


Friday, May 17, 2013

Stencilling

It's Gez's turn to set the challenge on the Daring Cardmakers and she would like to see lots of stencils being used.  How you use it, and whether it's a bought one or you make one yourself is up to you.

If you do a google image search on "free stencils" there are loads of ideas to download and use with inks, paints etc.  I found a pretty butterflies stencil  I saved the image, then decreased the colours to just 2 (Black and White) before moving the butterfly images about a bit to fit better onto a square card. 
I saved this as a .gif and opened it on a Craft Robo page and resized to be the right size for my project. The stencil was cut in plain white card and was all ready to use.
I used the little cut out butterflies too, inking them and adding them in the gaps.  Some were just glued down flat, others are just adhered under the body section so that their wings can be folded up
Inks; mix of Versamagic and Cats Eye ink pads
Dies: Memory Box Amana Circle, Large Butterfly
Bazzill deep purple card
Dewdrops in aqua shades
Ice Stickles in purple and crystal white

I did make another card but it was such a "dog's breakfast" that it's going in the bin!

Hope you'll pop over to the DCM BLOG and join in with us this week
Thanks for visiting


Tuesday, May 14, 2013

2 Birds....

Okay, so saying this may be a little controversial, but it drives me nuts when people say "I'm entering this project for the following 101 challenges...."  
Now, combining 2 or 3 or maybe up to 4 when the challenge calls for a particular sort of technique or embellishment is absolutely fine but any more than that just means someone has made a card, perhaps with a couple of challenges in mind and then scanned through challenge list blogs for all those their card could, however dubiously qualify for.  What is the point?  

Well, today I'm sharing something which works for The Sketch File blog and is also a Design Team project for Crafty Templates.  So I hope that doesn't me sound like a hypocrite!!

you can put together in any way you fancy.
I used the "Flower Garland" template from Crafty Templates  as it worked so beautifully with May's "Cascading Circles" LO from The Sketch File    


I've used Kraft card, some black Bazzill and a strip of patterned paper cut from one of the 12x12 sheets in the last Quirky Kit box.  The squiggly design was the perfect corner piece for this card. 
 There's more info over on the Quirky Kits Ideas Blog

 Materials and Tools
Crafty Template used; Flower Garland (March 2013)
Papers from the Quirky Kit, plus a couple of additional sheets from some MME 8x8 pads
"HELLO" cut from a tag in a previous Kit
Black organza ribbon, black Prima gems from my stash
Flower centres made with one of the pieces from the Memory BoxCherry Blossom die set
Quilling Ball Tool used to create shape for the flowers
LO idea from The Sketch File


This is the LO from The Sketch File I used - click on the link to see the DT's projects so far this month
Today I've been making yet another of the May "boy" birthday cards - I'm so fed uyp of footballs that this one has a Rock Star theme for a change.  I know I've not actually got round to sharing most of them, but I will soon!  When I get one of those elusive, and much sought after Round Tuits

Thanks for popping by today
See you again soon


Saturday, May 11, 2013

Sneak Peeks

It's my turn to host the Get Funky and Craft Inspiration Blog this weekend and I've made a couple of cards using Anice's newest collection.  Actually, as it's not been released for sale yet it's more of a sneak peek at what will be in the Funky Hand Shop soon.
As usual I've done a bit of resizing and cropping to get the most from the downloads
Here are the cards I've made - there are a couple of extra photos over on the Funky Blog 


The new collection will be called "Spring Wedding" and as well as some lush papers in these pretty colours there are matching "chipboard" letters and numbers etc
I hope you'll come and visit us over there and leave a message.

Thanks for looking today


Friday, May 10, 2013

Distressed and Inky

Well, I've not blogged in a while and it's time to make a big effort to get back into crafting as well as the blogging.
We had a wonderful week's holiday in Derbyshire (photos to follow), arriving home last Friday but since then I've not been feeling too well and haven't managed to do half the things that were on my agenda for this week.  I'm feeling better now though and hopefully my crafty mojo will come back soon too!

The only thing I managed to make this week was my card for today's new DCM challenge- and that was yesterday afternoon so a bit Last Minute Minnie.


 It's Keilly here with this weeks dare and my theme is
Ink It Up!
I'd like to see cards using ink - there are lots of choices, perhaps you could ink up an image or patterned stamp or even use spray inks to create a background.  Let's see how inventive we can be with this crafty basic!
 I wanted to use inks to make the background for my card, my first plan was to create something using masking tape and Distress Inks.  It started out ok but then the tape started pulling off layers of the card that was already inked.  Probably something to do with not leaving one layer to dry, I suppose.  It was binned and I was back to the drawing board.

Rifling through my stash I came across a few paper flowers that I'd inked and Glimmer-misted ages ago. they turned out quite pretty, but never got used.  I decided that Glimmer Mists were more trouble than they're worth - I think they are quite expensive for something that just seems to get bunged up and stop working within a few sprays, no matter what I do to try and prevent it.  I even tried making some of my own - it's easy enough to do and they work pretty well - till the spray mechanism fails.  I have quite a cache of unusable spray bottles and I've given up the whole notion.
However the rediscovered flowers gave me a colour palette for my second inky background attempt.


 The flowers are those really big ones which we probably all have masses of from when they were popular a few years back....well I have loads, anyway!  I didn't want a giant bloom for my card so cut down the petals and used them individually to make a different kind of flower.  Maybe I can now get rid of a few more "big bloomers" this way!  I can't remember which inks/glimmer mists I used as it was so long ago, but there's definitely a gold effect in there somewhere
For the background:
Distress Inks: Mustard Seed, Tattered Rose, Spiced Marmalade and Barn Door
Stazon Black Ink used with a die cut "stencil" (Memory Box Contemporary Circles Border Die)
I tore the stencil roughly in half after using it with the black ink, then used the torn section to stencil with Gold Acrylic paint, plus some Gold Ice Stickles
 Also:
Flocked Sticky backed fancy braid, Black and metallic orange Card Candy,  a few black and gold Prima gems, Flocked Black Brad
The leafy flourish is a Craft Robo template
 
 Please join in with us this week, it would be fab to see your inky-fingered creations!  There are some wonderful ideas on the Daring Cardmakers blog this week to get you inspired.

Now I have to get busy with some samples for my turn on the Get Funky and Craft Inspiration blog - I've just printed off some papers from a collection that will be on sale soon - so my blog post will be a bit of a sneak peek at what beautiful designs Anice has come up with this time......

Best get on then....
Thanks for looking

Friday, April 26, 2013

Interesting Ingredients!

Did you/Do you ever watch "Ready Steady Cook" on TV?  I'm not even sure whether it is still going strong or has been thoroughly trounced by all the other cooking programmes you can whet your appetite with at the moment.
Anyhow, the chefs on that programme were each given a bag of ingredients to use to create a wonderful meal.
On The Daring Cardmakers' Blog today we have challenged ourselves and all those who play along with us to do something similar with our stash!


    This week we have a bit of a recipe challenge for you to try. 
    We don't mind what sort of card you make but it must feature all of these "Ingredients!"
    An Aperture of some kind
    Something beginning with the letter P
    A Die-cut or Punchie
    The colour Blue

Here's my card 


 Materials and Tools
All papers; Bo Bunny "C'est La Vie"
Pearl Sprays, Wired Flowers, Prima Leaves, Blue Braid,
Blue flat-backed pearls 
Die: Memory Box Butterfly
Punch: Woodware Butterfly
Craft Robo: internal Label

Aperture: I used one of the journalling cards from the paper set and hand-cut the aperture
Things beginning with the letter P: Pearl Spray and flat backed pearls, plus a touch of Pink with the paper and the wired flowers
Die-cut or Punchie: 2 x butterflies
Blue: Paper inside the card, Blue flat-backed pearls, Blue braid and a Blue Butterfly
 
Thanks for visiting today, I hope you'll come again soon

Tuesday, April 23, 2013

Chalks Away revisited

I've really been a bad blogge recently and it seems I've managed to accumulate a few crafty things that I've not got round to uploading on here.  I've also been really bad at getting around to my blogmates to see what they've been up to - so I apologise for that and will try to do better.....

Anyway, first up on my "catching up" list is the second card I made a few weeks back for Nat's   "Chalkboard" themed challenge over on the Daring Cardmakaers BLOG. 
In the end I went with the flowery number for my example on the blog, so here's the other one I made


 The problem with not keeping up to date with blogging the things I make is that I completely forget what things I used! 
That's my excuse for not being able to say which papers these are....
I think they may be Echo Park and maybe a few pieces of MME in there too
The blackboard and the test were all done in Paint Shop Pro using a free downloadable chalkboard background I found  on the web HERE, and various fonts I already had plus a few new fabulous freebie new ones from DaFont
The birthday cake is made using a Craft Robo template that I made a while back and has proved quite useful! 
The frame for the chalkboard is also a Robo template - I was trying to make it look like one of those  blackboards with wooden frames that you often see in cafes

That's it for this time - I'm off to hunt out more things I missed blogging!  Have a good day


Join in with "a Card a Day Blogging"  by linking up with our Facebook group and our BLOG homepage HERE

Friday, April 19, 2013

It's Child's Play!

Ok, so I was a bit sneaky, and knowing that this challenge was coming up I kept the card I made for my cousin's young son to myself till now before sharing it on here. Naughty huh?
It's Sharon's challenge this week and it's all about children - little ones through to the teens who think they aren't "children" any more!

Child's Play
I'd like to see cards for little people - it can be for a new arrival, 
young child, or even a sulky teenager!
I went for a pirate theme
Lots and lots of Craft Robo cutting for this card; the pirate ship is a template I made a couple of years back and has had quite a bit of use.  New templates made for this card are the waves, the trees on the island and a new version of the skull and crossbones.  The various letter are also Robo cut, with the "Pirate Sam" ones being "dipped in blood" before adhering to the flag.

The papers are (I think) from MME - the wave ones are from the Lime Twist paper pads
I've used mainly Bazzill card for the cut out pieces
Lots of Ink and some White Gel Ink plus Ice Stickles on the edges of the waves

 As I already had my card made for this week's Daring Cardmakers challenge I spent my crafting time this week getting organised and getting down to ticking off lots of the other things on my crafty to-do list..................................OK, I lie :), all I actually did this week was make one card then spend the rest of it shuffling paper and be totally undecided about what to use and what to make.
Must try harder....

Thanks for visiting.  I hope you'll head over to the DCM BLOG to check out some wonderful inspiration for children's cards
Please come back soon...

Tuesday, April 16, 2013

I Hate Football

....but sadly, lots of the males in our family think there's nothing nicer than kicking a ball around a muddy field or shouting "Ref-er-ee....!" at the TV.  So it happens that I've made quite a few football-themed cards over the year.

I've used the current LO on The Sketch File to make the latest footie fan card.  This one is for one of my BiLs who has a birthday soon.  
I've had this old QuicKutz football die for soooo long - it was one of the first dies I bought when I got my first die cutter - which was one of the old blue QuicKutz ones!  They were hard work, weren't they?  hehehe

Materials and Tools:
14cm square smooth white card blank
Silver-grey card Red card, Black and White card scraps
Various ribbons, Ric-rac braid
Embossing folder: Footballs (Crafts Too)
Die: Football (QuicKutz)
Decal Sticker sentiment on hand cut banner

This is the sketch I used
 That's all for today, thank you for visiting


Friday, April 12, 2013

Any Um-ber-ellas, Any Um-ber-ellas

....to Mend Today?
laalaalaa I don't know any more of the song, you'll be relieved to hear.

One of our newest teamies over on The Daring Cardmakers is Mirjam (Miri) who lives in Germany and this week it's her very first time sitting in the dare-setting hot-seat.
Her challenge is very topical....
 April showers bring May flowers!
It seems that the snowy season is finally over as we 
already have had lots of rain this week.
So, this week I dare you to use raindrops, 
puddles, umbrellas, rainbows … on your cards.
So, this week I dare you to use raindrops, puddles, umbrellas, rainbows … on your cards.
I made a couple of cards - and tbh I'm not particularly  happy with either of them - don't you just hate it when the idea in your mind doesn't transfer to paper in the way you'd hoped?

My first card uses a couple of the templates from  Crafty Templates - they are both from the soon-to-be-released set so worth looking out for.
I've used the flower and pot designs from one template and the umbrella  from another to make this card, and a mixture of papers from a couple of recent Quirky Kits


 Materials and Tools:
2 x flower and pot templates, Umbrella template from Crafty Templates
Papers (Various) from Quirky Kits plus a few extras from my stash
Distress Inks for background, Cats Eye ink pads for edging
Green card for plants, scrap of card for layering umbrella onto
Pink and White Polka Dot Ribbon
Umbrella is raised from the background using a box hinge so that it folds down flat for posting
Corner Rounder punch

For the 2nd card I altered one of my old favourite Robo cutting templates. On the original you can only see the hand that is holding the umbrella, and the umbrella itself is in a different position. One of the cool things about using Paint Shop Pro alongside the Craft Robo is that it doesn't take much effort to tweak an existing design.  I added the other hand/arm, and tilted back the umbrella so that there was somewhere to put the potted plant.  The greeting was supposed to be a "thank you" one but I couldn't find a sticker and didn't have time by then to do it on the pc. ;)

 Materials and Tools:
Papers all from Everyday Eclectic 6x6 (Echo Park) 
Flower and pot  template from Crafty Templates
Bazzill card,
Narrow Pink ribbon, Teeny Tiny buttons
Sticker sentiment 
Craft Robo to cut Child with Umbrella, and the Label tab (it's the same label I made for last week's card)

We're having one of those days where one minute it's bright sunshine and the next the rain is pouring down - so being a bit "umbrella-centric" is definitely right for the day.  They say it might get up to about 16 or 17 degrees at the weekend.....about time too....but we won't be holding our breath, will we?

Loads of lovely cards to see over on the Daring BLOG today, so please check them out - and it would be fab if you'd join in and we'd have a deluge (pun - geddit? haha) of cards for Miri's first challenge!
Thanks for visiting


Tuesday, April 09, 2013

Just 9 Words

 A very short quotation to add to my tiny book this time, but wouldn't the world be a better place if we could all try to live by them?


The LO plan is this month's sketch from The Sketch File 

Materials and Tools
All papers "I Love You Sew" (Funky Hand)
Red metallic thread, tiny clear star gem
PC generated wording
scrap card for adding dimension. Black and red gel pens
Spellbinders dies; Plain and Pinked circles

I've printed the papers to get the chevrons and buttons in  different sizes by cropping and resizing using Paint Shop Pro.  One of the best things about using Funky Hand downloads is that you have the chance to mix up the sizes to suit your project - and to use different sizes on the same project.  You can see that on the chevron designs above.

I did a little screen-shot tutorial on the  Get Funky and Craft Inspiration Blog  at the weekend showing how I do this.
 There's also instructions on how to make the pyramid card base for this card.

That's all for this time. thanks for looking