Friday, April 26, 2013

Interesting Ingredients!

Did you/Do you ever watch "Ready Steady Cook" on TV?  I'm not even sure whether it is still going strong or has been thoroughly trounced by all the other cooking programmes you can whet your appetite with at the moment.
Anyhow, the chefs on that programme were each given a bag of ingredients to use to create a wonderful meal.
On The Daring Cardmakers' Blog today we have challenged ourselves and all those who play along with us to do something similar with our stash!


    This week we have a bit of a recipe challenge for you to try. 
    We don't mind what sort of card you make but it must feature all of these "Ingredients!"
    An Aperture of some kind
    Something beginning with the letter P
    A Die-cut or Punchie
    The colour Blue

Here's my card 


 Materials and Tools
All papers; Bo Bunny "C'est La Vie"
Pearl Sprays, Wired Flowers, Prima Leaves, Blue Braid,
Blue flat-backed pearls 
Die: Memory Box Butterfly
Punch: Woodware Butterfly
Craft Robo: internal Label

Aperture: I used one of the journalling cards from the paper set and hand-cut the aperture
Things beginning with the letter P: Pearl Spray and flat backed pearls, plus a touch of Pink with the paper and the wired flowers
Die-cut or Punchie: 2 x butterflies
Blue: Paper inside the card, Blue flat-backed pearls, Blue braid and a Blue Butterfly
 
Thanks for visiting today, I hope you'll come again soon

Tuesday, April 23, 2013

Chalks Away revisited

I've really been a bad blogge recently and it seems I've managed to accumulate a few crafty things that I've not got round to uploading on here.  I've also been really bad at getting around to my blogmates to see what they've been up to - so I apologise for that and will try to do better.....

Anyway, first up on my "catching up" list is the second card I made a few weeks back for Nat's   "Chalkboard" themed challenge over on the Daring Cardmakaers BLOG. 
In the end I went with the flowery number for my example on the blog, so here's the other one I made


 The problem with not keeping up to date with blogging the things I make is that I completely forget what things I used! 
That's my excuse for not being able to say which papers these are....
I think they may be Echo Park and maybe a few pieces of MME in there too
The blackboard and the test were all done in Paint Shop Pro using a free downloadable chalkboard background I found  on the web HERE, and various fonts I already had plus a few new fabulous freebie new ones from DaFont
The birthday cake is made using a Craft Robo template that I made a while back and has proved quite useful! 
The frame for the chalkboard is also a Robo template - I was trying to make it look like one of those  blackboards with wooden frames that you often see in cafes

That's it for this time - I'm off to hunt out more things I missed blogging!  Have a good day


Join in with "a Card a Day Blogging"  by linking up with our Facebook group and our BLOG homepage HERE

Friday, April 19, 2013

It's Child's Play!

Ok, so I was a bit sneaky, and knowing that this challenge was coming up I kept the card I made for my cousin's young son to myself till now before sharing it on here. Naughty huh?
It's Sharon's challenge this week and it's all about children - little ones through to the teens who think they aren't "children" any more!

Child's Play
I'd like to see cards for little people - it can be for a new arrival, 
young child, or even a sulky teenager!
I went for a pirate theme
Lots and lots of Craft Robo cutting for this card; the pirate ship is a template I made a couple of years back and has had quite a bit of use.  New templates made for this card are the waves, the trees on the island and a new version of the skull and crossbones.  The various letter are also Robo cut, with the "Pirate Sam" ones being "dipped in blood" before adhering to the flag.

The papers are (I think) from MME - the wave ones are from the Lime Twist paper pads
I've used mainly Bazzill card for the cut out pieces
Lots of Ink and some White Gel Ink plus Ice Stickles on the edges of the waves

 As I already had my card made for this week's Daring Cardmakers challenge I spent my crafting time this week getting organised and getting down to ticking off lots of the other things on my crafty to-do list..................................OK, I lie :), all I actually did this week was make one card then spend the rest of it shuffling paper and be totally undecided about what to use and what to make.
Must try harder....

Thanks for visiting.  I hope you'll head over to the DCM BLOG to check out some wonderful inspiration for children's cards
Please come back soon...

Tuesday, April 16, 2013

I Hate Football

....but sadly, lots of the males in our family think there's nothing nicer than kicking a ball around a muddy field or shouting "Ref-er-ee....!" at the TV.  So it happens that I've made quite a few football-themed cards over the year.

I've used the current LO on The Sketch File to make the latest footie fan card.  This one is for one of my BiLs who has a birthday soon.  
I've had this old QuicKutz football die for soooo long - it was one of the first dies I bought when I got my first die cutter - which was one of the old blue QuicKutz ones!  They were hard work, weren't they?  hehehe

Materials and Tools:
14cm square smooth white card blank
Silver-grey card Red card, Black and White card scraps
Various ribbons, Ric-rac braid
Embossing folder: Footballs (Crafts Too)
Die: Football (QuicKutz)
Decal Sticker sentiment on hand cut banner

This is the sketch I used
 That's all for today, thank you for visiting


Friday, April 12, 2013

Any Um-ber-ellas, Any Um-ber-ellas

....to Mend Today?
laalaalaa I don't know any more of the song, you'll be relieved to hear.

One of our newest teamies over on The Daring Cardmakers is Mirjam (Miri) who lives in Germany and this week it's her very first time sitting in the dare-setting hot-seat.
Her challenge is very topical....
 April showers bring May flowers!
It seems that the snowy season is finally over as we 
already have had lots of rain this week.
So, this week I dare you to use raindrops, 
puddles, umbrellas, rainbows … on your cards.
So, this week I dare you to use raindrops, puddles, umbrellas, rainbows … on your cards.
I made a couple of cards - and tbh I'm not particularly  happy with either of them - don't you just hate it when the idea in your mind doesn't transfer to paper in the way you'd hoped?

My first card uses a couple of the templates from  Crafty Templates - they are both from the soon-to-be-released set so worth looking out for.
I've used the flower and pot designs from one template and the umbrella  from another to make this card, and a mixture of papers from a couple of recent Quirky Kits


 Materials and Tools:
2 x flower and pot templates, Umbrella template from Crafty Templates
Papers (Various) from Quirky Kits plus a few extras from my stash
Distress Inks for background, Cats Eye ink pads for edging
Green card for plants, scrap of card for layering umbrella onto
Pink and White Polka Dot Ribbon
Umbrella is raised from the background using a box hinge so that it folds down flat for posting
Corner Rounder punch

For the 2nd card I altered one of my old favourite Robo cutting templates. On the original you can only see the hand that is holding the umbrella, and the umbrella itself is in a different position. One of the cool things about using Paint Shop Pro alongside the Craft Robo is that it doesn't take much effort to tweak an existing design.  I added the other hand/arm, and tilted back the umbrella so that there was somewhere to put the potted plant.  The greeting was supposed to be a "thank you" one but I couldn't find a sticker and didn't have time by then to do it on the pc. ;)

 Materials and Tools:
Papers all from Everyday Eclectic 6x6 (Echo Park) 
Flower and pot  template from Crafty Templates
Bazzill card,
Narrow Pink ribbon, Teeny Tiny buttons
Sticker sentiment 
Craft Robo to cut Child with Umbrella, and the Label tab (it's the same label I made for last week's card)

We're having one of those days where one minute it's bright sunshine and the next the rain is pouring down - so being a bit "umbrella-centric" is definitely right for the day.  They say it might get up to about 16 or 17 degrees at the weekend.....about time too....but we won't be holding our breath, will we?

Loads of lovely cards to see over on the Daring BLOG today, so please check them out - and it would be fab if you'd join in and we'd have a deluge (pun - geddit? haha) of cards for Miri's first challenge!
Thanks for visiting


Tuesday, April 09, 2013

Just 9 Words

 A very short quotation to add to my tiny book this time, but wouldn't the world be a better place if we could all try to live by them?


The LO plan is this month's sketch from The Sketch File 

Materials and Tools
All papers "I Love You Sew" (Funky Hand)
Red metallic thread, tiny clear star gem
PC generated wording
scrap card for adding dimension. Black and red gel pens
Spellbinders dies; Plain and Pinked circles

I've printed the papers to get the chevrons and buttons in  different sizes by cropping and resizing using Paint Shop Pro.  One of the best things about using Funky Hand downloads is that you have the chance to mix up the sizes to suit your project - and to use different sizes on the same project.  You can see that on the chevron designs above.

I did a little screen-shot tutorial on the  Get Funky and Craft Inspiration Blog  at the weekend showing how I do this.
 There's also instructions on how to make the pyramid card base for this card.

That's all for this time. thanks for looking

Friday, April 05, 2013

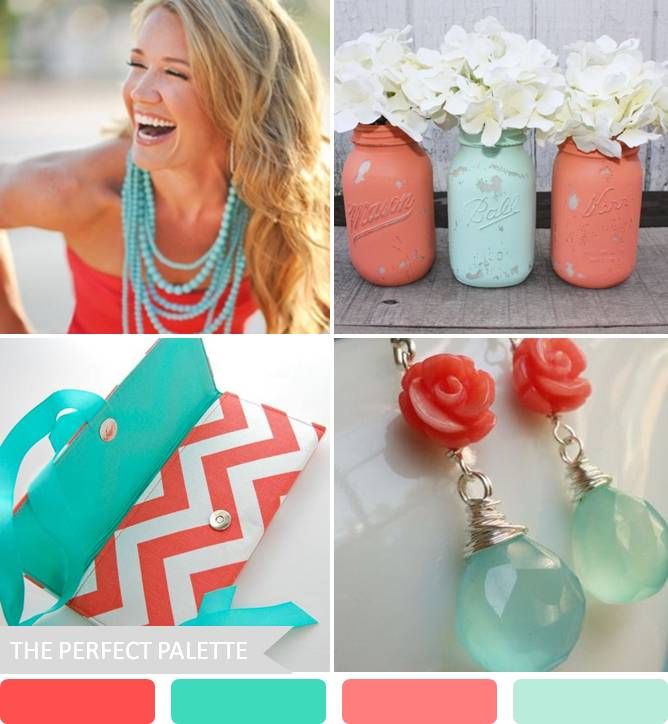
Coral and Aqua

Gez has chosen a fabulous colour palette for the Daring Cardmakers April Colour challenge and the BLOG looks amazing!

Here's my card for this week, it looks slightly different to the version on the DCM Blog because I couldn't resist adding a few pearls and some glitter late last night!
Materials
Chevrons, flower, lettering;  Bazzill card
3 x Aqua papers are all from the "Yes Please" collection from American Crafts
Resin bird from Tea House Bridge
Pale peach Pearls, Tiny Black Gems ("i" dots) Stickles Glitter Glue
Tools
Craft Robo for lettering, "labels" style background, cutting the chevron shapes
Corner Rounder punch for chevron paper, Circle punch and reverse tweezers for the curled petal flower

I went hunting for a good frame shape using the image search in Google as none of my Spellbinders labels seemed quite what I wanted.  I found this lovely shape and tweaked it a bit so that I could convert it for cutting on Craft Robo.   I'm really pleased with how this shape looks and of course,  because it's now a Robo template it can be stretched either way for a different look.   If you would like a copy of this template please email me and I will send a copy.

Here is the inspiration LO for the colours Gez chose
from The Perfect Palette


 Gorgeous isn't it?  How can that fail to inspire? 
The only problem is that when you get challenges like this you realise that what you though was a pretty good collection of Bazzill and an even larger collection of papers suddenly fails to deliver!  A good excuse to go shopping so that next time these EXACT colours turn up I'll be ready hahaha.
It's when you see all the photos together on the screen that you realise you didn't quite get them right.  ho hum

Thanks for looking in today. don't forget to head over to the Daring Blog and see the fabulous colour-coordinated display we have this week - and there's the announcement of the winner of our prize voucher from Little Blue Button too

Right, now I need to get my post ready for Funky Hand as it's my turn this weekend to try and inspire some Funky Crafty Action!

See you soon


Thursday, April 04, 2013

Thursday Already?

Surely it can't be?
Just as I was getting back to the blogging habit a BH weekend comes along to knock it all off kilter....well, that's my excuse and I'm sticking to it
This week is "new sketch week" on The Sketch File - a bit of a delay from our usual Tuesday postings, but....well. I refer to the above....:)

I'm trying to get organised for the May Birthday Onslaught (mainly "boy" birthdays too, just to make it even more tricksy), so I've used the sketch for the first of the Nephew birthdays

I've used:
http://kathyswafflesketchfile.blogspot.co.uk/
The Sketch File April LO
White card blank
Orange Background paper from
BG "Clippings" 6x6 pad
All other papers;
Year-O-Graphy 6x6 pad (Simple Stories)
Numerals; American Crafts Thickers
Ribbons and braid for stash
"today" letters cut in 2 layers of Black Bazzill using Craft Robo and coated with Enamel Accents
Number 5 and loop also cut with Craft Robo


Got to get on with my card for tomorrow's new challenge over on The Daring Cardmakers now.  
One day I'll be up to date with everything, the house will be spotless and the garden manicured and perfect....... oh yes and maybe Spring will actually arrive.....in my dreams....
Have a great rest-of-day, please leave a comment if you've time ;)

Friday, March 29, 2013

Chicks AwaY!

It's Beckie's first time in the Daring Cardmakers' challenge-setting hot seat and she's chosen a  this week:
"Springing into Spring"
Beckie wants us to celebrate Spring by adding a "real" spring somewhere on our cards.
We've a prize up for grabs this week to celebrate Beckie's first challenge 
and the arrival (we hope) of Spring.
It's a voucher to spend on goodies of the winner's choice from Little Blue Button
http://digitaldesignsby.blogspot.co.uk/
 There are lots of fab digis to choose from and all you need to do is make and share a card for the challenge, make sure you take notice of the simple rules then cross your fingers till next week!

Anyway, here's one of a couple of cards I made using springs to add a bit of fun
 
 The Chick is one of the current set of Crafty Templates - see HERE for more info
All papers are by American Crafts
The Flower panel is made using an EK Success border punch on a folded strip of paper
I used a small daisy punch to cover up how badly I matched the punching on the other edge - well, it was the first time I'd tried the technique! hehe
The "Spring" word and the tiny flower centres we cut with Craft Robo
The spring was made by coiling a piece of wire around a pen.  One end goes through a hole in the card base and is held securely and concealed inside with another strip of card.  The other end of the spring is similarly attached to the back of the chick.

I shall make a paper "belly band" to go around the card and keep everything in place when this goes into the post!

It would be great if you could join in this week, we'd love to have you play along.
Thanks for visiting


Wednesday, March 27, 2013

Funky Pyramid

Well, a couple of weeks ago I made a pyramid shaped card for Lythan's A Cute Angle challenge on the Daring Cardmakers.  I mentioned on my blog post that having made the first one I couldn't resist making another,

One of the reasons I wanted to make a second one is that I realised that using Funky Hand paper designs meant I could print onto my card rather than stick a layer of paper onto the basic card pyramid.  I'll show how I did this in a couple of weeks when it's my turn to post on the Funky Hand Inspiration Blog aka Get Funky and Craft!

So really this is a sneak peek for that, plus a chance to see the latest download collection that I used to make it.
This collection is called "I Love You Sew" and is absolutely gorgeous.  Lots of lovely chevron designs just for starters!
 You can find out all about Funky Hand and the latest wonderful download collections by visiting the Funky Hand WEBSITE
Th Get Funky and Craft BLOG is HERE - we all take turns to share tips, techniques and things we've been making with Funky Hand goodies - it's updated twice every week, so worth adding to you regular reading list!!

Thanks for visiting, please come back soon


Monday, March 25, 2013

Some Crafty Templates

I've been really bad at getting my DT stuff blogged lately - it's not that I've been late getting it made - just late blogging about what I've made - not good.  Must try harder!

Leo's changed things slightly so that instead of sending my photos to her to put into the inspiration file that goes out to Crafty Templates subscribers, we nowload those and things made with the Quirky Kits directly onto the Quirky Kits Blog
So here's a little round-up of the things I've blogged over there so far - more to come in a few days time.

Pencils Textbook Doodle Template
Pencils are made in several layers of card and paper.
All papers from the current Quirky Kit
Quotation printed directly onto the card before the pencils were added
I'm really pleased with the bright colours and the dimension on this, and the quotation is a perfect fit, isn't it?

Tweet, Tweet, Tweet Template
These little birdies are so sweet.  You always get several sizes of the various templates so you have a choice of how to use them.  I've made tiny ones for this card and used papers, ribbon and the cute "Hello" tag from my Quirky Kit.  I added the yellow Baker's Twine from my stash

Floral Cupcake Doodle Template

I used this fab cupcake template on my Daring Cardmakers card last week, but thought I'd pop it on here as a reminder of another of the templates in the current collection

You can find out all you need to know about the wonderful Crafty Templates and the various Quirky Kits that are available HERE
The Quirky Blog is HERE

Thanks for popping by

Friday, March 22, 2013

Chalks Away!

OK, so I was a bit panicked when Nat gave us her challenge for this week's Daring Cardmakers.  You're probably well aware by now that I don't really do stamping and the style of cards the Chalkboard or Blackboard trend is about is really a stamping technique.

".... this week I've challenged the design team and you to...
Create a card that pays homage to the chalkboard look
Ideally I would love it if you could try the heat embossing technique, but if you don't have the supplies there are plenty of fonts and printables out there that you could use to replicate the look."

Nat explains all about it over on the DCM BLOG so please pop over and have a look at the info and all the fab cards the team have made this week
I don't have any suitable stamps and I don't have any white ink or white embossing powder to stay true to the technique so I had a hunt around on the net and found a wonderful free printable background which cheered me no end!
Next I spent a good deal of time playing about with fonts and dingbats - tbh I should have just stopped messing about and got on with ticking off other things from my to-do list!
In the end, I made a couple of cards - I'll save one of them for another post but here's what was actually the second card I made

I used:
Papers and die cut border Crate Papers "Lillian"
Ribbons, Lace, Wired Flowers all from stash - mostly from Creative Treasures
Coiled paper roses made from paper scraps

Blackboard:
Chalkboard Printable Background from HERE
With the background loaded into Paint Shop Pro I added the sentiment on to the centre using the colour set to white
The flowery border is actually made from a dingbat font called "Menina Graciosa Ornaments Two" and is made up of masses of flower patterns - you just type a letter on your keyboard to get the corresponding flower or leaf design
I just "doodled" with the font-flowers to make the frame for the words. 
That done, I took it a step further and added a few bits of chalky-colours using the flood fill tool, still working with PSP.
Next step was to resize and print off the finished design and make the card

I hope you like it and will feel inspired to have a try at making your own version - or go the "proper" route and do it the stamping way!

Thanks for visiting


Friday, March 15, 2013

What's Your Angle?

Friday again and another new challenge over on The Daring Cardmakers

This week it's Lythan's turn and she says:
".... we want to see some sharp shapes. 
Geometry is all the rage in cardmaking so we would like to see geometric shapes in play as you
Make a cute angle
 its a play on words really - "a cute angle" is like "acute angle" get it? Or perhaps not...
 If you can make your acute angle cute then that would be fab too
However you interpret the dare we would love to see the results. Here is the team's take ..."
Something I've seen, but never felt inclined (incline, angle, pun!) to make is a Pyramid-shaped card - but I reckon a challenge is a challenge and why not add something extra into the mix - like learning to do something a bit different,
I had a hunt around on the net and found a few Pyramid cards - most were the decoupage style thing where you use ever-decreasing sizes of the image so that looked at from the side it's a bit like a stepped pyramid.  Not what I was after.
I also found some that were like a triangular exploding box which are cute, but not really a "card".
The style I went for in the end is such a neat idea and even though the finished card forms a 3D pyramid, it actually still folds (relatively) flat for posting - clever, eh?  
Even better, there are no complicated shapes to cut or folds to make.  It starts our life as 3 equal squares - you fold each on the diagonal, stick them together and as if by magic you get a pyramid!  It's the way you stick them together that makes it all happen.  There are several tutorials and videos available - THIS is the video I use to learn the technique

You end up with 3 faces to decorate - but as the third one has the extra fold to flatten the card for posting down the middle I left that unadorned for now - I think this would be the perfect place to make an area for adding your "to and from" bit
Materials and Tools
White Bazzill for the 3 card squares
 (my usual card would be too thick for this sort of card)
Papers: "Blue Hill" MME 12x12 collection pack -the swirls are also from the pack and the flowers were cut from one of the papers
Tiny clear gems, Ice Stickles, Glossy Accents, Seed Beads, Velvet ricrac braid
Die: Spellbinders 
Craft Robo: I used the Spellbinders die to make a "stretched" version to add behind the the main label
Paint Shop Pro: sentiment 
More cut out flowers and stems used on face 2 of the pyramid
I must admit that in the past I thought pyramid shaped cards were a bit naff and not my thing at all - but I surprised myself  by how much I enjoyed making this.  I must have, because I've another almost finished sitting on my desk!  The other thing I enjoyed about making this card was using some papers I've not looked at for ages - it's such a joy to rediscover forgotten favourites and wonder how come there is still so much left in the bag when the papers are so lush and should have been all used up by now!
Anyway, that's all for today, I hope you like the card and if you follw that link and make one yourself, I'd love to see it
Don't  forget to visit the Daring Cardmakers BLOG to see what other angles the team have taken this week.


Tuesday, March 12, 2013

Plato said.....

It's always good if you can make one project tick two things off your list, isn't it?
My "show and tell" for today is a double page in the quotations Maze Book that I've been gradually adding to over the last few months.
One of the pages uses the March LO from The Sketch File and for both sides I've used some soon-to-be-released papers from Funky Hand - so you can get a sneak peek at what Anice will have in the shop soon 


 Materials and Tools
Papers; "I Love You Sew" a  sneak peek at the coming download collection from Funky Hand 
Other Items: Tiny red and clear gems, Black and White Baker's Twine, 
 Pink Button Twine, Black ink pad
Heart and button are hand cut
Small square punch for mosaic tile border

This is the Sketch File LO I followed for the right hand page


And a closer look at the left side page - the gorgeous text paper is part of the I Love You Sew download and comes in other colours from the collection too. 

 That's it from me today
Thanks for looking
 

Monday, March 11, 2013

Spring Scrapling

Well, I'm not impressed with the weather - just as it looked like Spring might actually have arrived the chilly temperatures and even some of that bizarre white coloured rain :) have returned.
I mean - the Met Office app on my phone says "feels like -8"1  Now that's not funny, not one bit!  grrrr....or should that be brrrr?

Anyway, here's a a bright yellow scrapling card to bring a little ray of sunshine to this cold and windy day
Base card is ribbed Kraft card
other card is Bazzill in cream, green and yellow
Cream ribbon, cream lace, deep pink velvet ric-rac
Cats Eye Chalk Inks; various
Sentiment and flower decal - home made using printable decal paper from Crafty Computer Paper
Border Punch; EK Success
Flower Die; Memory Box
Leaf - a freebie die-cut with an order from Dies to Die For
Embossing Folder; Cuttlebug

Off to make a hot chocolate now!
Please come again soon