Oh the joys of a British Summer!
Friday is, as usual, Daring Cardmakers Day and we have a lovely new dare to play with:
This week we have a dare called:
On The Edge
We'd love to see you making use of all sorts of border treatments; scallops, trims, pleats, or anything else which makes the edges of your papers and cards look special. You could use Border Punches, Die Cutters, Lace, Fancy Trims and that's just for starters - let your imagination live right on the edge this week - or maybe even go right over the edge!
If you head over to the DCM BLOG you can see how the Design Team interpreted the challenge and hopefully be inspired to have a go yourself. We'd love as many people as possible to join in - we love to see all the cards you make and its such a wonderful way to share and inspire.

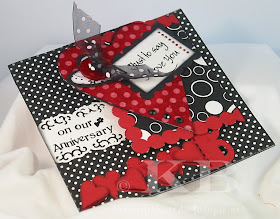
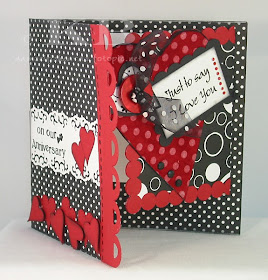
As we'll be celebrating our 16th Wedding Anniversary card at the end of the month I thought I'd use this dare to make a card for hubby. It'll be a change to have it ready ahead of time, instead of doing the last minute panic thing!
I thought I'd add to the edges available to decorate by making a joyfold "card within a card" type thing. I've used a border punch to make the white panel, and my Craft Robo to do the other decorative edges.
I've got "Greetings Card Factory" and "Print Artist" graphics programs on my pc - I don't use them for actually making cards, but they do come in handy for all sorts of stuff - so I've been experimenting using making some Robo templates using GCF.
I used it to make the scalloped edge with the semi circle holes, the joined circles trim for the smaller card on the right side and also the scalloped frame for the pc generated message card.
 Supplies: Papers: Doodlebug, Imaginisce, Bazzill red card, Spotty velvet paper, large red button, spotty ribbon (Ribbon Oasis), Anitas gem wheel, Maya Road Rub-ons (Bubbly Funk), Fiskars border punch
The "Hearts" edging trim is another Robo template, I thought I'd tell you how I made it in case you'd like to have a go, I used a preset shape in Paint Shop Pro, but I'm sure there'll be something similar in whatever photo/graphics programme you use.
 Here's how to make it:
Use the same heart shape pasted several times, swivvling them round and overlapping them to make a long row.
Go to the Layers menu and click "Merge All"
On the Colours menu, use the "decrease number of colours" to use only 2 colours
Use the Fill tool to fill all the shapes with black
Save as a gif file.
I then use the "Back" button to go back through all the steps until I had the original heart shape remaining, I then copy/pasted a few of the hearts without having them touching each other, decreased the colours as before, filled each heart with black and saved this new version too.
In Craft Robo, open a new page and load both versions, resize them together to the size you need and cut. This way you have the row of joined up hearts, and more hearts of the same size to add on top of some of them for dimension - I used foam pads to add my extra hearts.
Let me know if you have a go with the tutorial - hopefully it makes sense, but it would be nice to know one way or the other!
Thanks for visiting today

oooo lovely clever card Kathy! Love the Black & Red combo X
ReplyDeleteWow, that's a lot of edges! Looks fab. Hope you have a lovely anniversary!
ReplyDeleteWhat a superb card Kathy - and thanks for the robo tips too!
ReplyDeleteOh Kathy that is a gorgeous card and some fab edging there. I have plans to make more of these cards as they look brilliant.
ReplyDeleteLoving this Kathy, first the black white and red, fab, and I love your take on the edge too, that row of hearts is super.
ReplyDeletehugs
En xx
lovely card, I love the idea of this dare... will have to squeeze some crafting time in! Thanks for popping to my blog :)
ReplyDeleteThanks for the tutorial Kathy - I'm going to collect the robo tomorrow from school and I'll have a go and let you know how I get on.
ReplyDeleteHope your husband loves the card?
:)
Fab card Kathy, as always, I'm sure hubby will love it.
ReplyDeleteThanks for the Robo tut, I've saved it for when I actually unearth my Robo from the mound on my table :)