Hello there!
I've been experimenting at making my own stamps/plates to use for hot foiling with my GoPress & Foil machine.
If you've been following this series you'll have seen how regular cutting dies can be used with the hot foiling gadgets, of not, check out the list of Hot Foil Adventures posts in the side bar.
In
my HFA post #2 I shared a couple of cards made using ready cut
"SnipArt" as a hot foil stamp and as that worked out pretty well I got
to thinking that if a cardboard cut-out could be used to foil with,
then surely I could use a die to make my own.
After a bit of experimenting I found that by carefully gluing 3 die-cuts (300gsm card) together and burnishing the edges so that they are a bit less 'sharp' I was able to get a workable hot foil stamp. Obviously, being made from card they won't last as long as metal ones, but it does open up a whole raft of possibilities from your die collections!
I chose a die which isn't too 'fussy' and doesn't very skinny lines to cut, as they can be quite tricky to stick together really accurately. This one is a lovely Marisa Job die set from Spellbinders.
Step by Step
Click on the photos for a bigger view
1. Cut the die three times in smooth card. Mine is 300gsm, and the colour doesn't matter! Make sure you pop out every single little bit of card that shouldn't be there
2. Carefully, and accurately, glue the three layers together, be sure to match them all up on top of each other perfectly. Leave to dry,
3. Use a ball tool or something similar to burnish all the edges a little on the top layer, just to stop them being too sharp. It's a bit tedious, but you'll get a nicer stamped image if you take the time to smooth those edges!
4. Now you can use your stamp.
Start by turning your machine on so that it can be heating up while you prepare your foiling sandwich
Cut a piece of the card you want the image to appear on.
Add a piece of the foil, shiny side up (sticky side down!)
Position your stamp on top with the burnished side down
add pieces of washi tape to hold it all in place
5. Place the 'sandwich' onto the hot foil machine's platform as in the photo, then add a card shim before closing the lid. Leave to heat everything up for a couple of minutes
6. Roll the platform through your die-cutting machine slowly a few times as usual. Remove the sandwich from the platform; I like to let it cool for a minute before removing tape, stamp and foil.
Here's how this one came out - I should have chosen better colours for this, but I hope you can see it okay. The used foil is on the left, the foiled card in the centre and the home-made stamp on the right
Info
Joyous Celebration die by Marisa Job for Spellbinders cut 3 times
Rose Gold foil by Couture Creations
Scraps of 300gsm card
Bazzill card
Washi tape
GoPress & Foil machine
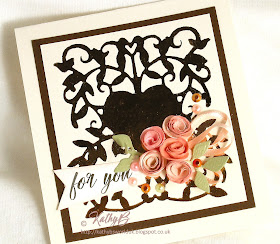
Card 1
punched heart from peachy pink inked cardstock
2x rose buds with spiralled stems
Coffee coloured organza ribbon
Narrow peachy pink ribbon tied in a three loop bow
Small heart die cut from a spare piece of foiled card
Card 2;
Same stamp and foil, but onto cream card
Rolled roses from peachy pink shades of card plus green die cut leaves
Same narrow ribbon looped and glued in place
Gems
Just before I go, here's another hot foil stamp made in the same way. This is a Memory Box Christmas Tree die.
Well done on getting to the end - I hope you think it was worth the effort and that the tutorial will be useful to you.
If you have a go, I would love you to come and tell me how you got on and where I can see what you've made.
Thanks for visiting, please leave a message 😊
Happy Crafting


Really pretty cards. I don't have a foiling machine, but I do like to see what people make with it, and I'm sure they will find the tutorial really useful
ReplyDeleteHi Kathy your cards are stunning I love them. That is a great way to get more use out of your dies. Take care. Hugs Jackie
ReplyDeleteHi Kathy your cards are stunning. That is a great way to use your dies. Take care. Hugs Jackie
ReplyDeleteGreat tutorial Kathy and fabulous cards made with your home made foil dies. I wish I had more time to spend playng with my machine but life seems to be getting in the way at the moment.
ReplyDeleteSylv xx
Lovely cards Kathy. The hot foiling looks so elegant xx
ReplyDeleteThis is gorgeous xx Jan
ReplyDeletethis is very beautiful Kathy
ReplyDeleteGr Karin
Great idea and stunning cards.
ReplyDeleteGG
You are so clever Kathy- such a beautiful stamp and stunning cards. Cathy x
ReplyDeleteThis is so very clever Kathy. I shall have to try it! Shabneez PS. Fabulous card
ReplyDeleteStunning cards
ReplyDelete