Friday, September 28, 2018

Autumn Shades with a Flourish

Hello
How are you?
I'm waiting for my grocery order to arrive, so if I dash off in a minute, you'll know why 😀
It's my turn to set the challenge for the Daring Cardmakers this week and I decided to keep it really simple - at least for me, anyway!  You can read why that is in my blurb:

It's me, Kathy here this week and I challenge you to
~  ~  Add a Flourish ~  ~
Using flourishes and swirls is one of my favourite card-making techniques.
 I'll let you into a secret - it's a bit of a trick really! They are often last-minute additions when I've put a card together and get one of those  'something missing', 'too much white space', 'hmm, the balance isn't quite right' feelings.  Adding some kind of swirly accent almost always sets things right.
So please add a swirl or flourish to your cards this week - in any way you like; die cuts, beads and gems, stamping, embossing, stencilling - there's lots of ways to do it as you'll see on the wonderful inspirational cards made by our design team [HERE] this week.

I loved seeing the different ways my lovely teamies chose to add their flourishes.  It's what I love most about The Daring Cardmakers; the way a challenge is given then everyone runs with it in their own way, it's so inspiring.
 
It was harder to make sure I actually started my card with the thought of having swirls and flourishes in there as opposed to just adding them as an 'extra' when everything else was in place!
I really wanted to use Autumn shades and flowers (for a change), but I wasn't keen on the first background I made, so this was my second attempt.  
This time I started with a piece of corrugated card that was poking out from the scraps box, and a lovely dark red card blank that caught my eye just as I was about to reach for a white one. 

Info
Dark red square card blank
Corrugated card from a box
Soft Old Gold card for matting
Mirror Gold card for lower swirls 
Green card (some inked) for leafy flourish and some leaves
Orange, Beige and light brown card, with added inky shading for other leaves
Various wired flowers from my stash
Dies are all by Spellbinders:
Gold swirls (under flowers) Cinch and Go Flowers set one
Green Leafy Flourish (at top): Foliage Flourish Shapeabilities Etched Dies

I curled some of the wire rosebud stems around skewers for some extra swirl shapes

 I'm pretty happy with how this turned out and I love the mix of colours.  It was one of those cards that I enjoy putting together as all I do is move around and add more bits and pieces until I like the arrangement.
Anyway, I hope you like it too and feel inspired to have a go at the challenge yourself - we welcome all-comers and love to see how people respond to the challenges.
That's it for now, thank you for visiting - don't forget to leave a message!
Happy Crafting

Friday, September 21, 2018

Beady Eyes

Hello
Hope you've had a good week and haven't been blown away in the windy weather!
I failed again with my blogging this week.  I had this plan for getting back into more regular posting and aiming for two a week.  Oh well, I'll try that one again next week!  It's not even that I don't have things to blog - I do, there's a bit of a backlog actually.  I'm just rubbish at sitting down and writing stuff.

Anyhoo on to the new Daring Cardmakers challenge, and all the way from Germany we have Miri in the hot-seat:
Turn up the bead(s)
I’m quite sure that you as a crafter have a stash of beads in all colours and sizes somewhere. Right?! And if you’re anything like me, you might not know what to do with them.
So let’s inspire each other and share your beady creations with the Daring Cardmakers this week.
See what the members of the design team made by clicking HERE
I think Miri has been spying on me! I love beads and have many boxes of them stashed away in my cupboards!  I had a bit of a jewellery making phase a while back but now I don't use them much at all.  
This was a lovely opportunity to use some - though, as you'll see I ended up using just a few teeny ones for my card - not really even a tiny dent in the bead collection to be honest!

 Info
Smooth quare card blank
White, green and pinky-lilac Bazzill card 
Gorgeous patterned flower from Bubbly Funk 
Lilac stamens (I changed the original ones to match my card)
Silver thread
Dies from Spellbinders:
Background for flower: 
Heart Leaves from the Joyous Celebrations Collection


We were given some money towards an Afternoon Tea for an Anniversary present, but for one reason and another (mainly being ill!) we'd not got round to doing anything, as it was my birthday last week we had a bit of a double celebration and went off to one of the local Country House Hotels at the weekend and 'took tea'!  We've been here a couple of times before, its such a lovely hidden away place and the building and gardens are stunning, which really adds to the whole thing.
I thought I'd share some photos with you.  Neither of us like fruit scones, so our scones were plain ones and some yummy lavender ones


Right, this has taken way longer than it should have done, so I will shut up and go and make myself a coffee - and then maybe I will make something new....
Have a fabulous weekend
Happy Crafting

Friday, September 14, 2018

A Bit of Embossing

Hello

It's a lovely sunny day here again, I hope its nice where you are too.  I really struggled with my crafting this week - nothing worked!  My desk looks like a tip.
The card I've made for the Daring Cardmakers is not thrilling me, even though it's taken days to put together - I'm totally frustrated with it!
I did have one good result while making it though; I lost one of my favourite flower dies a few weeks back, search high and low and couldn't find it anywhere.  I'd just about come to terms with having to buy a replacement then, when using my circle die stack for cutting the circles for this card, I felt something on the reverse of the magnetic sheet and there it was.  Oh Happy Day!  More bizarrely, though I also found a tiny tulip head die stuck to the GoPress and Foil magnetic tweezers - and I haven't a clue where it's from.  I think its a Spellbinders one because its the brown metal sort, but I can't remember which set it might be from.
So now I have 2 small dies stuck to my fab Main Attraction
while I try to work out where their 'homes' are!

Anyway, Here's Ruth's challenge for this week:
  Hello and Happy Friday!
 My  theme for this week is

Who's the (Em)Boss?!

Let's see all your embossing creations and don't forget to tell us 
how and what you have used!

Well, that's nice and straightforward, I hear you say - but as I mentioned before, I didn't find it so at all.  So I've a feeling this one will either be binned or pulled apart and the bits used for something else!

 Info

Pale Blau, Navy Blue and off-white card
Silver card for matting
Blue satin ribbon and lots of inking
Silver Hot Foil (Couture Creations)
I used two different embossing folders on this.  The lower panel is a Woodgrain one (SU) and the lighter one is the lovely 'Blistered' paint effect one from Spellbinders
For the sentiment panel  I used a hot foil stamp and my GoPress and Foil machine.  I think the 'stamp' is by CraftStashUK but it may be Couture Creations
The Initials are definitely from the Monograms set, which is one of the new Spellbinders Glimmer Hot Foil range  - I indulged in a few of theirs last week! 
We'll call them an early birthday present to myself ;) They are really lovely.  There may be more heading my way soon!

In case you were wondering what a Main Attraction
is, it's a diamond shaped object which has a really strong magnet inside and it's perfect for popping your dies on mid-project!
 
That's it for this time,  Thanks for looking
Have a great weekend!

Monday, September 10, 2018

Gold Star Shaker

Hello
I've never had much success at making shaker cards, they've always turned out a mucky mess when I've tried them in the past, but inspired by my lovely friend and DT teamie Dawn, I've felt the need to crack the technique! 
  Over the last few years I've seen some wonderful shaker elements Dawn has added to cards and other projects and it made me a tad jealous that my own past efforts were so awful!

Anyway, thanks to Dawn (and Bubbly Funk Through the Letterbox) I just needed a good excuse to have another go.  The perfect excuse came a couple of weeks back when our youngest nephew deserved a gold star for doing brilliantly in his GCSEs


There's more info on what I used and how I created this star-shaped card over on the Bubbly Funk Through the Letterbox Blog and of course you'll find more of Dawn's shaker creations there too - they are definitely worth looking out.

I filled the shaker section with sequins from the Hooked! Through the Letterbox craft box and added a few small stars punched from one of the larger glittery stars in the Seeing Stars box

I'm so glad I decided have another  try at making a shaker card - it was fun!.  Thanks Dawn for encouraging me to do it!
Bubbly Funk's fabulous Through the Letterbox Craft Boxes can be found HERE and are always full of lots of interesting and inspiring bits and bobs to keep you crafting for absolutely ages!
Thanks for looking
Happy Crafting

Friday, September 07, 2018

September Elemental Inspiration Picture


Hello

How can it be September already?  It hardly feels more than five minutes since it was cold and dark and I was longing for Spring!
I hate it when the nights start drawing in, but at least the weather has stayed nice and we've had some lovely warm sunny days lately.
I think my dear friend Shabneez feels the same about hanging on to Summer for a while longer - its her turn to set the Daring Cardmakers' challenge this week and its an Elemental Inspiration one this time
It's Shabneez here and yes, I know it's September but I just can't let go of the summer - not just yet anyway!  The elemental board I've chosen has fond memories of summer on it and lots to choose from so I hope you'll join in.  You simply have to pick 3 elements from the board which can be an item, colour, shape etc.
The two things I loved most about this picture board were the bright, vivid colours and the actual layout of the mini pictures.  So I really wanted to use those on my card.  The third element was harder to decide on but in the end I went for the pot plant,  I did actually add another element in to the background of my card, but it doest show up so well on the photos.

Info:
To begin I needed to create the inky background, which I planned to cut up into the tiles on the layout.  I used a piece of plain 350gsm white card stock and got to work with various inks and also some Fresco Finish paints to cover the whole piece of card.  Once dry I chose the sections I liked best for each tile and cut them out roughly before trimming to the correct sizes.  I cut a few spares too, just in case it all went pear-shaped! 
My chosen tiles were matted onto plain white card pieces of the same sizes, and the edges were inked in dark blue.
Next I added a thin coat of Glossy Accents to each tile and left them to dry
The white background piece was the extra 'element' I mentioned; rather than leave it plain I wanted to emboss it with the wavy lines from the lower middle square on the board.  However I don't have a wavy lines embossing folder, a couple of chevron ones but they looked a bit too 'spiky'. So I improvised and with the square of card resting on one of the foam mats I used for shaping flowers I just 'drew' some wavy lines with an embossing stylus.  That's about as far as my drawing skills go, but it worked out quite well, I think! They show up better on the photo below
The white square was matted onto yellow, then onto the card blank.  The tiles were added, and also the die cut sentiment.
The cute cactus or succulent plant is from a Spellbinders die set which I've been meaning to use for ages.  I cut the pot from a leftover red section of the original inky card, and again added Glossy Accents to give it some shine. The plant was cut three times in green card and the little flowers in the same yellow used elsewhere on the card.


It may have taken a while - with all that waiting for things to dry, but I had a lovely time making this.  There's something therapeutic about getting properly inky and painty, and there's the surprise element too as you're never really sure what sort of result you'll end up with (well I'm not!).  Sometimes it works, sometimes it doesn't, but the fun is always there.  And in my case this time the messy blue fingers!

I hope you'll pop across to the BLOG and see the other cards inspired by Shabneez's great Inspiration board, and of course we'd love you to join in and see what you can come up with too.  We have news about our lovely new DT member and our fantastically talented September Guest Designer over on the blog aswell.
Thanks for visiting
Have a wonderful weekend

Tuesday, September 04, 2018

Our Silver Wedding

Hello

It's time I got back into better blogging habits, and it's definitely time I blogged something about our Silver Wedding Anniversary.  It doesn't seem possible that it's now over a month ago!  
Anyway, first up I'll show you the card I made to give to my lovely OH on our special anniversary.  It was a good excuse to use the beautiful large, intricate heart die and some fabulous pewter charms that I've had in my stash for literally years and been completely unable to part with!  This way I've not actually parted with them, I suppose!

Info
Silver Stardream card made to a customised size
Inked card piece to use behind the die cut created using various blue and aqua coloured inks
Matted onto Bazzill card in white and a matching shade of blue
Silver card for cutting the heart, sentiment background, and lower layers for letters
Red Glitter card for hears
Silver twine
Pewter champagne and corkscrew charms
Computer generated sentiment
All dies are by Spellbinders

 To make the heart I cut the die in silver card firs, then in some scrap card to make a template.  The template was used to cut the inked blue card to shape. I placed the blue card into the heart die and used a stylus to emboss into all the gaps.  In 'real life' the blue sections are quite 'puffy' within the swirled pattern of the heart.  The silver heart was then glue in place and I repeated the embossing on the reverse to get as much of a cushion effect as I could.
The heart was adhered to the white and blue panels then using silver thread and a needle I attached the charms through the layers of card before adhering this whole section to the base card
The letters were cut several times in silver card and adhered together, then cut in white for the top layer
The 'ribbon' across the lower section was made from  strips of blue and silver card.  I created the sentiment on the pc and resized to make sure it would fit into the white oval before printing.  Once printed, I taped a Nesties oval die over the top and ran it through the machine. This piece was adhered to the silver fancy die cut and glued in place using some chipboard to add dimension and make sure it was all nicely level.
To finish I punched some glitter hearts and fixed in place, then added a multi-loop bow tied in silver twine

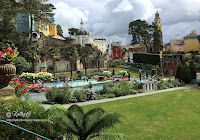
We spent the week of our anniversary in Portmeirion.  It's somewhere we've always talked of going to but up to now hadn't got around to.  So our 25th anniversary was the perfect excuse to 'push the boat out' and book into the village for a week.
It's not a 'real' village, as far as I know no-one actually lives there.  There is a hotel down on the quay, and many of the buildings around the village are actually serviced 'hotel' rooms - just with that added extra of being hidden away in the various buildings of the village!  There are also several self-catering holiday lets, Telford's Tower was out home for the duration.


Telford's Tower - all ours! 
The view over the village from the top of the tower section of our 'house'
and from our private terrace in some weird evening light
The Portmeirion Hotel and estuary
And just a few photos taken around the village - you find something new every time you take a stroll!


That's all for now - I won't bore you with any more photos this time ;)

Thank you so much for visiting, please don't go without leaving a message!