Thursday, November 30, 2017

Tree in Winter - Spellblogger post for Spellbinders


Hello! 
I'm back with another Spellblogging post for Spellbinders
I'm really l;ate this week because I've been having computer 'issues'!  Hopefully all sorted now thanks to my lovely, patient OH!
 So this card has been waiting a while as I couldn't actually get onto my blog at all for a few days

Spellbinders recently released a lovely range consisting of a beautiful bare-branch tree, and a series of  'toppers' to add to it.  So far I've only got the tree and the Winter decorative set, but I shall have to have the others too, I think.
The Winter topper is especially fabulous as not only do you get the snowfall to pop over the branches, but there's a sweet little deer, and 5 gorgeous snowflakes (and I LOVE snowflake dies!).


Info
White card blank plus extra for inked panel
Dark blue card for backing piece
White, black and gold card
Background was created with several colours of Distress Inks, and a light dusting of Glamour Dust was added
Basic tree shape was cut in black and white cardstock.
The snowy topper is made with three layers of white card, glued and dipped in Glamour Dust glitter (it really sparkles!)
The deer was cut in gold and  black card, Snowflakes in gold and white
I added a few red pearl beads to add a pop of bright colour

As it happened, I got a bit carried away with these new snowflake dies, and ended up cutting a whole load of them.  We won't dwell on the fact that at one point one of the dies pinged off the cutting mat and hid itself for a good hour. I tidied all the things on my desk, then the boxes of stash on the floor nearby before finally upending the bin and going through all the inky, gungy, scrappy mess in there bit by tiny bit.  And yes that's where it had landed.  At least it was found.
I made a whole batch of snowflakes tree cards, so I thought I'd sahre a quick pic of a few of them


Here are the Spellbinders die sets used this time


Four Seasons Tree 
 Four Seasons by Lene Lok 
Shapeabilities Etched Dies


Winter Canopy and Elements 

Four Seasons by Lene Lok 
Shapeabilities Etched Dies

I also used:

Platinum Die Cutting and Embossing Machine
 That's it for this time, I love these beautiful die sets, and I'm sure to be getting my hands on the others in the series soon too!

  Thank you for visiting, if you click on This Link  you'll find yourself at the Spellbinders store where you will be tempted by lots of lovely dies, stamps and much much more!

Happy Crafting


Tuesday, November 28, 2017

A Single Snowflake

Hello
A very quick post from me today.  PC 'issues' yesterday mean I'm way behind on all sorts of things.  Thank goodness for the Resident Tech Help Desk!

I have a card using the November LO from the Sketch File to share today
I love this snowflake die, but it's a big one so doesn't seem to get used as much as it probably should - anyway, it works perfectly for this LO so I may just run off a few more variations on this one to help boost the Christmas card count which has rather stalled atm!

Info:
I used Imagination Crafts wonderful Sparkle Medium to make a glittery edge for the card blank
On a separate piece of card I stencilled the turquoise stars, then moved the
stencil a bit and added more of the Silver Sparkle Medium.  This starry stencil is by Crafters Workshop
The lovely snowflake die is by Sweet Dixie
The sentiment is one of my own stickers - made using decal paper from Crafty Computer Paper
The sentiment was adhered to a length of ribbon from Bubbly Funk Through the Letterbox's November craft box
Here's the sketch:
 The finished card is super-sparkly!


That's it for today, thank you for visiting, I really appreciate you coming by.  I promise to get down to some serious blog-hopping as I've really missed seeing what all my crafty friends have been making - it's so inspiring to see  everyone's creativity, isn't it?
Anyway, must get on!
Happy Crafting

Friday, November 24, 2017

Two Christmas Icons!

 Hello there,
Sunny and chilly here today.  
I was just checking the calendar and realised that this week's Daring Cardmakers' challenge is the last one in November, so we are definitely creeping closer and closer to December and you know what that means!

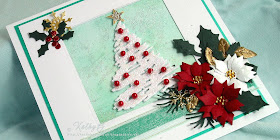
Today I've a couple of cards to share.  The first for the DCM challenge:
 

Trim the Tree
You don't just need to think 'Christmas Trees' for this, we'd love 
to see all sorts of trees.  
Could be just one or two or perhaps a whole forest of them!

Click HERE to see what the team have created.
Info
Square aperture cut into main card blank.
A piece of inked and glittered card was adhered to the inside of the card behind the aperture
Apertures cut into another piece of white card and a slightly larger piece of pearlescent deep aqua card to fit over the top
2 lengths of ribbon adhered along the lower border
The tree is cut with a Memory Box die.  There are 3 layers of white card glued together, the top layer was covered with PVA clue and a thick layer of Glamour dust was added.
For the corner elements I used carious holly, pine sprig and snowflake dies, topping those with white and red poinsettias made using the smallest of the four dies in the Layered Poinsettia Shapeabilities  Etched Dies set 
To finish: Red beads to decorate the tree, Tiny yellow gems for flower centres. Gold Leaf trim this stuff is a bit garish for my taste so I inked over it with a Sharpie pen to reduce the brightness a bit, Tiny red glitter dots for holly berries, 2 punched gold stars and a couple of gold teeny snowflakes tucked in too
I've used this Layered Poinsettia Die such a lot this year - it's definitely been the best of buys! 

So on to card 2
 The Man in Red
I blogged this one yesterday on the Bubbly Funk Through the Latterbox Inspiration blog, but I'm pleased with it, so its getting a show here too!


From the November Letterbox Box I used:
Vellum Quotation
A bell
A snowflake charm
A snowflake eyelet
From my stash I added: die cut Santa, stars and snowflakes, red and silver glitter card,  red ribbon, silver cord

Believe it or not for such a CAS card, this took a whole day to do.  Sometimes it's a lot harder to keep it Clean and Simple that just bunging it all on, isn't it?

Anyway, that's quite enough for this time - I have crafting to do!
Thank you so much for popping by - lease leave me a comment, I always love to hear what you think.

Wednesday, November 22, 2017

Snowflakes and Snowmen

Hello!
It's a rather grey and murky day here 😞.  Seems already dark and its not 2.30 yet.

Anyway, the Christmas crafting goes on ....and on!

Today I've some snowmen cards for Bubbly Funk Through the Letterbox and another card using the November LO from The Sketch File.

This is the one for The Sketch File, I wanted to make use of a lot of gold and white snowflakes I'd cut out when I made the box I shared here last time, and I thought they would look fab against a black background
.  
Info:
Black card blank
Various other card pieces in gild and white
Stamped sentiment 
narrow red satin ribbon
Lots of different snowflake dies and punches

This Sketch:
The Sketch File Blog November 2017

For the Snowmen card I used just a length of ribbon from the Bubbly Funk Through the Letterbox November box - when I saw it, it reminded my of an old Quickutz die.  I love the way these boxes work with my existing stash an encourage me to use it!

Info
White card blank
Blue and Silver card
White glitter card and other scraps to decorate
Dies: Snowman, small snowflakes. Sentiment, Plain and Scalloped squares
Ribbon from Bubbly Funk Through the Letterbox November box

Well, that's it for this time - got to get on, more things to be cut, inked and glued!
Thank you for coming by, hope you'll visit again soon/ Leave me a message and I'll be sure to return your call 😉


Shop at:  Bubbly Funk Through the Letterbox 
Be Inspired: Bubbly Blog

Monday, November 20, 2017

Snowflake Box - Spellblogger post for Spellbinders


Hello! 
I'm back with another Spellblogging post for Spellbinders
and I've another box to share with you this time


I just could not resist making another box with Becca Feeken's
Vintage Elegance Gift Box die set
I just love this die set, it makes such a useful size box.  It goes together so perfectly and then the only thing you have to worry about is how to decorate it!
 I made this one using Gold White and Red, which are the colours I'm planning to use for our tree and other décor this Christmas.
 

I absolutely love snowflake dies - I just can't get enough of them.  Every year I tell myself 'enough is enough' and then I espy some new ones and my resolution fails.
This box is decorated with two new Spellbinders die sets; Snowflake Snippets and Create a Flake 6 (I'll give the details below). 
 I cut the largest and smallest of the Snippets dies twice each and glued then one on top if the other, then matted them onto gold foil card squares to partially cover the top of the box.
I cut loads of each of the Create a Flake lots of times - some I've used on the box lid and front, others I'll be using on other project.  You might as well cut a lot out while you're at it, eh?

I've used lots of different gold and white card.  There's glitter and foil and sheen, and lots of lovely layers.  A gold organza double bow and some red gems in different sizes to add a splash of colour.

 Materials
Patterned pearlised white card 350gsm
 Gold Glitter card
White Glitter card
Gold foil card
Gold organza ribbon
Red gems


Here's a run-down of the Spellbinders die sets used this time


  Vintage Elegance Gift Box 
from Amazing Paper Grace by Becca Feeken 
Shapeabilities  Etched Dies


Shapeabilities Etched Dies

 Shapeabilities Etched Dies

I also used:

Platinum Die Cutting and Embossing Machine

That's it for this time
  Thank you for visiting, if you click on This Link  you'll find yourself at the Spellbinders store where you will be tempted by lots of lovely dies, stamps and much much more!

Happy Crafting


Friday, November 17, 2017

Poinsettia Gift Box

 Hi there
Gosh I'm late today - just a long and boring saga of pc 'issues' and other stuff that only seem to happen on the days when the to-do list is long!  You know exactly what I mean, I'm sure.
So I'll keep it short today.
I'm sharing a project for The Daring Cardmakers today:
We're taking a 'Step Away from the Cards' this week - instead we'd like to see gift bags and boxes - make them yourselves or decorate a ready made one.  It all helps when you're getting ready for Christmas of course - but your creations don't have to be Christmas themed; we need pretty boxes and bags for all sorts of reasons!
We really hope you'll join in and share your creativity with us this week 

I made and decorated a box which will probably be used as a gift box for a piece of jewellery.  It measures about 16 x 7cms and 2cms deep
It's a very simple, basic box and lid.  The sort where you just make the two parts in the same way, except that before you start making the score lines you cut 2mm from the length and width of one of the card pieces.  That way the lid is just enough bigger to fit over the base section.  Is that as clear as mud?  Would you like more of a tutorial?
Anyway, I made the box from some patterned card sheets - thes came in a pack of A3 card from Crafter's Companion.  It is the Centura Pearl card and is supposed to be gold tones, but tbh I'm quite disappointed in the colour - its not very gold at all, to me its more of a coffee and cream sort of effect.  Lovely thickness of card, perfect for boxes, and the designs are lovely, its just not the colours I was expecting.

For the decorative top:
Plain gold card panel cut slightly smaller than the top of the box
Filigree piece using the French Flair Card Creator Die (details below)
Frame to go over the top is just cut with a craft knife

For the Label topper:
Dies used to cut these pieces are from the Renaissance Jubilee Label 56 die sets (details below)
Same card, plus gold glitter card, and a small piece of plain cream card


For the Poinsettia:
I used the Layered Poinsettia die set (details below) and cut 2 of each size petals cut from red card, and some leaves cut from plain gold card
The stamens were some I bought last year and hated.  The gold part was very long about 1.5cms and looked very gaudy, so I pulled the gold part off and cut  it right down to a few mms before adding a bit of glue to the stem section and poking them back into the holes in the glittery part.  They looked so much better and are now just the right size for this large poinsettia!
It's always worth seeing if you can make a poor purchase work for you!

I glued a couple of pieces of ribbon around the lid and box base - I think it's ribbon retrieved from a box of chocolates.  I NEVER throw ribbon away!

So here are the dies I've used this time:


French Flair Card Creator Etched Dies from the Rouge Royale Deux Collection by Stacey Caron


I was really happy at how the box turned out.  And I even managed to get the two pieces to fit together at the first attempt.  I do know 'the rules' on how it works, but so many times I decide to change that 2mm trim for one reason ior another a it all goes pear shaped!

Anyway, that's it for today, thank you for visiting