Friday, March 31, 2017

Tinned Tomatoes

Hello
Hope you are enjoying the same lovely Spring sunshine we've been seeing over the last few days.  Doesn't it make a difference to everything!
I'm a bit excited because we've just booked a sneaky little week at the coast.  Being a seaside-born girl I really miss seeing the sea.  I don't even care if its wild and stormy - seeing the sea in all it's moods is good for the soul.  Well, mine, anyway!

We have such an interesting challenge to play with over on The Daring Cardmakers this week:
Wrap It Up 
It's Enfys here with this week's dare....I thought it would be fun to challenge you to use something that was used to wrap a grocery product on your project.

So when you are unloading your shopping this week, take a closer look at those cardboard boxes, acetate, plastic, chocolate wrappers or those little nets that held your oranges......

We've used all manner of packaging items over on the blog - you'd never really guess it was just "rubbish"!   There's treasure to be had all over the place when you actually take the time to look.  

In the end I used part of the cardboard wrapper from a 4 pack of tinned tomatoes, but I do have a couple of other things on my desk which I'm going to try and make use of in the next few days - before the mood wears off
I went with a gardening theme - probably because one of the kitchen worktops is currently home to a whole load of tomato plant seedlings....so it was rather in my mind!

Info
I cut a circle aperture in the cardboard where the name etc was, then glued it onto a card base which I'd already inked in pale blue.
I used a Scalloped Nesties die and a plain circle (both Spellbinders) to make a frame; this covered some of the other unwanted printing on the tomatoes label, the rest is concealed beneath the other die-cuts.
All the various garden tools themed die cuts are made using the
 fantastic set from XCut
The seedling is a bit of a composite; the pot, stem and the leaves are all from different dies, because none of the ones I had were just the right size and shape.  Sometimes you just have to adapt what you've got!
The tiny tomatoes I used to decorate the frame are made using another large Spellbinders die - but just the little circles that are usually the 'waste'.  I added absolutely teeny green stars cut with a Tonic Edger punch - I've never actually worked out how this particular edger is supposed to be used, but its still very useful for the different sized stars (various degrees of tiny!) that it cuts
The sentiment quote is pc generated 


That's it for this time.
Thank you for visiting, I hope you'll leave a message - and don't forget - we'd love to see you joining in over at The Daring Cardmakers this week

Tuesday, March 28, 2017

Rabbit Pie

Hello

Just a quick post from me today (whoop-whoop I hear you say), because I need to find out whether my crafting mojo has lost itself under the piles of discarded card, paper and what-have-you that's about to topple off the desk.

This is a little Easter card made using the March LO from the Sketch File.  I admit I took a few liberties with the sketch, but then, I often do.  I think sketches are there to spark ideas so that's ok, isn't it?


Info
Blue inked background using a couple of Distress Inks
Grass is stencilled using a trio of different shades of green ink
Rabbits are a dies set by Joanna Sheen (aren't they cute?) - I sponges some fawn ink over a scrap of white Bazzill card to give a mottled 
rather and solid colour
Their tails are White Ice Stickles and I added a bit of pale pink pen 
to their ears and noses
Their Burrow entrance is a die-cut circle of brown card (Spellbinders Nesties)
Sentiment is pc generated and matted onto navy blue card.
Here's the sketch
The Sketch File - March 2017

That's it.  Told you I'd be quick!

Thank you for popping by
 

Friday, March 24, 2017

Air-time

Hello there
How are you?  I'm gradually getting over the horrid cold OH kindly shared with me, it's so lovely to share, isn't it?
We've had 'proper' Spring weather this week, with days of beautiful blue skies and sunshine and days of torrential rain and sometimes both within the space of half an hour.  Only the foolish look out at the bright blue sky and go out to buy their lunch-time sandwich without taking a coat or umbrella πŸ˜‰

I've not really felt up to much this week, so my blog output has been poorer than usual.  I do have a few things to share now though, so will try to catch up.

Today I've my card for the Daring Cardmakers and also a gift tag made using the March LO from The Sketch File.
First, today's Daring Cardmakers' challenge:

It's Svenja here and this week the sky's the limit - my theme for you is
* * * * Up in the Air * * * *
I'm asking you to make a sky- or flight-related card.

Feeling "blue" at the idea? Just check out the BLOG to seet the creations the design team have come up with to get you started - and see how colourful they are!

Loads of things ran through my mind for this, kites, balloons, aeroplanes, butterflies, birds and bees to name just a few, but also a few songs with sky or air related lyrics.  The one that stuck in my head was an old song from The Hollies, and its those lyrics I decided to feature on my card.  What I didn't know till I checked the song on the internet was that it's actually a Lennon/McCartney song.

Info
I started with a couple of lines from the song, which I arranged and resized using Paint Shop Pro before printing onto a strip of Bazzill Diamond White card.
This panel was matted onto red card.
I embossed a piece of the same white card with DΓ©cor Circles A4 embossing folder (Teresa Collins), and matted this piece Black card before adding to the smooth white card blank
Next the lyric panel was adhered in place 
For the heart balloons I inked some smooth white card using several shades of Distress Ink to get good depth and slight variations of colour.
I stencilled over this with my current favourite Mini Window Screen stencil (Crafters Workshop) using gold Alchemy Wax and Red Sparkle Medium  (both Imagination Crafts)
Once dried I selected a couple of areas to cut out with heart dies
 (DieNamics Nested Hearts).  
The ends of the balloons were just cut from scraps and glued in place
The bows and strings are black twine.  The loopy string happened by accident as I'd just used the two ends tucked under the balloons and the twine between just formed iteslef into a lovely loopy pattern!  So I just added a spot of glue to ensure they stayed put.


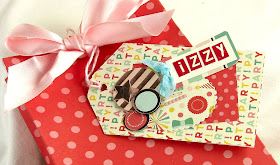
Next up is a little gift bag made to hold my niece's birthday gift.  I made a tag for it using the March LO from The Sketch File.
Rather than make handles for this gift bag I just punched holes and added extra wide satin ribbon to tie in a bow.  
The papers are all MME "Hooray" and I've used both 12x12 and 6x6 for this project.
I have a tutorial for the gift bag HERE
once you have made one or two its easy to alter to make them to match what you want to put inside!
Here is the sketch I used to make the tag
March 2017 - The Sketch File


That's all for this time, I hope you'll take a minute to visit both the Daring Cardmakers blog and The Sketch File  it would be great if you could join in with us all this time
Thank you so much for checking in, I hope you'll be able to leave a comment. 
 

Friday, March 17, 2017

Going Green

Morning All

It's Friday again and that means a new challenge from The Daring Cardmakers, and predictably enough there's a bit of a link to the date in there this time. 
  
It's Lythan here today with a new challenge for you
* * * * Green with a Glimmer of Gold * * * *
Well it had to be really didn't it.
I'm sure we will not be the only challenge blog to feature green this week but when St Patrick's Day falls on a Friday what else can you do? 
So how about some cards featuring green and a dash of leprechaun's gold if you like!
The team have made some awesomely beautiful cards to get those creative juices flowing (click here to see), so why not join in this week?

Green isn't really my favourite colour to craft wit, at least not as the main colour, so that in itself provided a bit of a challenge for me.  Over the last week or so I've been playing about with a bit of a stencilled background theme, using more than one stencil and a few different inks to add depth to the design - so I thought I'd continue the theme and see what happened.
The first stencil used is Mini Mosaic Tiles (Crafters Workshop), which I inked through with 4 or 5 different green inks.  I also added a little rub of gold Alchemy Wax (Imagination Crafts)
The second stencil is my current favourite; Mini Window Screen (also Crafters Workshop).  I used gold Sparkle Medium (Imagination Crafts) to stencil this time, and I rather like how this, smaller stencil ties the two layers together


Happy with the results I now had to decide what to put onto the background - as of course I hadn't planned ahead!  
Generally speaking when I can't decide what to do I make a flower or two.
In this case one nice big flower would fill a lot of the space, and its ages and ages since I last made a gorgeous peony flower (and peony season is getting closer), so decision made,
I wasn't sure whether to make a gold one or see how a green one turned out (wasn't convinced about the green), but Lythan's challenge had Green as the main element and if I made a gold flower then my colour palette would be more gold and green.
Actually, I've quite happy with the flower, it looks ok in green

Tools and Materials
Smooth White card (PDA Woodward)
Green card for flower (Bazzill)
Stencils;
Mini Mosaic Tiles and Mini Window Screen (both Crafters Workshop)
Various green inks
Alchemy Wax and Sparkle Medium  (both Imagination Crafts)
Punch Bunch punch for flower petals
Medium Ball tool for shaping petals (Rainbow Sugarcraft)
Gold card for swirls with Leafy Sprigs die set (Spellbinders)
Pearl and gold wire spray for added detail


That's it for today, I hope you like what you see.  
Don't forget to head over to the DCM BLOG to see the other DT cards - the blog looks so beautiful today!

Thank you for visiting, please leave a message.....
Have a great weekend


Other Challenges:
The Moving Along with the Times   Handmade Flowers

Tuesday, March 14, 2017

it's Not a Chicken

Hello 
How are you, well I hope?  It's been lovely and Spring-like for the last couple of days - which hopefully will help everyone get over all these nasty cold bugs.  I'm getting mightily sick of lemsips and Covonia!

I've been having a bit of fun with stencils, ink and all sorts of other mediums (media?) this week, so thought I'd see whether I could use one of the pieces I'd made work with the "Allsorts, Layered" March Sketch File LO

I needed an anniversary card, so made this


Info
Stencilled piece
I used a Tonic oval die to cut an aperture in some scrap card, washi-taped it to some smooth white card and inked the shape using a couple of diffeernt shades of peach and pink ink
I slipped the hearts stencil underneath the piece with the aperture and stencilled the hearts in a couple of shades, then moved the stencil a bit and stencilled some more of the hearts
Next I added some gold Alchemy Wax through the stencil, and then just a small amount of gold glitter gel (Sparkle Medium from Imagination Crafts)
Smooth White card
Patterned Papers MME "Gather" and "Heart Day"
Hearts stencil (Joanna Sheen Signature collection)
Scraps of Black Bazzill
Butterfly die set (Apple Blossom Dies from CraftStashUK)
Card Candy circles - I also punched a couple of tiny hearts from some of the circles 
Computer generated sentiment 


Here's the sketch  
I substituted my stencilled oval for the rounded rectangle on the sketch and flipped a few layers too, but that's ok πŸ˜‰

Sketch File, March 2017
On my desk the card looked fine, I quite liked how it turned out - but now looking at it on the screen I suddenly thought "Oh!  It looks like a chicken!"
I turned the screen round so Hubby could see and asked him "Does this look like a chicken to you?", for a moment he looked slightly bewildered and then thefog cleared and he saw what I meant!  🀣 🀣
Oh well, too late, this card is long gone into the post and beyond any tweaking!
  
 I used the oval aperture piece and the same technique with a different stencil and colours but its sitting on my desk waiting for some inspiration on how to finish the card. Watch this space.....

Thank you for visiting, I hope you'll take a minute to leave a message, and hopefully you'll pop over to The Sketch File and join in with us this month

Friday, March 10, 2017

Taking the Rough with the Smooth

Morning All, Happy Friday!

I've just been out in the garden and spotted the first tulip to be in full flower.  It's sheltered by the branches of something else, but still how very brave of it to flower already.  We have a few tulips that grow rather strangely;  full-size flowers on tiny stems!  They look really odd!  I suspect its something to do with the naughty squirrels disturbing the bulbs - they seem to think our garden is their larder.

On Wednesday I set about making my card for today's Daring Cardmakers challenge.  It's all about using rough and smooth textures on one card, and I'd decided to raid OH's DiY stash for some sandpaper.  I thought I could do something with a beachy feel with the sandpaper as the sand and some 'sea' coated with Glossy Accents for the sea.  Well, what I discovered was that we have sandpaper in many colours, but not one of them is sand coloured!
My new, plan B stayed with the colours of the sea and Glossy Accents, but added in curvy pieces of some green sandpaper.
Then the panic set in.  Using a thick layer of Glossy Accents would take an age to dry, then I had to assemble it all before taking my photos.  I'd never get it all done in time!  I reached for the heat gun to help dry the stuff, then left it while I tried to get as much of the card done as possible while it dried completely.  
I cut the aqua backing layer, then it took 3 tries before I managed to cut the aperture neatly enough (why didn't I just use my Silhouette to do it?), and only then did I remember that it was only Wednesday morning and I had the whole of Thursday to get this card finished if I needed more time. doh!


It's Joanne's very first time setting the challenge for the Daring Cardmakers this week:
"Take the Rough with the Smooth
For this challenge I'd like you to contrast something rough (or bumpy) with something smooth/shiny on your cards."
 
Info
The coloured panel is made using Gelatos, which I rubbed over with a damp wet-wipe to merge the shades together in a watercolour effect
A thick layer of Glossy Accents was applied over the whole area, then I added my pieces of sandpaper (they are the deep green coloured sections). 
 I also added in some swirls of Diamond Stickles.
It looked a bit bare around the frame so drew a couple of swirls of  Diamond Stickles.  Next I coloured some thinner card on both sides using the 'spare' colours in the same wipe as before, re-dampened to release all the colours and rubbed over the card.  There was enough colour to make matching paper for a bunch of tiny circles to make the rolled roses.
The swirly bits were cut from a scrap of the deep aqua backing card 
using a Spellbinders die.
From the off-cuts of the main, Glossy Accent covered panel I die cut some circles
 (berries from Holly and Mistletoe die-sets), and shaped them with a ball tool before adding them in around the swirls and roses.


I think the reason for Wednesday' "Losing my marbles" incident was that I generally do end up making my DCM card on a Thursday, working against the clock to get it finished.  I could be more organised and get things dine in advance, but that would be breaking the habits of a lifetime, wouldn't it?
I've always been a bit of a last Minute Minnie!

It would be wonderful if you'd join in with our challenge this week - there's lots of inspiration on the DCM blog, and you can click on the names above the pictures to find out more about how the Design Team created their cards.
That's it for now, Hubby is asking "What's For Lunch?", so I'd best get to it πŸ˜‰πŸ˜‰
Thanks for visiting
 

Tuesday, March 07, 2017

Allsorts, Layered


Hello there!

What?  Blog posts on consecutive days?  What's wrong with the woman?! 🀣🀣
How is your day going?  The weather is a bit mixed here just now - one minute sunny, the next a bit grey.  Typical Spring weather really.  
At last Hubby's cold seems to be receding, it's another home-working day today, so we'll see how he's feeling later when the thought of going to the office tomorrow rears its head.  He's just done a Skype meeting and I could hear lots of coughing and sniffing from the various "attendees" so it's obviously affected quite a few of them.
Anyway, I have another craft project to share with you and it's a little gift box this time
The new March sketch launches today over on The Sketch File and I thought I'd see if I could shrink it down to make a decorative all-in-one closure and tag for the gift box.
Actually this box is made the same way as several gift bags I've made before and there is a link to my tutorial in the side bar.
The Sketch File, March 2017


This time I used a strip of about 20cms cut from a sheet of 12x12 paper.  By the time the base is created and the top is folded in to make a neat edge the box stands about 10-12 cms high.  It's already gone to the recipient so my measurements are a bit approximate!
As these are usually gift bags I add some handles, but for this I cut a piece of cream card, made a fold at about 2cm from the top and rounded off those two corners.  This tab would eventually be glued to the back of the bag.
I added some pretty paper to the front section of the closure then made the holes for the ribbon; folding the closure piece in place I used my Cropodile to make the holes through all the layers.
Info
All Papers and letter stickers from "Hello Gorgeous" 12x12 (My Minds Eye)
Circle flower piece and rolled roses cut from the same papers
Leaves are created using a flower petal punch (Tonic) with the petals separated.
Ribbon from stash
Once all the pieces were in place I glued the folded tab to the back of the bag, then threaded the ribbon through the holes, knotted the ends and tied a bow.
These papers are glittered, so they are very pretty!

That's my lot for today.  It would be fab if you'd join in with us this time over at
The Sketch File You can use the sketches to make anything your like - even just a little part of a larger project if you like. 

Thank you for popping by today, and if you'd be kind enough to add yourself to my Followers over in the sidebar that would be just wonderful!  And I'll reciprocate, of course!

See you soon 😎
 

Monday, March 06, 2017

All Your Cars

Hello there
Thank you for visiting today, I hope you are well.
I have a poorly hubby here - poor thing has a rotten cold and is feeling very sorry for himself so is having an extra work-from-home day rather than spread his germs all round the office.  Never mind that one of them probably gave said germs to him in the first place......
As I look across to his desk I can see a bottle of cough mixture, a box of throat lozenges, box of tissues and an empty glass from his last lem-sip!  I think that's got it covered 😜😜

While on the subject of my OH, I've not shared the card I made for his birthday which was a couple of weeks ago yet, so today I'll put that right.
I was a bit stumped for what to do this year, but inspired by the gift I'd decided to buy (I'll tell you more later in this blogpost), I decided to stick to the theme and I made a "Box of Your Cars" card!

Luckily for me, I found a file on the pc with photos of nearly all the cars he's ever owned, which even though it still took absolutely ages to make, did make the task I'd set myself a lot easier than if I'd had to trawl through all the photos we have looking for individual photos!
Having printed them all out I adhered them to dark brown card then cut around the outlines.  I used double-sided tape to fix each car to a strip of acetate (cut from die set packaging) and to the supports inside the box fold card,
From his very first Fiesta and Mini to MR2s, Suzuki Cappuccino, Fiat Coupe (my favourite), Ferrari, Porsche Boxster, the Peugeots, Toyotas,  Audis and all the rest - they are all there!


The box card was made from Dark brown card,  When folded flat it fits 
into an 8cm sq envelope
All of the decorative papers are all by Authentique

To keep everything in place when folded, I made a "belly band" and used some stars, a Happy Birthday die cut sentiment and a "proper" mini to decorate. 
 The mini is cut from my own template and cut on the Silhouette Cameo machine
I did actually buy a ready-made die for a mini, but I didn't get on with it at all, so reverted to my own template instead.

 Here's how the card looks when all folded flat and ready to go into the envelope

 I mentioned the gift I'd bought for him, and I thought I'd post about it on here as I bet a lot of you sometimes despair of finding really interesting and unique gifts for the men in your lives!  
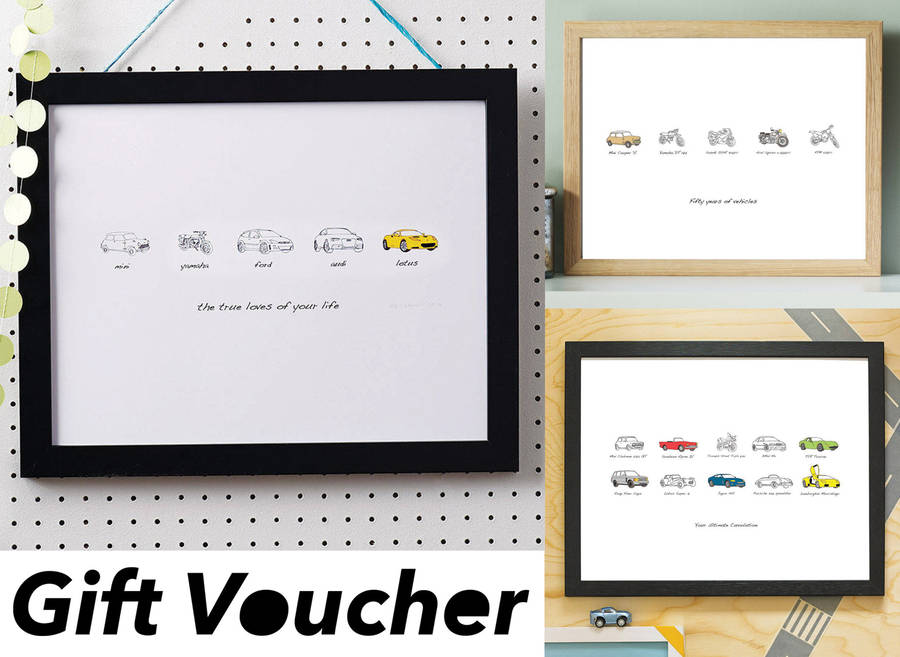
I gave him a gift voucher for a personalised "carvolution" print from "Oh! Studio" 
I chose to buy it as a voucher so that Hubby can select which cars he wants to have featured on the picture, and the layout which will be used.  I did mention to Oliver that my OH is very fussy, bit he assures me that he's worked successfully with such people before....... 🀣🀣🀣🀣

OH is still "thinking about what to do" and hasn't decided yet, so I will try to remember to show you the finished print when it eventually arrives!
You can choose motorbikes, cycles etc too, btw

That's all for now
Thank you for coming by
 

Friday, March 03, 2017

Marching In

Hello there
Its a bit of a wet one here in Hertfordshire, but never mind, it's March at last and there are welcome signs of Spring everywhere.  
Just think, at the end of this month it'll be time to Spring Forward - we'll be re-setting our clocks to British Summer Time! 
I think Spring is my favourite season.

This week on The Daring Cardmakers its Enfys in the hot-seat for the very first time,  She's hosting the March Elemental Inspiration Picture challenge and has chosen to go down the Home DΓ©cor route.  
This is my card:

This is the photo Enfys chose for us to work with


My thought process went a bit like this;
Ooooh lovely, I do love a bit of Black & White, those stripes on the rug are fab! The vase of twigs would make the perfect focus piece for a card. 
Oh, actually, there's a stripey cushion just behind the vase, its like a background for it. And there's a framed picture on the wall, so I could make a frame for some striped paper and sit the vase on top.  
Bingo! Stripes. Frame and Twiggy Vase - three elements.
Info:
White, Black, Brown, Kraft card from Bazzill
Tonic Nested Rectangles (set of mixed straight and scalloped edges) to make the black frame.  Brown layer was hand cut
Striped paper is by MME from a 6x6 pad.
White vase was made by cutting down an oval (Tonic Nested set) of Bazzill Diamond White card.
Twigs are from Spellbinders Cherry Blossom die set
 (this is one of my most used die sets)
Arranging the elements on the card, I decided the background looked a bit too plain, so embossed another piece of the same white card using "Woodgrain Cottage" (Teresa Collins, A4 folder) - which added in another 
element from the picture too 
The vase looked dull too, so I used the berries from a Holly set (Crafters' Companion) to cut a load of tiny black dots and stuck them on.
'Birthday' is by  Creative Dies (CraftStashUK)
It did need a little splash of colour, and if you look in the top left of the picture near the glass vase of twigs you'll see some books and other bits on a shelf unit.  The tiny bit of yellow would be perfect to add some Spring blossom to my twigs - just like the forsythia or Winter Flowering Jasmine in my garden!
(tiny flowers also from Spellbinders Cherry Blossom die set)
I'm interested in how different crafters work.  I'm definitely not a plan-it-out-first sort of person.  Usually I find a starting point and just see what happens from there.  It doesn't always work, which is why I end up with half-made cards with backgrounds but no focus piece, and focus pieces with no backgrounds made.  Sometimes it's because I just don't like how they've turned out, and sometimes its because I can't find the right 'marriage' between the elements.  Maybe a bit of planning would help, but I think I'd still go off on a tangent most times πŸ˜‰

What about you?  Do you go with the flow, or are you a meticulous planner? 

Anyway, thank you for popping by today, please leave a message, I'd love to hear from you - and do take a look HERE to see what the rest of the DT made.