Friday, May 27, 2016

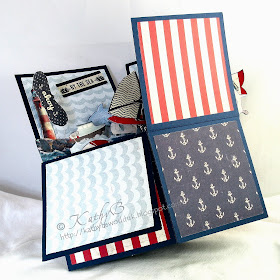
Card, Box, or Both?

Hello, it's a lovely day here today - I wonder if it will stay that way for the whole w/e?  Surely not!  It's a Bank Holiday Weekend, after all!
 
It's Dawn's turn to set the challenge at The Daring Cardmakers this week, and this time its definitely more of a technique challenge as we've all been making box cards.
These are the cards that fold flat to go in an envelope but then pop out to make a 3D box, with flaps that flop down to show all the embellishments hidden inside.
I really enjoy making these, but tend to get a bit carried away!
This time I went with a nautical sort of theme and made this
 Info
There are loads of tutorials for the basic box-card structure on the 
web, like this one HERE
Once you know it works, it's pretty easy to make then to fit whatever envelope you want to use.  It may mean you need to use a couple of sheets of card and have more than one  tab to join the  pieces with, but really you can go mad and make them however you like.
Inside the box you need to add some spacer bars, which are simply strips of card cut and folded to fit inside.  These stabilise the box when it's standing open and are used to attach your embellishments to.
I took a photo looking into the box so you can see the "innards"

This is a big card when it's flat - it measures about 20cms square when folded flat. I used the envelope to work out how to cut 2 A4 sheets of card, making sure to add a couple of cms extra for the tabs


I used a selection of 12x12, 8x8 and 6x6 papers from Authentique and 
Graphic 45 for this project.  
Embellishing pieces;
Die-cut stickers from the paper sets;
(eg. anchor, ship, 'by the sea' on back piece)
Hand cut from some of the flat papers;
(eg. shells, 'By the Sea' banner, Lighthouse)
Own templates cut on Silhouette Cameo;
(eg. Windsurfer, beach ball)
Dies;
(2x yachts) 
Printed images
(eg. Ship's wheel, Dolphins, Lifebelt)


The team have made some wonderful cards this week - there are loads of ideas showing how versatile this style of card is.  Maybe you've seen them, but never made one - well, this week we give you the perfect excuse to have a go!

Thank you so much for popping by today, I hope you'll leave a message - I'll always make a return visit to your own blog as it's always fun and inspiring to see what other crafters make
All for now


Thursday, May 26, 2016

Footie

Hello, Good to see the sun is making an appearance here now - it was avery dingy, damp start to the day though!

My card for The Sketch File this week is a football themed card, and I've been delving in to the big box of really old dies again to make it.


 Info:
The inked 'square' background is made using a couple of different green inks, and a torn paper mask
Die cut elements:
 Trophy - Sizzix
Football Strip and Football - Quickutz
White rectangular panel is embossed with footballs
(footballs embossing folder - not sure, might be Crafts Too)
The scarf is handcut
Sentiment is a homemade decal sticker
(Dry Decal Printer Paper - Crafty Computer Paper)
Here's the sketch

 I used the rotated version

I think this idea would work for various sports and hobby themed cards - although the sketch uses the same 3 items, we don't have to ;), it's all about creativity.


Anyway, I hope you like it, and also hope you are inspired enough to come and join in with us this time on The Sketch File

Thanks for looking, please leave a comment!


Friday, May 20, 2016

Rainbow Road

http://daringcardmakers.blogspot.co.uk/

Hello from a much brighter Hertfordshire today.  It's been a bit grey for a few days but the sun is shining this morning - maybe Lythan's challenge for The Daring Cardmakers worked some magic....


Paint the Rainbow
It's Lythan here this time, and its a bit dismal down here in Devon at the moment so this weeks dare is really brightening me up. I would like you to make a card featuring a rainbow or using rainbow colours - you don't have to use them all but they do need to be in the right order!
Check the blog [HERE] for some fantastic inspiration to get 
your imagination going
  Well, this one must really have fired up the imagination as several of us made a couple of cards to share rather than just the one - mind you, in my case it was more about trying to make something that worked as well on paper as it did in my head ...... and I'm not sure I succeeded in either case!
In my head this didn't look quite so"busy" and maybe I should have taken more note of Lythan's guideline that "...you don't have to use them all but they do need to be in the right order."
Or maybe I should have made the final "Enjoy" word stand out more - but its a bit too fine and fiddly to use multiple layers, or even dimensional glue

Info
Smooth white square card blank, plus extra of the saem card
(both PDA Woodward)
Zigzag panel is stencilled on separate piece of card using Versamagic inks
(Chevron stencil - Prima)
I inked up an extra sheet of card with blocks of the same colours for
 die-cutting 'Enjoy' word
(die 'Enjoy' - Creative Expressions)
The words were adhered in correct rainbow order onto the card blank and then a strip cut from the stencilled panel to fit the remaining space.  I used a border punch on this strip rather than leave it plain
(Broderie Anglaise border punch - EK Success
"your special day" is pc generated and the panel matted on black card

I thought I could do something with the remaining scraps of inked up pieces of card, and in my head saw a rainbow arc of butterflies.  My issue this time was making the arc look right - I didn't like any placement of the butterflies that I tried, so in the end abandoned the rigid arc design idea and just let them there butterflies do their own thing!

Info
White card as before
Embossed square for background and dimensional interest
(Embossing Folder - Petite Dots 6x6 - Crafters Companion)
Sentiment is pc generated then die-cut, red circle also die cut
(Nested Circles die set - Tonic)
Butterflies are the smallest size from the Butterfly Trio die; they are adhered only down the bodies so the wings can stand away from the card
(Butterfly Trio die - Memory Box)
The tiny hearts are the 'waste' saved from the first card
The tiny gems are iridescent and catch the light, shining in different colours 
(Gem Wheel - Anita's)
its definitely worth heading over to see all the cards this week - the blog looks so bright and cheerful and is stuffed full of lovely rainbow ideas
That's it for this time, thank you for visiting, it would be great if you'd leave a message, it's always lovely to read them


Tuesday, May 17, 2016

Stars

Hello from Sunny Hertfordshire!

My card for The Sketch File this week was made for the birthday of one of our nephews. and as I think it's often harder to make cards for the grown up nephews than it was when they were small (and it was hard enough then!) I chose to keep it simple with a stylish black, white and silver colour theme.


 Info:
The starry background is stencilled in black ink
(Starry stencil - Memory Box)
Die cut Black and Silver squares, with the silver one trimmed down slightly for a narrower border
(Nested Squares die set - Tonic)
White rectangular panel is embossed with stars
(Stars embossing folder - Cuttlebug)
Black and Silver stars are die cut, some are solid shapes, others "open", created by taping one die inside the other evenly before cutting
(Nested Stars die set - Die'Namics)
HAPPT letters, die cut 3 times in black and adhered on top of each other, then once in 
white for the top layer
(set of HAPPY letters in different fonts - Memory Box)
"Birthday" is pc generated; printed in black ink on white card

Here's the sketch
I like the way this one went together, and I think it may be popping up again soon!  I wonder how many times I can get away with it though?
Hope you like it, and also hope you are inspired enough to come and join in with us this time on The Sketch File

Today's London photos are of Tower Bridge and the Tower of London


My, it was such a busy day, the whole area was packed! 
We were lucky enough to be on the embankment when the bridge was opened to let a big ship through - unfortunately it was one of those ugly cruise ships rather than a pretty "tall" ship, but you can't have it all, and it was good to see it go as it had been hogging the view over the river as it was moored alongside HMS Belfast! Hubby took this photo, managing not only to get just a tiny glimpse of said ugly boat on the other side of the bridge, but also no hint of the number of excited people there were taking photos!
Finally a couple of evening shots - just so pretty!


Thanks for looking, please leave a comment!

Friday, May 13, 2016

Breakfast at the Sky Gardens


We were up nice and early for once on the Monday of our long w/e in London because we were going to the Sky Garden for breakfast! It was only a 5 minute walk up the lane from the flat we'd rented, so it wasn't too much of a chore to be there by 9am!  It is such a mad shape - sloping and curving outwards the higher it goes, and ending up much wider at the top so I guess when you're up there you are sort of hanging over the other buildings!
It was a bit of a shame that the only dull day we had on our trip was that day, but to be honest I loved the place so much it didn't really spoil our visit - I'd definitely want to go back there, which is probably why I'm making this a dedicated post for some (a lot of) photos.


It's free to visit, but you do need to book your tickets ahead, as they limit the number of visitors - we were too late for the simple visitors tickets, but there were bookings available for breakfast tables, so booked for that.  Once you're in, you can spend as long as you want to there.
Once you've checked in at ground level and gone through the airport-style security, a super-speedy lift whooshes you up to    like a great big airy piazza in the sky - imagine a three storey high, glass-roofed space with a cafe-bar cum cocktail place on the main level, with tree-ferns, palms and masses of planting and a wide staircase on either side with views out over the city.  The steps lead up to another cafe-bar area at the back, with views towards the Gherkin and Cheesegrater buildings, with more steps go up to a terrace overlooking the main piazza area and out across the Thames. The Sky Garden also has two restaurants, and there's an outdoor terrace looking out over the river too.


I got a bit carried away choosing photos to add here, but I don't want to leave any out, so rather than have a mile long post I'll add them in small size from now on and you can click on them for the bigger images.  Please excuse the colours - it was a bit on the grey side that day, plus there's quite a bit of thick glass between you and the view up there!

I've marked the London Eye with an arrow on this one....


There's the Shard (photos on another day), and HMS Belfast down on the river

Going up the steps on the west side there's a great view of St Paul's, with what looks to be a Guard of Honour from all the cranes!
At the "back" of the Sky Garden, facing away from the river you can see the 'Gherkin' and the 'Cheesegrater' buildings
Heading down the steps at the other side you can see the Tower of London and Tower Bridge, and way along the river east towards Canary Wharf and Greenwich 

Side steps from upper terrace


 You can so so high that you look down on the tops of the big palm trees and see this amazing pattern!
As you go up/down the various flights of steps there are little paved areas off to the side, with small seating areas for you to sit and contemplate the view!

I would love to go back, hopefully on a brighter day so we can take better photos and enjoy the whole wonderful place again! 
Hust a couple more photos from outside taken when the sun was shining!
This one from the street just along from the building
....and one from the other side of the river 
 If you get the chance to go to the Sky Garden - don't miss it - it's a fantastic place to visit and the views are wonderful.  
Thanks for visiting

Unlucky for Some

Hello
Not such a nice day here so far today - it's a bit dull and windy - and as I've just been out in the garden I can say that it's not particularly warm either!
It's also Friday the 13th, if you are interested in these things.  I've just checked the calendar and I think it's the only one this year.  Our lovely Svenja has chosen this 'unlucky for some' date to base her challenge for the Daring Cardmakers around:
It’s Svenja here and as today is Friday 13th some of us might be feeling a little triskaidekaphobic about it. So I decided that my challenge needs to be
good luck
– just for that little extra bit that might be needed…
Extra (virtual) brownie points for anyone who shows signs of good luck-superstitiousness, e.g. lucky clover, horseshoes, chimney sweeps… what else can you think of?"

Do people still give those silver covered cardboard horseshoes (and I seem to remember rolling pins too) decorated with ribbon and a few flowers to newly-weds? I do remember them from weddings I went to when I was very little, but I'm pretty sure we didn't receive anything like that. Anyway,
my first plan was to make a wedding card with a little horseshoe charm on it - I was sure I'd have some.  It turned out I didn't, so while I was thinking about whether I could cut something that would look ok on the Silhouette another idea came to me - the little rhyme that goes "See a penny, pick it up, and all day long you'll have good luck"
I didn't have a penny either
But finding a decent image of an old penny to print out and use was much easier than the horseshoe idea!  

Info:
I resized the picture to print out exactly the right size for the pucnh I wanted to use; printed onto glossy photo paper it looks quite real, especially when a couple of layers of copper coloured card were added to give the right sort of dimension.  
The verse was printed onto white Bazzill card. I used the RGB codes for a good coppery colour from the photo'd penny to match the colour of the wording
Using the same Bazzill card, I stencilled the 'Textured Drip Rings' design (Memory Box) with a few different shades of orange and coppery ink
Once dry, I cut an aperture in the stencilled piece and adhered to the copper card mat with 3D glue. then glued the verse inside the 'frame' 
To make the penny more interesting I made a spring from some wire, and hiding the ends with smaller punched card circles attached it to the card.

You can see the wire spring under the penny in the last couple of photos.  What do you think?  Does it look realistic? Would you be tempted to pick it up?  hahaha
That's it for the crafty stuff today, but I'm also adding another post today, with photos from our visit to the fabulous Sky Gardens, where we had breakfast one day during our recent stay in London - probably my favourite of the places we visited!  So please check out that post HERE too
Thanks for looking

Wednesday, May 11, 2016

A Page, a Card and the Cutty Sark

Hello!
I forgot to post my Sketch File projects last week, so once again I'm playing the catch-up fame
I used the new May sketch to make a page for my Paris mini album, one of a little set of pages using photos taken when we visited Montmarte and the Sacre Coeur
I used a Joanna Sheen "Artist" die set for the small splatter and paintbrush elements - I'm sure I made a little artist's palette to go on this page too, but I must have changed my mind (my memory is rubbish! I made this a couple of weeks ago and we've been away again since then... ay ay ay!)
I did love the vibrant, graphic designs of these Eiffel Tower paintings and was sorely tempted!

Here's a couple of views of the May sketch:
I'd also used the sketch for this Anniversary card I made for the Daring Cardmakers the week before - sneaky, eh

 Here are some Cutty Sark photos from our trip down the river.  I really cannot put into words how much I loathe the blue glass monstrosity they have built around the beautiful ship.  They have almost obliterated any view of it, especially at the front.  Surely they could have designed something less intrusive?


That's all for this time.  Thank you for visiting