I've added a couple of quick cards made with leftovers from the Bubbly Funk November kit to the emag today. It's really been a great kit to work with, the Dream Street Wonderland papers are just fabulous, and all the extra bits and pieces that Caroline adds to the kits work so well together.
I've also made some index cards to go into one of the projects I did for the October kit
I made a book full of pockets ready to fill with whatever lists, menus, reminders etc I'd need in the run up to Christmas. Today I've made some really simple index cards for organising my Gift Shopping.
I've punched a hole in the corner of each card and clipped a book ring to inside of the book wires so that I can use the ring to link together the cards I want to take out shopping with me.
If I actually remember to add all the info it should be a useful resource for the coming years too and stop me buying Rachel a scarf three years running.
I took the photos in the dark, so they are rubbish, sorry.
The book looks like this, and all the info about making it can be found in the archives of the Bubbly Scrumptious emag
Following on from yesterday's DCM White with Pink challenge, I made some more cards with the same theme
The paper on both cards is also from the BF November kit. The trees are Cuttlebug ones cut in felt.
"Winter Wonderland" greeting is from a fabby Cosmo Cricket rub-on set, available from the Bubbly Funk Shop - they are, I think, the best rub-ons I've tried so far.
To be honest, I don't have much luck with rub-ons, it's not for the want of trying either, but these CC ones are gorgeous and work perfectly, they have a beautiful silver finish and look wonderful on the cards.
Right, I suppose I ought to go and do some more work now, but I'm incubating a cold and finding it hard to settle to anything today.
Thanks for looking, please don't leave without saying "hi"!
Saturday, November 29, 2008
Friday, November 28, 2008
Add a dash of pink
Friday is always Daring Cardmakers Day of course, and this week it's Jane's turn to set the challenge.
She gave us a nice Christmassy one to play with and asked us to design our cards on a theme of:
A good chance to practise leaving white space, I thought - I'm still struggling with that concept!
I've tried to keep the design really simple, in my head it was even simpler, but there was too much of that dreaded white space so I had to fill some of it up a bit!
I've made a couple of cards - thought I should make the effort to add to my box of cards
The trees are from last year's Cuttlebug "Winter" set, I cut them first in card, then in felt and stuck the two layers together. I mounted them onused white glitter card and bright pink Bazzill The gorgeous pink and white striped ribbon is from Ribbon Oasis
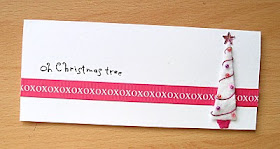
My 2nd card is a mini DL shape. The xoxoxox ribbon was some I had left over from my Bubbly Funk "Hugs & Kisses" kit from a few months ago. This time it's the new Cuttlebug tree, cut i white felt and card as before. I wound thin pink wire around the tree, added a pink flet pot, a few beads and a few blobs of pink glitter glue.
I'm planning on doing a few more using the same sort of design - I still need to bulk out my "Christmas Cards Made" box - my plan to get them all finished before the end of November looks like a failure atm.
Do head over to the DCM blog if you can and see what the others have come up with. We'd love you to join in with the dare and maybe this will help you bulk up your Christmas card stock too!
She gave us a nice Christmassy one to play with and asked us to design our cards on a theme of:
White Christmas,
but with a hint of Pink.
A good chance to practise leaving white space, I thought - I'm still struggling with that concept!
I've tried to keep the design really simple, in my head it was even simpler, but there was too much of that dreaded white space so I had to fill some of it up a bit!
I've made a couple of cards - thought I should make the effort to add to my box of cards
The trees are from last year's Cuttlebug "Winter" set, I cut them first in card, then in felt and stuck the two layers together. I mounted them onused white glitter card and bright pink Bazzill The gorgeous pink and white striped ribbon is from Ribbon Oasis
My 2nd card is a mini DL shape. The xoxoxox ribbon was some I had left over from my Bubbly Funk "Hugs & Kisses" kit from a few months ago. This time it's the new Cuttlebug tree, cut i white felt and card as before. I wound thin pink wire around the tree, added a pink flet pot, a few beads and a few blobs of pink glitter glue.
I'm planning on doing a few more using the same sort of design - I still need to bulk out my "Christmas Cards Made" box - my plan to get them all finished before the end of November looks like a failure atm.
Do head over to the DCM blog if you can and see what the others have come up with. We'd love you to join in with the dare and maybe this will help you bulk up your Christmas card stock too!
Thursday, November 27, 2008
Scrummy
Thursday is my day to post on the Bubbly Scrumptious emag.
I had a rather tiresome day yesterday - you know? the ones where lots of little irritants conspire together to make life difficult for you. I won't go into details because it's boring unless you're in the middle of it. Save to say the printer had a hissy fit in the morning, then we had a power cut which knocked out all the clocks, the pc aetc. All the computer stuff came back on ok - except the external device where all our joint stuff lives, including the camera stuff. Which meant I couldn't upload new photos - or get at any I'd already done.
It meant I needed to add my pics for the Bub Scrump this morning.
But the alarm clock didn't go off did it? So we didn't wake up till about the time hubby normally leaves for work.
Never mind, hopefully things have all settled down and I can now have a more normal day - I've got loads to do so don't need any hitches!
In the November Bubbly Funk kit was the prettiest little chipboard book - all pearlised chipboard pages with scalloped edges. The chip pages are graduated in size and all different pale colours. To me it had an icy sort of feel so I decided to use it for snowy day photos and add lots of glittery, pale coloured accents to match the pages.
There's more about how I made it, and extra photos on the emag, which is now available to everyone and worth checking each day as new articles are posted daily
The December Kit will soon be available and is going out much earlier than usual so that you have plenty of time to get busy with Christmas projects, or maybe plan how you're going to remember the Festivities in your post-Christmas projects.
Here's a sneak peek of one of the things I've made with the new December Kit
Right, I have my DCM ard to do for tomorrow, plus a birthday card for MIL and a host of other things on my Crafty List. I'd like to do some Christmas Shopping too if I get the time.
Hope to catch up on all the blogs later too.
Have a good day
Monday, November 24, 2008
Wow, something not for Christmas!
We went to the craft fair at Wimpole Hall, near Cambridge on Saturday morning. It was freezing cold, but at least we managed to pick up a few things for Christmas and the December birthdays we also have - I think they do it just to make life difficult for us - thinking of Christmas presents is bad enough but it's downright inconsiderate to have a birthday in December, don't you think? lol
Having those men in to link us up to cable tv/BB/phone meant we had to unpack and move some of the cupboards and shelves so we did a bit of clearing out while tidying up again. Which I suppose is a good thing!
We've now got Virgin media and the tv box thing that goes with it - but tbh we're not impressed with the box - it's slow and it's ugly and it's nowhere near as good in any way as our Humax PVR, which is really disappointing. If you're reading this and know anything about such things - is it possible to get anything better than the regular Virgin box?
I managed a bit of crafting over the weekend. I've had this card on order for ages, but as the anniversary is at the start of December I thought I'd better actually make it soon!
I've used a sketch I made a while back for this card - I've now added the sketch to the Sketch File, and would love it if you used it to make some cards - I hope you find it useful.
For my card I've used papers from Scenic Route's Newport collection - I bought them a week or two back and this was the first outing for them.
The two twill ribbons I've used are from Ribbon Oasis.
I made the monogram using Paint Shop Pro and cutting it with the Craft Robo. The brads and the little chipboard photo corner are from my stash.
Copper is listed as a tradional gift for a 9th anniversary, which this card is for, so I used copper brads and coloured the photocorner and edged some of the paper an card using a copper Krylon pen.
I decided it was time to make some word cards for Christmas, so again used the PSP/Craft Robo combo to do some nice big letters and mats for these cards:
The papers are BG Wassail.
Once you've made and cut the letters these are really simple to put together. Robo doesn't cut thick card, so I tend to use a couple of layers of thinner stuff, then cut and add a layer of the patterned paper letters. It doesn't really take long to stick them all together then just inking the edges covers any white that shows.
Tracking down thin gold/silver card to use for the mats is proving tricky, so I experimented a bit here and once the mats were cut I coloured them with a Ranger Paint Dabber in gold. I think it worked quite well, the gold is quite a nice soft shade. I painted the letters individually, because I had the idea after I'd popped the letters from the card - but another time I'll leave everything attatched to the carrier sheet and paint them first.
I was going to make some JOY cards too, but I spent way too long deciding on a font - and in the end, when you look at a word for long enough they start looking really weird! So I gave up - I'll have another go another day!
Thanks for looking, don't forget to check out the Sketch File too
Friday, November 21, 2008
Chaos and Cappuccino
It's all been a bit choatic around here this morning. We've had the guys in to set us up with new phone/Broadband/cable TV and in the way of these things the study is now awash with cables and wires and piles of stuff that had to be moved to give access to the walls.
I've only just warmed up again as they had the front door wide open all the time, and I woke up with a headache which wasn't helped by drilling through the walls! I shall stop moaning now though.
The main reason we've had to go down this route is the rubbish TV reception we get here, even with a digi box and boosters sometimes it was unwatchable, so we're now cabled.
I wonder how long it will be till the computers and associated bits and bobs are working, and the bookcases and general "stuff" is all tidied away again
This week sees the wonderfully talented Vanessa setting her first DCM dare:
I'm a cappuccino girl too - what I hate, and I've probably mentioned this before - is asking for a cappuccino and getting a yucky cup of hot milk that once saw a photo of a coffee bean but that's as close at it ever got. Fortunately the coffee shop in town is Italian owned and they make them properly!
My own cappuccino machine is on it's way out - it keeps hurling boiling water down the steam nozzle - which doesn't actually work well for frothing milk. Good timing really as now I actually have something to put on my Christmas wish list!
Anyhoooo.
I know I said I wasn't going to make my own shaped cards any more after the pram shaped one I made for the "wheels" dare a few months ago, but I couldn't resist having another try when I saw Vanessa's dare.
I think the dotty paper is by Doodlebug, the brown saucer is Bazzell with a scalloped edging just made from a strip of card - I drew round a small punched circle to get the scalloped shape this time. I used a couple of different cream and white inkpads for the froth, and a few dabs of various brown chalk inks for the chocolate sprinkles.
Why not join us for a coffee break right now - make yourself your fave coffee tipple, head over to the DCM blog and spend a few minutes relaxing and seeing what the team have made this week
I've only just warmed up again as they had the front door wide open all the time, and I woke up with a headache which wasn't helped by drilling through the walls! I shall stop moaning now though.
The main reason we've had to go down this route is the rubbish TV reception we get here, even with a digi box and boosters sometimes it was unwatchable, so we're now cabled.
I wonder how long it will be till the computers and associated bits and bobs are working, and the bookcases and general "stuff" is all tidied away again
This week sees the wonderfully talented Vanessa setting her first DCM dare:
Good morning everyone, my name is Vanessa, aka Ellepiggo, I've been cardmaking for several years now and I'm delighted to be part of the Daring Cardmakers team. This is my first time at setting the dare and as we're on "firsts" I thought about the first thing that springs to my mind every morning - Coffee!! LOL!
Yes, I'm a bit of a cappuccino/latte macchiato girl, so I want to see lots of cards inspired by coffee!! Coffee colours, cup shaped cards, card inspired by a coffee jar label, using coffee beans on your card, coffee shop logos on your cards etc etc.....
I'm a cappuccino girl too - what I hate, and I've probably mentioned this before - is asking for a cappuccino and getting a yucky cup of hot milk that once saw a photo of a coffee bean but that's as close at it ever got. Fortunately the coffee shop in town is Italian owned and they make them properly!
My own cappuccino machine is on it's way out - it keeps hurling boiling water down the steam nozzle - which doesn't actually work well for frothing milk. Good timing really as now I actually have something to put on my Christmas wish list!
Anyhoooo.
I know I said I wasn't going to make my own shaped cards any more after the pram shaped one I made for the "wheels" dare a few months ago, but I couldn't resist having another try when I saw Vanessa's dare.
I think the dotty paper is by Doodlebug, the brown saucer is Bazzell with a scalloped edging just made from a strip of card - I drew round a small punched circle to get the scalloped shape this time. I used a couple of different cream and white inkpads for the froth, and a few dabs of various brown chalk inks for the chocolate sprinkles.
Why not join us for a coffee break right now - make yourself your fave coffee tipple, head over to the DCM blog and spend a few minutes relaxing and seeing what the team have made this week
Thursday, November 20, 2008
Explosion!
For ages now I've been looking at Exploding Boxes and thinking about having a go at making one. When my designer kit arrived from Bubbly Funk with the November goodies inside I knew what I would do with the box-blank from 3Bugs that I found in there!
It was more a case of what to put in it, so I left it to one side while I got started on other projects and hoped that an idea would have a chance to brew!
So I made the card I showed on Bubbly Scrumptious emag last week, and some more cards and projects that I've still to put on there and then I got started on this box. I've loved making this so much it's jumped the queue of projects because I couldn't wait any longer to blog it! So today I've uploaded my Christmas Memories Box in my Thursday Project slot, and now I can put it on here too.
It's not finished yet - I'm adding photos of the Christmases since Hubby and I were married, and I don't want to fill it up all in one go. I'm trying to choose photos that bring reminders of certain events, particular gifts, different people and places associated with our various Christmases together. It's been a lovely thing to do, but not without some sadness when I see photos of loved ones who are no longer here to celebrate with us.
You can check out my box project, and see lots of fab projects for the November Kit, all the other kits and lots of other things available from the Bubbly Funk shop in the Bubbly Scrumptious emag
I've just been over to the BF shop site and see there are still November kits in stock - I thought they'd be sold out! So there's still a chance to get your sticky mitts on these fab Dream Stree Wonderland papers, the box, a beautiful chipboard book and all sorts of other delights - check the shop for a full list of contents
Wednesday, November 19, 2008
Hang up Your Stockings
Taking a break from trying to come up with something for the new DCM challenge for Friday.
My brain hurts and my mojo has upped and left.
Good job I have a couple of things in reserve to put on here then. Mind you, when they're gone, they're gone as they say on the ads.
This is another little sewing project I've done for Ribbon Oasis this month. I thought it was about time I found out if I could still remember how to thread my sewing machine!
I'm quite pleased with this little stocking. If I had the time, patience and motivation to make 24 they'd be cute as an Advent Calendar sort of thing.
Especially if filled with little chocolate treats....
The little stockings are made from red and white felt, I've sewn lengths of Bea's gorgeous ribbons and braids around it and added a ribbon loop for hanging it up. I reckon it's big enough to fit something like a tube of Smarties in. Or a few wrapped sweeties of some sort.
Maybe I could get away with just making this one....plus a lot of numbered tags. Then I could just change the tag each morning to indicate the right day of Advent. What do you think? lol
The Christmas card making grinds on. slowly.
I found a couple of Cuttlebug embossing folders I'd forgotten I'd bought so thought I'd better have a go at using them. Well, one of them. Actually, a bit of one of them.
I've used the Cuttlebug trees from a cut & emboss set - haven't got on very well with the embossing bit of the set but I love the cut part!
Papers are the fabulous "Oh Joy" set from Cosmo Cricket - I've had them for about a fortnight and I've not "gone off" them yet!
My mouse marker wotsit has disappeared - makes it very tricky to know where I'm at when I need to correct anything. I wonder if it's gone off with my mojo?
Tuesday, November 18, 2008
Stitching and Sticking
I've slipped into Bad Blogger mode over the last few days. Not only have I not blogged since Friday, but I've not really managed to do much blog-hopping either. I've been trying really hard to get around all the comments left on the DCM blog about the birdie cards we asked you to make though. Sometimes it takes ages, but it's always worth it to see all the fantastic cards, and all the ideas people share with us all.
I think that later today I'll treat myself to a wander down my links list and all the blogs I find along the way.
This morning I had one of those update messages from Friends Reunited and instead of ignoring it I thought I'd wander over and see whether there really were "new people listed" I didn't spot any, but it's always bad to go to that site as before you even notice you've spent ages going down the lists and seeing if you can remember any more of those names which, frankly mean not a jot! Or maybe that's just me....
I have been crafting even though I've not done any blogging, I've had something on the go for a couple of weeks now, doing little bits towards it every now and then. It's still a "work-in-progress" but as it's something I want to add to in the future that's ok!
This is a sneak peek
And here's another little something I've been playing with
Next another blatant plug for my fave source of wonderful ribbons and trims!
Bea from Ribbon Oasis sent a wonderful little bag of gorgeous ribbons etc in lovely Christmassy red, green and white colours for me to play with. And guess what? I've not made any cards (yet).
Here's one of the projects I have made so far:
It's a little purse just big enough to hold a small gift, maybe a necklace or some earrings or other small thing. I used felt for the base and then strips of ribbon were woven together to cover the felt and sewn in place. I bound the raw edges with pieces of wider ribbon and sewed up to make the little purse shape. It closes with a popper and I've sewn a brass button on the top.
Just thinking out loud.....I wonder if I could make a tiny little book to put inside this? hmmmm that would be cute!
I've got more bits and bobs to share, but I'll add them another day
Friday, November 14, 2008
Its Reining Birds!
I'm sorry, but I couldn't resist the pun - today we have Rein, our wonderful Belgian member of the Daring Cardmakers Design Team setting her very first dare for us.
If you've never visited Rein's personal blog, please go and check it out because it's such a fab place, her work is always beautiful and inspiring. I've been popping by there for the last few years now and always enjoy seeing Rein's amazing cards, ATCs, tags and other crafty makes.
Here's what Rein says:
I was born in Belgium, I'm married to a German man and live with my family in Germany. I love stamping, handikraft, sewing, nature...
I'm glad to set my first dare here.
Bird, Birds and More Birds
I love birds so I'd like you all to make a card featuring birds this week......a bird in the snow, a birds nest, a carrier pigeon, a white stork or birds in the sky, or...,or... even big bird!
What a lovely challenge! Birds are everywhere at the moment and there are some fab stamps, die cuts and papers featuring birdies of every shape, colour and style - I'm sure there'll be plenty of takers for this dare.
I've so much enjoyed seeing all the birdie cards the DT girls have been making I don't think I'll ever get bored with that bit. The dare is set and as the week goes on the various team members show what they've made - the anticpation is such fun!
I've mentioned already this week that I've been spending probably too much time playing with my Craft Robo. My card today is another one made with lots of help from Mr Robo
I'm not sure what sort of birdie this is, but he's definitely excited about Christmas. He seems to be all ready for a spot of carolling!
The bird and scalloped circle are Robo cut, the scalloped borders are hand cut as is the branch he's standing on.
Halfway through making him I decided to cut his hat and scarf from felt. Sadly Mr Robo threw up his hands in Gallic fashion and said "Non!" to this idea (I didn't even know M. Robo had any French in him - maybe it was just the right gesture for the moment) - he wasn't even willing to try - and tbh I don't really think I was going to ask him to anyway.
At some point I looked at Birdie's skinny little legs and thought "that poor bird needs warm socks" so out came the felt again - they're a bit wonky but it's hard to be accurate when cutting such tiny socks from felt!
The cards on the blog are all fantastic, so please do go over there and have a look, they can't fail to raise a smile.
Great first dare, Rein!
One of the wonderful things about Blogland Crafters is that you don't need to speak the Blogger's language to apreciate their work. I'm not sure how I first came to stumble upon this particular fab blog, http://scrapowe-pasje-nutki.blogspot.com/ but I'm so glad I did for her work is so gorgeous and I love going over there to see what's new.
And now she's given me a lovely award - how fab is that?
I find it really hard to choose just a few blogs when these things come around - so I'd like to pass this award on to all the blogs I visit often - you know who you are!
Thanks for inspiring me, for making me smile and for being so generous in the way you share your ideas and talents.
Thursday, November 13, 2008
Wonderful Wonderland
If you like beautiful Christmas papers, and you like them to arrive in a box filled with other tempting and inspiring goodies that can't fail to have you forgetting the household chores and rushing headlong for your craft space then you'll probably love the November Bubbly Funk kit.
The papers are Dream Street's Wonderland, there's matching Bazzill cardstock, there are buttons, ribbons and brads, a Thickers Alpha, there are rub-ons, flowers, metal bookplates, chipboard - and if that's not enough there's a beautiful little chipboard book with layered, scalloped pages, and a fab ready-to-make memory box from 3Bugs in a Rug. Wow!
The big news this month is that the Bubbly Scrumptious Blog that used to be exclusive to the kits has now been linked to the shop as well as the kits and is there for everyone to see.
There are new faces highlighting all the wonderful goodies in the shop, as well as designing for the Kit so it's definitely worth bookmarking as new things will appear every day - not just crafts but recipes, articles and all the other things you'd expect from a magazine.
I've had such fun with this kit!
My first project is on the emag today, so if you'd like to see more photos and read about how I made this card, then check it out here
I've made lots of things with this kit and I'll share them with everyone over the next few weeks.
Here's my first project - I hope you like it
I'd love to know what you think about this one - I really enjoyed making it, even though it took ages to work out how and make the template. I've kept that though, so when I want to make something like this again it I can get straight to the fun bit of decorating the card!
Wednesday, November 12, 2008
Trees, and a pudding!
This is another card using the newest set of Crafty Templates. I love this quirky tree design and decided to add a couple of extra branches by using the template twice then arranging one on top of the other. Leo's added circles of differing sizes to use as leaves and I've crumpled; opened out, inked and layered a couple for my leaves. I used tiny ru-bons to make the message for one of the circles and added a flower to the centre. The papers are again from the "Family Tree" collection - one of the debut ranges from Bella Boulevard, along with some of the fab Sassafras Lass.
I cut a square shaped piece of bachground paper then handcut the scallops and added a holey pattern using the Cropodile
The second card is a mini card using a Christmas Pud template which actually forms part of another of Leo's suggested projects using the new template set. I just thought this little pudding shape would be perfect on a teeny tiny card, so first I cut the whole template from red card to make a base and the plate. I then used just the pudding section and cut it in felt and sewed a few black beads on for currants. I cut the holly section from green metallic card and then used one of the circle shapes from a Cuttlebug die to make the berries - there are berries on the template of course, but even with guidelines I can't cut a nice round shape so I always look for the easy way around the problem.
Mounted on white and gold card squares before adding to the base card, the whole thing took not time at all. There's an equally cute little tree template I meant to use to make a similar card, but I've not had time to make that one yet.
Did I mention that I've been playing around making templates for the Robo?
There's loads of free clipart out there whichcan be converted to amke simple and more intricate layered designs for cutting with Mr R. I found a lovely tree shape a few days ago and had it ready to go but hadn't actually tried it out. Yesterday Nicky posted a nice stressfree challenge on JB forum - all we had to do was put a Christmas Tree on our cards, LOs, whatever.
As I said yesterday the C card making has slowed a bit and needed a kick-start. Well Thank You Nicky! This was just what I needed. Plus of course a good excuse to make more use of those gorgeous new Cosmo Cricket papers I've been drooling over. Honestly, they are totally scrummy.
I cut a batch of the little trees and them made these three cards.
You can't really see the richness of the colours or how gorgeous the gold of that snowflake design on the red paper of top card really is, so you'll just have to take my word for it!
You can't really see the little glittery bits I added to the trees either.
Thanks for looking
Tuesday, November 11, 2008
It goes on...and on
But very slowly. The Christmas card making, that is.
TBH it's in need of a bit of a kick-start I think. It won't be long till those "last-posting-date" reminders pop up and I really don't want to be still making them in December this year. I say that now, in public in the hope that my resolve stays firm. Chance would be a find thing. Willpower is not my middle name.
These cards are made with Fancy Pants "Holly Jolly" I think it's a bit bright for me - I seem to err towards grungy, subtle shades for Christmas. Which is weird because I use lots of colour on my cards the rest of the year. These papers aren't so Christmassy that they can't be used at other times though so maybe they'll come into their own another time.
Now the "Snowy Jo" range from Imaginisce I'm finding easier - well, most of them, anyway. I still need to come up with something I like that uses the cutie-pie snowmen on, but hopefully something will spring to mind eventually.
For the cards above I've hand cut the little trees and the scalloped edging.
For the scallops I fold a strip of paer in half then cut the scalloped design on the folded edge. This way you get both strips exactly the same so they match when you stick them on your card, plus as you've cut them down the folded edge you don't need to cut the strip in half either. I'm lazy, I admit it. ok?
These two cards have my Craft Robo bauble design on. Which reminds me, I made another version of this template and I've not tried it out yet. Actually I've been spending far too much time making new Robo templates and not enough time making cards using them. I'm easily diverted from what I should be doing.
Another thing I'm still doing far too much of is acquiring more beautiful paper. A couple of months ago I espied some gorgeous Christmas paper just released be Cosmo Cricket called "Oh Joy" Last week the lovely Caroline at Bubbly Funk announces she's got new stuff in the shop and "Oh Joy" what did I find when I went to look! Oh Boy did I do some quick shopping!
I knew it would be beautiful, and it really really is. I've not had a chance to play with it much yet, but my new sketch on the Sketch File blog gave the perfect excuse to make a start using it - you'll need to pop over there to see what I did though.
I've another Crafty Templates card to show, but I'll save that for tomorrow I think.
Thanks for stopping by
Monday, November 10, 2008
Nuts About You
Leo sent me mainly woodlandy templates from her fabulous collections of Crafty Templates to play with this month. Last time I shared my Hippy Hedgehog, today my card is another "unusual" garden visitor
We live in an area frequented by black squirrels. I'd love to have red squirrels visit our garden but sadly I've never even seen a red squirrel irl. We do have grey onescome to our garden, but the blacks are much more interesting. Here's one of our visitors who's learned how to climb the metal pole of our bird-feeder
As soon as I saw the squirrel template I knew my squirrel card would have to be black
I used circles from another of the templates to make the lollipop flower wotsit, the greeting circle was made on the pc
I always regret using feathers because they always leave little bits of fluffy stuff on my desk which manages to hang around for ages, attaching itself to other projects for ages afterwards.
Crafty Templates are always fab, and they're always fun and inspiring. If you fancy having a go and seeing how they work, check out the website for more info.
That's all for the moment.
Don't forget to check out the Sketch File if you've not done already. I've got a new sketch ready to put on there. That's my next job so pop over in a minute and maybe it'll inspire you to get some cardmaking done!
Saturday, November 08, 2008
Introducing the Sketch File
I've decided it was about time I started storing my card and LO sketches in one place, so I've spent the afternoon making a new blog which I've called the Kathy's Waffle Sketch File - or just Sketch File for short. lol
It's really just a place where I can add sketches I've already made, and also new ones as I do them - plus cards I make using them. If you like using sketches, please keep checking back there for more inspiration and hopefully mojo-boosting templates. I'd love it if you would pop back and leave a message on the new blog if you do use one of the sketches - and I'd appreciate it if you'd give credit when you use them.
This week I've been busy with a few things including new cards for Leo at Crafty Templates.
This month she sent some lovely "Woodland Wonders" themed papers for me to use with the templates. In the pack were some rather lovely papers from the "Family Tree" collection - one of the debut ranges from Bella Boulevard, along with some from old favourite Sassafras Lass.
Of course there was also the usual eclectic mix of ribbons, buttons and other interesting and fun things that Leo always adds to her kits.
Most of the templates Leo sent for me to play with this time had a Woodland/Nature theme and they are such fun!
The first card I'm going to share is my Funky Hippy Hedgehog card
She's called that because she's gone all "flower power" lol
I cut lots of the flowers out from the paper and fixed them onto the base just by the middle so that the petals would still be £D, some were raised still more using foam tape.
Hope you like her.
For more info on Crafty Templates check out the shop here (and I notice Leo has a SALE on atm too!), and also visit the CT blog here.
Back soon with another garden visitor
Friday, November 07, 2008
Sparkle and Bling
As this week saw the annual Bonfire/Fireworks Night over at The Daring Cardmakers we've been getting into the spirit of things and making cards with plenty of Sparkle $ Bling!
For those who don't know, the year 1605 saw the failure of what became known as the Gunpowder Plot. The conspirators planned to blow up the Houses of Parliament along with King James I - if you want to find out more click here
Anyways, its a good excuse to have a bit of a party every year as Winter sets in, there's often a nice big bonfire - and on top of this there'll often be an effigy (probably some old clothes filled with straw and a mask of some kind for his face) of the infamous Guy Fawkes - one of the plotters - sounds macabre, deosn't it? There'll be plenty of fireworks and if you're lucky some tasty food too.
It's Jozza's turn to set the challenge this week, and she persuaded Lou Brigden, designer of the popular Dottie and george downloads to send the DT a set of images to play with. Not content with that she managed to get Karen, owner of the fabby Charmed Cards & Crafts shop to come on board for this dare too. Consequently we have TWO prizes to give away:
From Lou: 2 free downloads of the winner's choice from the Dottie and George Christmas collections
From CCC (sorry, this one is UK only): A fab mystery prize of goodies from the shop
Both these are, as usual Lucky Dip prizes so everyone who makes and shares a card with us featuring plenty of Sparkle & Bling is in with a chance - check the blog for more info
Oh, and the other news is that we've a new Guest Designer; Ruth, aka Tip Top is joining us for November. Ruth's stuff is fab, so it's going to be great to see her cards on the DCM blog for a whole month.
Here's my card for this week.
I have to say, I really struggle with"cutesy" images - I love what other people manage to do with them - and you'll see some wonderful cards on the DCM blog this week, and all around the web for that matter. But when I try to use them I'm always disappointed with the result. I can't colour in for toffee, and although Lou kindly sent ready coloured in as well as blank images for us to use I decided to use a blank one and then "colour" it in using PSP. I then got diverted (like I don't have enough to do atm, without faffing about) and started playing with textures too - so, if you were to see this image in a bigger size you'd see that the background, and the birdie suits all have diffferent textures, spots, weaves, marbled - a waste of time really as once I'd downsized the image for printing you can't see them.
The idea was that if two people were prepared to wear matching birdie suits then it MUST be love. Not sure about it now it's done though!
The scalloped edging is hand cut, the lettering was made with PSP - I just used the mouse to "draw" the letters, then expanded and flood-filled them to make sure they'd be ok for cutting on the Robo.
Though it's not a great card it was a worthwhile exercise because;
I practised using the brushes, fills, colour changing, texture tools etc in PSP
I practised mouse-controlled writing, and using some other PSP tools to make my own wording
I learned it's good to STOP adding Sparkle & Bling before it all gets out of hand! I had some lovely heart-shaped gems laid on this card initially, but I photographed it and realised when I saw it on the screen that they made the card look even worse - so I took them off, and stuck to the glitter glue.
I was soooo busy yesterday that I didn't get a chance to add my other Bubbly Funk Kit project my blog. I'd had this cheapie clipboard lurking in my stash for a year or so and decided that this kit would be perfect for actually using it
With the big bold designs of the Cosmo Cricket papers, the September kit was fab for making something bigger. After stripping away the blue plastic I used thin black card, plus strips of spotty Adornit paper (also in the kit) to cover the back, edges and front of the clipboard - they made a wonderful background for the "Hello Sunshine" papers
Once I'd stuck down some bits around the edges I decided to use the same basic sketch I made for one of my cards to fill in the big space in the middle.
I made a little "box" from a strip of paper to use as a note holder. The quotation panel is in the matching 8x8 pad
The mini pen was in a pack from Wilkinsons, I used one of the big chipboard buttons and twill tape from the kit to make a holder for the pen.
A few people have left comments saying that they too found this paper collection a bit scary - my advice would be to have a go at something like this - something nice and big, like a notebook cover or clipboard, because once you actually start using them these papers take on a life of their own, and you'll soon be thinking of lots of other ways to use them.
Don't forget my little sketch - I'd love to see if anyone uses it to make cards, LOs or other stuff with it, so please have a go and let me know where I can dome to see what you make
Wednesday, November 05, 2008
More Sunshine
A bit of damp and dull morning here - I hope it dries up in time for all the bonfires and fireworks later. I love watching fireworks, though we're not heading out to see any this Nov 5th - must remember to be more organised next year.
When I was little we'd always wrap up in coats, scarves, hats and gloves and go out into the garden to watch as my dad set off the fireworks.
My brother and I always had sparklers to twiddle about in front of us - I still love sparklers, and ooooh and ahhh at all the pretty lights and patterns all the fireworks make! I hope I never grow so grumpy that I lose the simple wonder and joy of watching fireworks light the sky!
Enough of the waffle!
Here's another project I made using the lovely September Bubbly Funk kit featuring those vibrant Cosmo Cricket "Hello Sunshine" papers. Although I panicked a bit when I opened my designer's kit and saw them (they are soooo not the sort of designs I generally gravitate to!) once I started working with the papers I found they seemed to suggest projects all by themselves. I liked using them so much that I went and bought the 8x8 pad too! having the same designs but in smaller size added another dimension, plus there were a few sheets with quotes, border designs and other wordy bits and bobs. This project never did make it onto the Bubbly Scrumptious e-mag (you get free access to this wonderful resource when you buy that month's kit) - I was just too slow in getting it finished. ooops, naughty me.In the kit were little journalling cards and when I saw them I thought I'd try using them as part of a different sort of Bind-it-All book. So here's what I came up with, a book that has a set of BIA rings on either side and opens in the middle - well, not quite in the middle, but you know what I mean! Each of the larger pages on the left has a journalling card page on the right. There's plenty of room for photos and notes about what they're all about. Obviously you can add as many pages as you like and maybe add extra tags and stuff by tying them onto the wiresI used paper, buttons, chipboard and buttons from the BF kit for this, as well as the journalling cards and Bazzill card. I was chuffed to find quite a few bits in my stash that were perfect for this project - funny how you manage to collect "stuff" then it just sits there in the bottom of a drawer, waiting.... The "FUN" letters and the green flower are from packs of foam shapes that I think came from Poundland once upon an age ago and the wooden beads threaded on the ribbon have been in the box for years!
I really like the idea of this little book - it was an experiment and needs refining, but I think it'll be an idea I use again. I hope you like it. I'm not finished showing all the things I did with this fab kit - it's funny how the this one grew on me - I've ended up with only a few scraps left because I made so many things - tomorrow I'll show the rest of this:
Tuesday, November 04, 2008
Jaffa Cakes and catching up
I couldn't think what to do for my cousin's birthday card this year, but finally yesterday I remembered how much he loves Jaffa Cakes. So with a bit of help from Google I came up with this:I printed off a couple of images so that I could cut out individual Jaffa Cakes from the spare one and mount them on 3D tape. I then highlighted a few of the choccie tops with Glossy Accents
The blue of the backing paper is actually a better match for the Jaffa Cakes box irl, but it's come out rather more "denim" on the photos. I made the wording with Mr Robo - I used the brush tool in PSP to draw the letters rather than use an existing font
Looking back over my pics I realised that I hadn't added the photos of the things I made for the September Bubbly Funk Kit. This was the one with the bright and beautiful Cosmo Cricket "Hello Sunshine" papers in and was such a fun one to use.
At first I found this set of papers quite challenging, but after a while they seemed to take on a life of their own. The colours and designs are really strong so I decided it was nest to let them work for me rather than the other way round.
I used the fab repeated motif on one of the papers to make this one, layering up parts of the motif and then adding some punched flowers and brads to give even more dimension.
This sweet little birdie sitting on the top of a chipboard tree was in the kit, along with tree shaped brads, various ribbons, journalling cards and some little safety pins. I painted the tree with acrylics, and used some Brilliance inks to colour the birdie. Once I'd got the pin through the card I glued it closed with superglue as I worry about adding sharp things like pins to my work!
I really loved the clean and crisp geometrics in these papers. For this next card I kept to a theme of circles and rectangles to try and highlight those shapes. I love the great big chipboard button and the big yellow flower. I used the bits that came out of the button's holes as fake brads - I coloured them black then added a topping of black Stickles.
I made a sketch to go with this card, and if anyone would like to use it to make a card or LO then I'd be really chuffed! Just don't forget to come back and let me know where I can see your creations! Here's the sketch:
I've got a couple of other things made with this kit to share, but I'll save them for tomorrow - I've gone on quite long enough already!